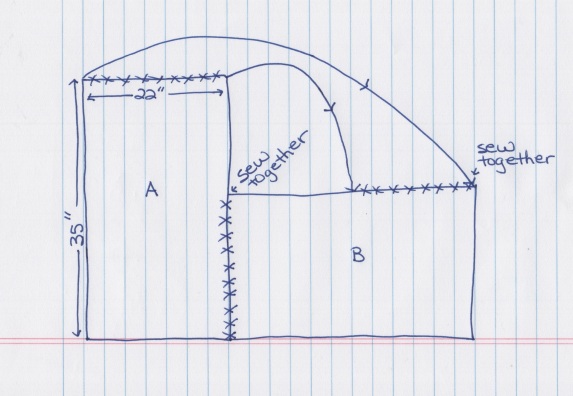
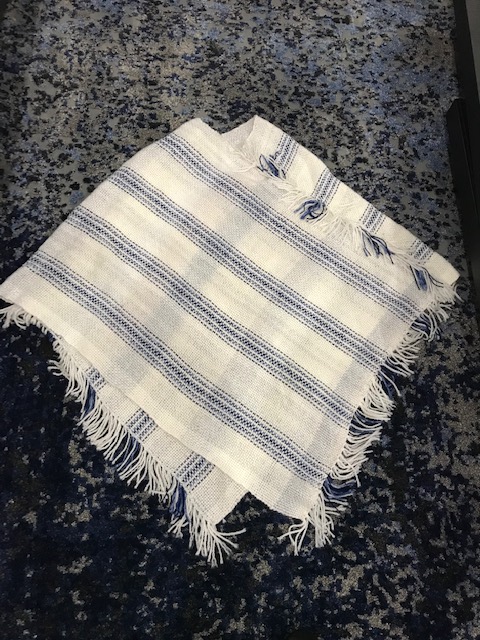
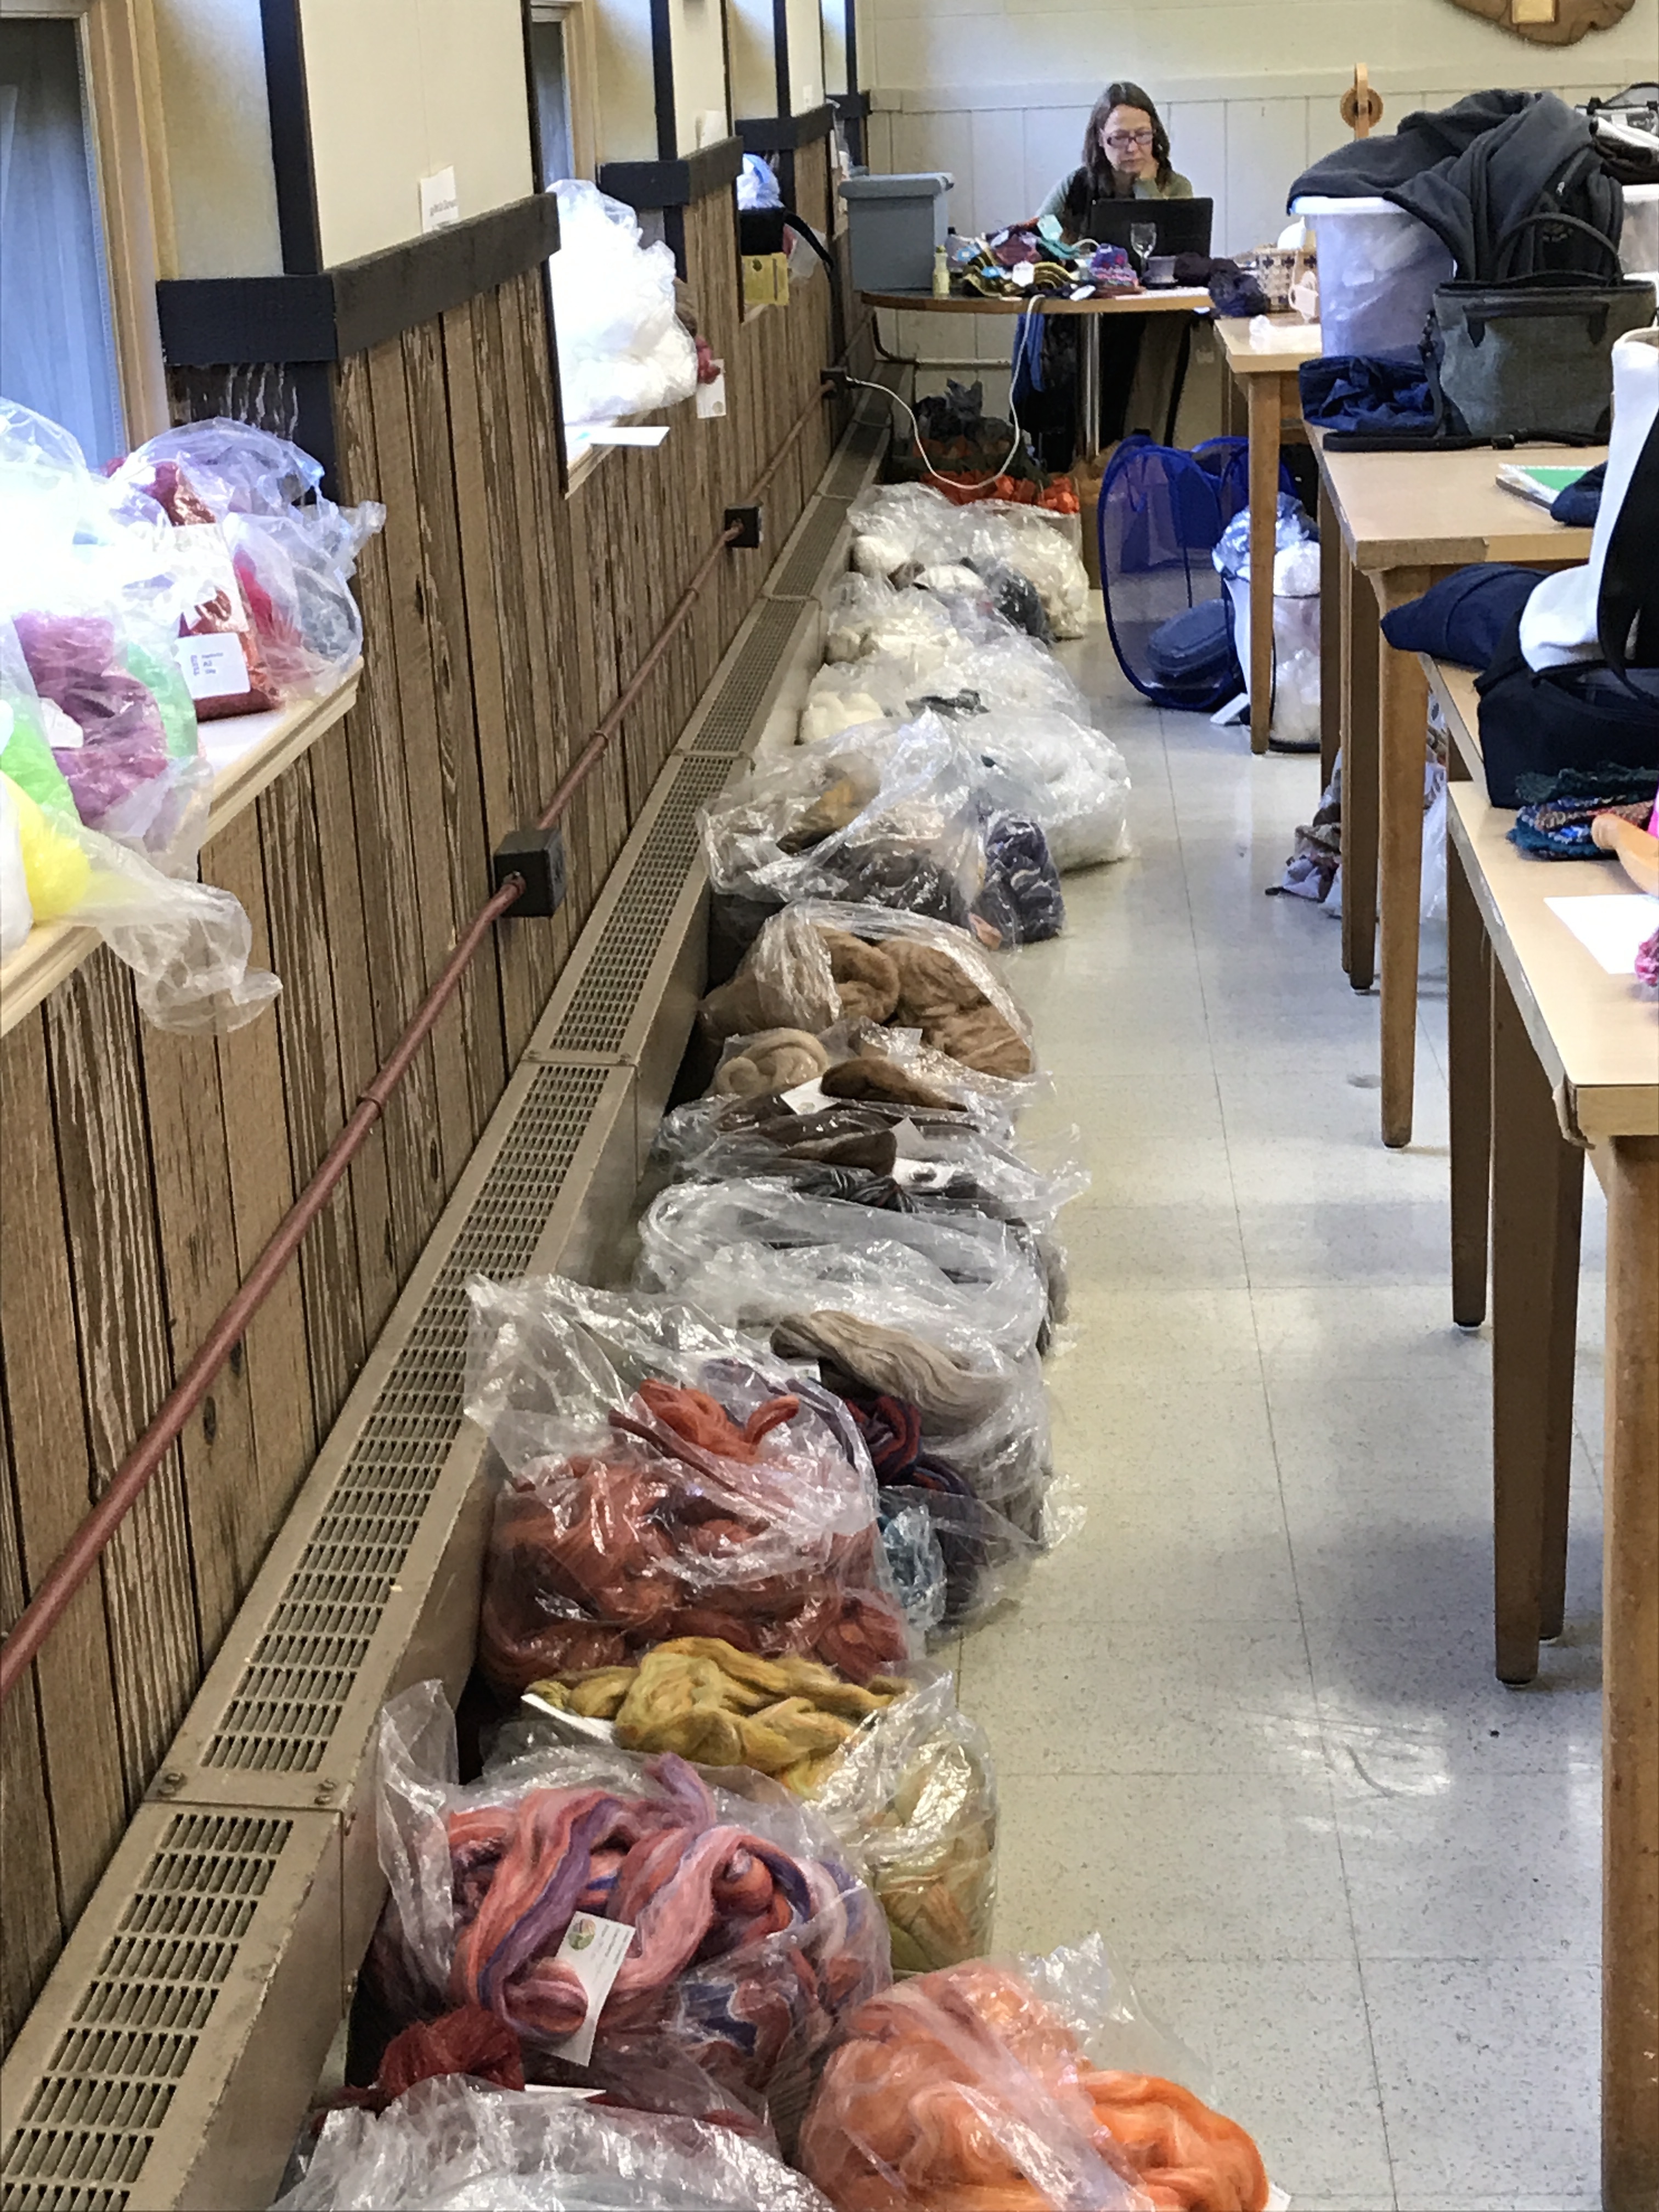
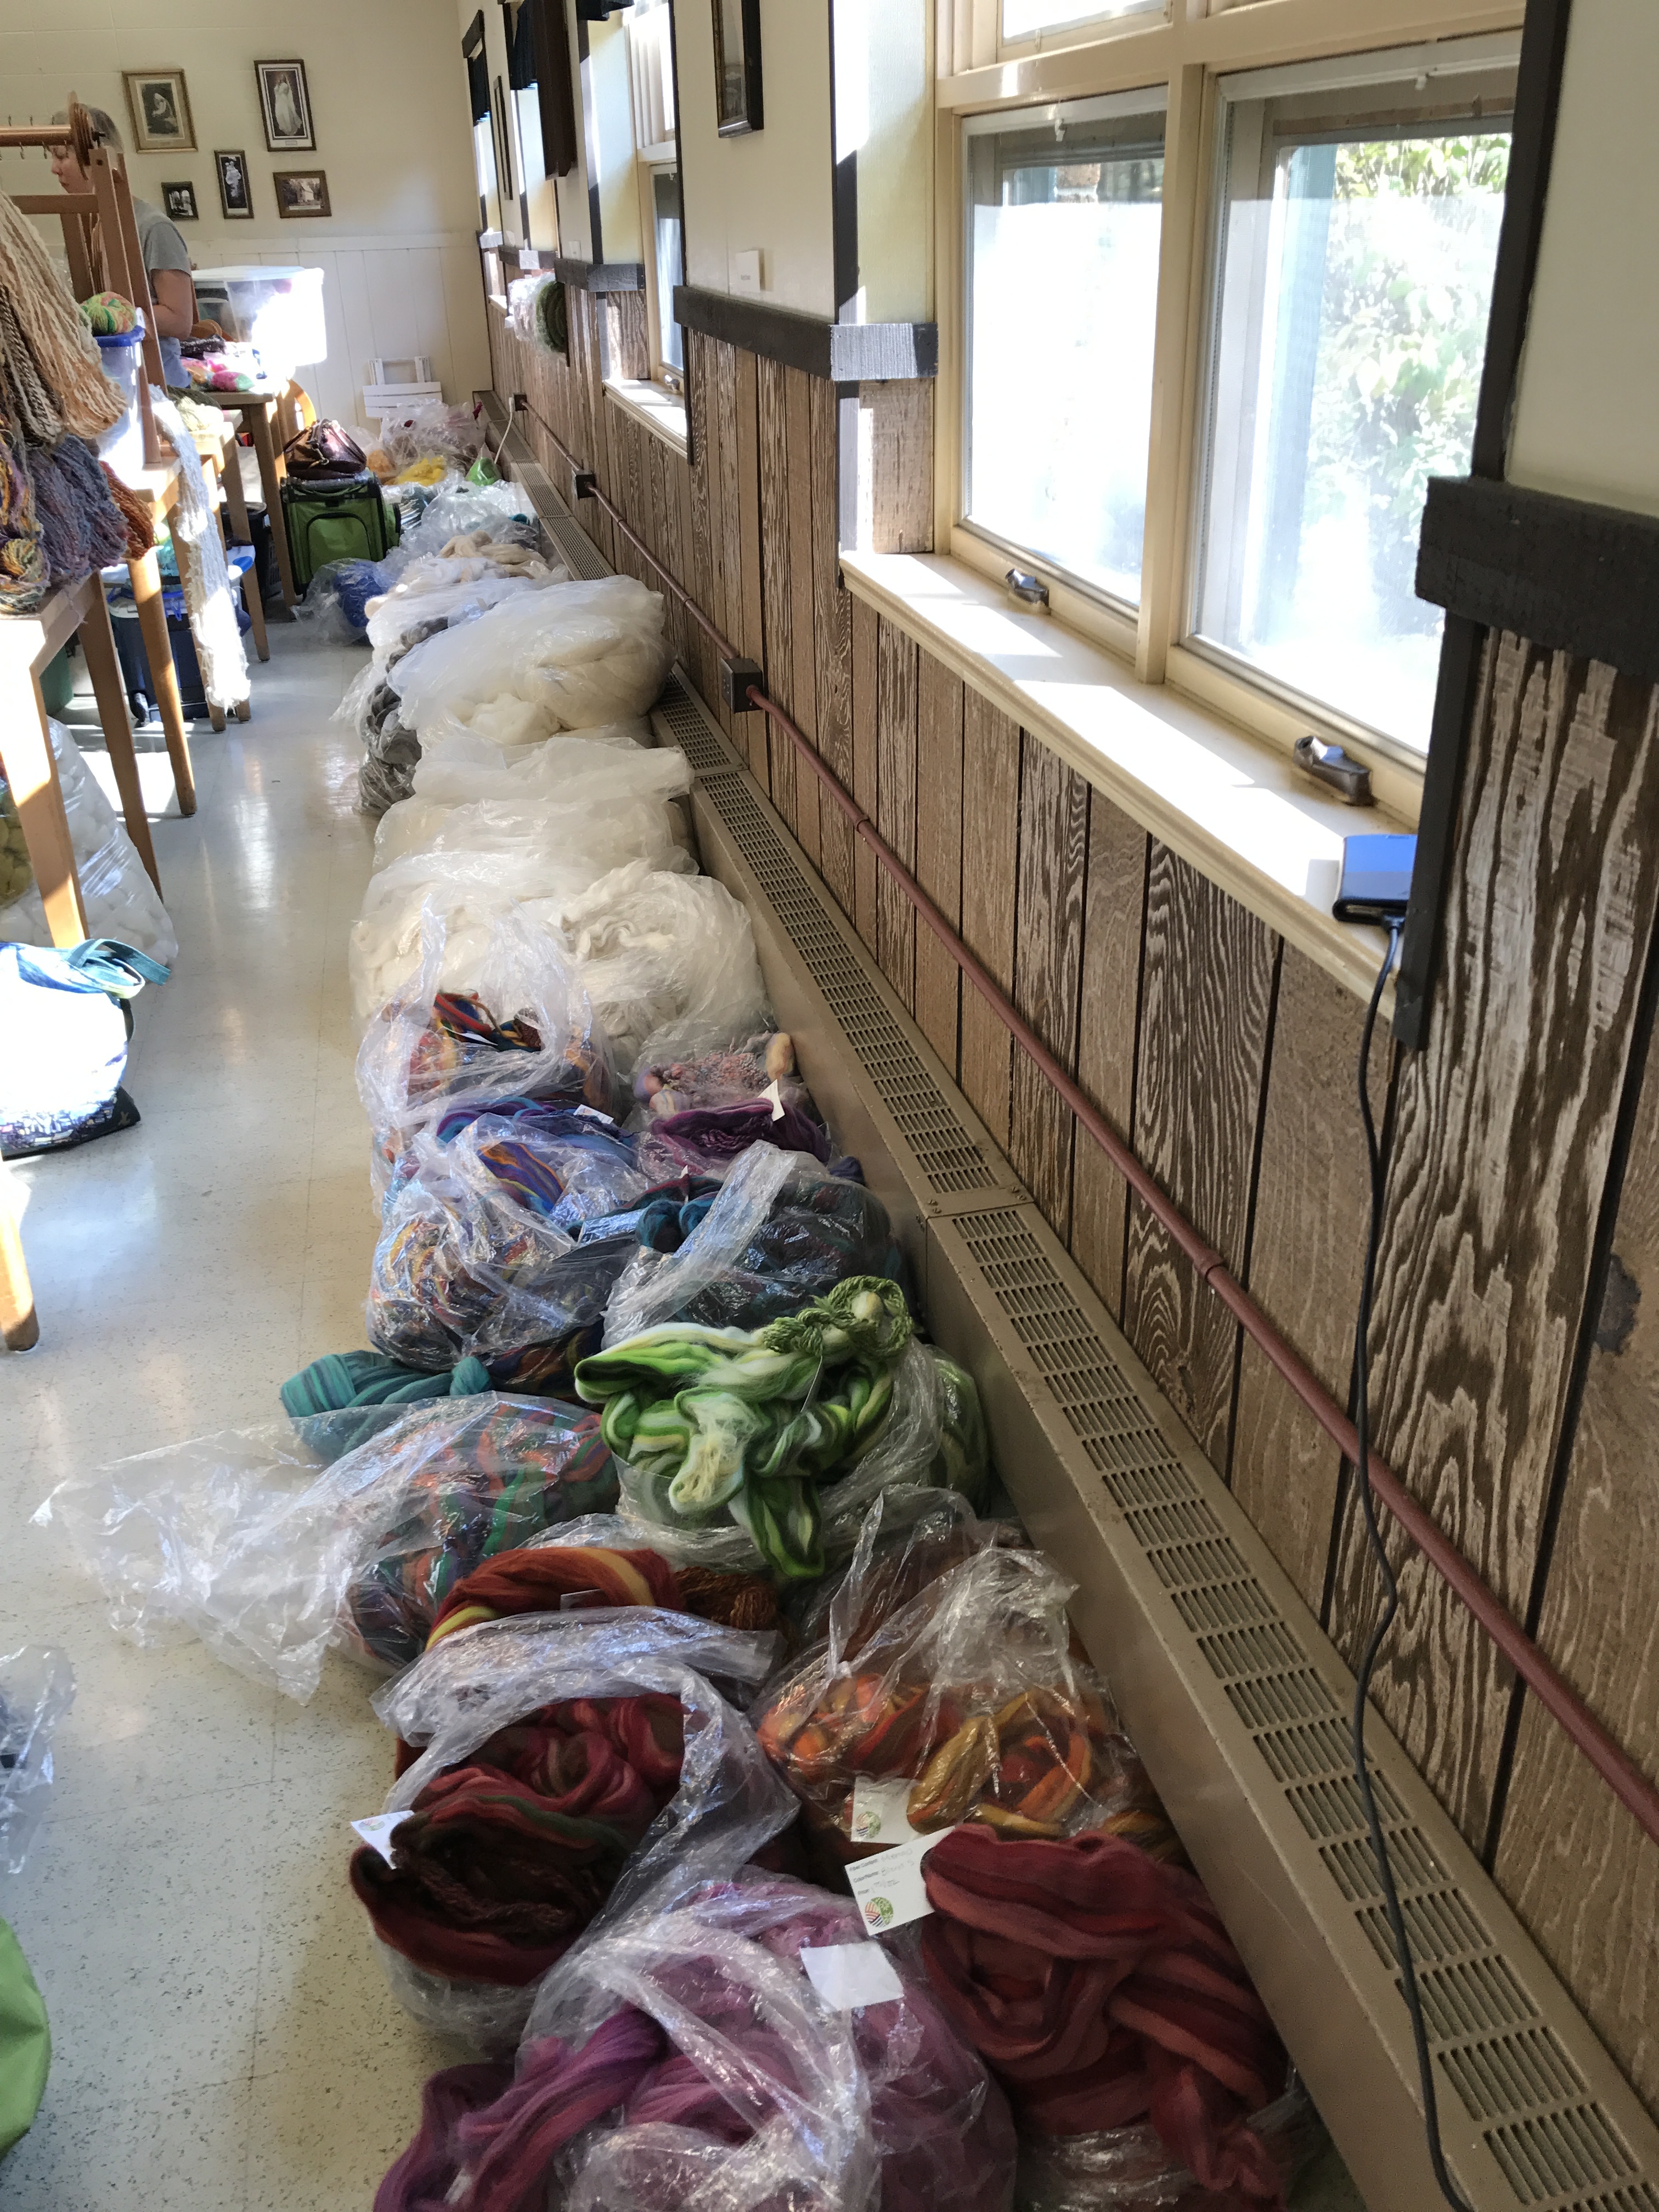
The first style is a poncho woven in two rectangular pieces and sewn together. I wrote about these in a previous post.
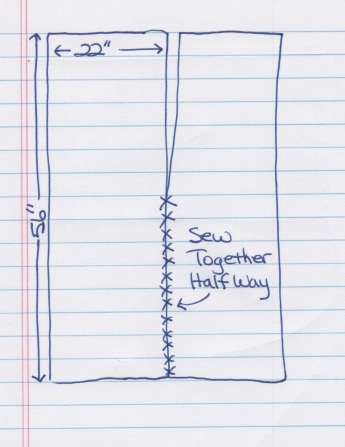
The second style is a wrap that I have come to know is called a ruana. This one can also be woven as two rectangles sewn together or it can be woven as a double weave.
Both are easy to weave since they are rectangles. It has been SO much fun weaving these wraps because there is no end to the number of design options available. As long as they end up the right size, anything goes. You can use any combination of yarns and any size reeds/heddles. They can be woven on floor looms, table looms, and rigid heddle looms.
All of the wraps I have made so far are plain (tabby) weave. It will be fun to try additional weave structures as well as combinations of colors and textures in the future.
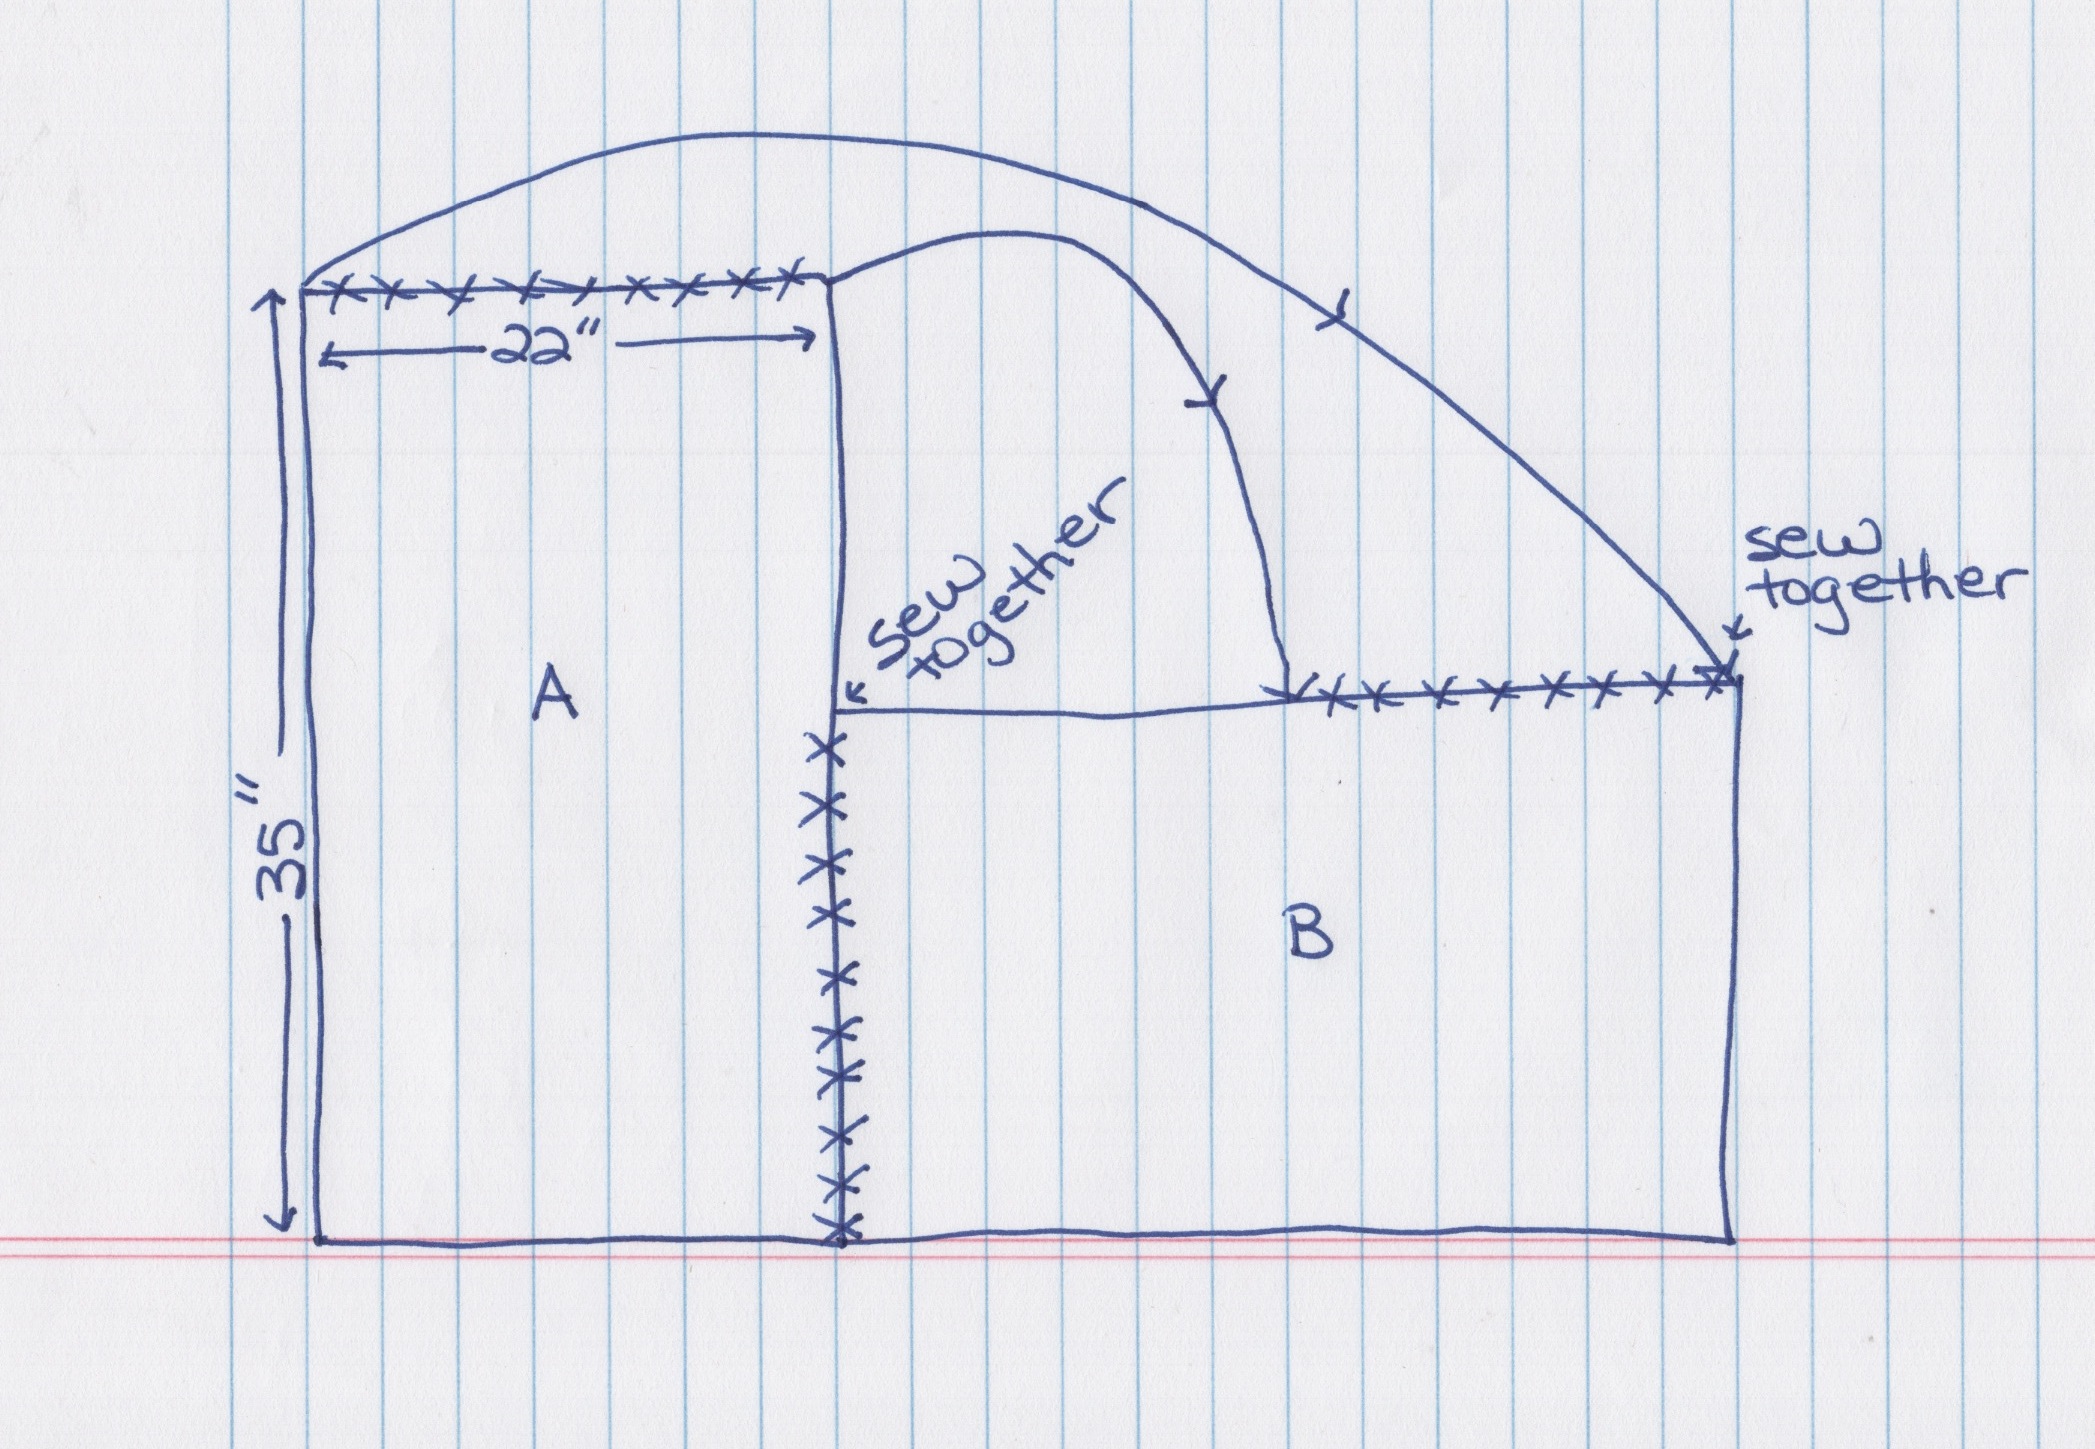
Poncho Size
The basic poncho is composed of two rectangles 22″ wide and 35″ long. The difference in length and width contributes to the size of the head opening. Once you know the correct size head opening keep this difference the same. If you make the piece three inches longer it should also be three inches wider. On the other hand, if you want to make the head opening larger or smaller, increase or decrease the difference. To make the opening larger, increase the length more than the width. To make the opening smaller increase the width more than the length.
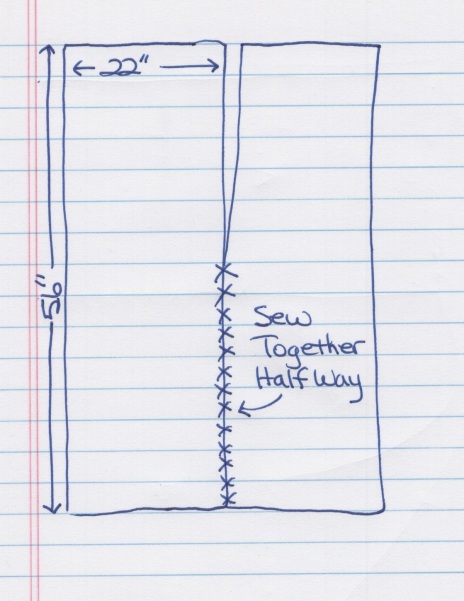
Ruana Size
The basic ruana is composed of two rectangles 22″ wide and 56″ long. This fits most adults pretty well. If you make the pieces wider, the wrap comes down farther on the arms and there is more cloth in wings. If you make the pieces a little longer the wrap falls closer to the knees. I just ask the person “normal or wide” and “longer or shorter”?
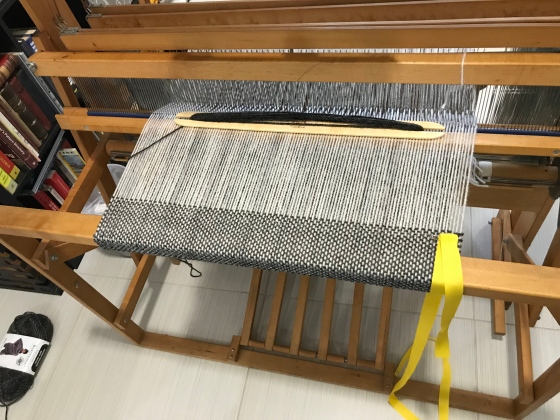
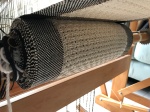
Although you could make these rectangles on any style loom, I made all of these on a four harness floor loom with a 5 dent reed. The structure is all plain weave.
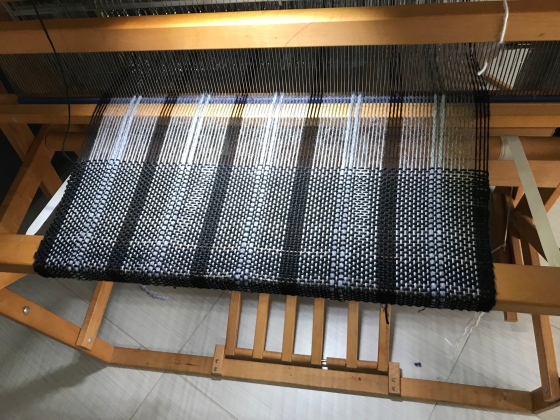
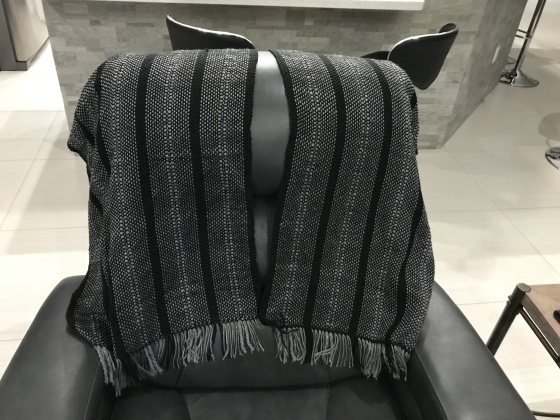
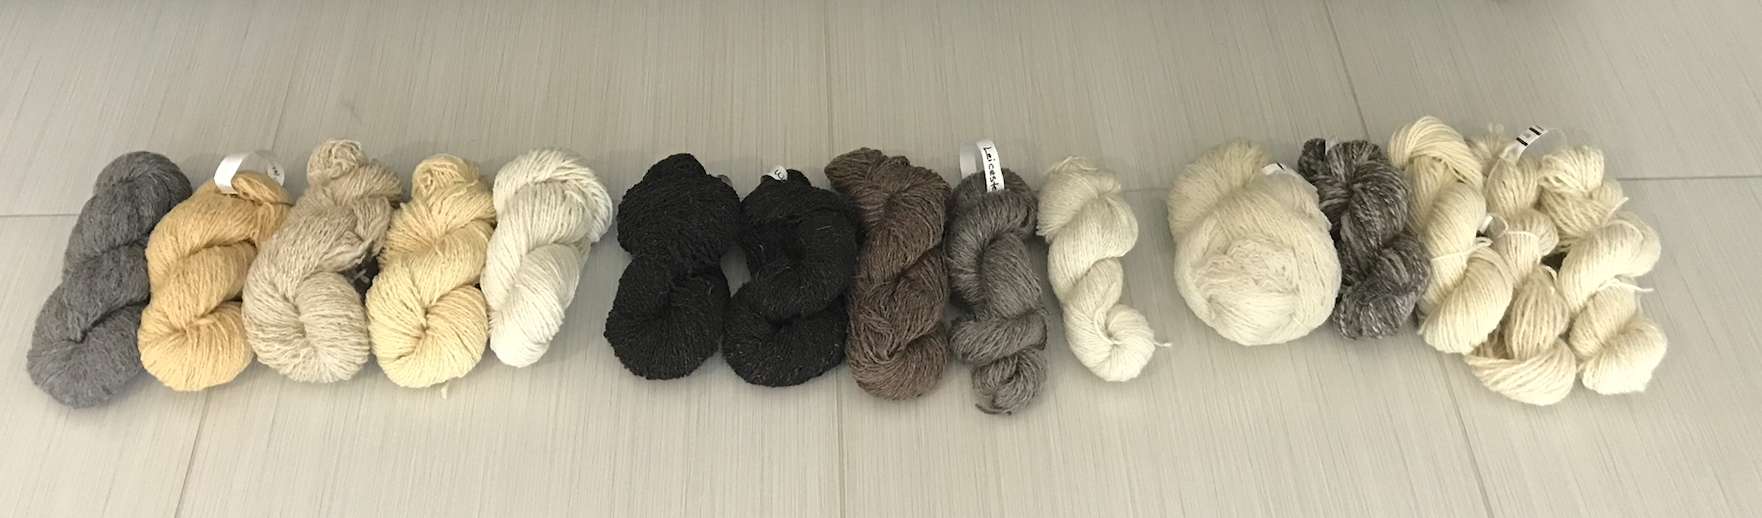
First and Second Ruanas
I have hoped that these wraps would be stash busters so for the first attempt I chose yarns that I already had on hand. I wanted to use the very old WoolEase sport weight yarn in color Wood. I didn’t have enough so I paired it with some Caron SimplySoft in color Black. The warp is stripes of black and Wood, the weft is all black. Everyone seemed to really like the stripes and most of the requests I got after this were for some variation of this design.
I made two ruanas like this, one a little wider than the other. I used up all of the woolease yarn, one of my goals.
Sheila’s Ruana
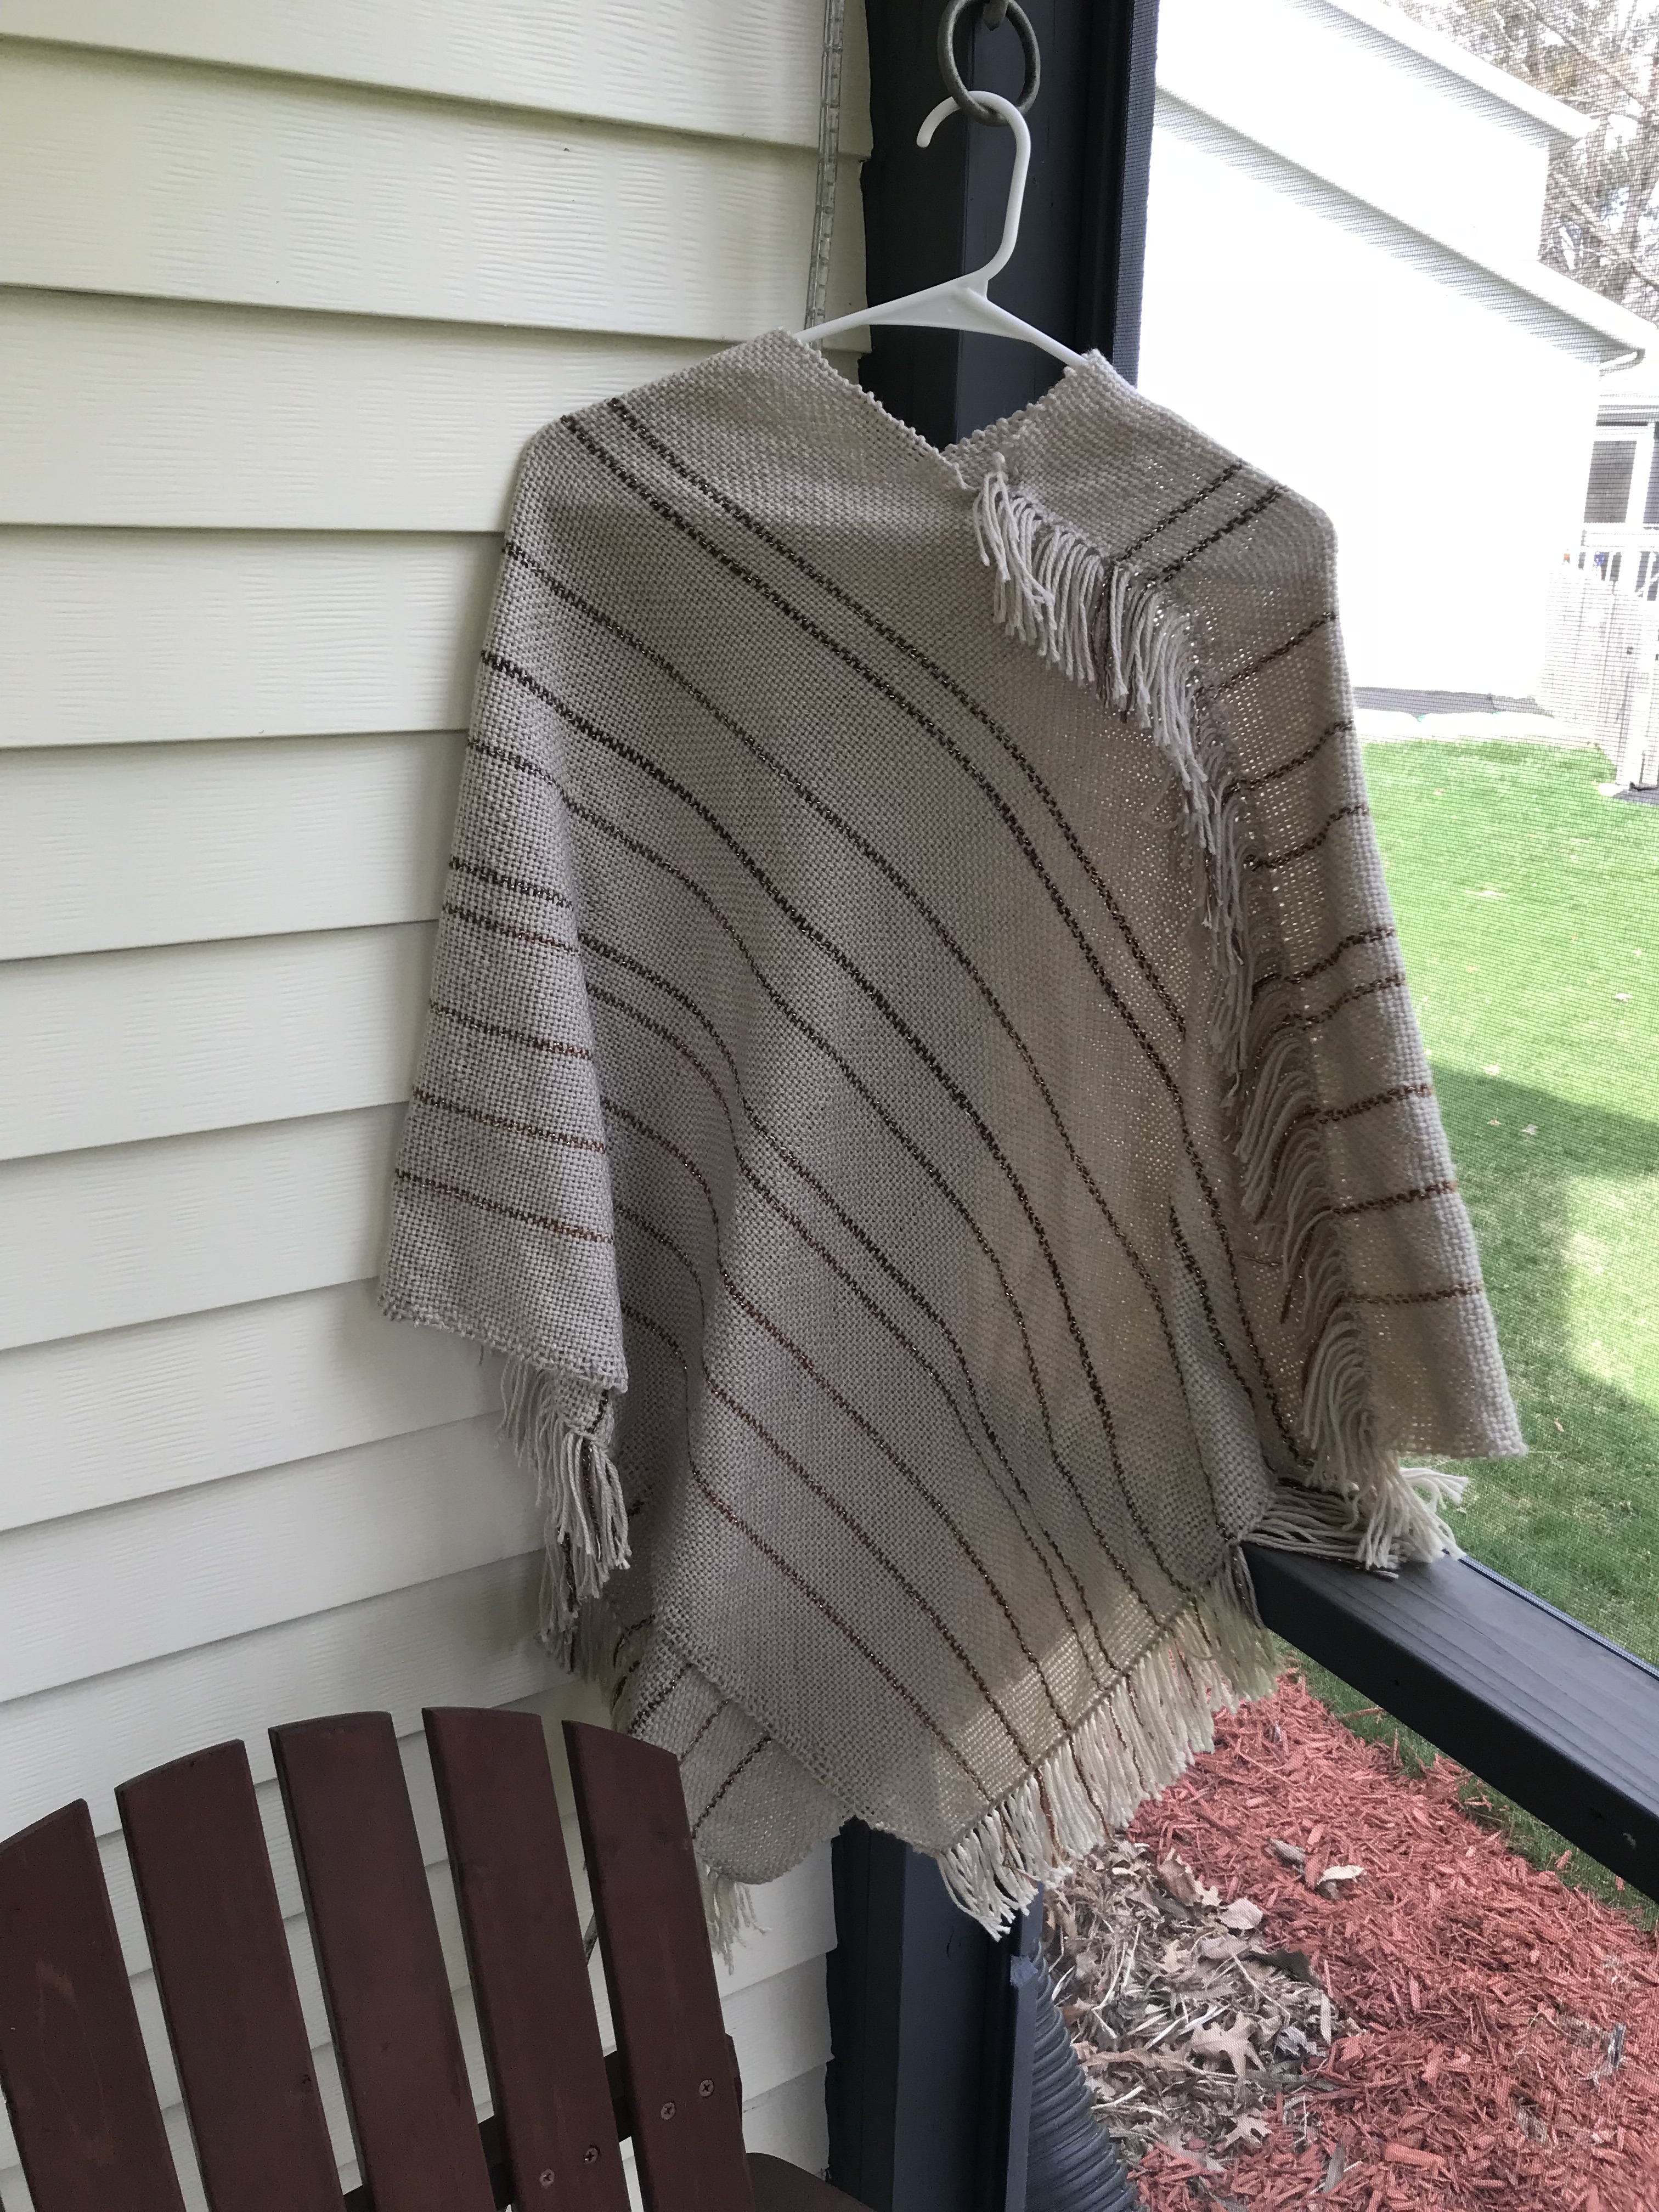
Sheila liked the Wood color yarn, but I was all out. So I had to go and find something similar. I chose this Caron SimplySoft in color Taupe.
It turned out nicely with a bit of interest from the tweedy yarn. This yarn has a nice drape and a soft feel.
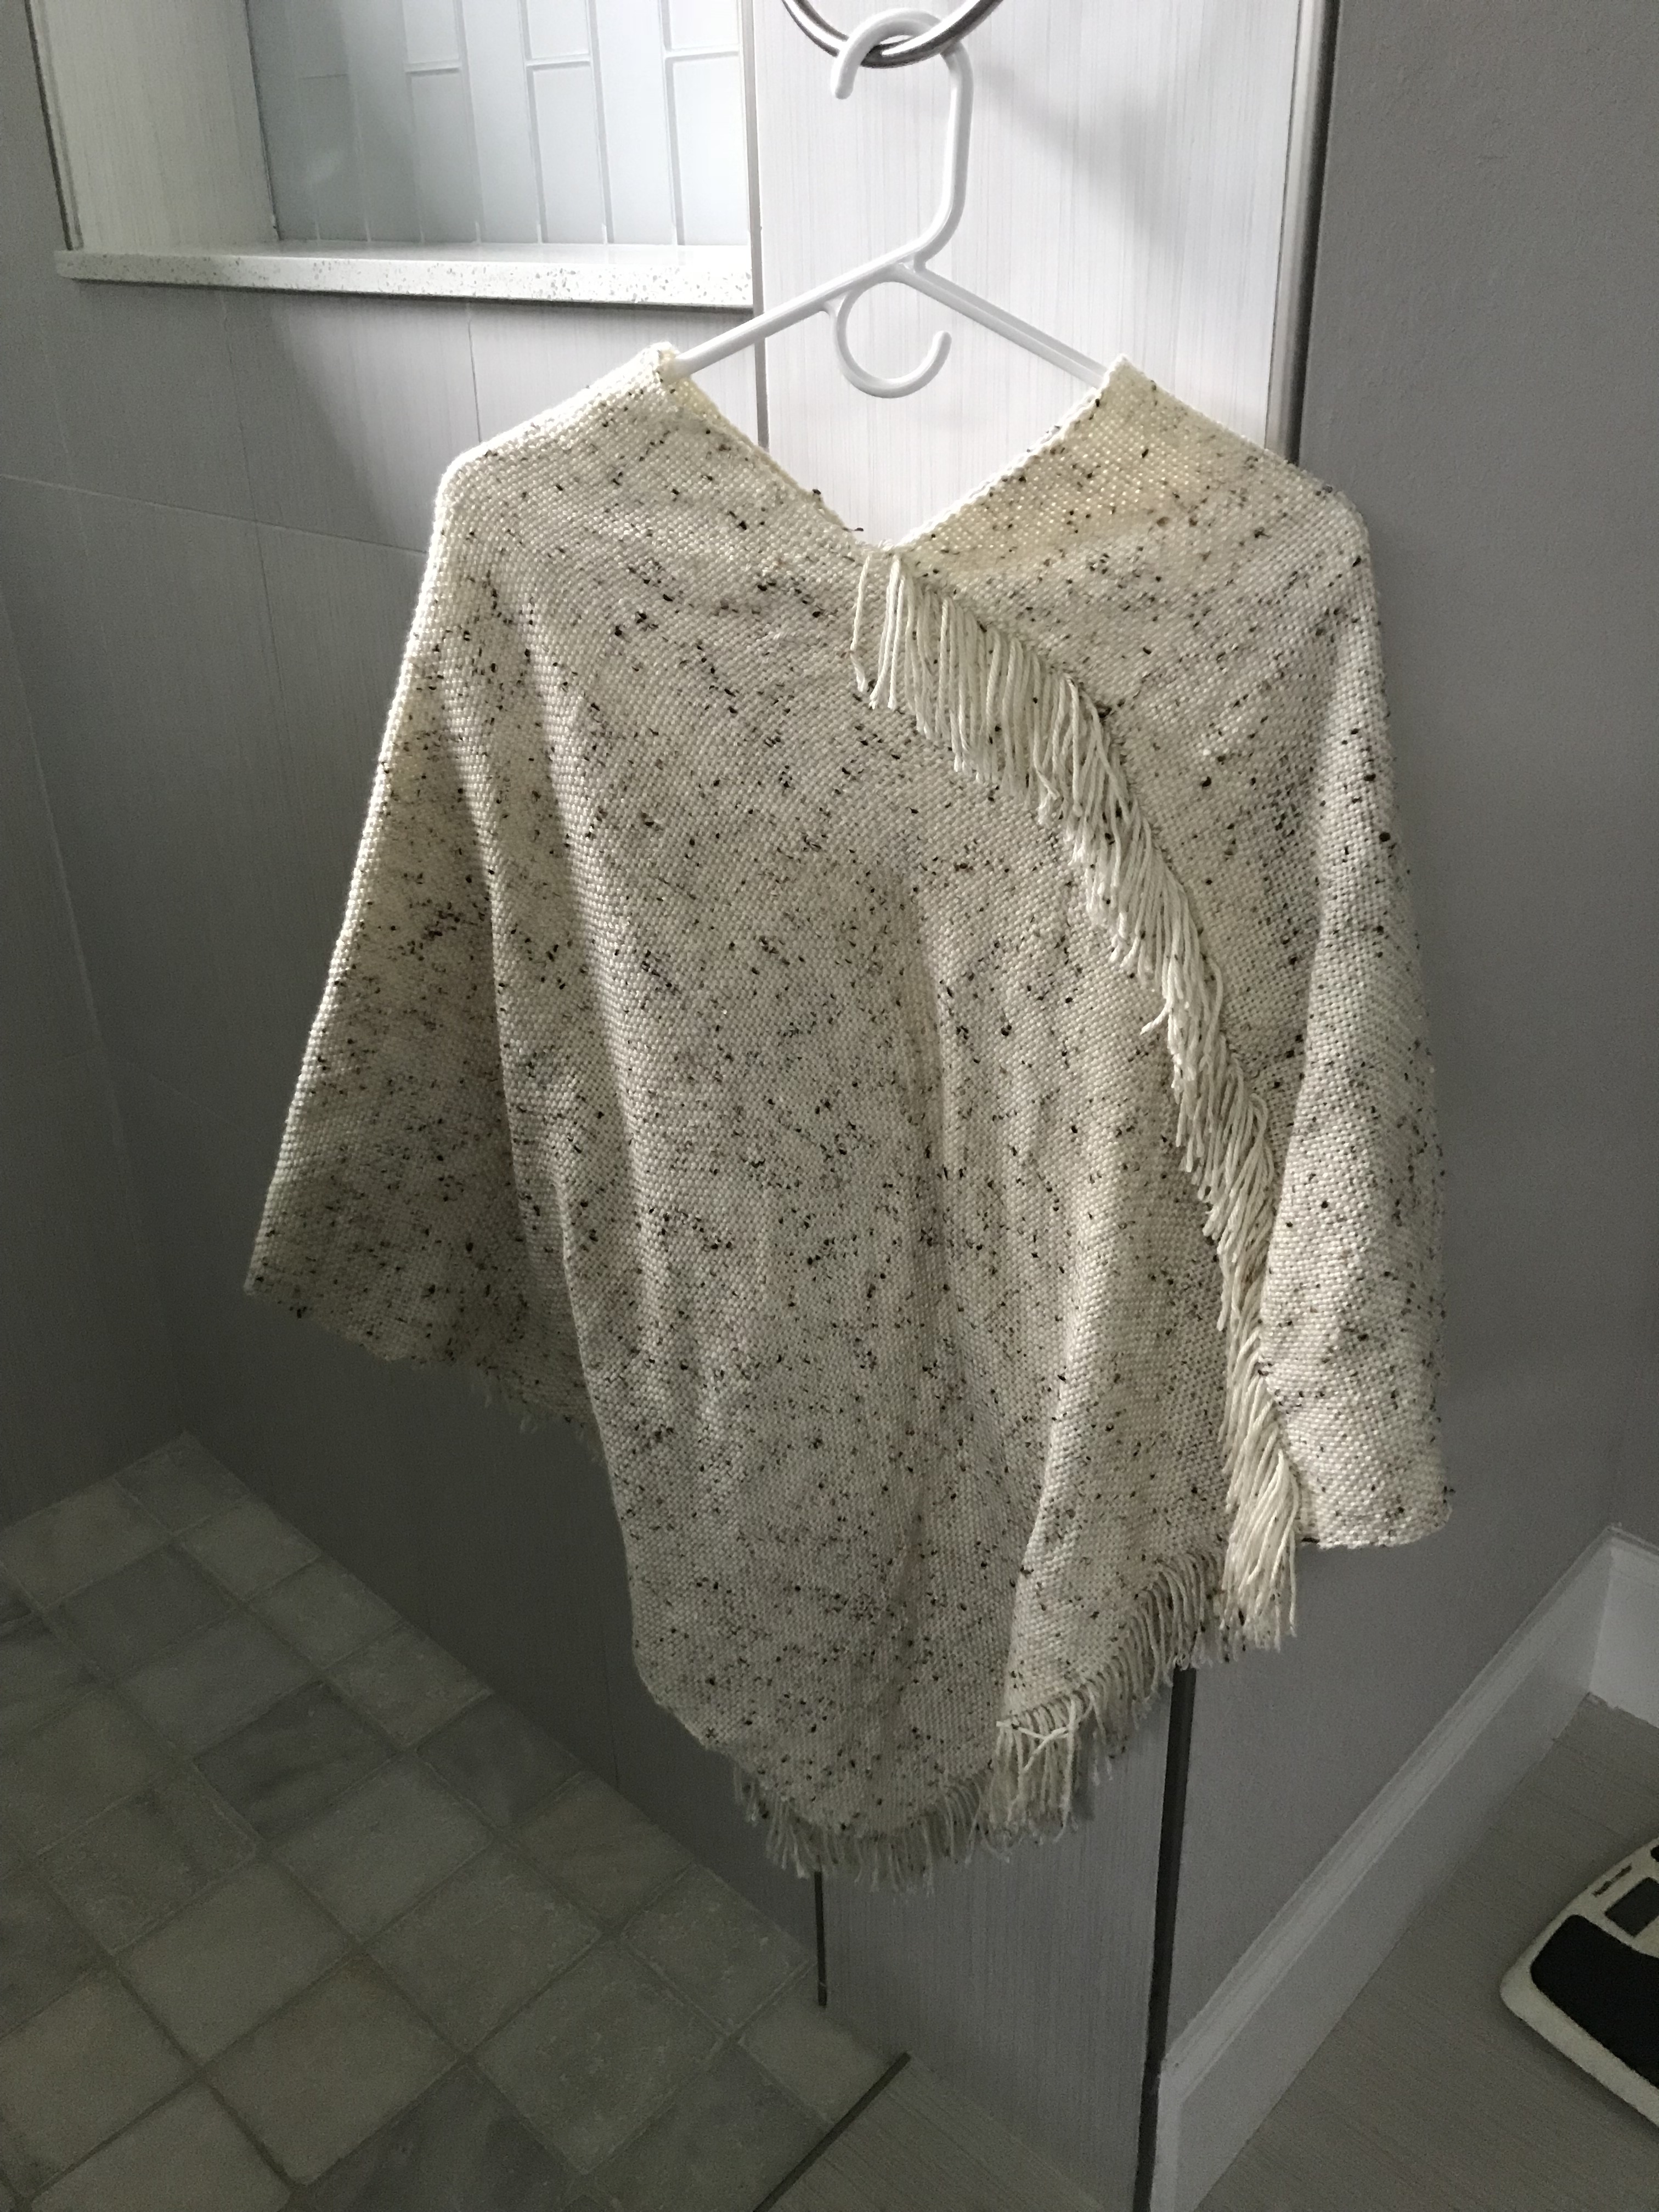
Gray Ruana
This one uses Loops and Threads brand Barcelona yarn in color Arctic for the warp and Onyx for the weft.
The yellow ribbon is used to measure the length of the piece as I weave. Even though this ruana has no stripes or patterns, it seems to be a favorite.
The Barcelona yarn is soft and fluffy. There are enough color variations to keep the cloth interesting even without other design elements.
Jodi’s Ruana
Jodi liked the striped ruanas with brown and black yarn but requested gray and black instead. I decided to perk up the stripes by adding a few thicker yarns to each stripe. The thicker yarns are Thick and Quick. The other yarn is Caron SimplySoft in gray and black warp and all black weft.
The thick yarns add interest without added another color.
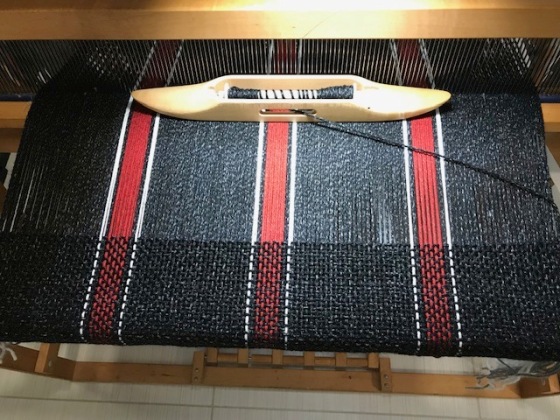
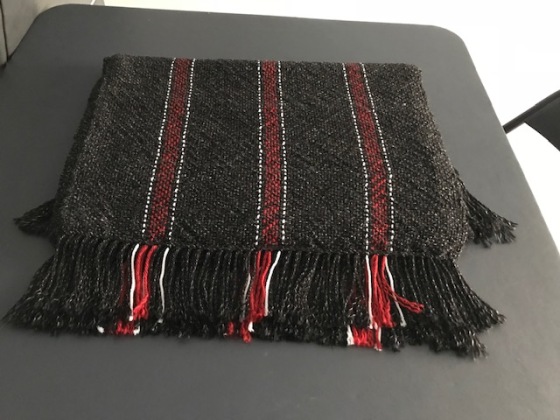
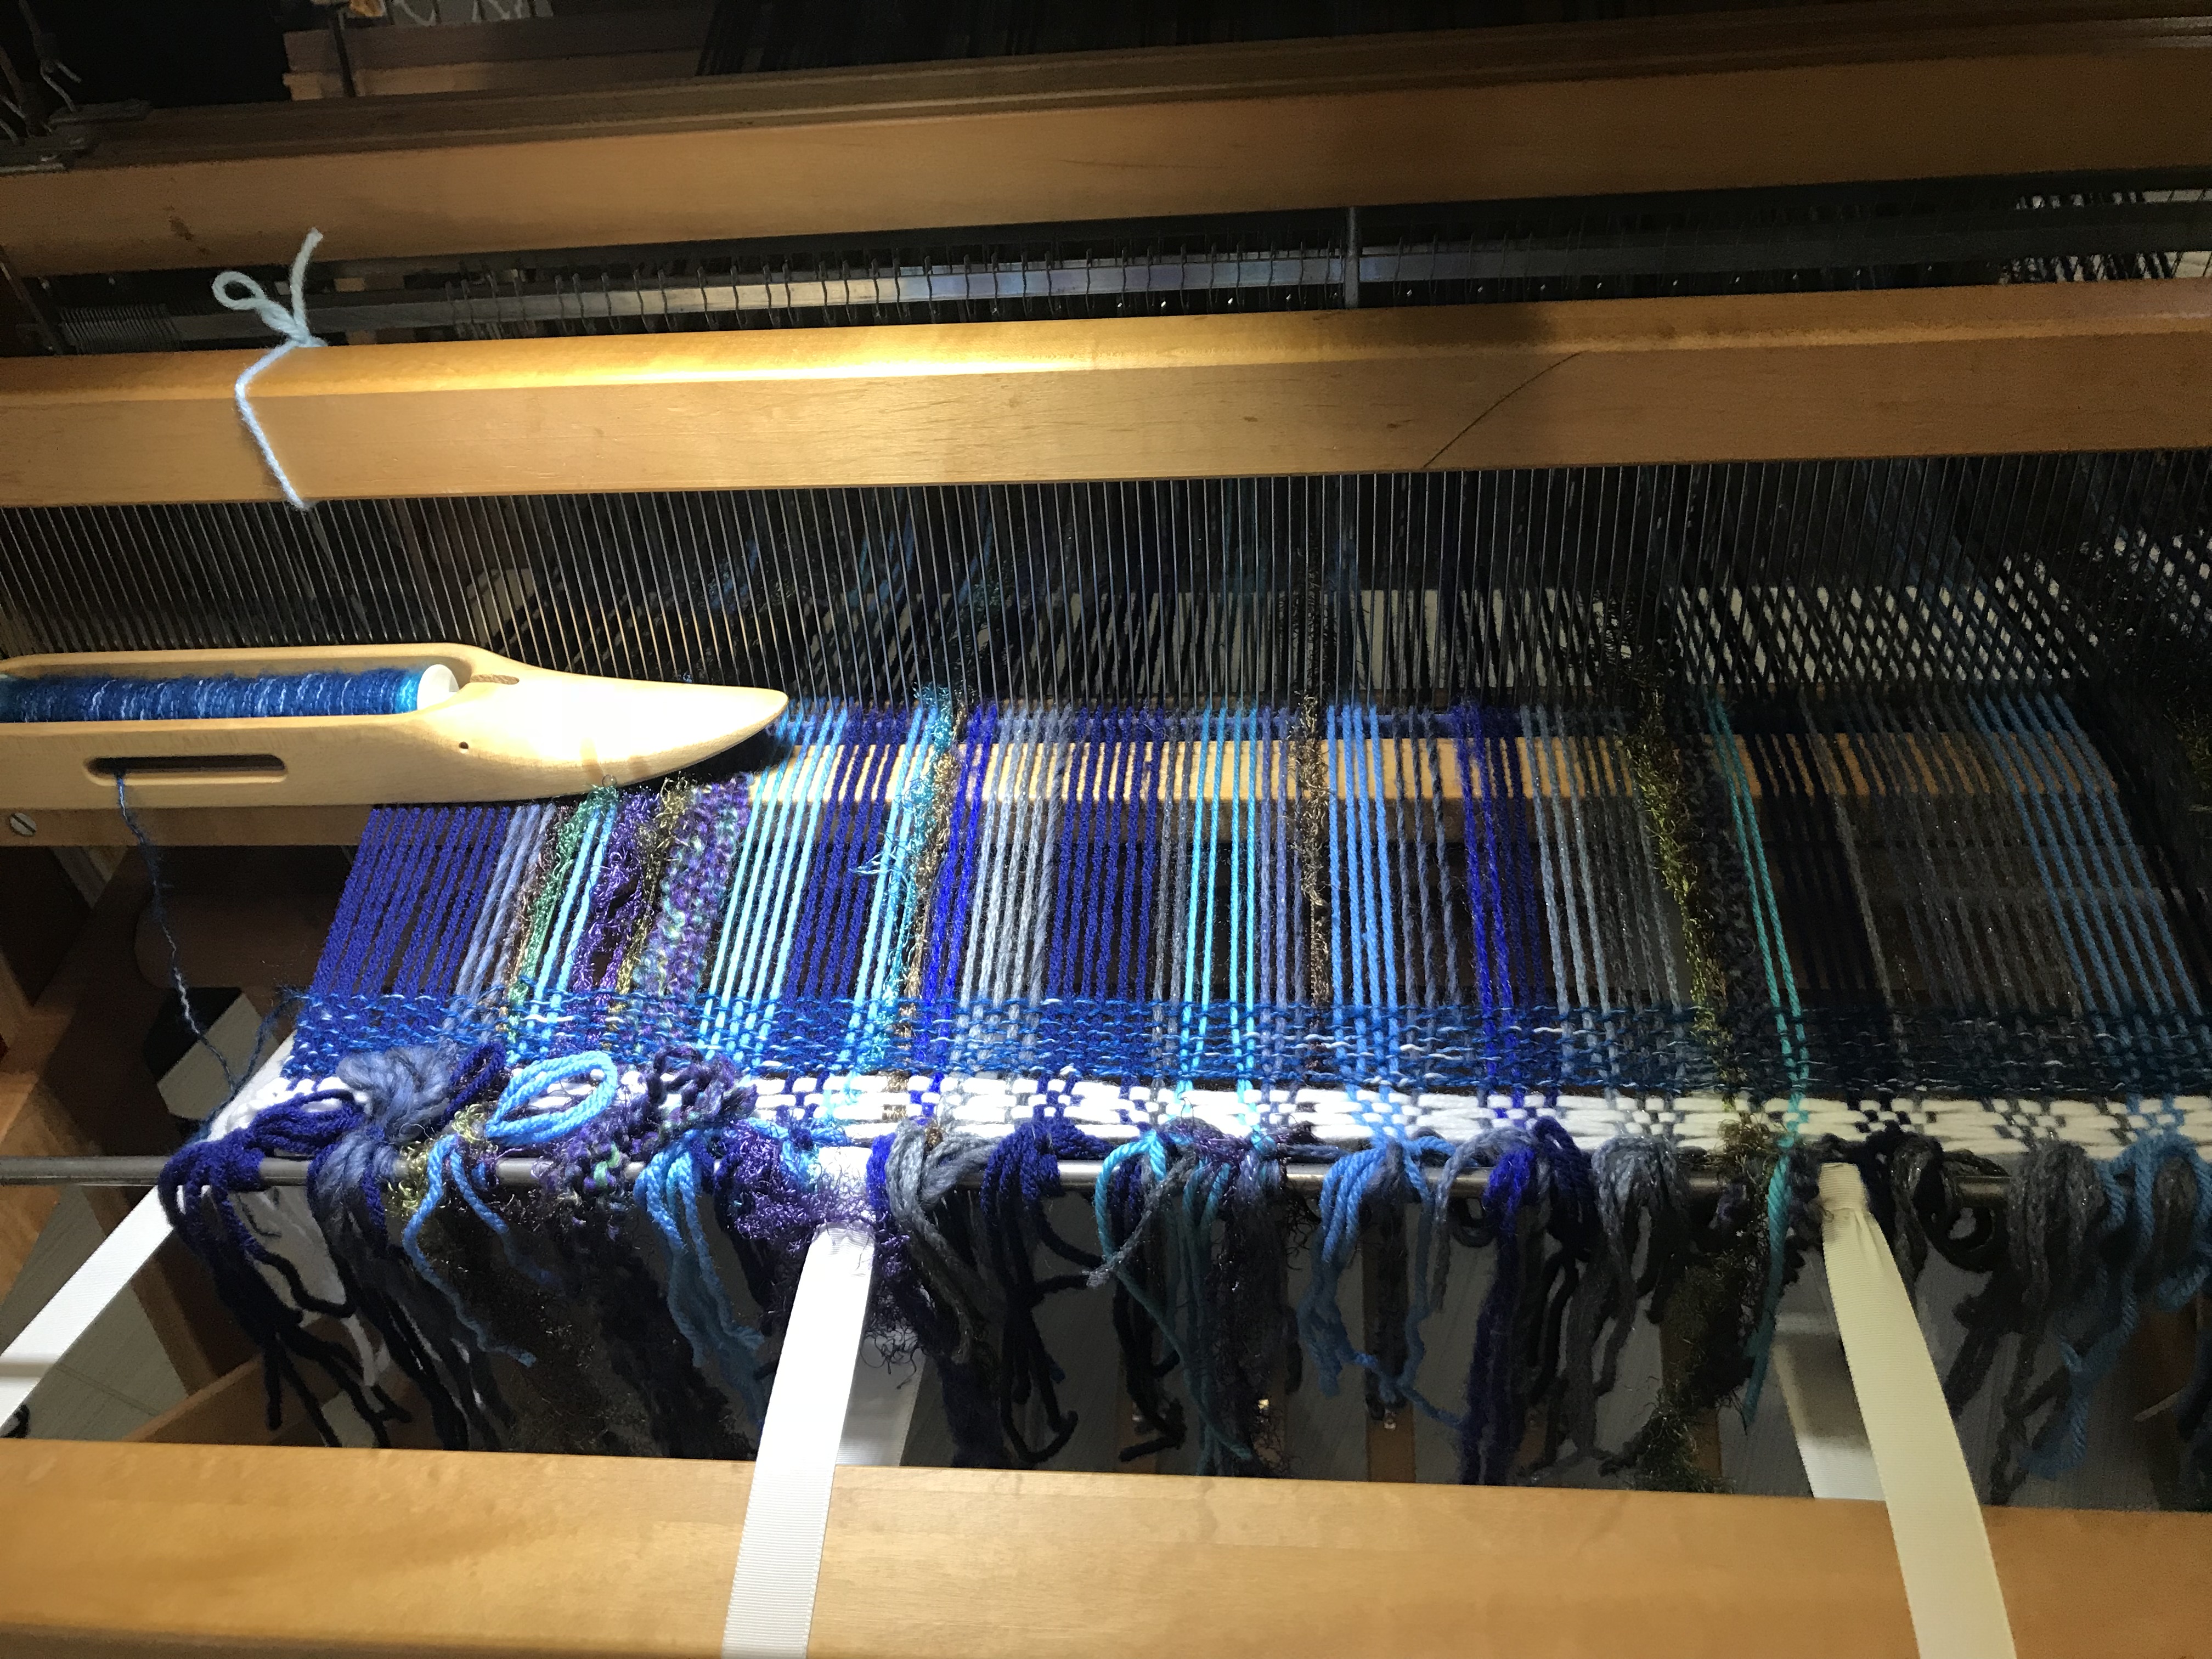
Anna’s Ruana
I made this ruana for Anna. The poncho I made her was light colored with navy accents so I decided to make the ruana dark with red and white accents. I had seen a plaid similar to this and considered trying a plaid but chickened out at the last minute.
I wanted the white accent threads to look “even” and not “odd” so I put an odd number of yarns between them. In this way they were both in the same shed. Both up or both down at the same time.
The yarn is Premier Everyday. I found it on sale for $2. The colors are Charcoal Heather, Red Heather, and White.
I am looking forward to getting creative with the wraps, trying new weave structures and color patterns. Keep watching!
As always, your polite and helpful comments are welcome.
This is a picture of a cape that I recently finished knitting and the story of its making. It all started in July when I visited the state fair. I went there to see the fiber exhibits. I am thinking … Continue reading →
Last year, I completed the challenge set forth by The Livestock Conservancy called Shave ‘Em to Save ‘Em (SE2SE). I purchased and spun wool from people who raise sheep listed on the rare and endangered list. The goal is to … Continue reading →
Last year, I completed the challenge set forth by The Livestock Conservancy called Shave ‘Em to Save ‘Em (SE2SE). I purchased and spun wool from people who raise sheep listed on the rare and endangered list. The goal is to support those who are raising these sheep and conserving their genetic diversity.
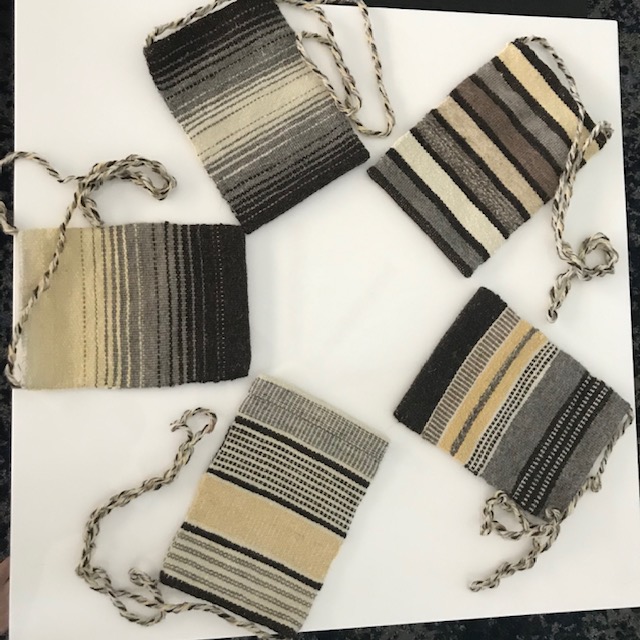
I used some the yarn spun from the fifteen breeds that I purchased to weave “Walking Around Bags” for my siblings. While I was doing so, I thought that the wool would make a good rug.
I have never woven a rug before. When I purchased my loom, used, in the late 1980s, there was a rug half done on it. As a new weaver and didn’t fully appreciate how much work had already gone into the rug so I just cut it off. Later, weavers told me that my loom, a Harrisville four-shaft, was too light weight to weave rugs. They said that you really have to WHACK the weft into place. So for years, I never wove rugs. But, after weaving the weft faced bags, I felt certain the loom would work for a rug.
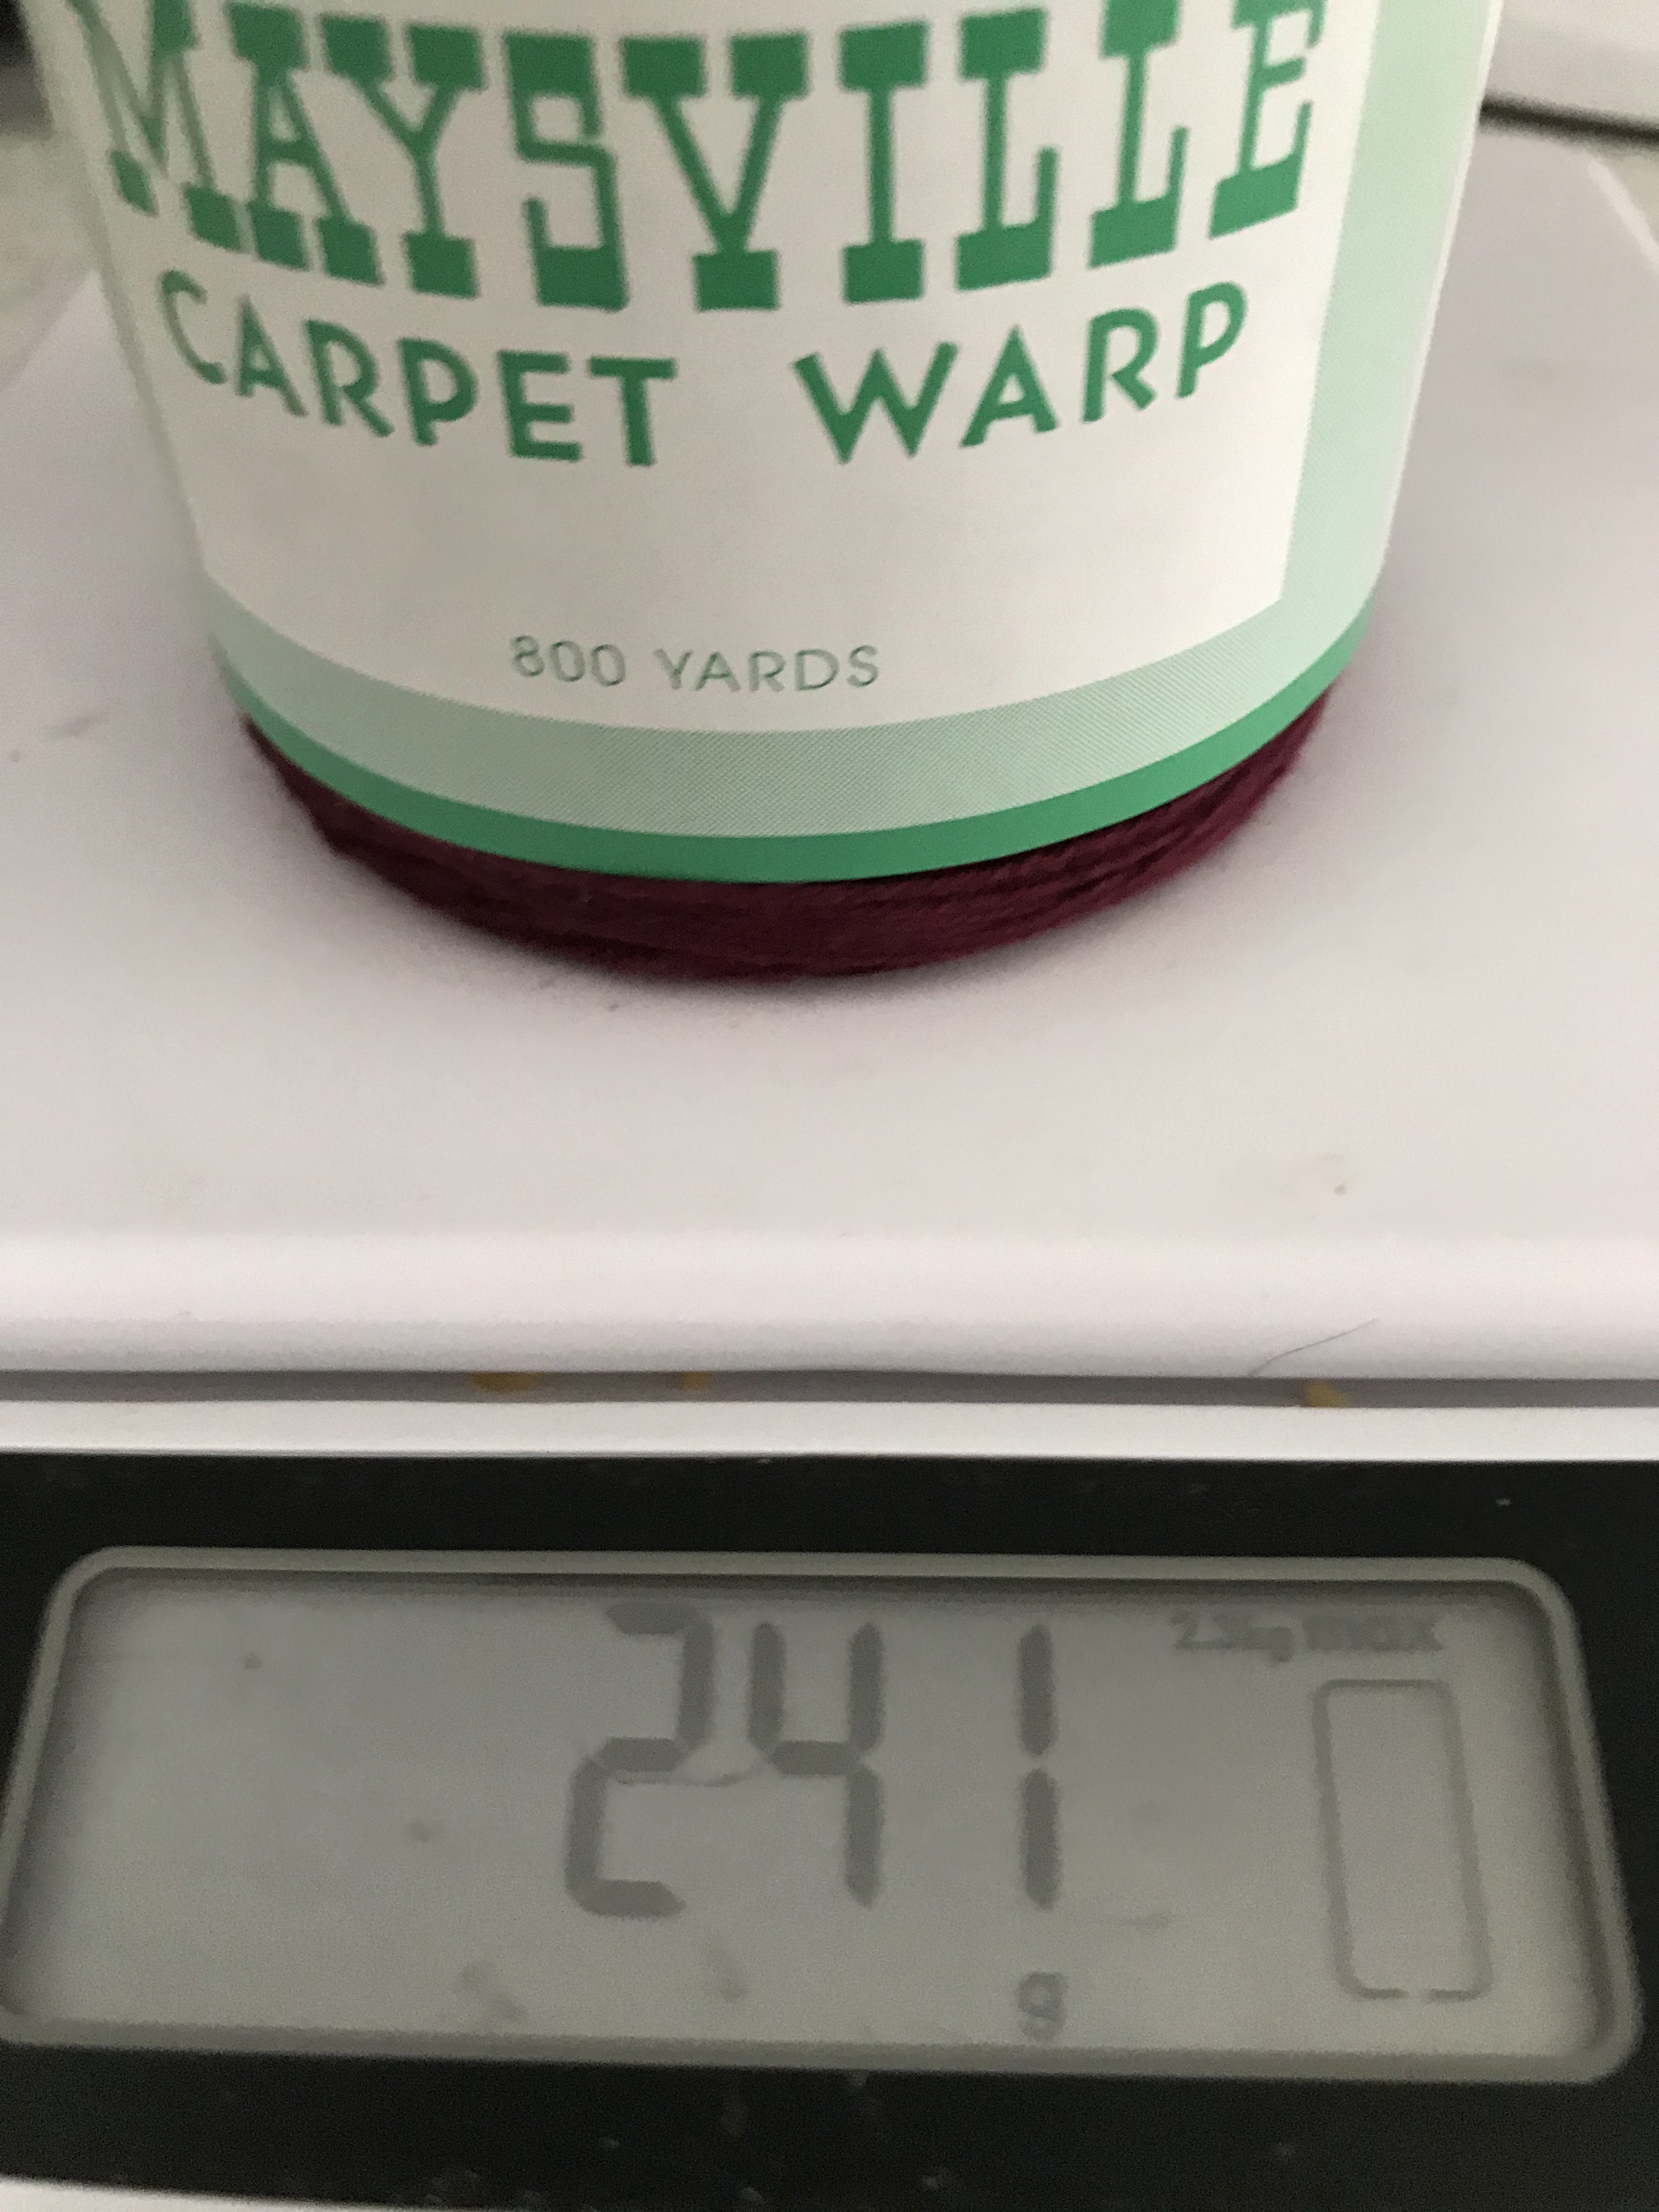
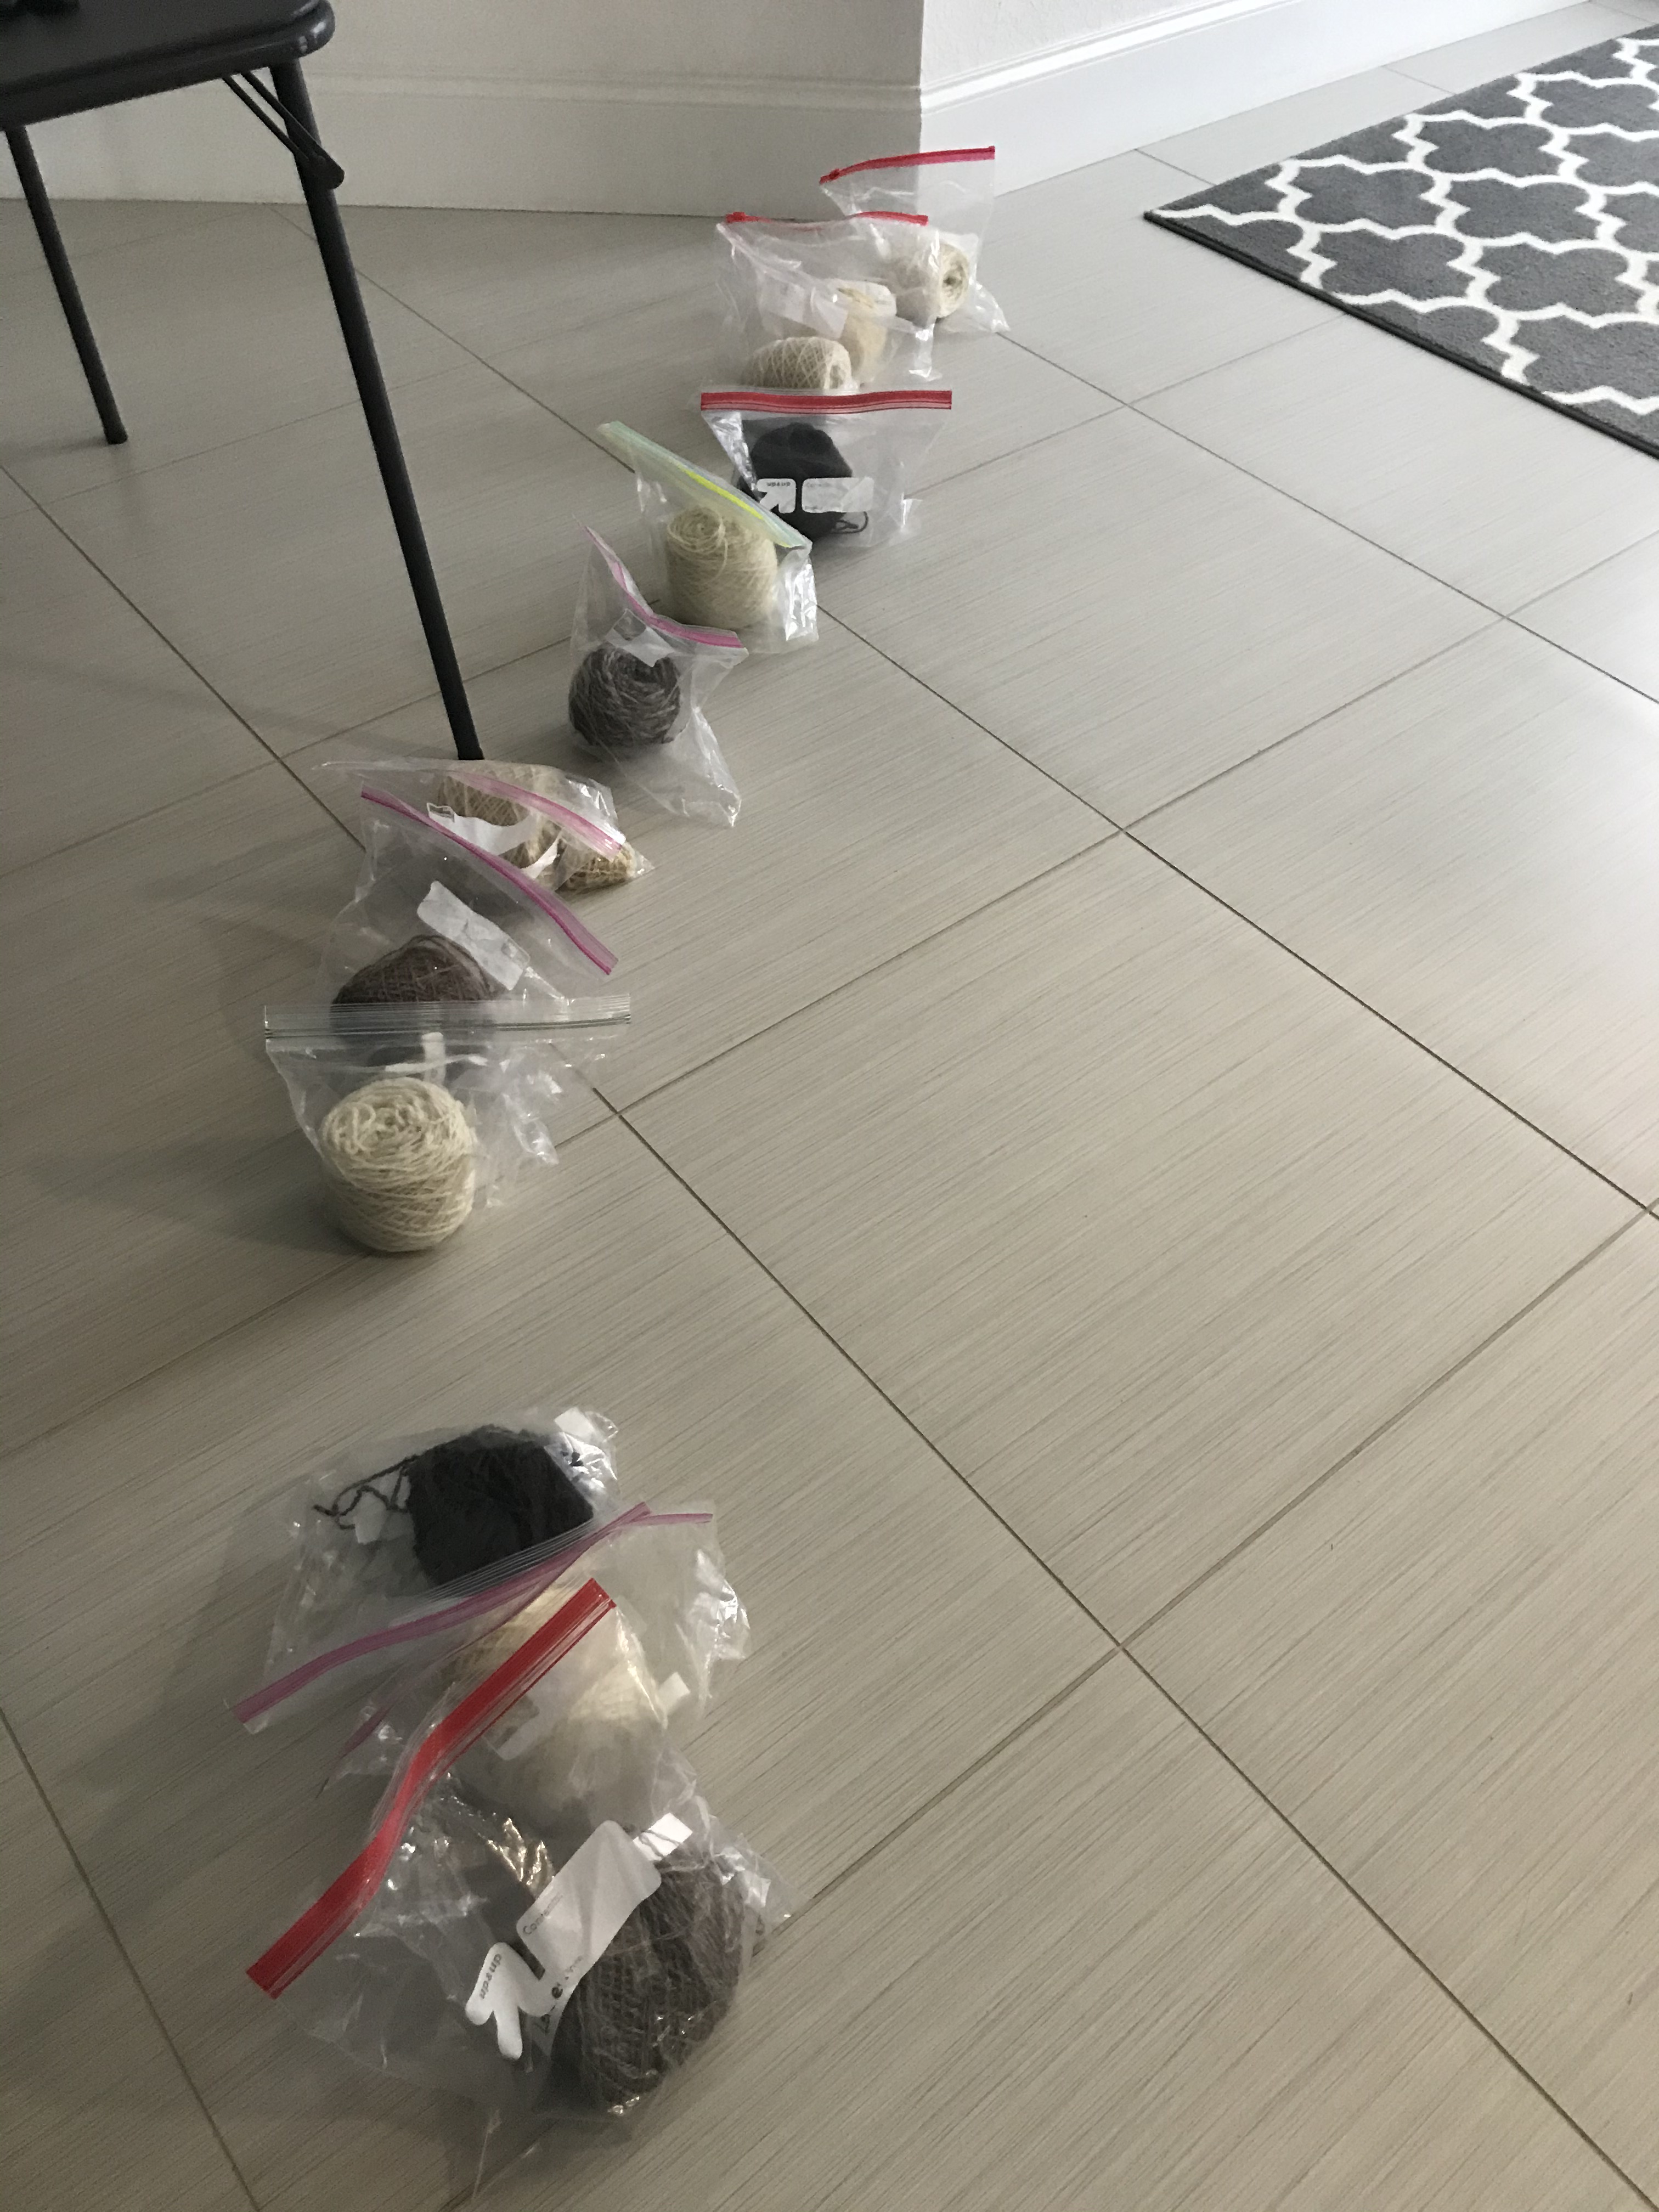
I calculated that I would need 500 yards of natural color carpet warp. I discovered that I only had two partial cones, left over from a placemat project. So I weighed them and compared their weight to that of a full cone of maroon warp containing 800 yards. It seemed as though I would have enough.
It turned out to be enough and this was all that I had left.
I usually warp F2B (front to back) and the warp looks messy at this point. But carpet warp is sturdy cotton and I soon had they threads all straightened out. I had to wind the warp by myself and swore I would soon get around to building the warping trapeze that I have planned.
So that’s where all my bobbins went! When I got the yarn out, I discovered that I had many bobbins left over from the bag project. I had never unwound them thinking that I would be weaving again. Now I am rich in bobbins again!
I was taught to wind the bobbins by first piling up the ends, then going back and forth across the middle. My teacher said that this was because the hole in the shuttle was in the center. By winding in this way, you would use the center yarn first leaving that area empty and making it easier for the end yarn to come off. But look at my new shuttle! The opening is so long compared to the older one. I wonder why they made the change. I will likely continue to wind the way I always have.
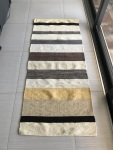
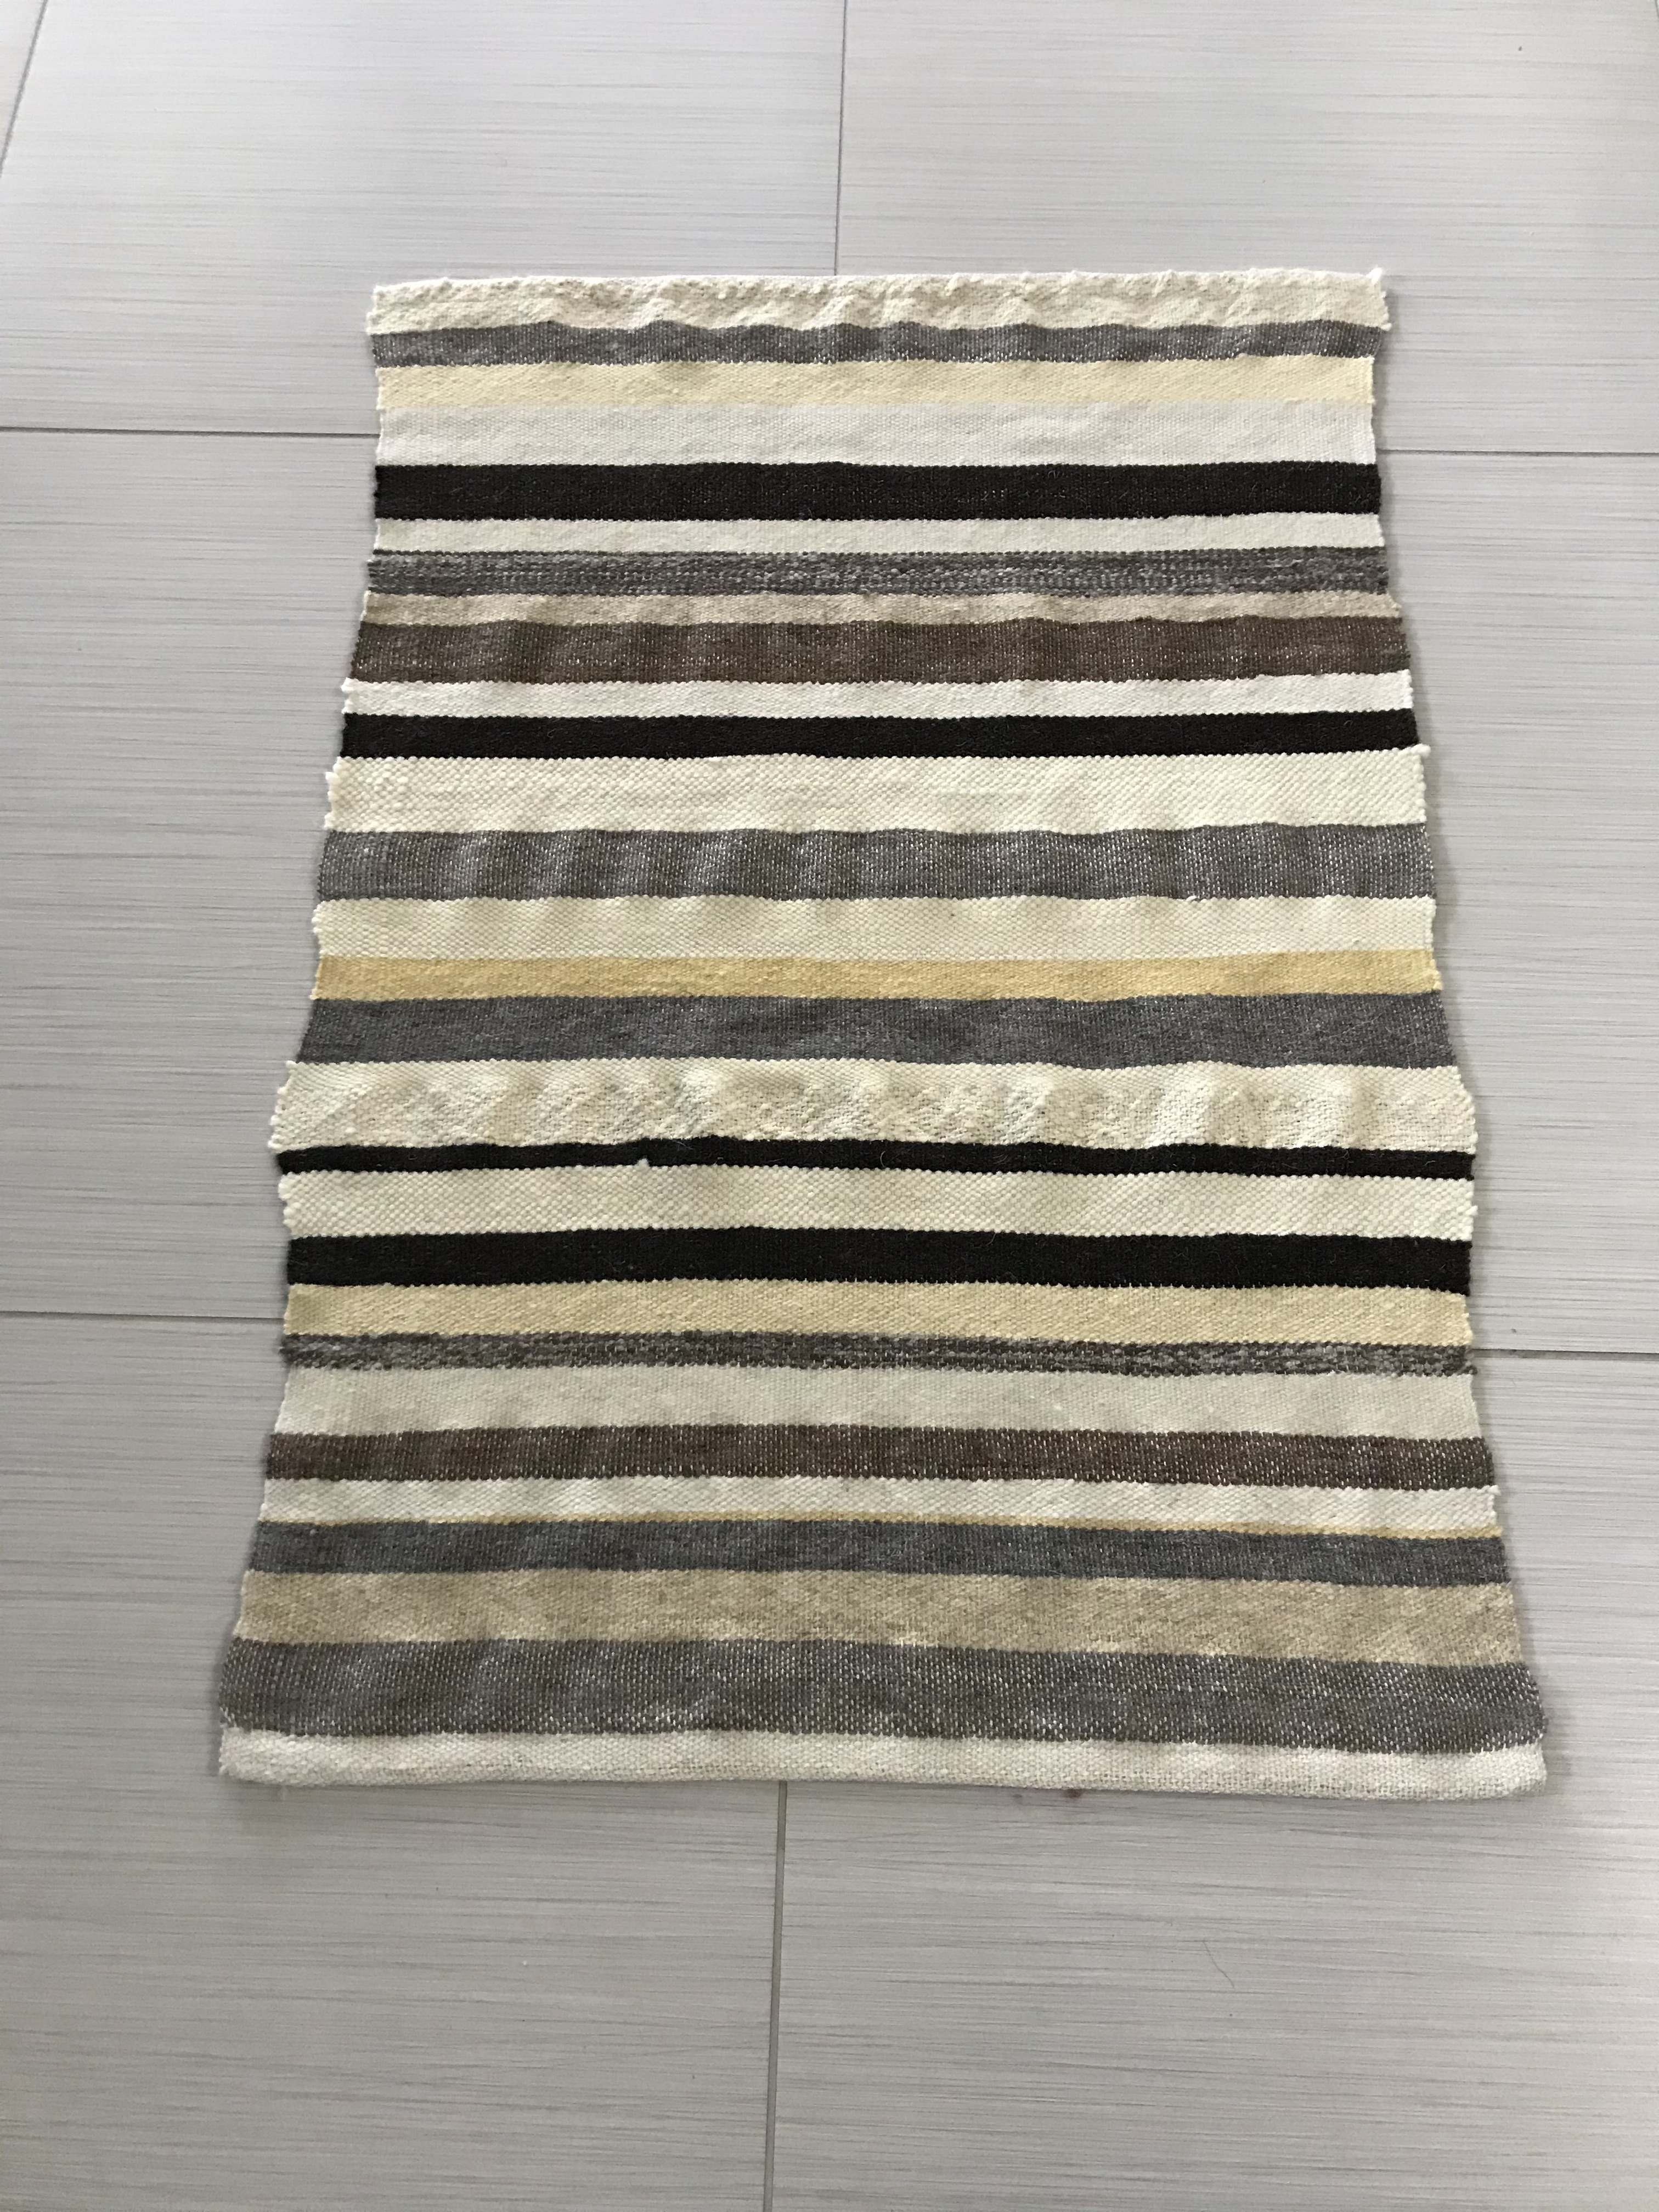
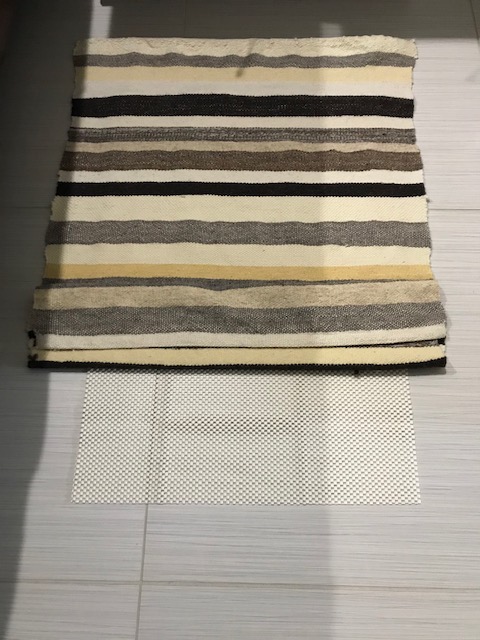
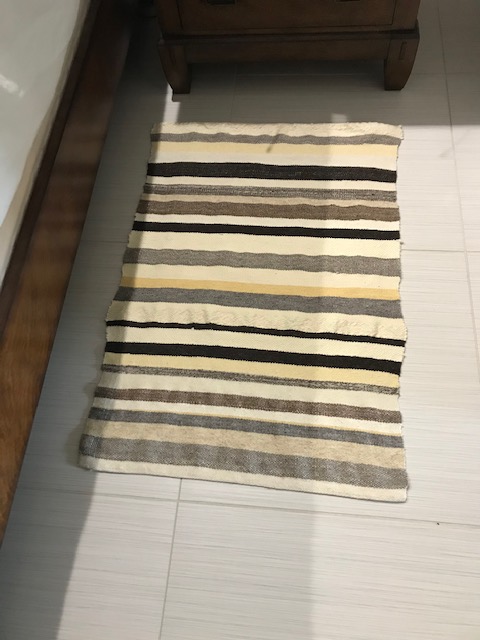
The rug was 29″ wide in the loom. I wanted to be at least 2’x3′ and I had no idea how much it would shrink. I used a temple to prevent progressive draw-in. The warp is 8 epi in an 8-dent reed. The only plan for the weft was that I would alternate dark and light yarn and never weave more than one bobbin full of any one yarn. I ended up with 30 stripes, with each yarn being used twice.
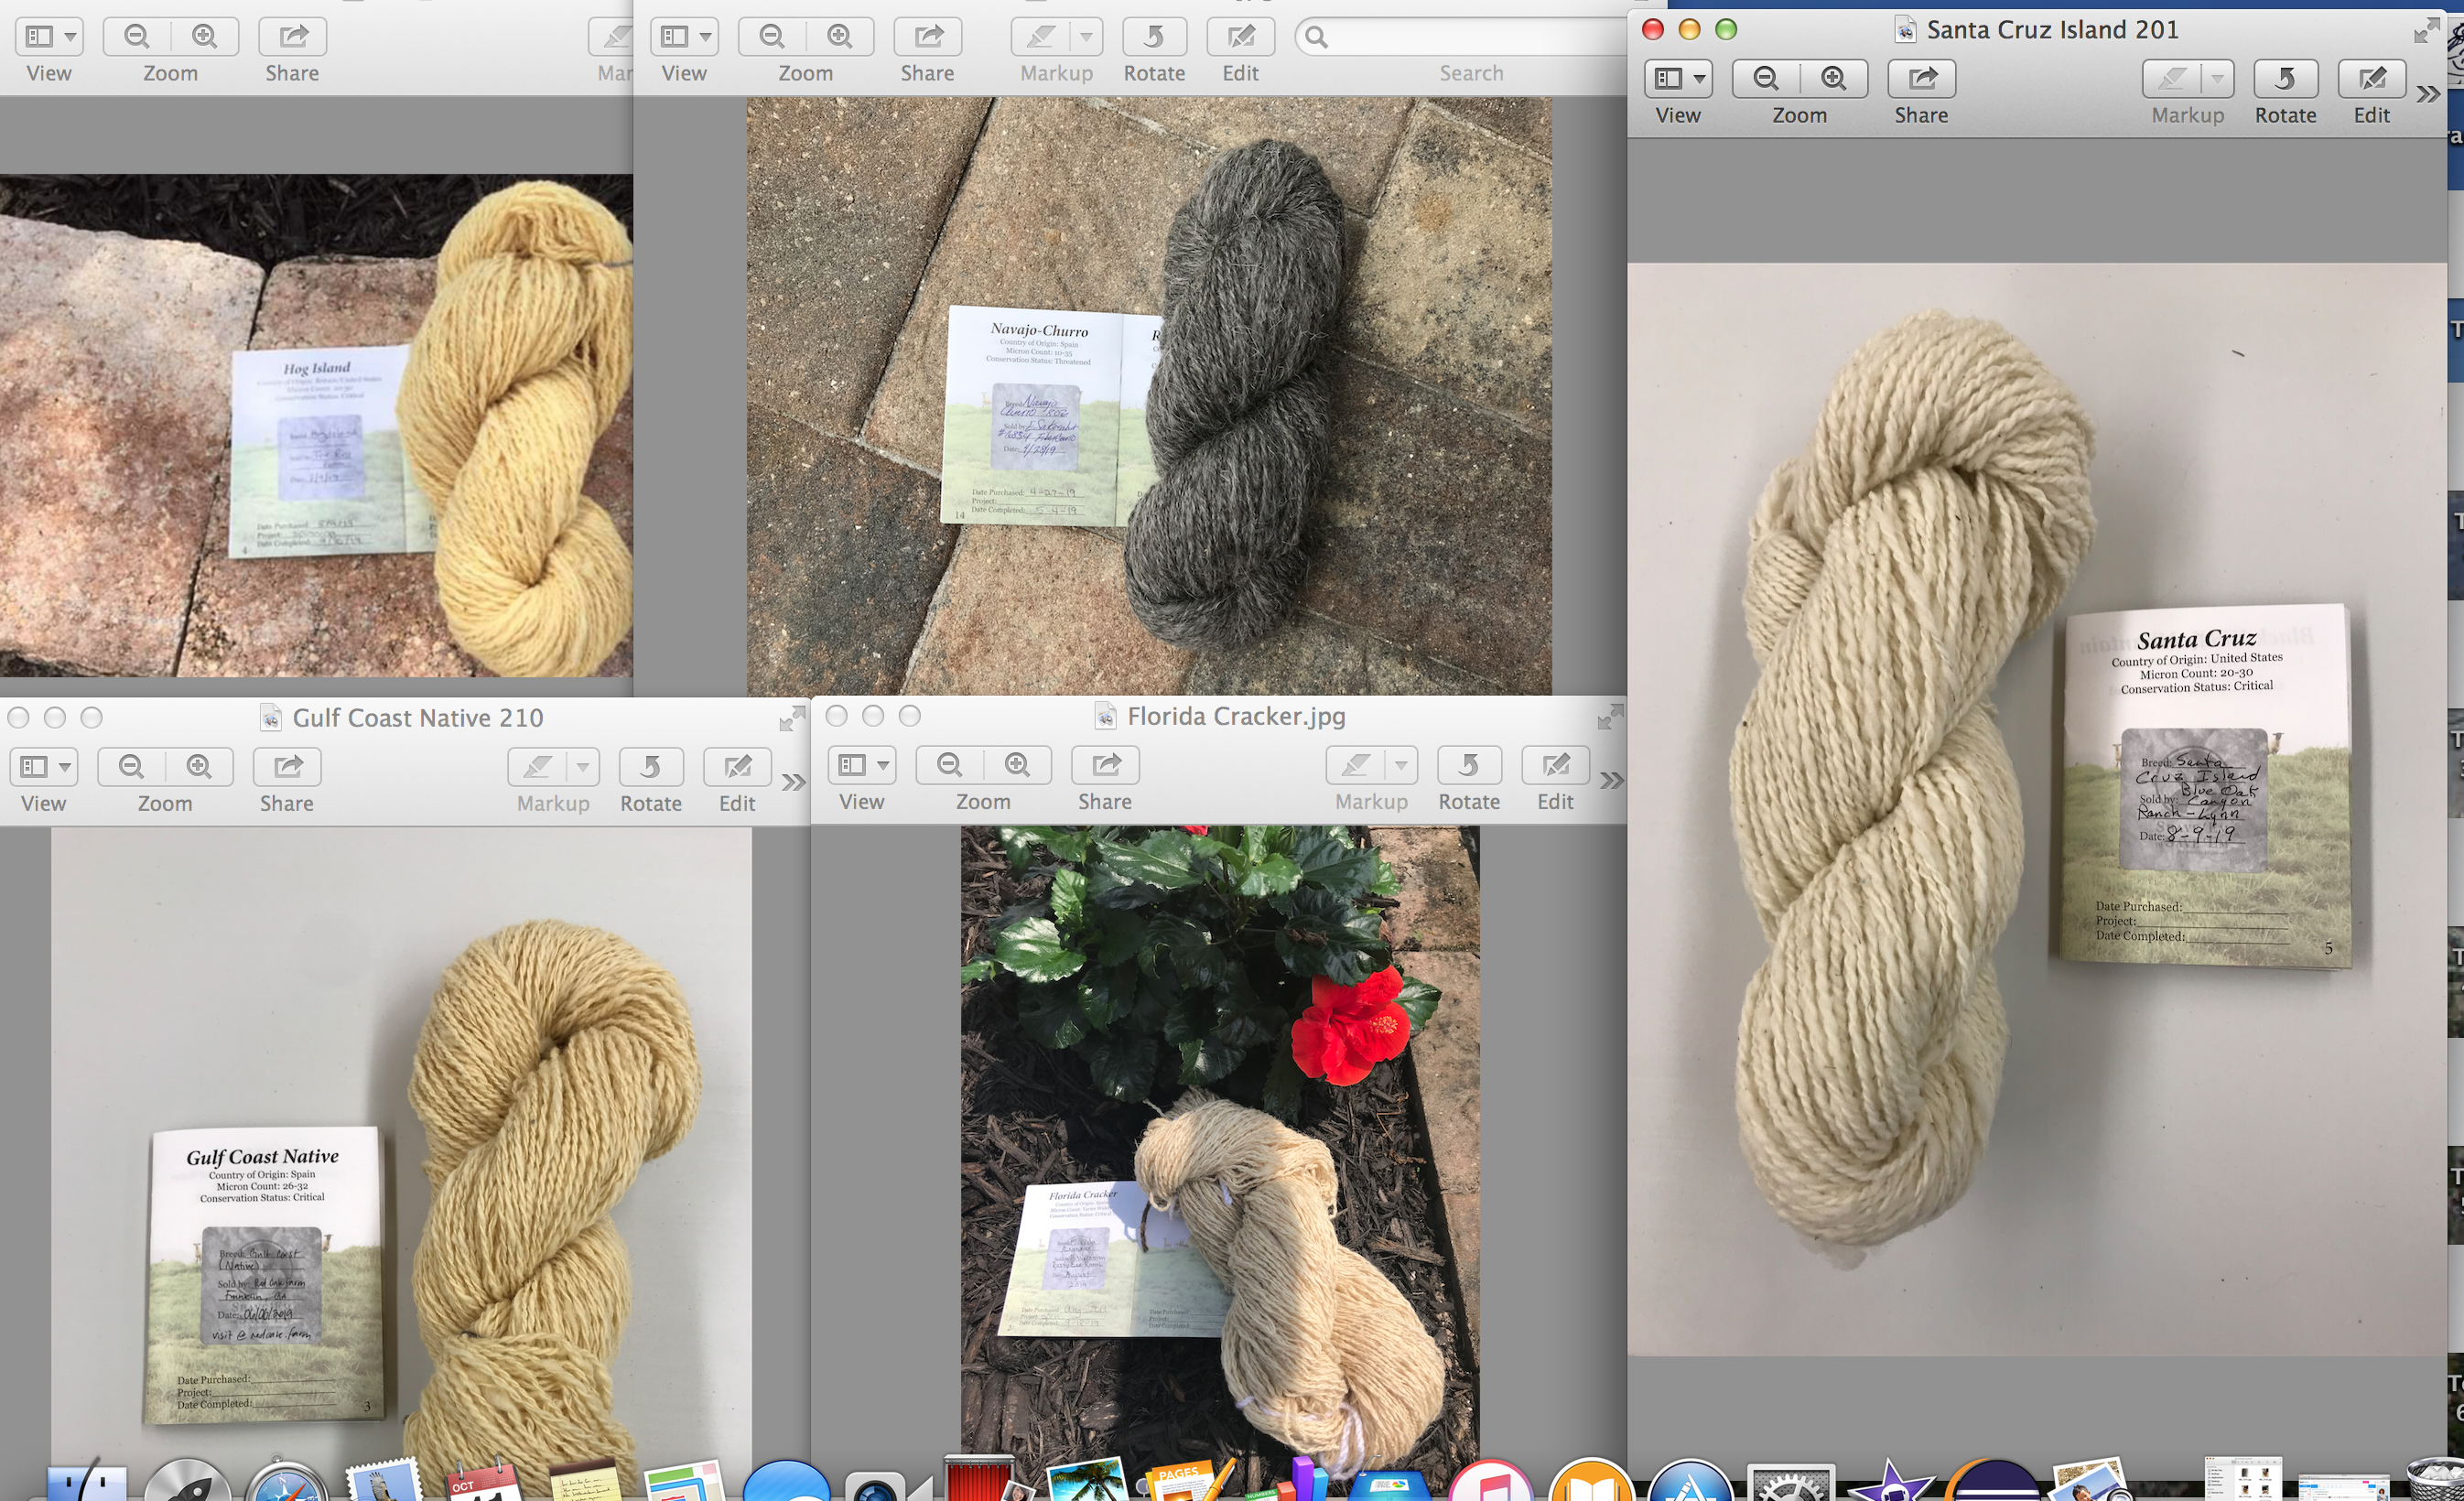
The first 15 stripes are, in order; Shetland, Leicester Longwool, Florida Cracker, Navajo Churro, Hog Island (very thin stripe), Santa Cruz, Karakul, Clun Forest, CVM, Gulf Coast Native, Jacob, South Down, Black Welch Mountain, Lincoln Longwool, and Tunis. For the second round I lined the bags up in a pleasing way and used them in that order. The hem at each end is 2″ of 3/2 mercerized cotton (natural color). I folded the hem under twice and machine sewed it so that none of the cotton shows.
I purchased a non-slip carpet pad at Target because our floor is tile.
The rug is a little bumpy. Some of the yarns were very stretchy. I think I may have wound them onto the shuttles under a little tension. Some of the stripes act like they are elastic. I steamed the rug on my ironing board and though it looked flatter, as soon as it dried it became bumpy again. So I think this will just be a characteristic of this rug. I love it anyway and next time I will pay more attention to this tension.
I hope you like the rug and the story. As always, your polite and helpful comment are welcome.
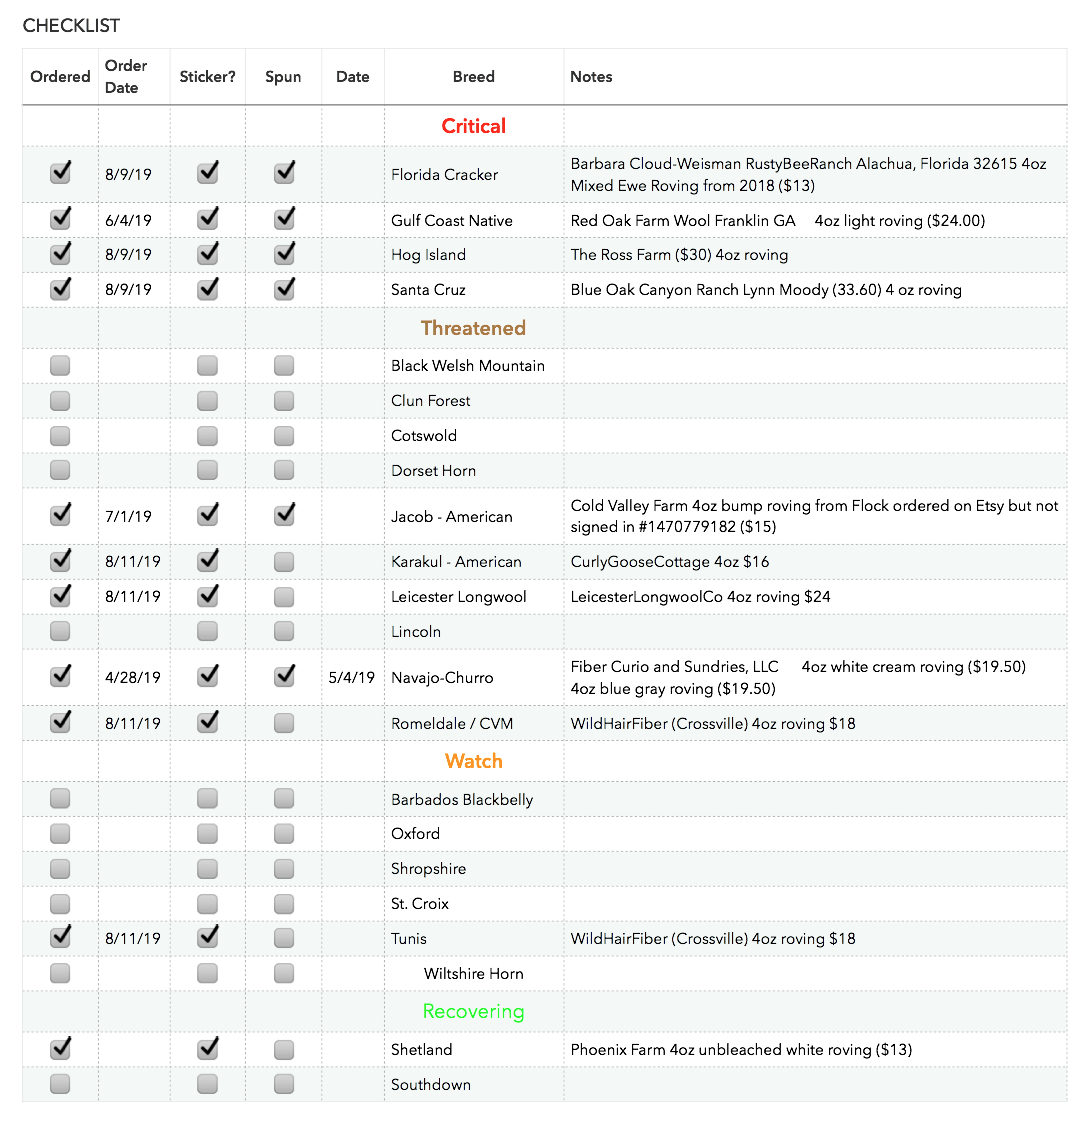
This year I have been participating in the Shave ‘Em To Save ‘Em Initiative sponsored by the Livestock Conservancy and currently open to residents of the United States.
The Livestock Conservancy is a nonprofit organization whose mission is “To protect endangered livestock and poultry breeds from extinction”.
The stated purpose of the SE2SE initiative is to “make it more profitable to raise heritage breeds” by recognizing fiber artists for using wool from breeds on the Conservation Priority List, while connecting shepherds of heritage breeds with customers.
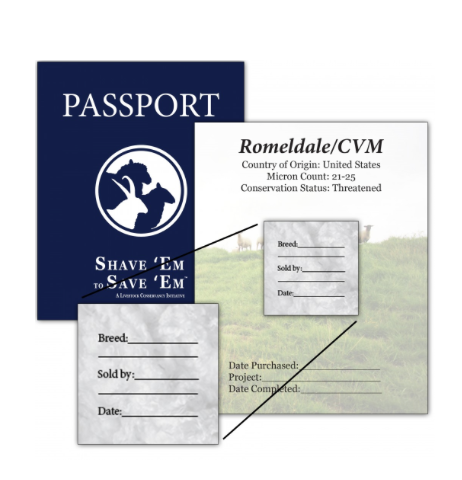
The recognition comes in the form of sticker stamps for a passport booklet. Artists share pictures of their projects with a Facebook and/or Ravelry posting. The more breeds they use, the more stamps they collect. The challenge is to complete fifteen projects in three years. There are gifts to be collected at five, ten, and fifteen projects.
Early on in the process I created a spread sheet with the breeds and my progress. The list of suppliers who can provide you with a sticker is available on the conservancy web page. Many of the shepherds also sell their fiber through an Etsy store. This is where I got most of mine. I’m not very experienced at cleaning raw fleece, so I thought it best to get roving ready to spin. To qualify, a project only need be four ounces. You could get fiber to spin, fiber to felt, or yarn to knit, weave, or crochet. These are not the only possibilities but they seem the most common.
This is a list of the endangered breeds.
It wasn’t always easy to find providers, especially at first. And several sources dried up as more people became involved in the challenge. So quickly I switched from spinning mode to acquisition. I ordered eleven samples and for several weeks fluffy packages of wool arrived in the mail.
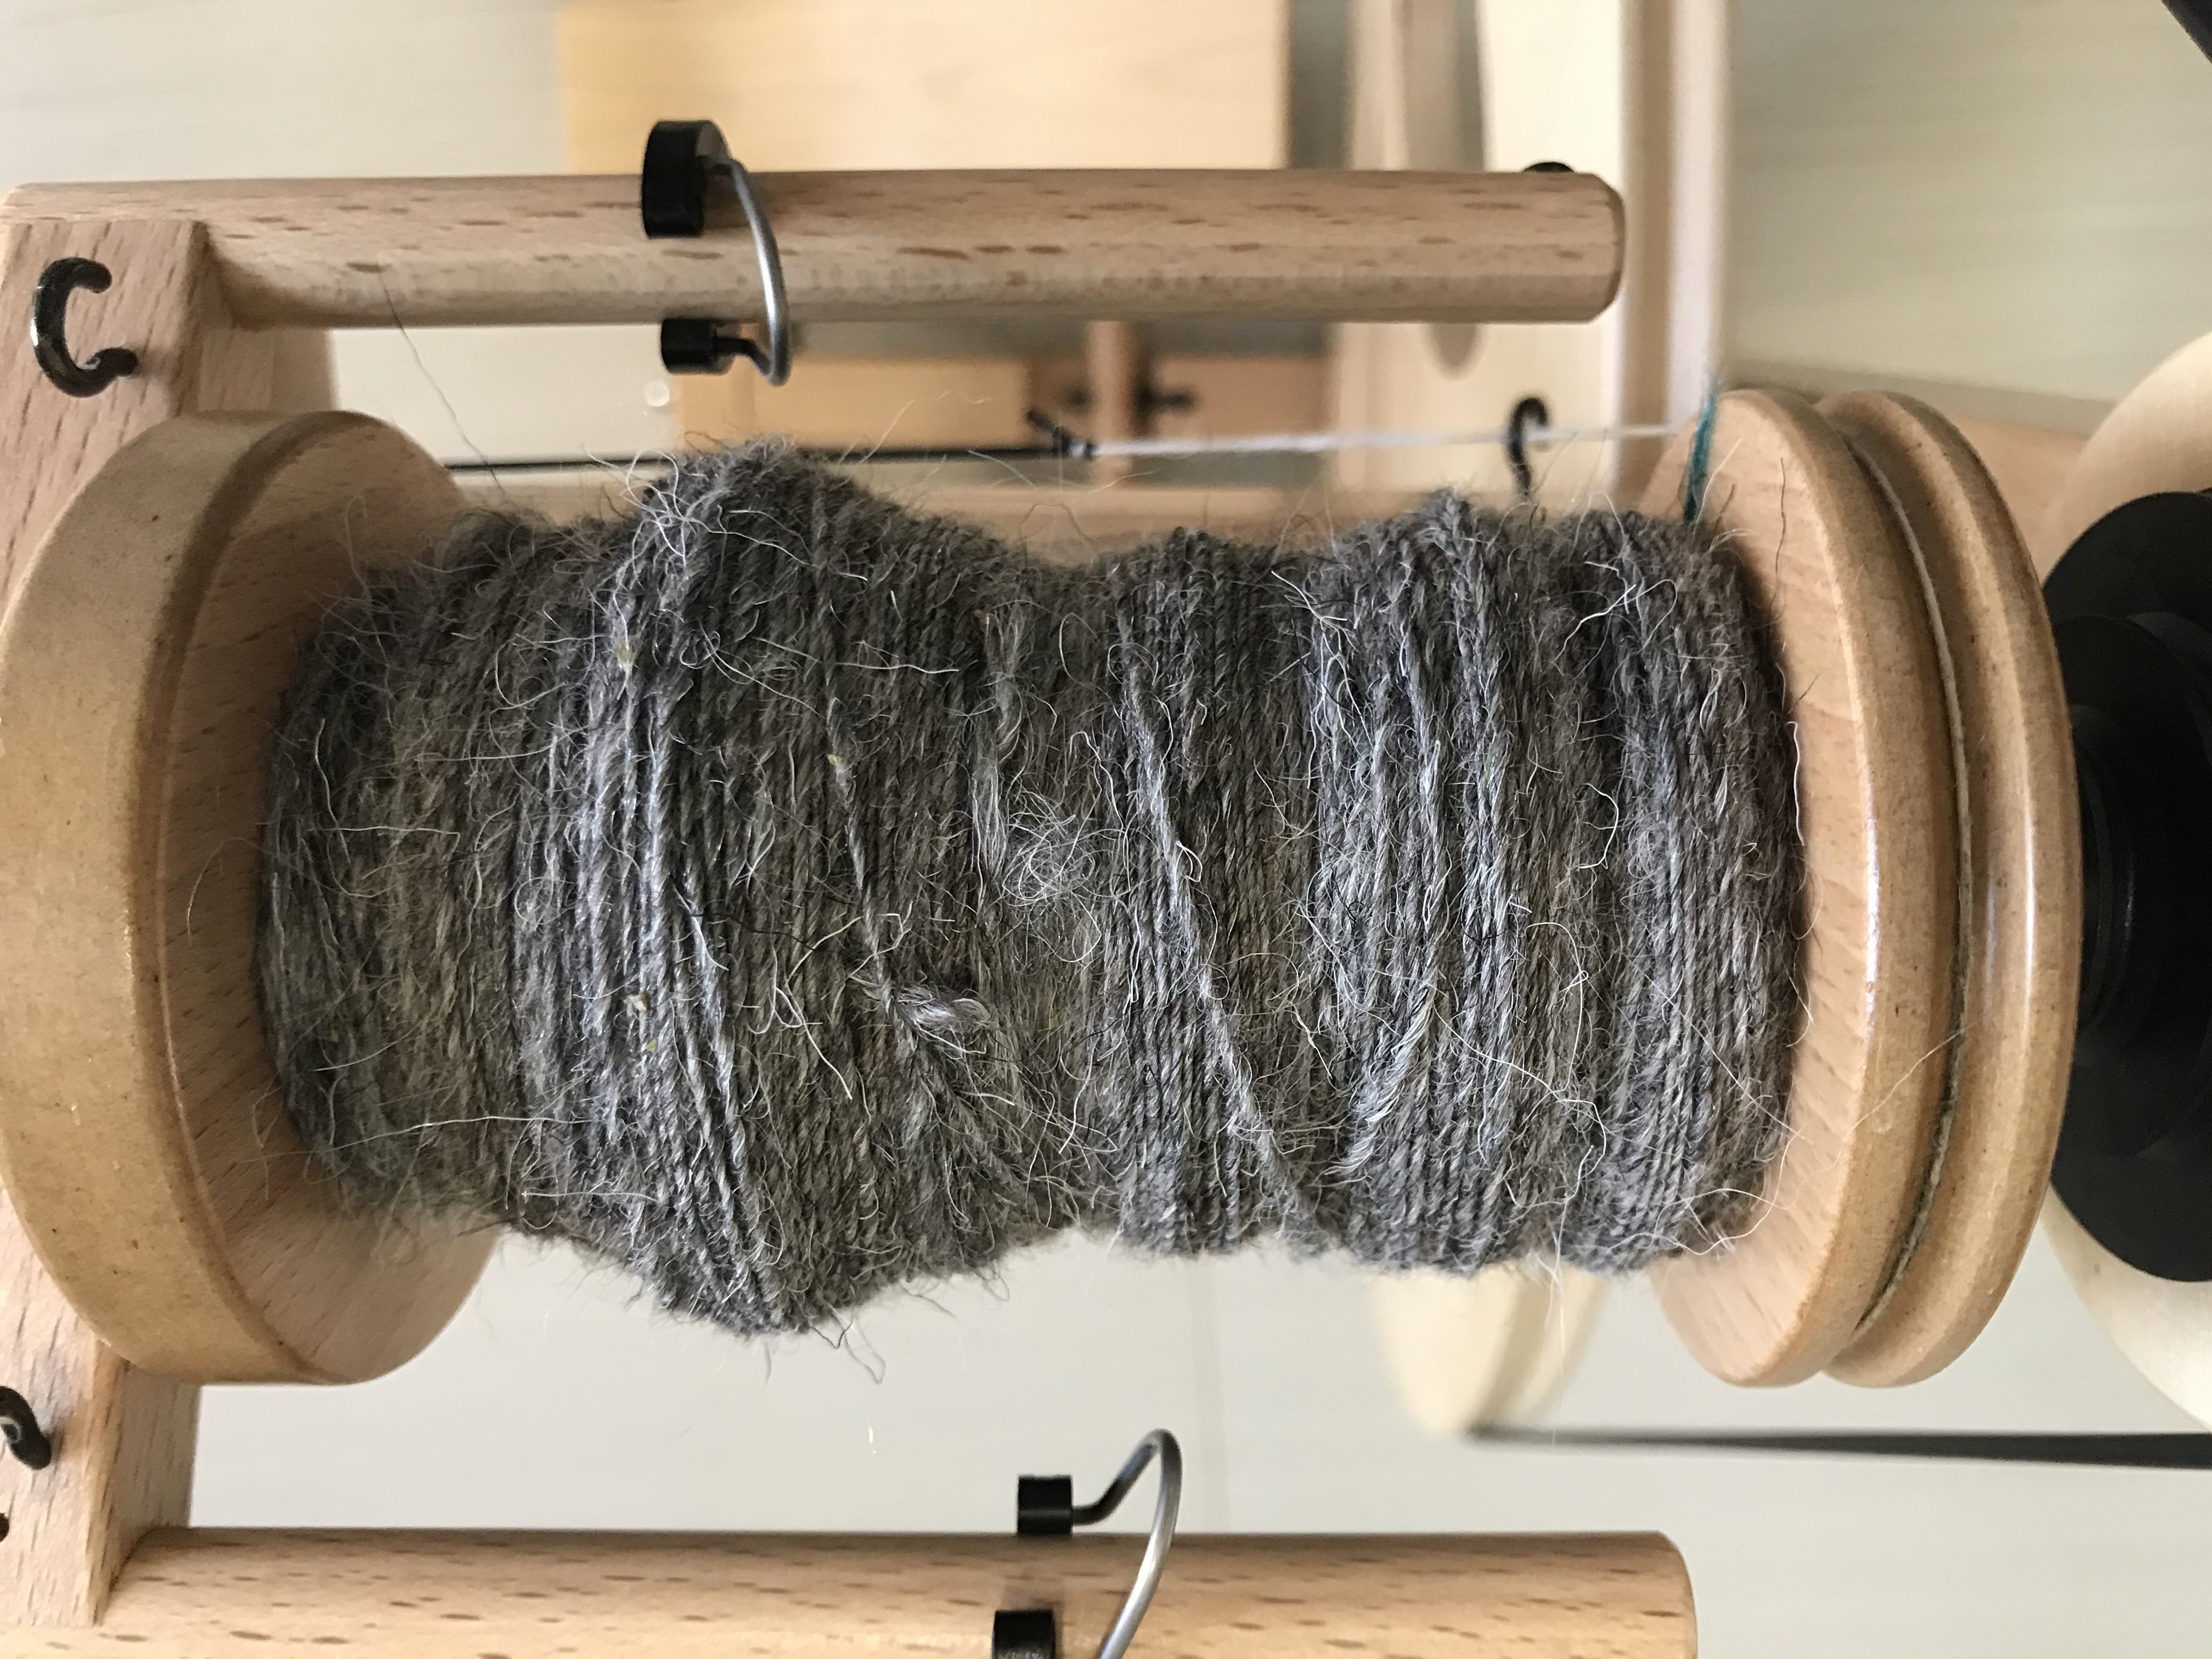
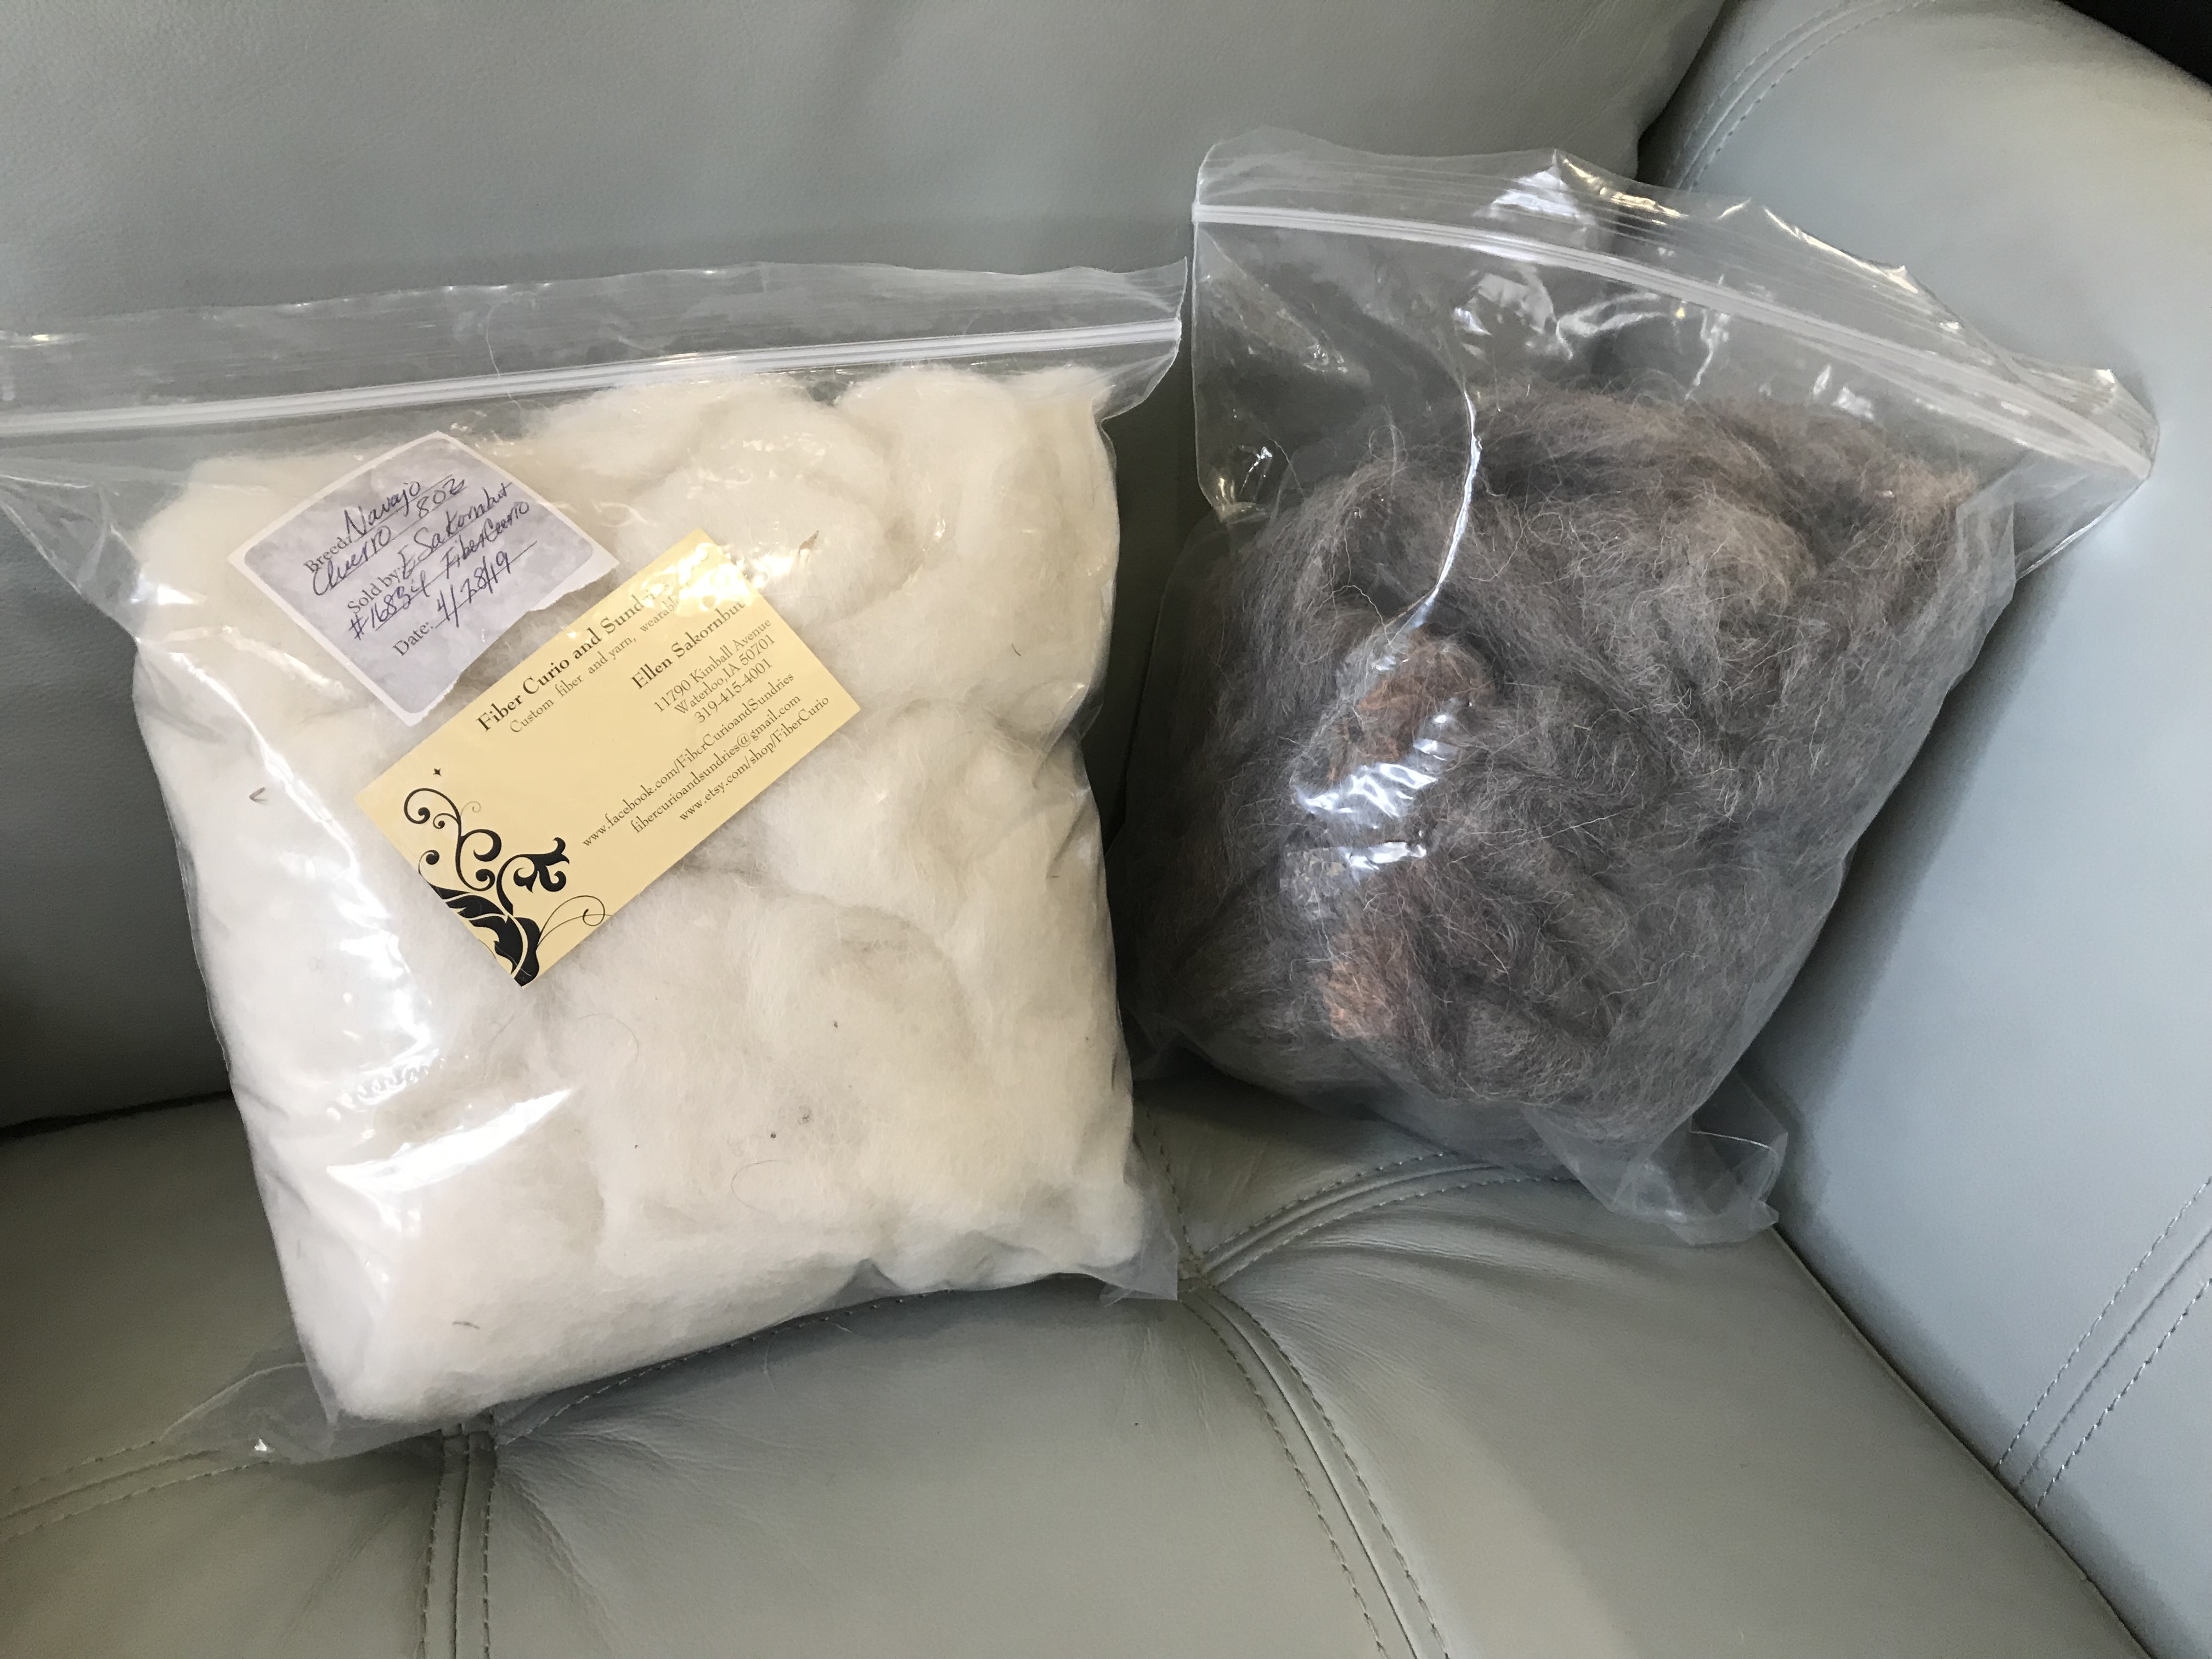
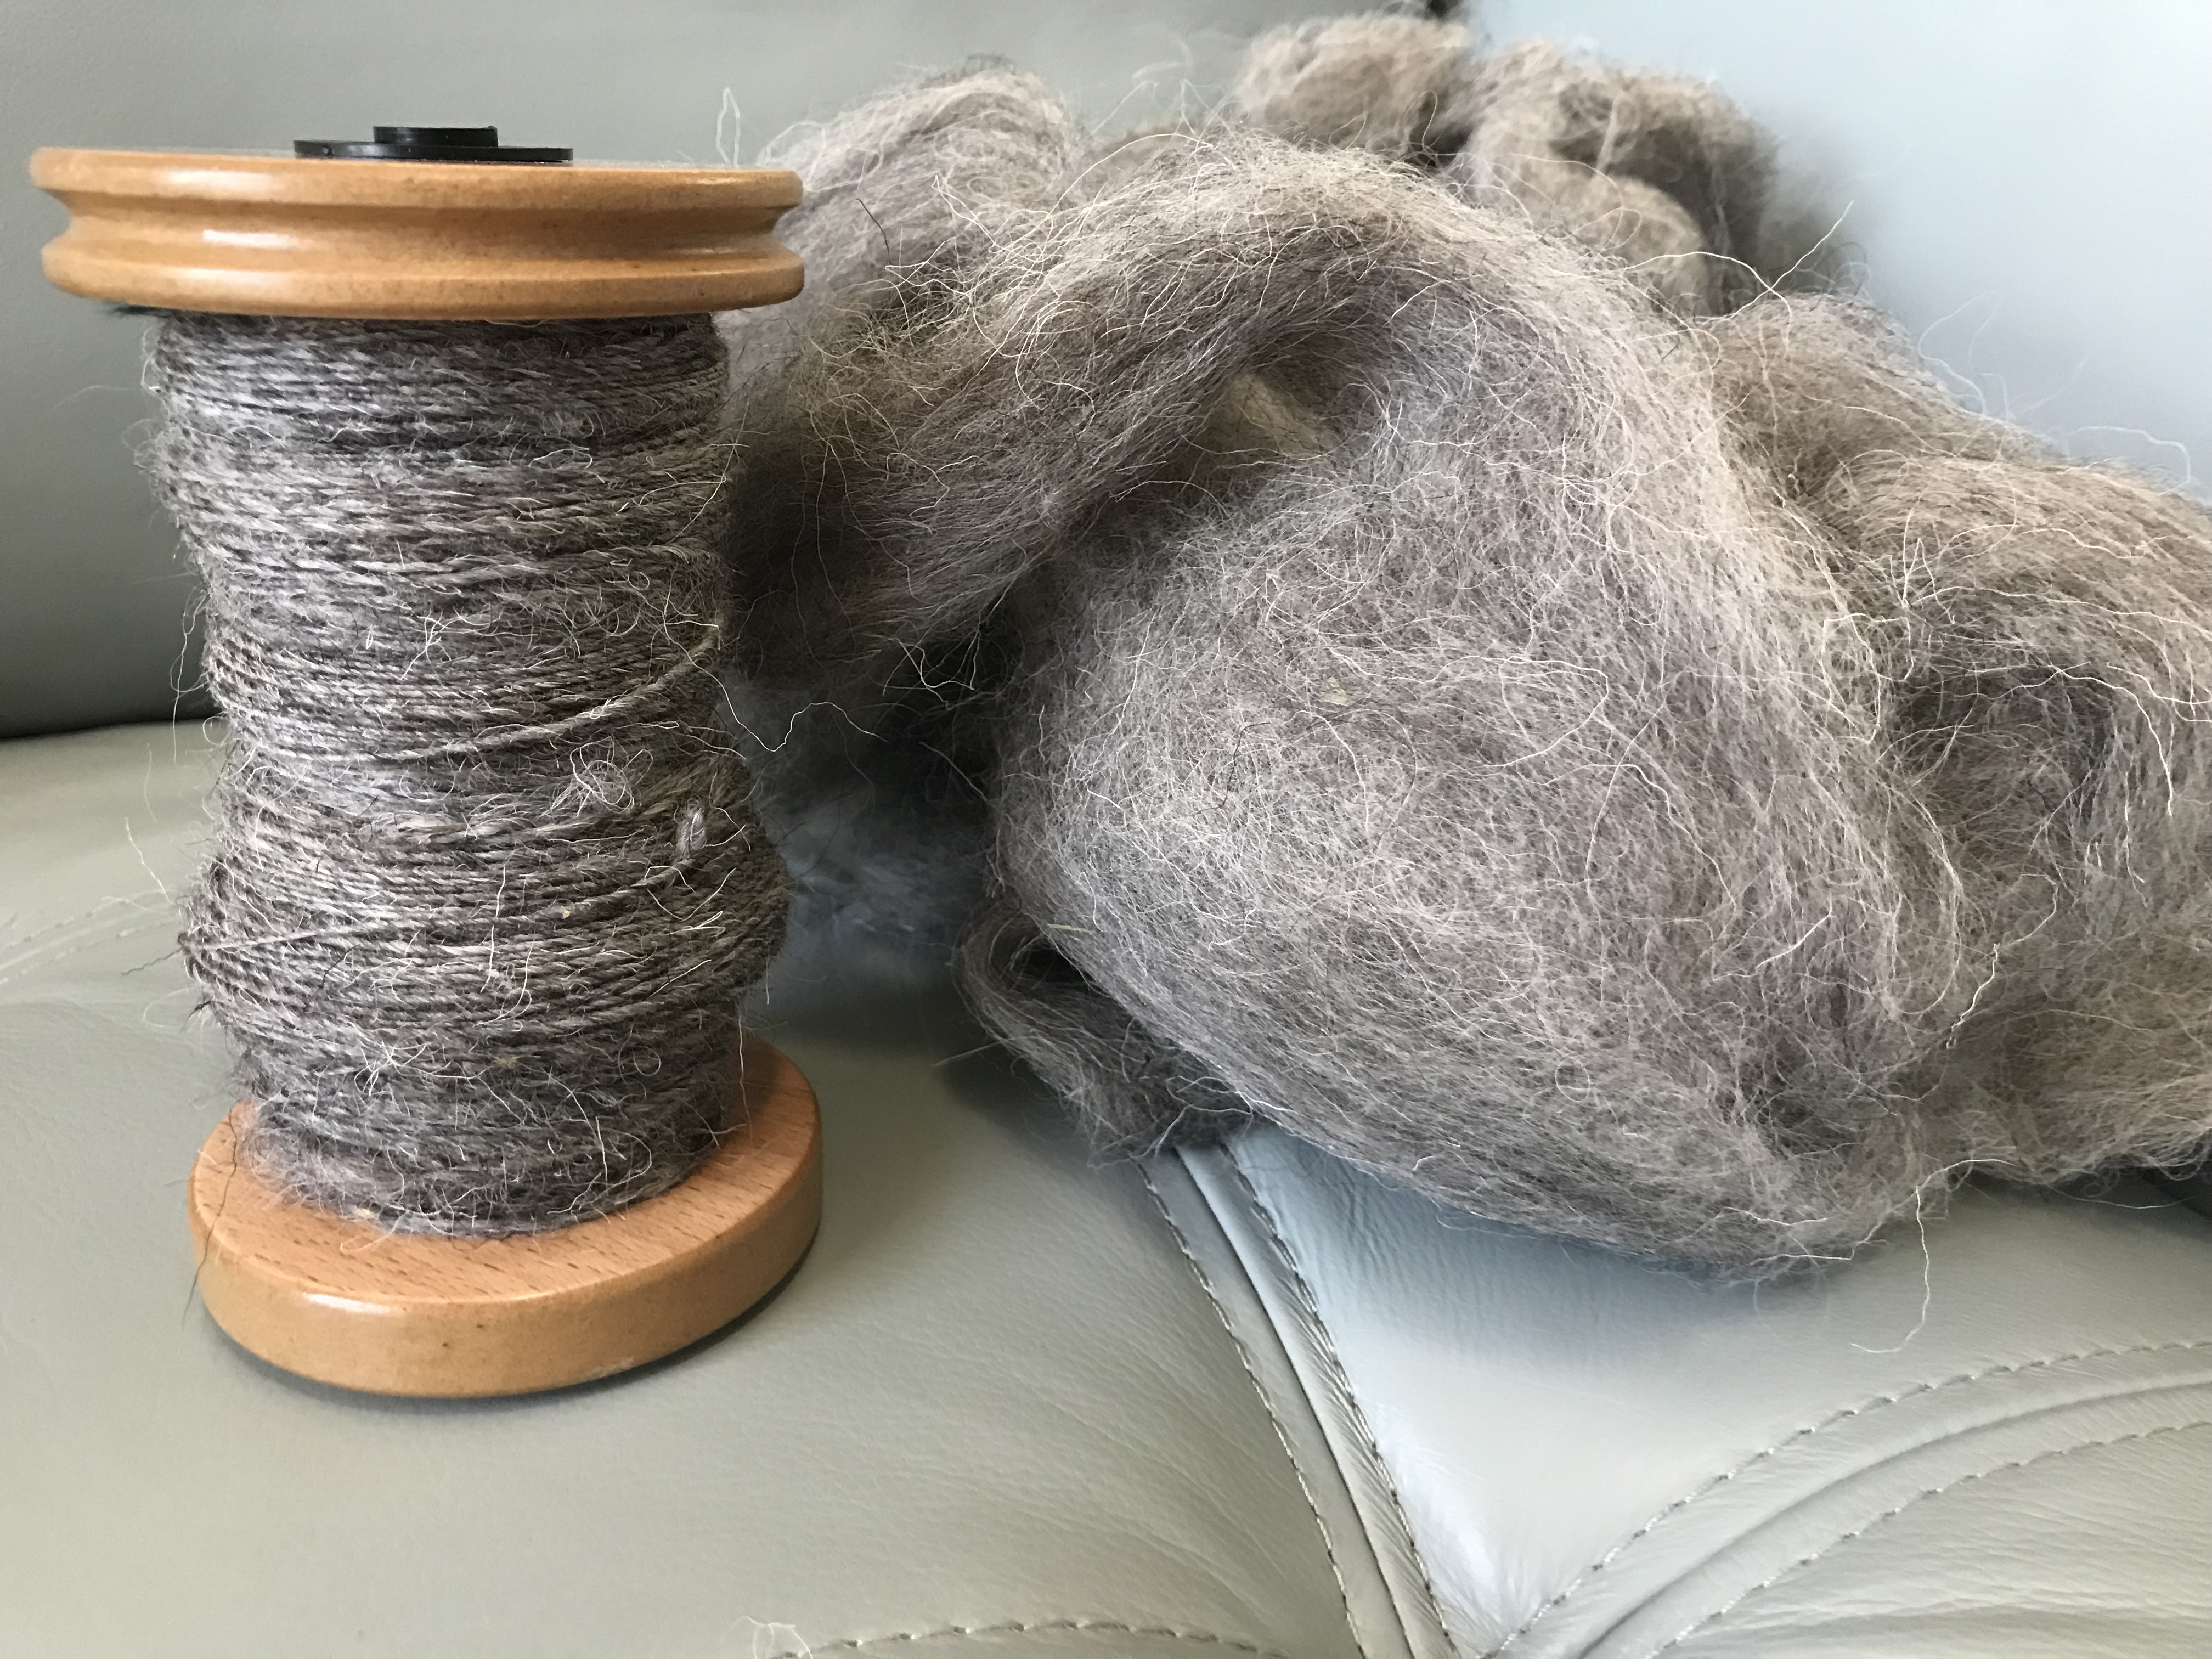
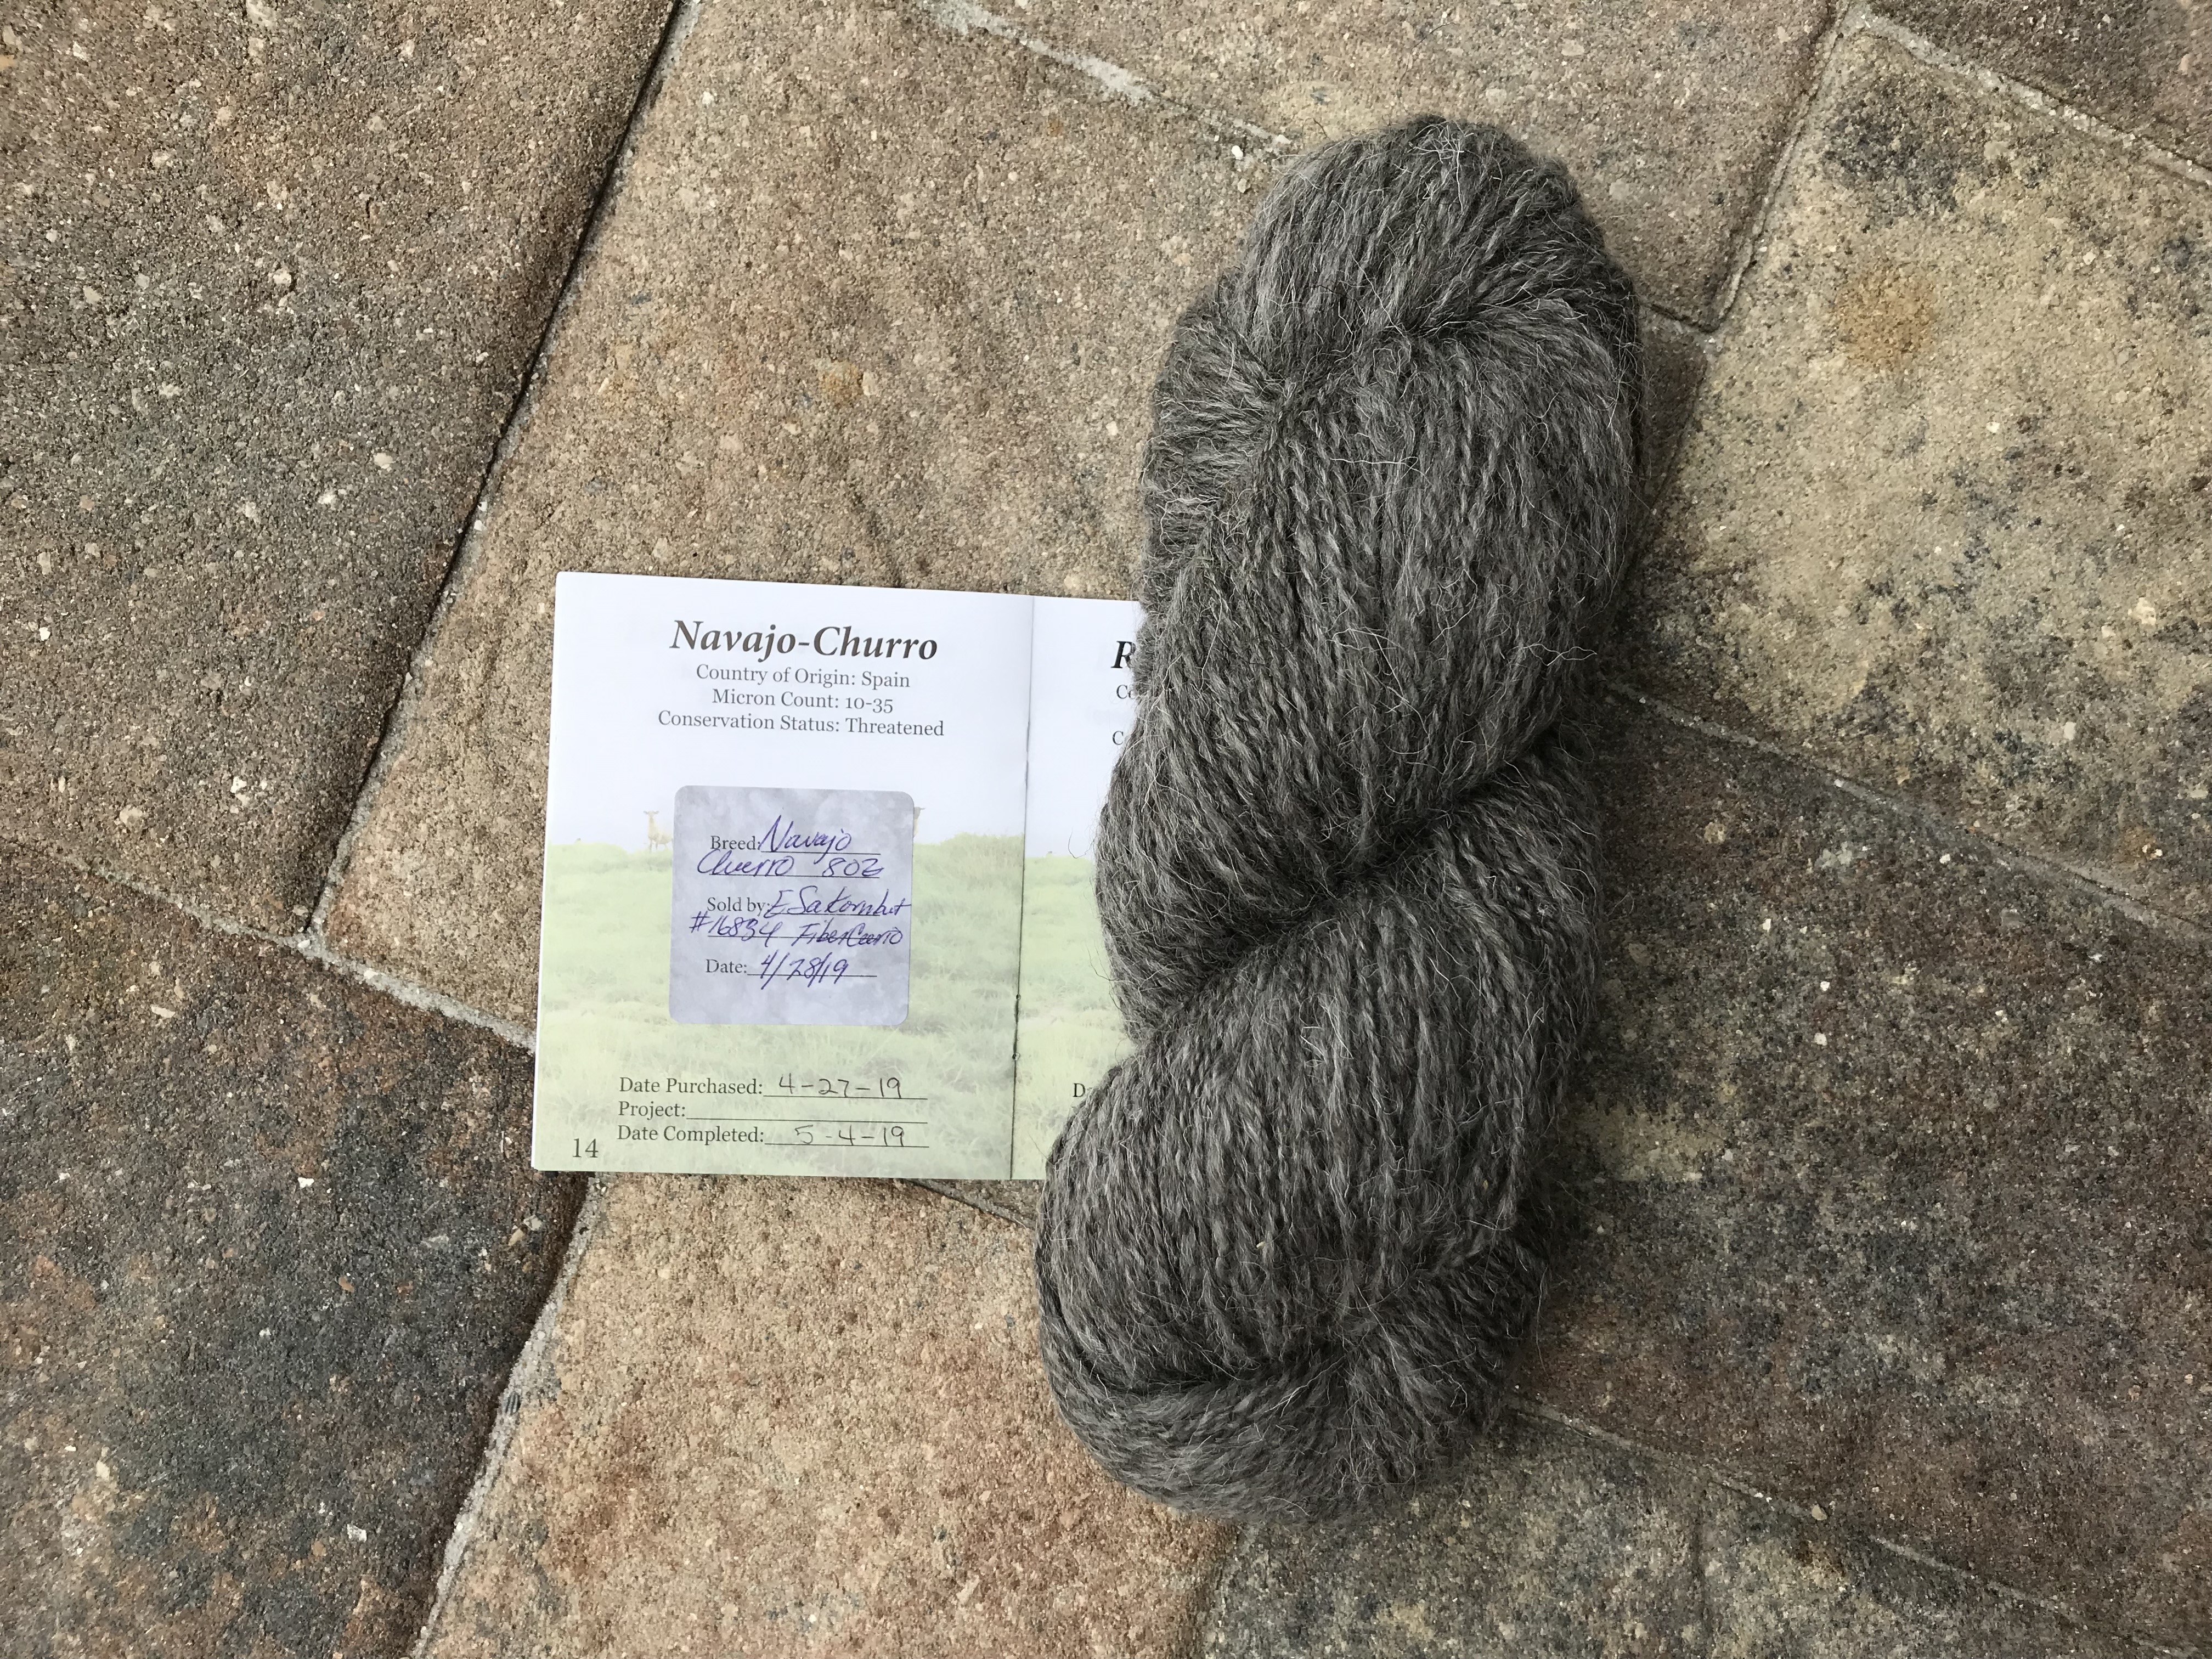
Breed 1 – Navaho-Churro
I loved spinning this fiber from the very first moment. I had taken the leap, signed up for the SE2SE program, and ordered my first fiber on Etsy. Until this time I had only ever gotten wool from the woman who taught me to spin.
I ordered two different colors from Fiber Curio and chose the darker (blue gray roving) to start.
I haven’t spun the light color yet but the dark one is gorgeous. The texture of this wool is so much different than anything I had spun before. It was less soft but spun up into a very strong, even yarn. And its SO pretty!
As proof of the project, you must take a picture of your work along with the passport page and the affixed sticker. It was fun finding just the right background setting.
After spinning my first fiber, Navaho-Churro, I was hooked. Though to be honest I was probably hooked after getting my sticker book in the mail. What is it about sticker books? I decided next to try to spin the four most critically endangered breeds. This would give me my first five to email in for a prize.
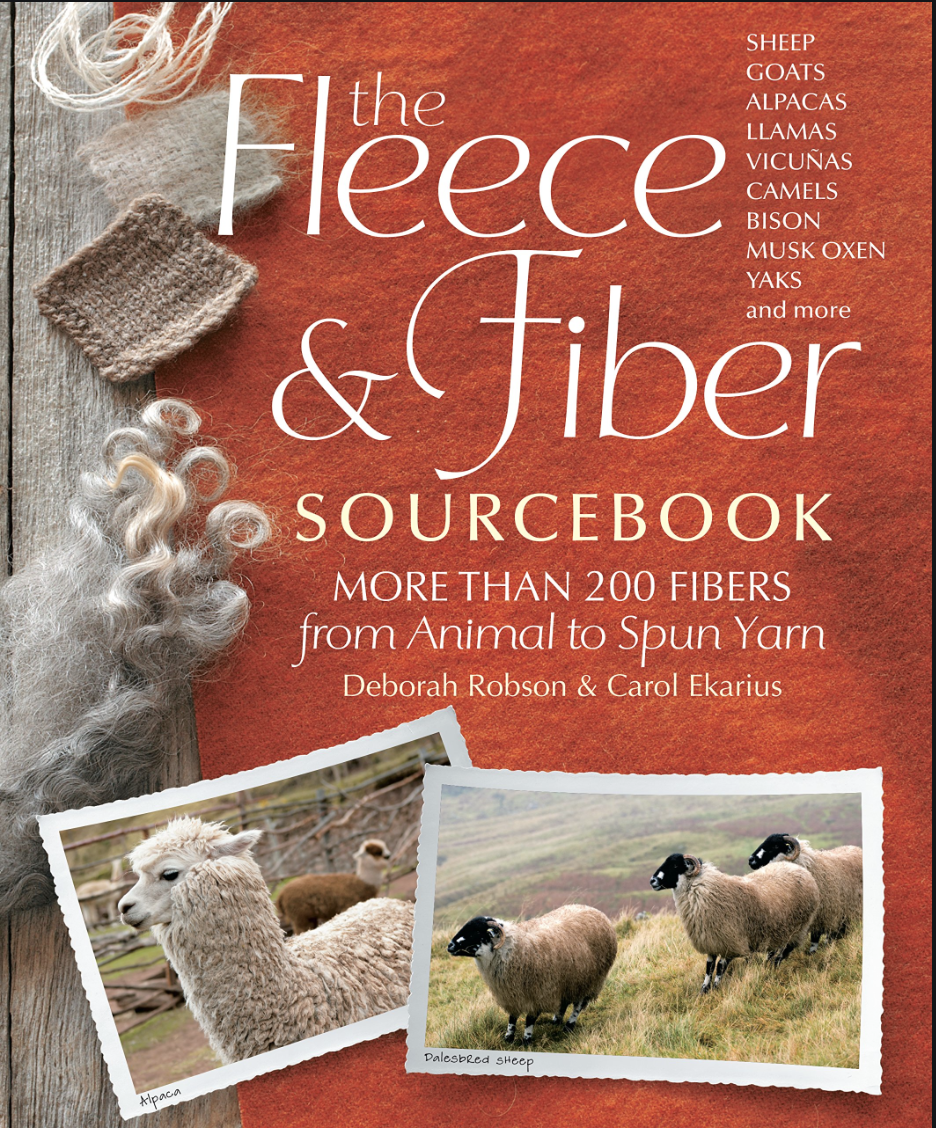
I learned a lot about each of the breeds from this book, The Fleece and Fiber Sourcebook. It describes the breed, its history, the characteristics of the fiber and gives prep and spinning tips.
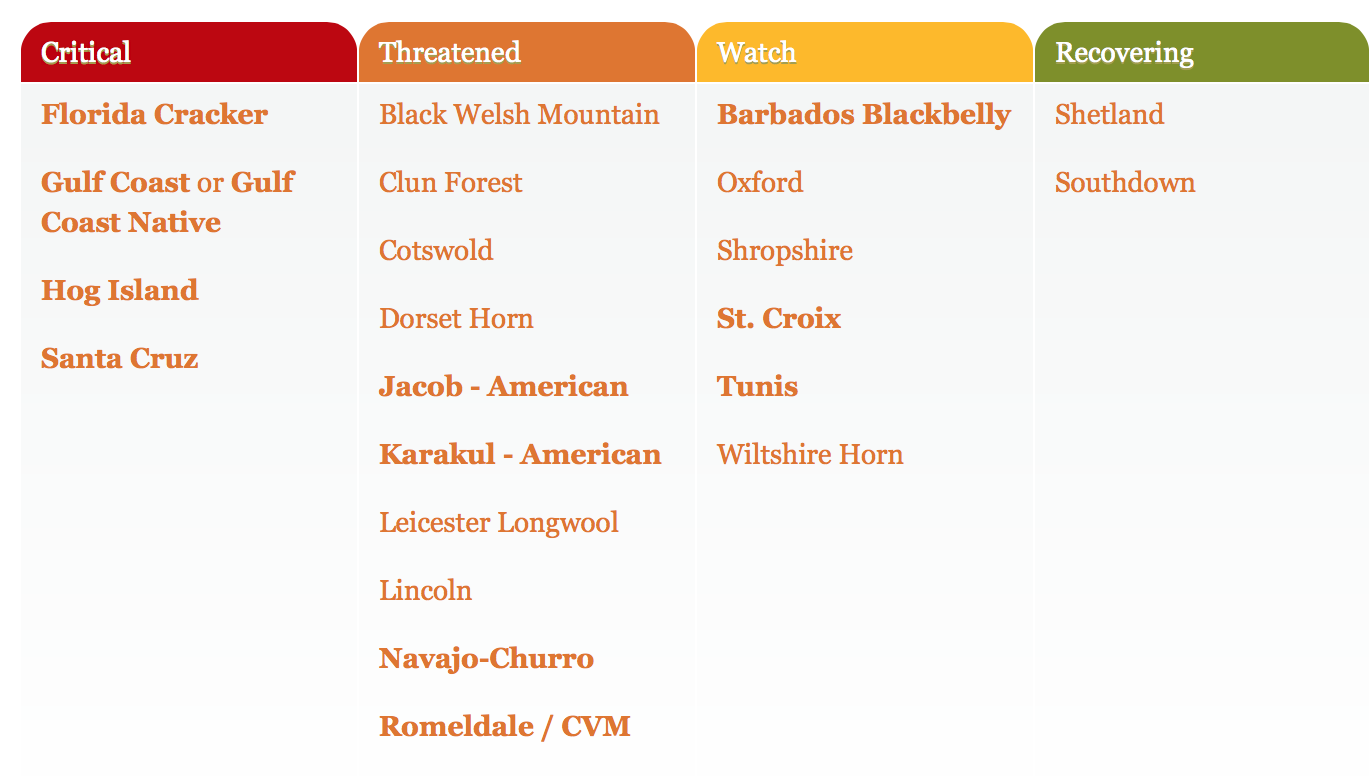
The critically endangered breeds all have one thing in common. They are feral breeds, meaning reverting to a wild state after the end of captivity or domestication. Most feral sheep breeds have been left to fend for themselves on islands (or some other geographical isolation) where predation low. The sheep that survive are often small and scrappy. Some shed their wool naturally if not sheared.
The sourcebook that I have has a publication date of 2011 and in it Florida Cracker is not yet recognized as a separate breed from the Gulf Coast Native. The Livestock Conservancy does recognize this as a separate, though likely related, breed.
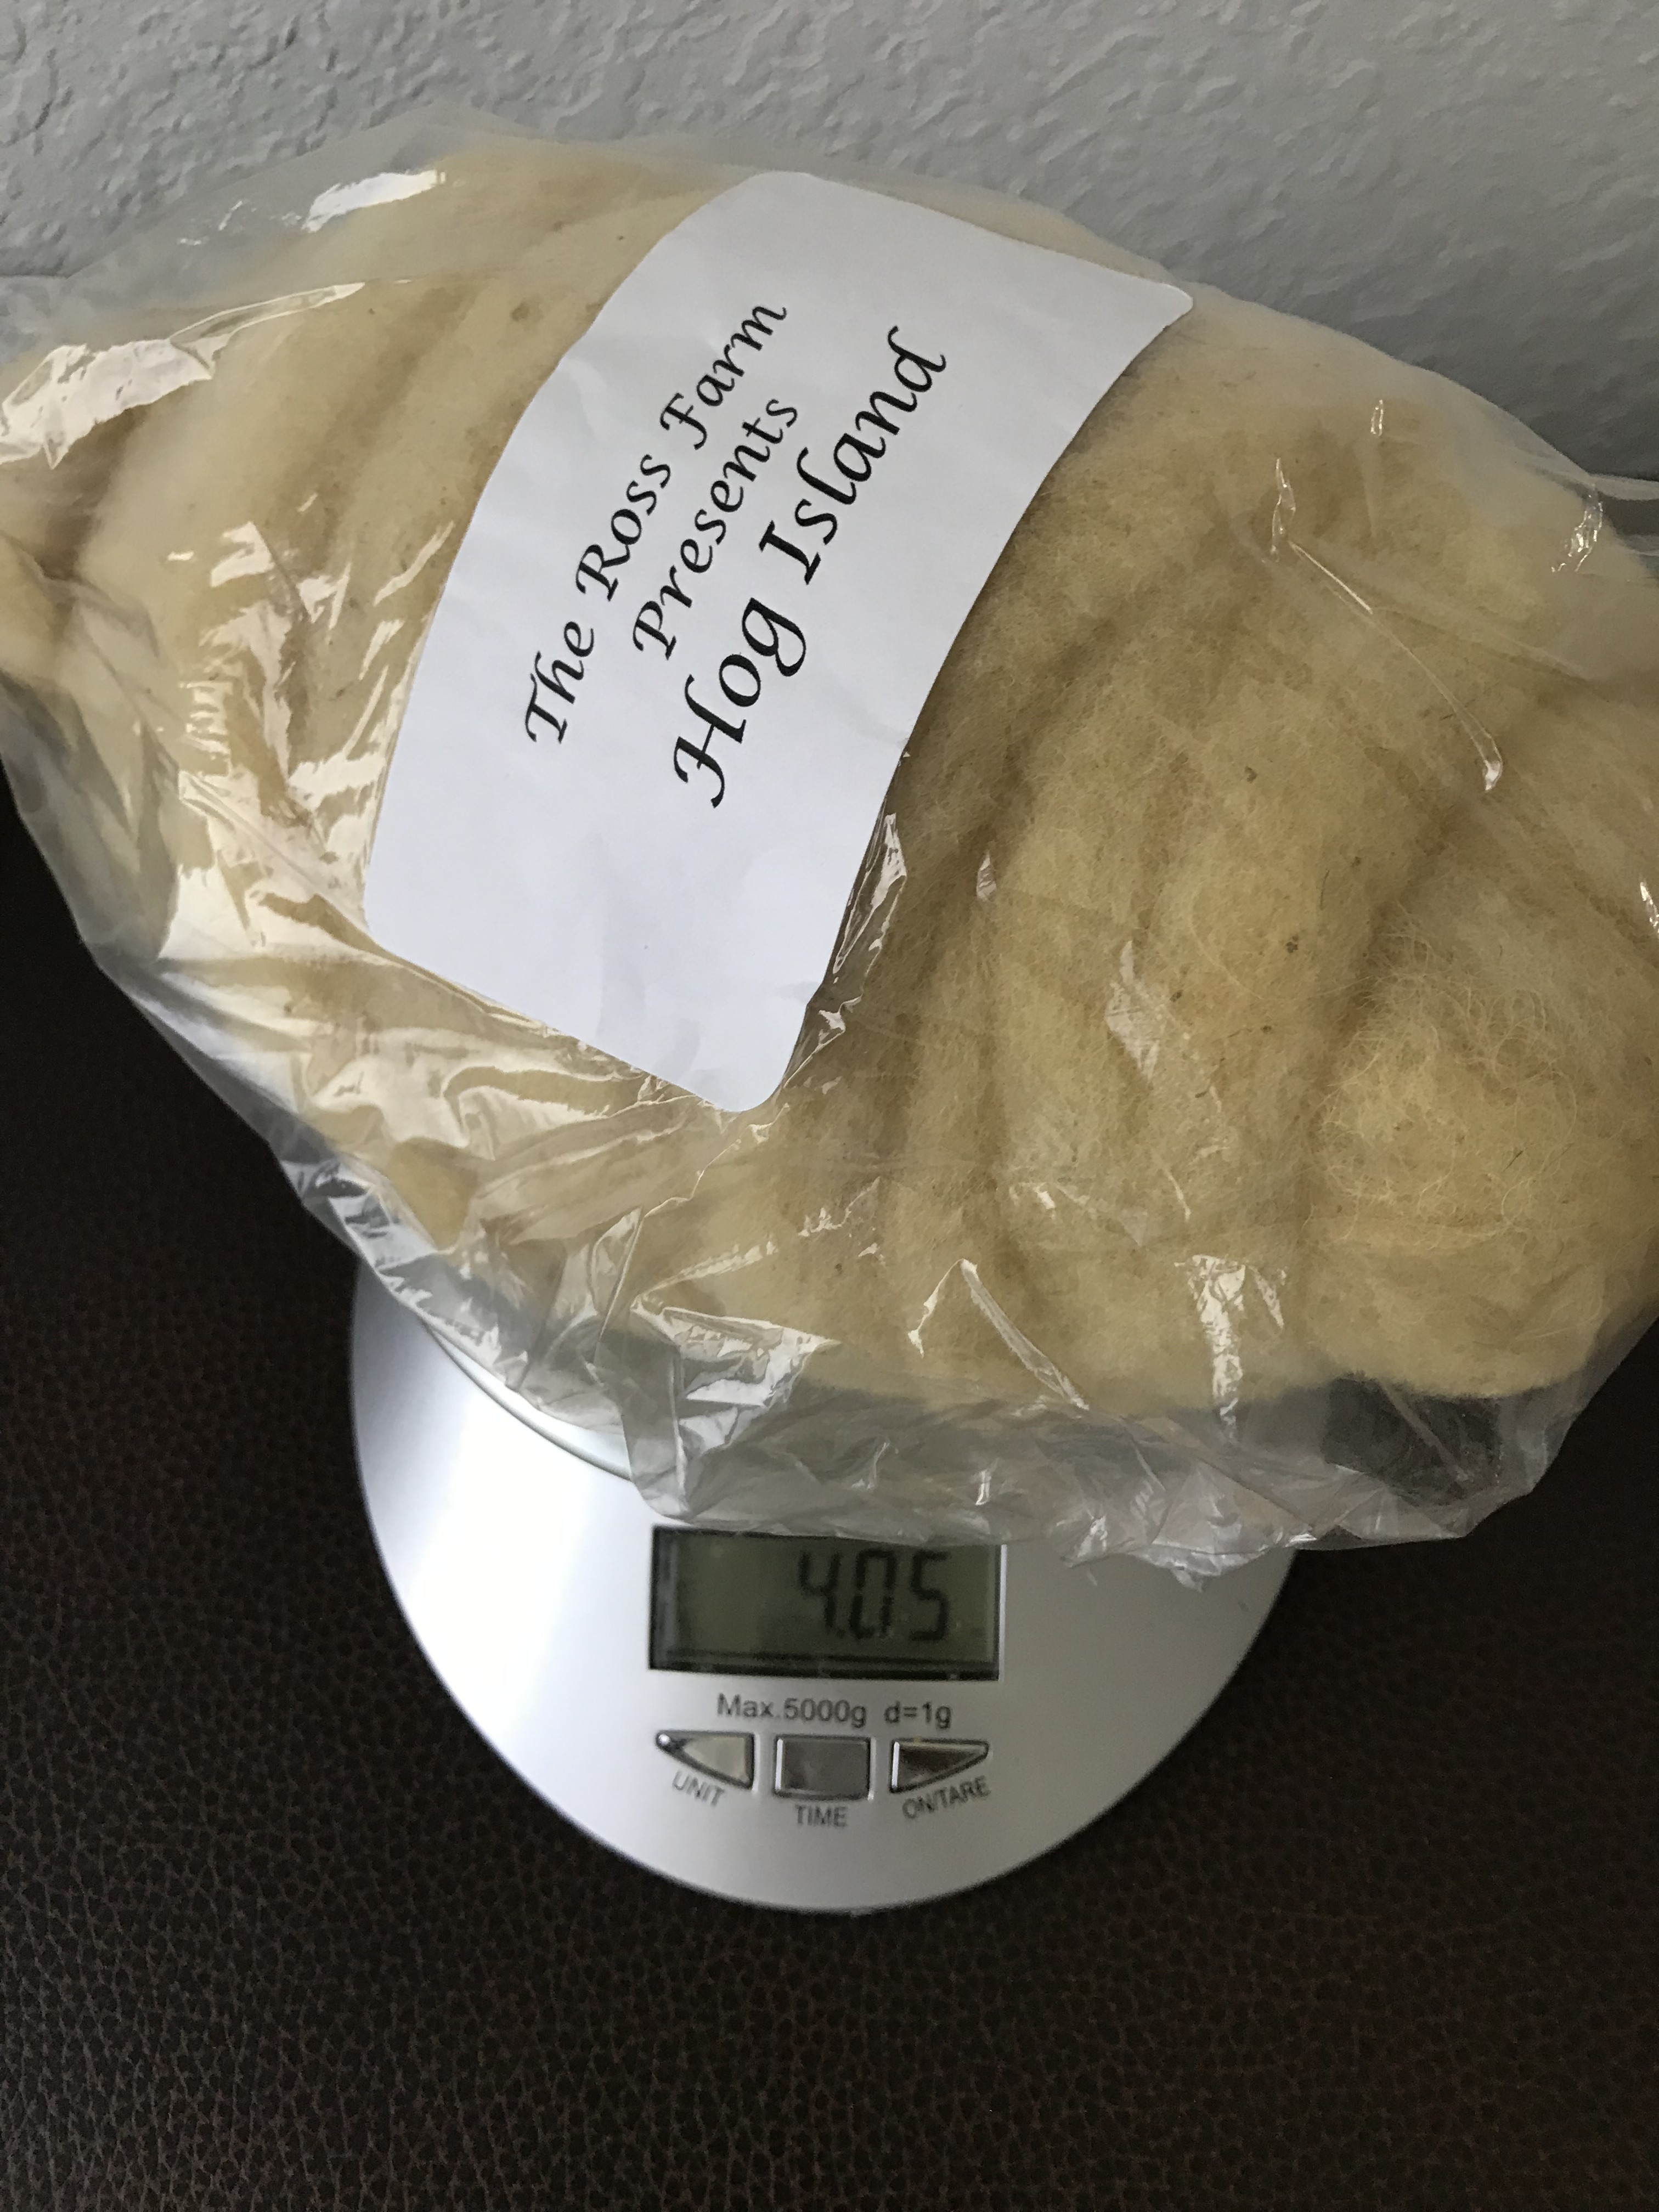
Breed 2 – Hog Island
Hog(g) Island sheep are the descendants of sheep raised communally on a barrier island off the coast of Virginia. The sheep became feral when the humans abandon the island in 1933 after a devastating storm. After many generations on their own, they were removed from the island in 1974 to encourage the return of the native grasses to the island.
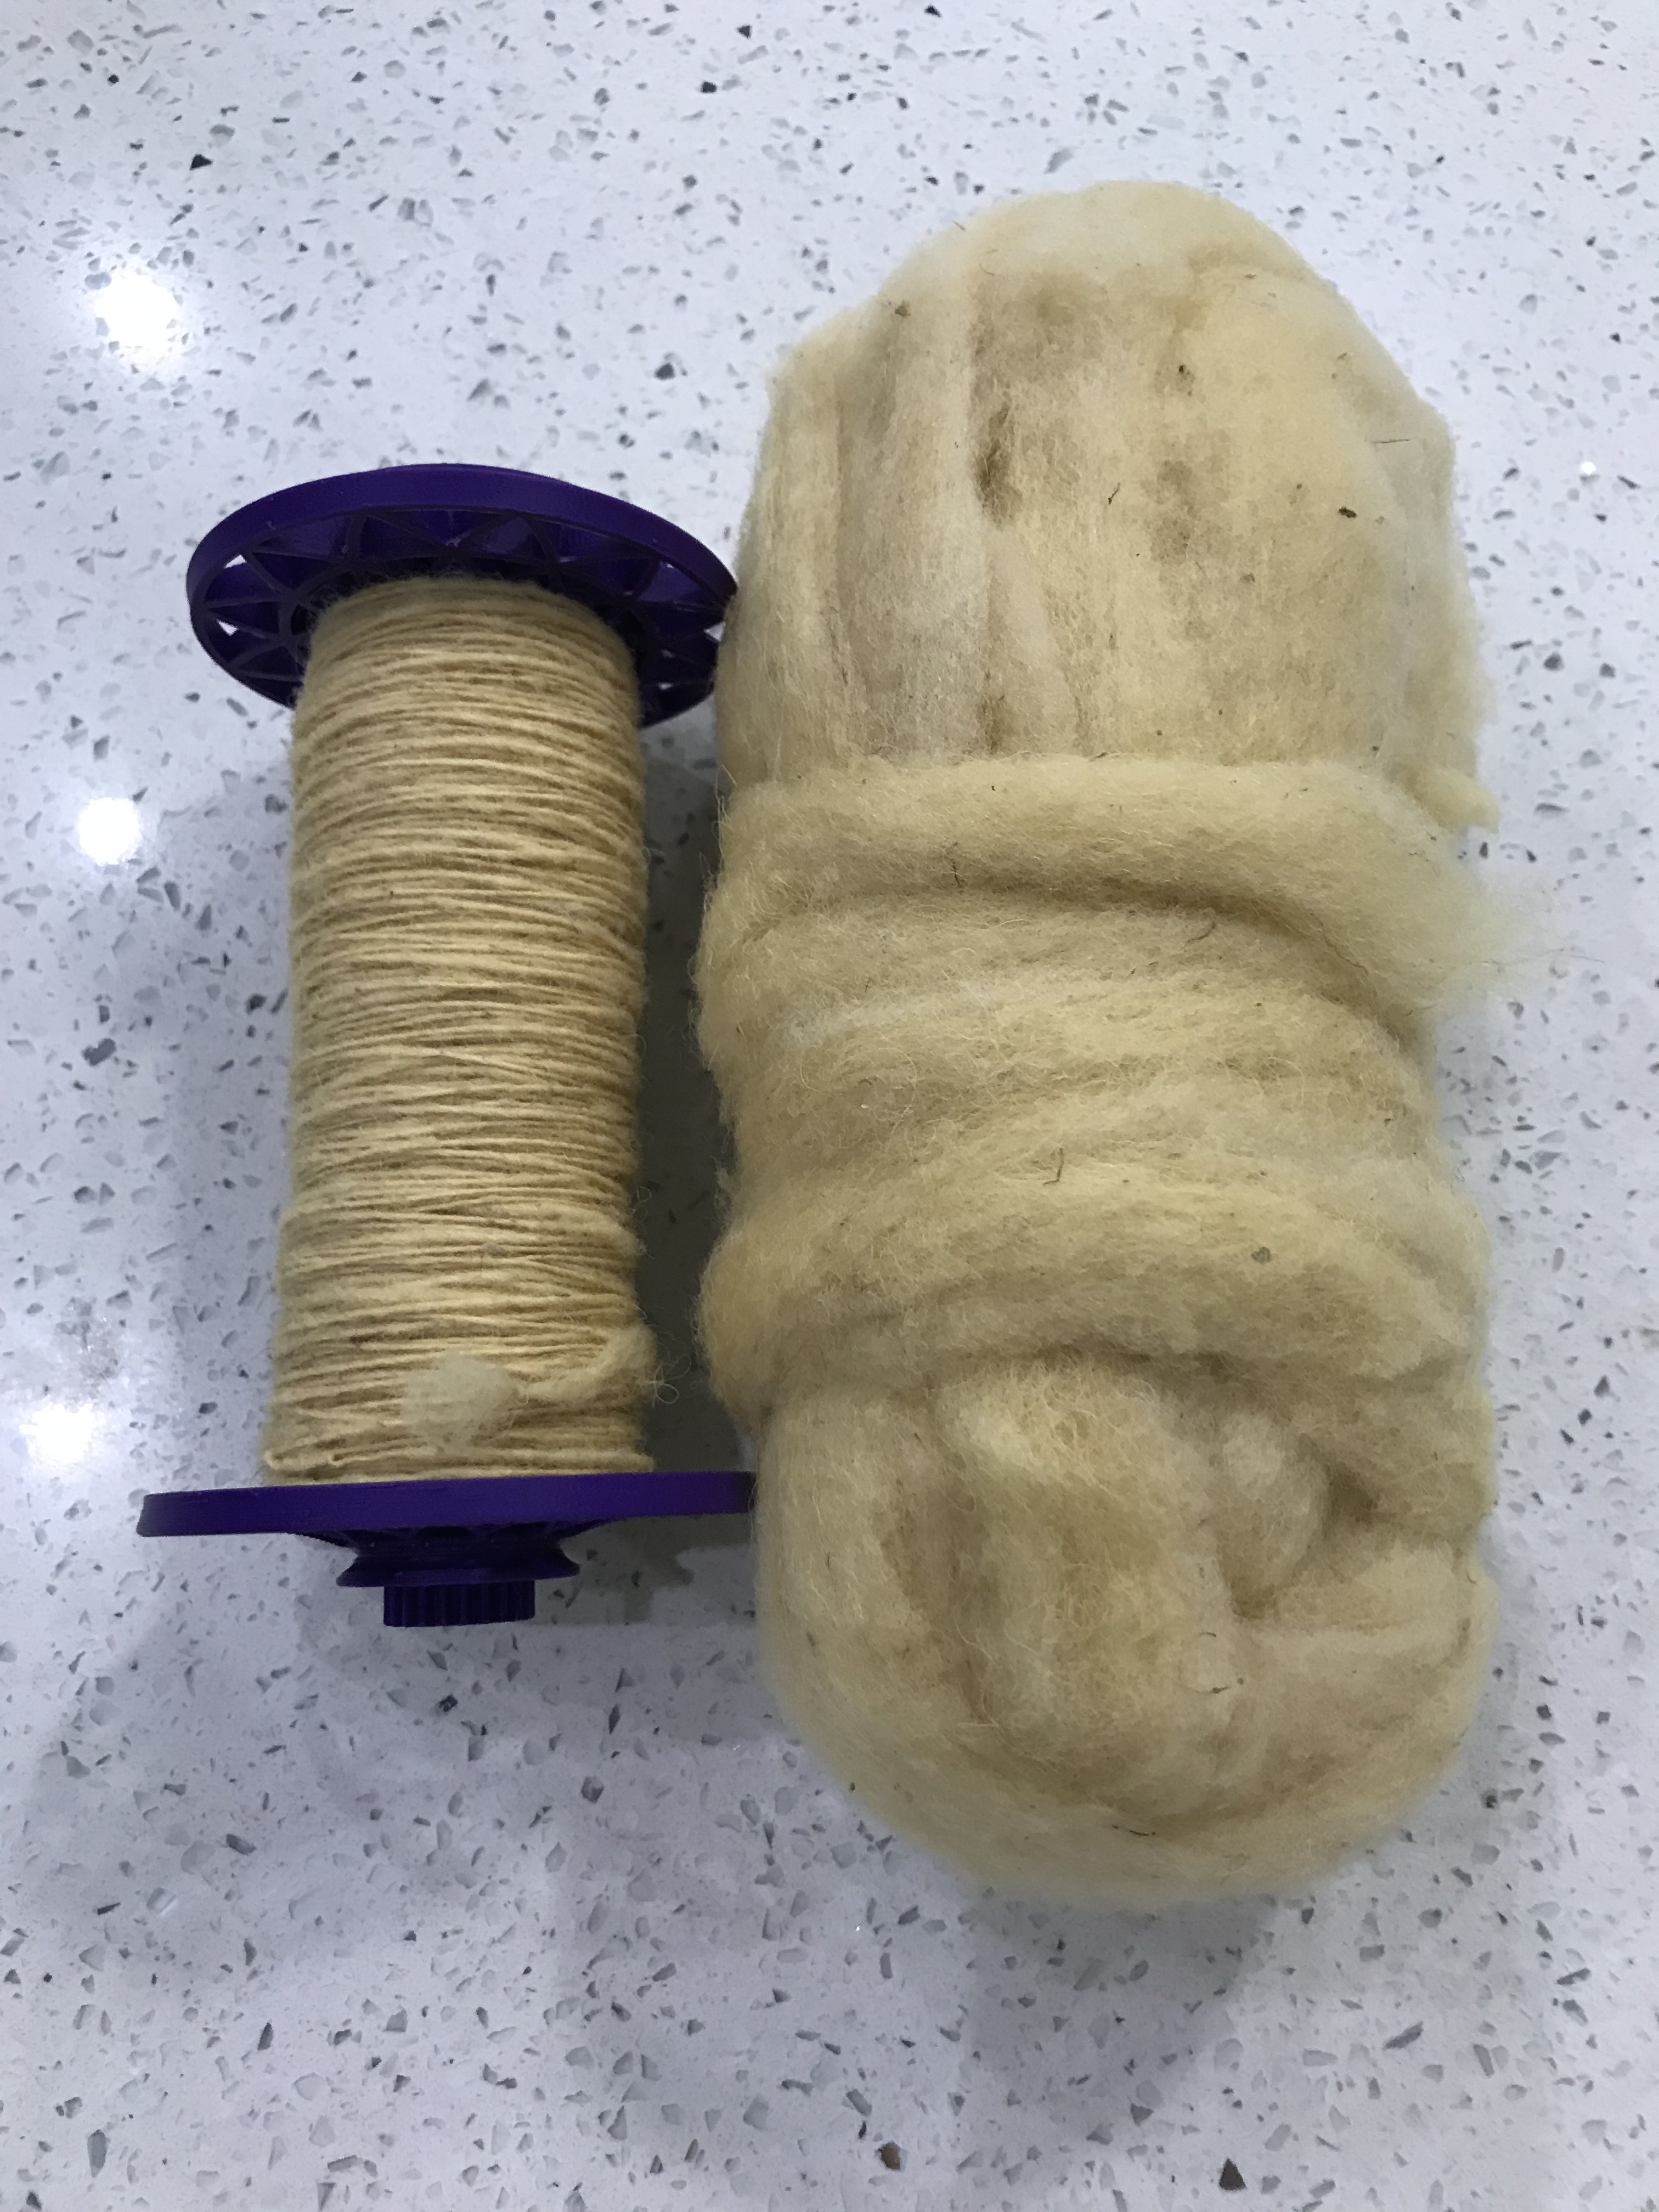
When I start spinning, I always divide the fiber in half by weight. In this way, I can spin each half and then ply them together. It never comes out exactly even, but I’m also getting pretty good at plying from the two ends of a ball that I have wound from whatever is left on one bobbin.
This Hog Island fiber, from The Ross Farm, had more lanolin than other preparations I have spun. Not too much, just a bit more than I am used to. This is apparently common for sheep experiencing the survival pressure of harsh stormy weather on islands. As a result, my hands were really soft after spinning.
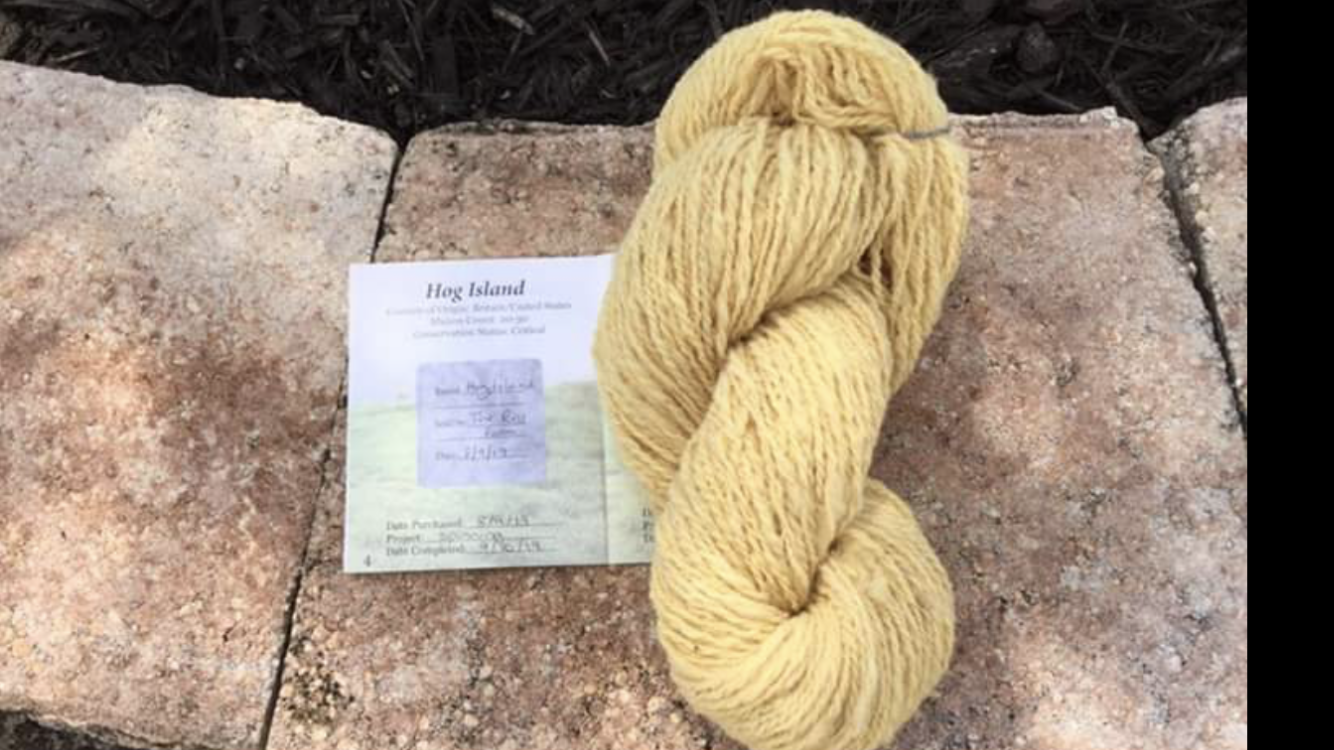
When I posted this picture on the Shave ‘Em to Save ‘Em Facebook page a reader asked what I had used to dye the yarn. I had asked the supplier why it was so yellow when I first got it. I knew that some types of yellowing were caused by undesirable processes. But she assured me that this was its natural color.
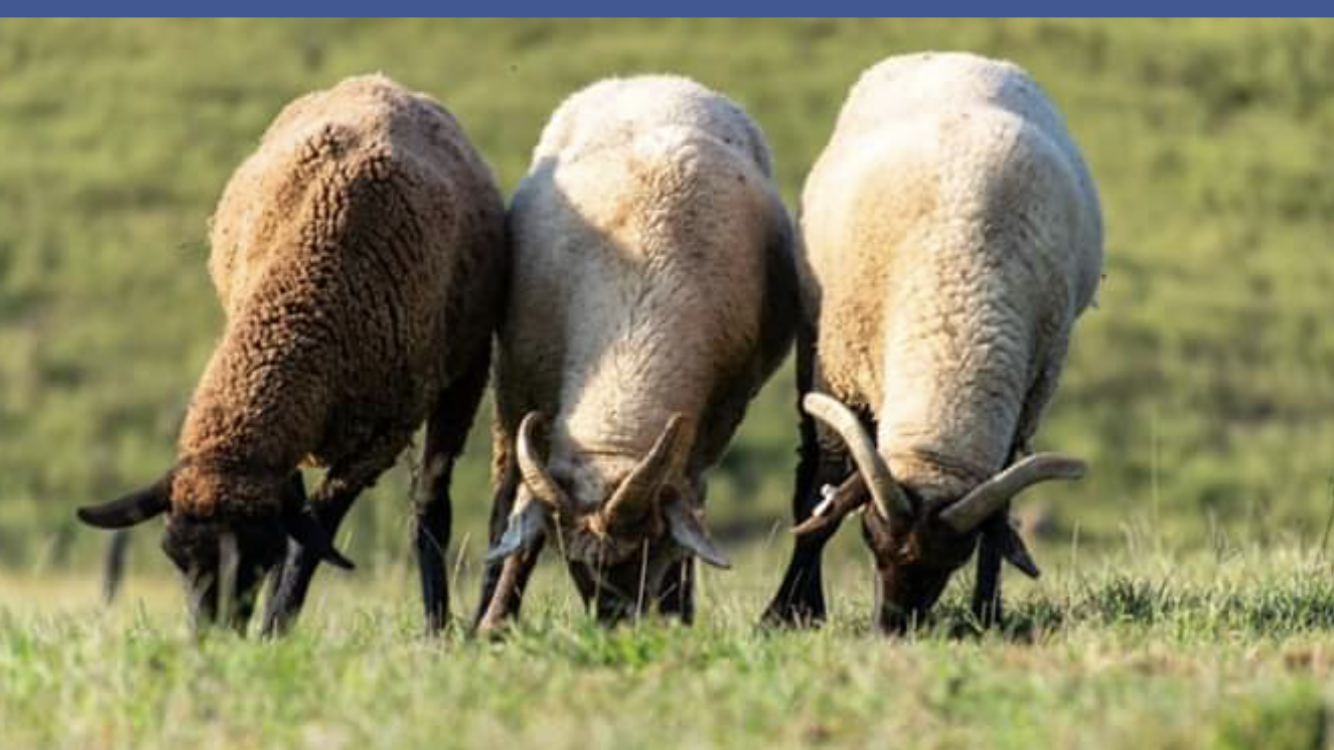
She even commented in the post with this picture of the sheep! 😍
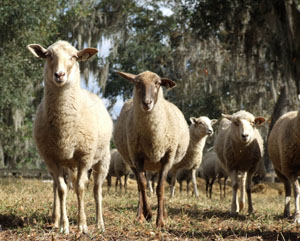
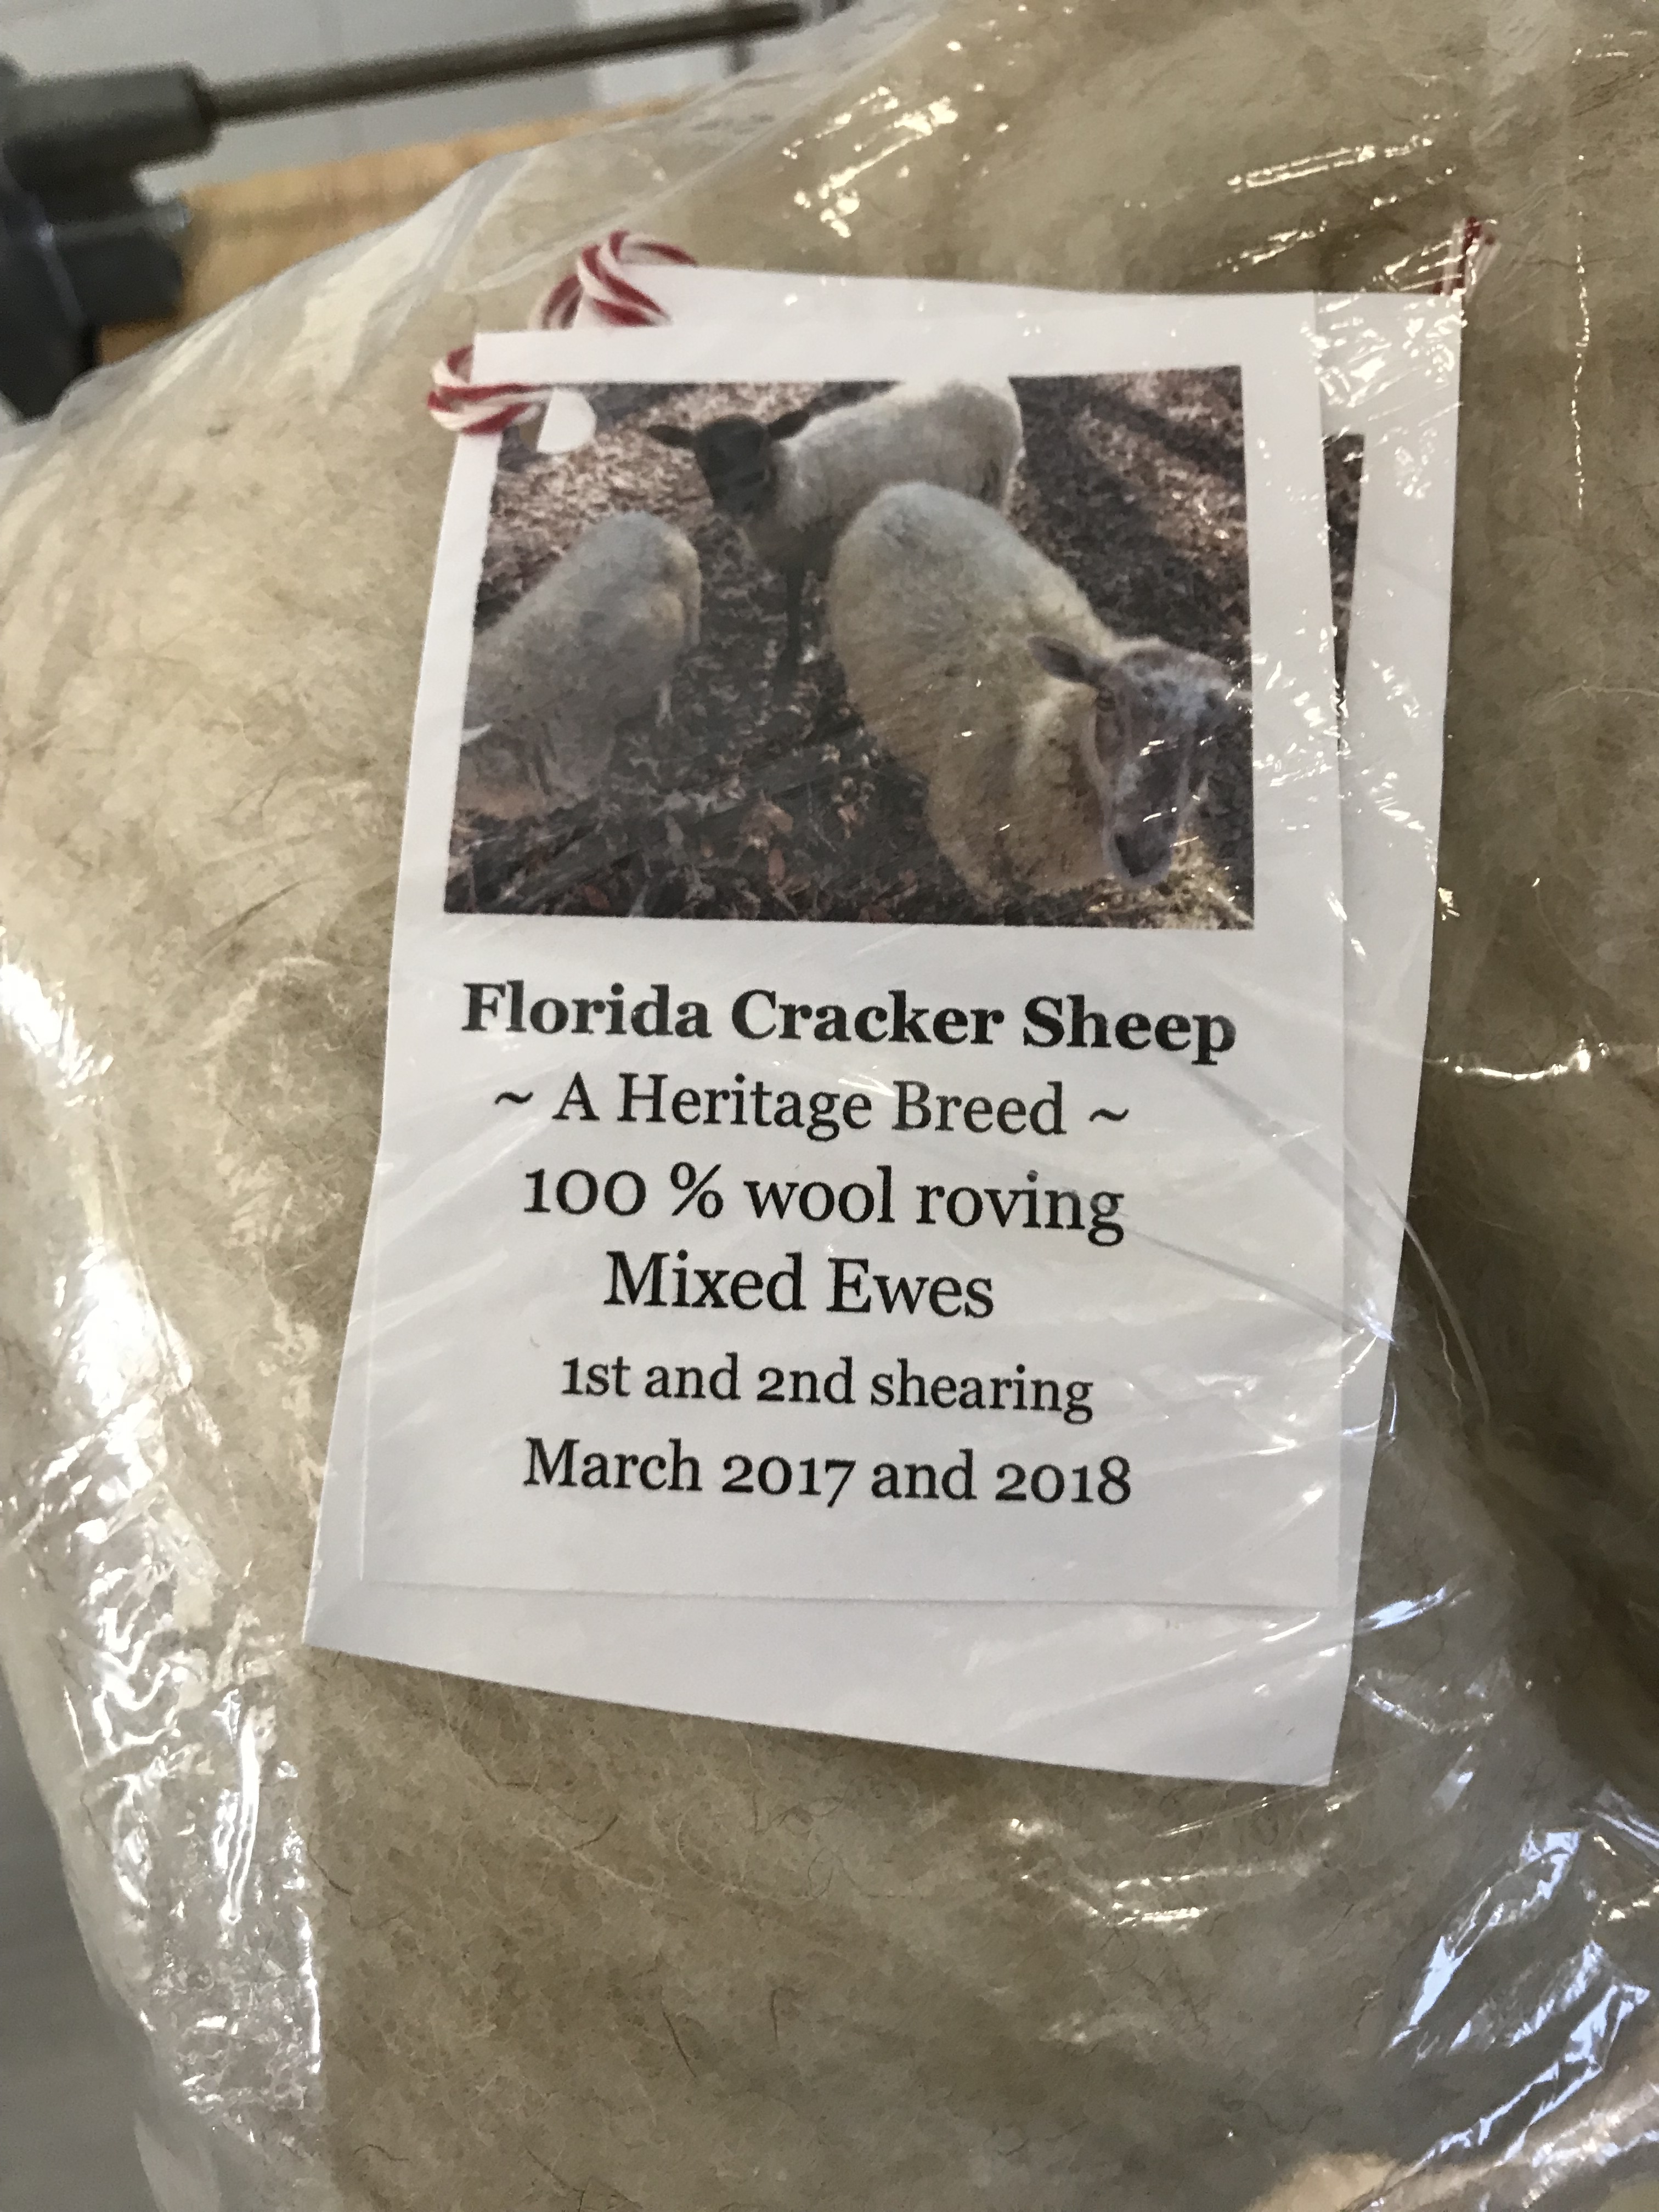
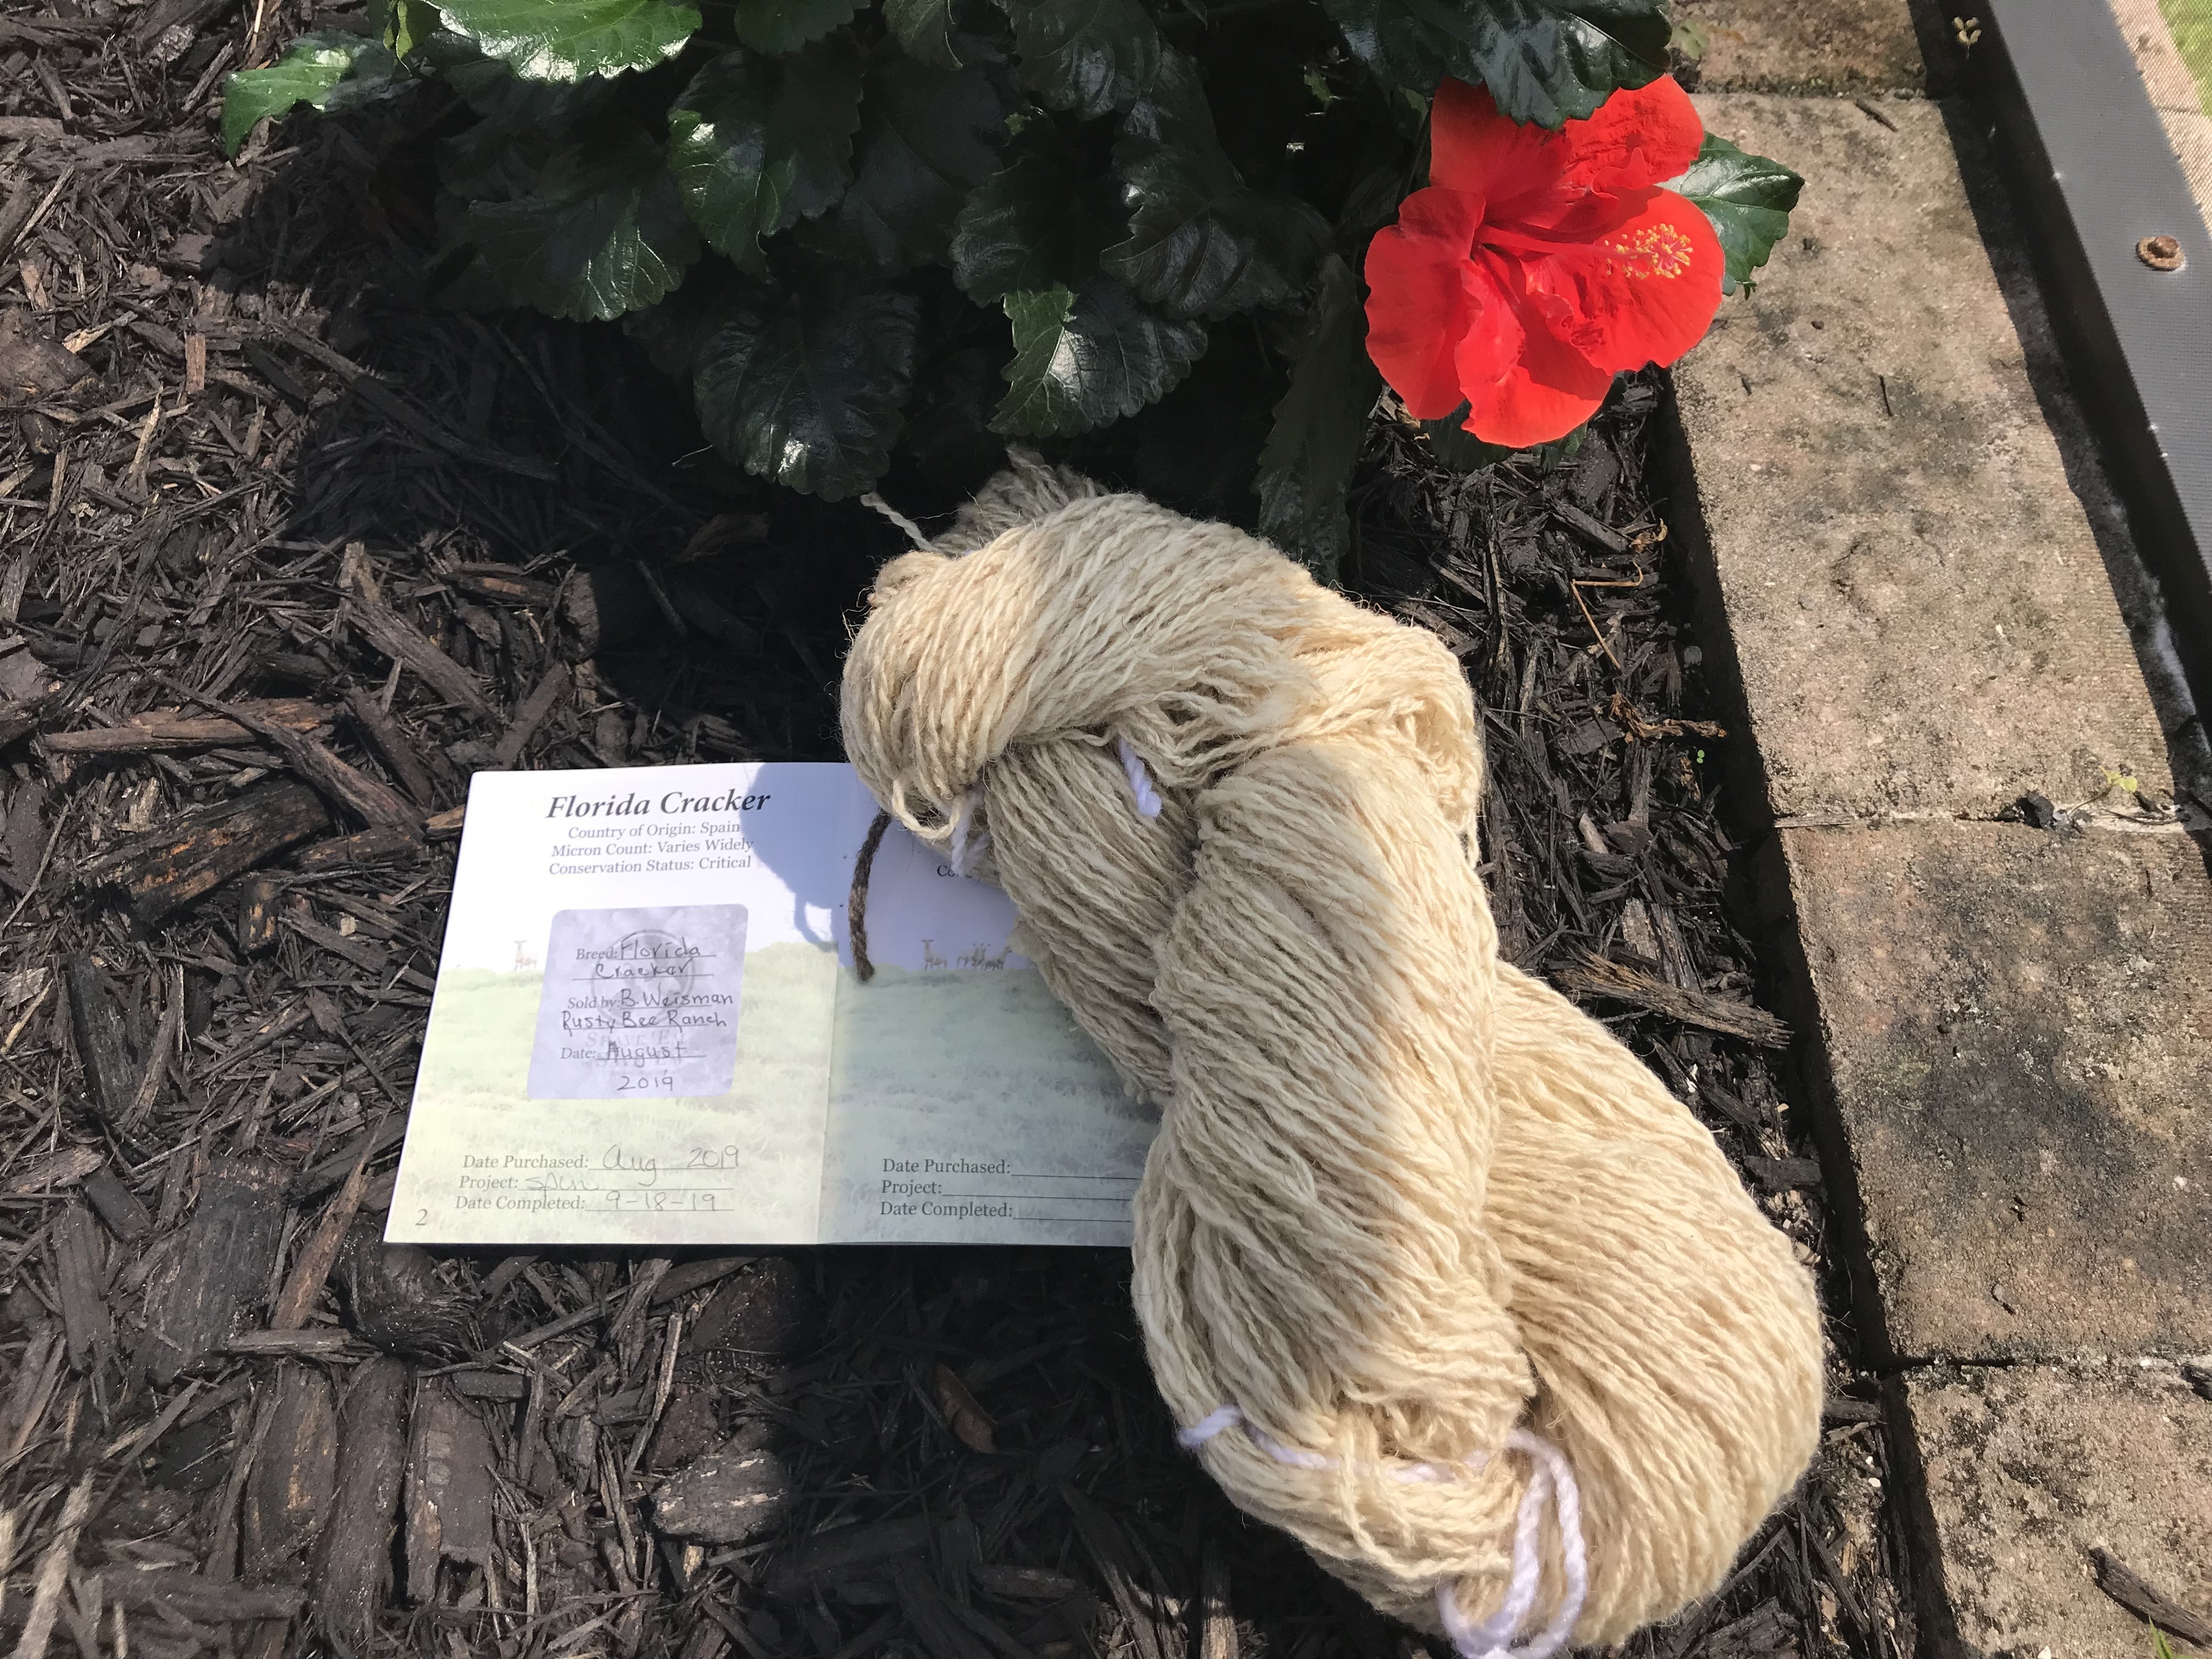
Breed 3 – Florida Cracker
According to the Livestock Conservancy, Florida Cracker is one of the oldest breeds in the United States. It is believed that these sheep are the descendants of sheep brought here in the 1500’s by the Spanish. Their characteristics are the results of hundreds of years of natural selection in the subtropical weather of Florida. Prior to 1949 they ranged free for most of the year, being brought in twice a year for shearing and marking lambs. They are very parasite resistant and can have lambs, often twins, twice a year.
I again chose 4 ounces of roving this time from Rusty Bee Ranch.
The fiber was beautiful and easy to spin.
Even though I divided the fiber in half by weight, you can see that the two bobbins are not equally full. I am still working on getting my fiber spun consistently.
Another pretty setting for the record picture.
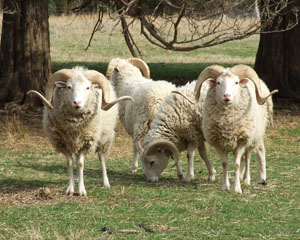
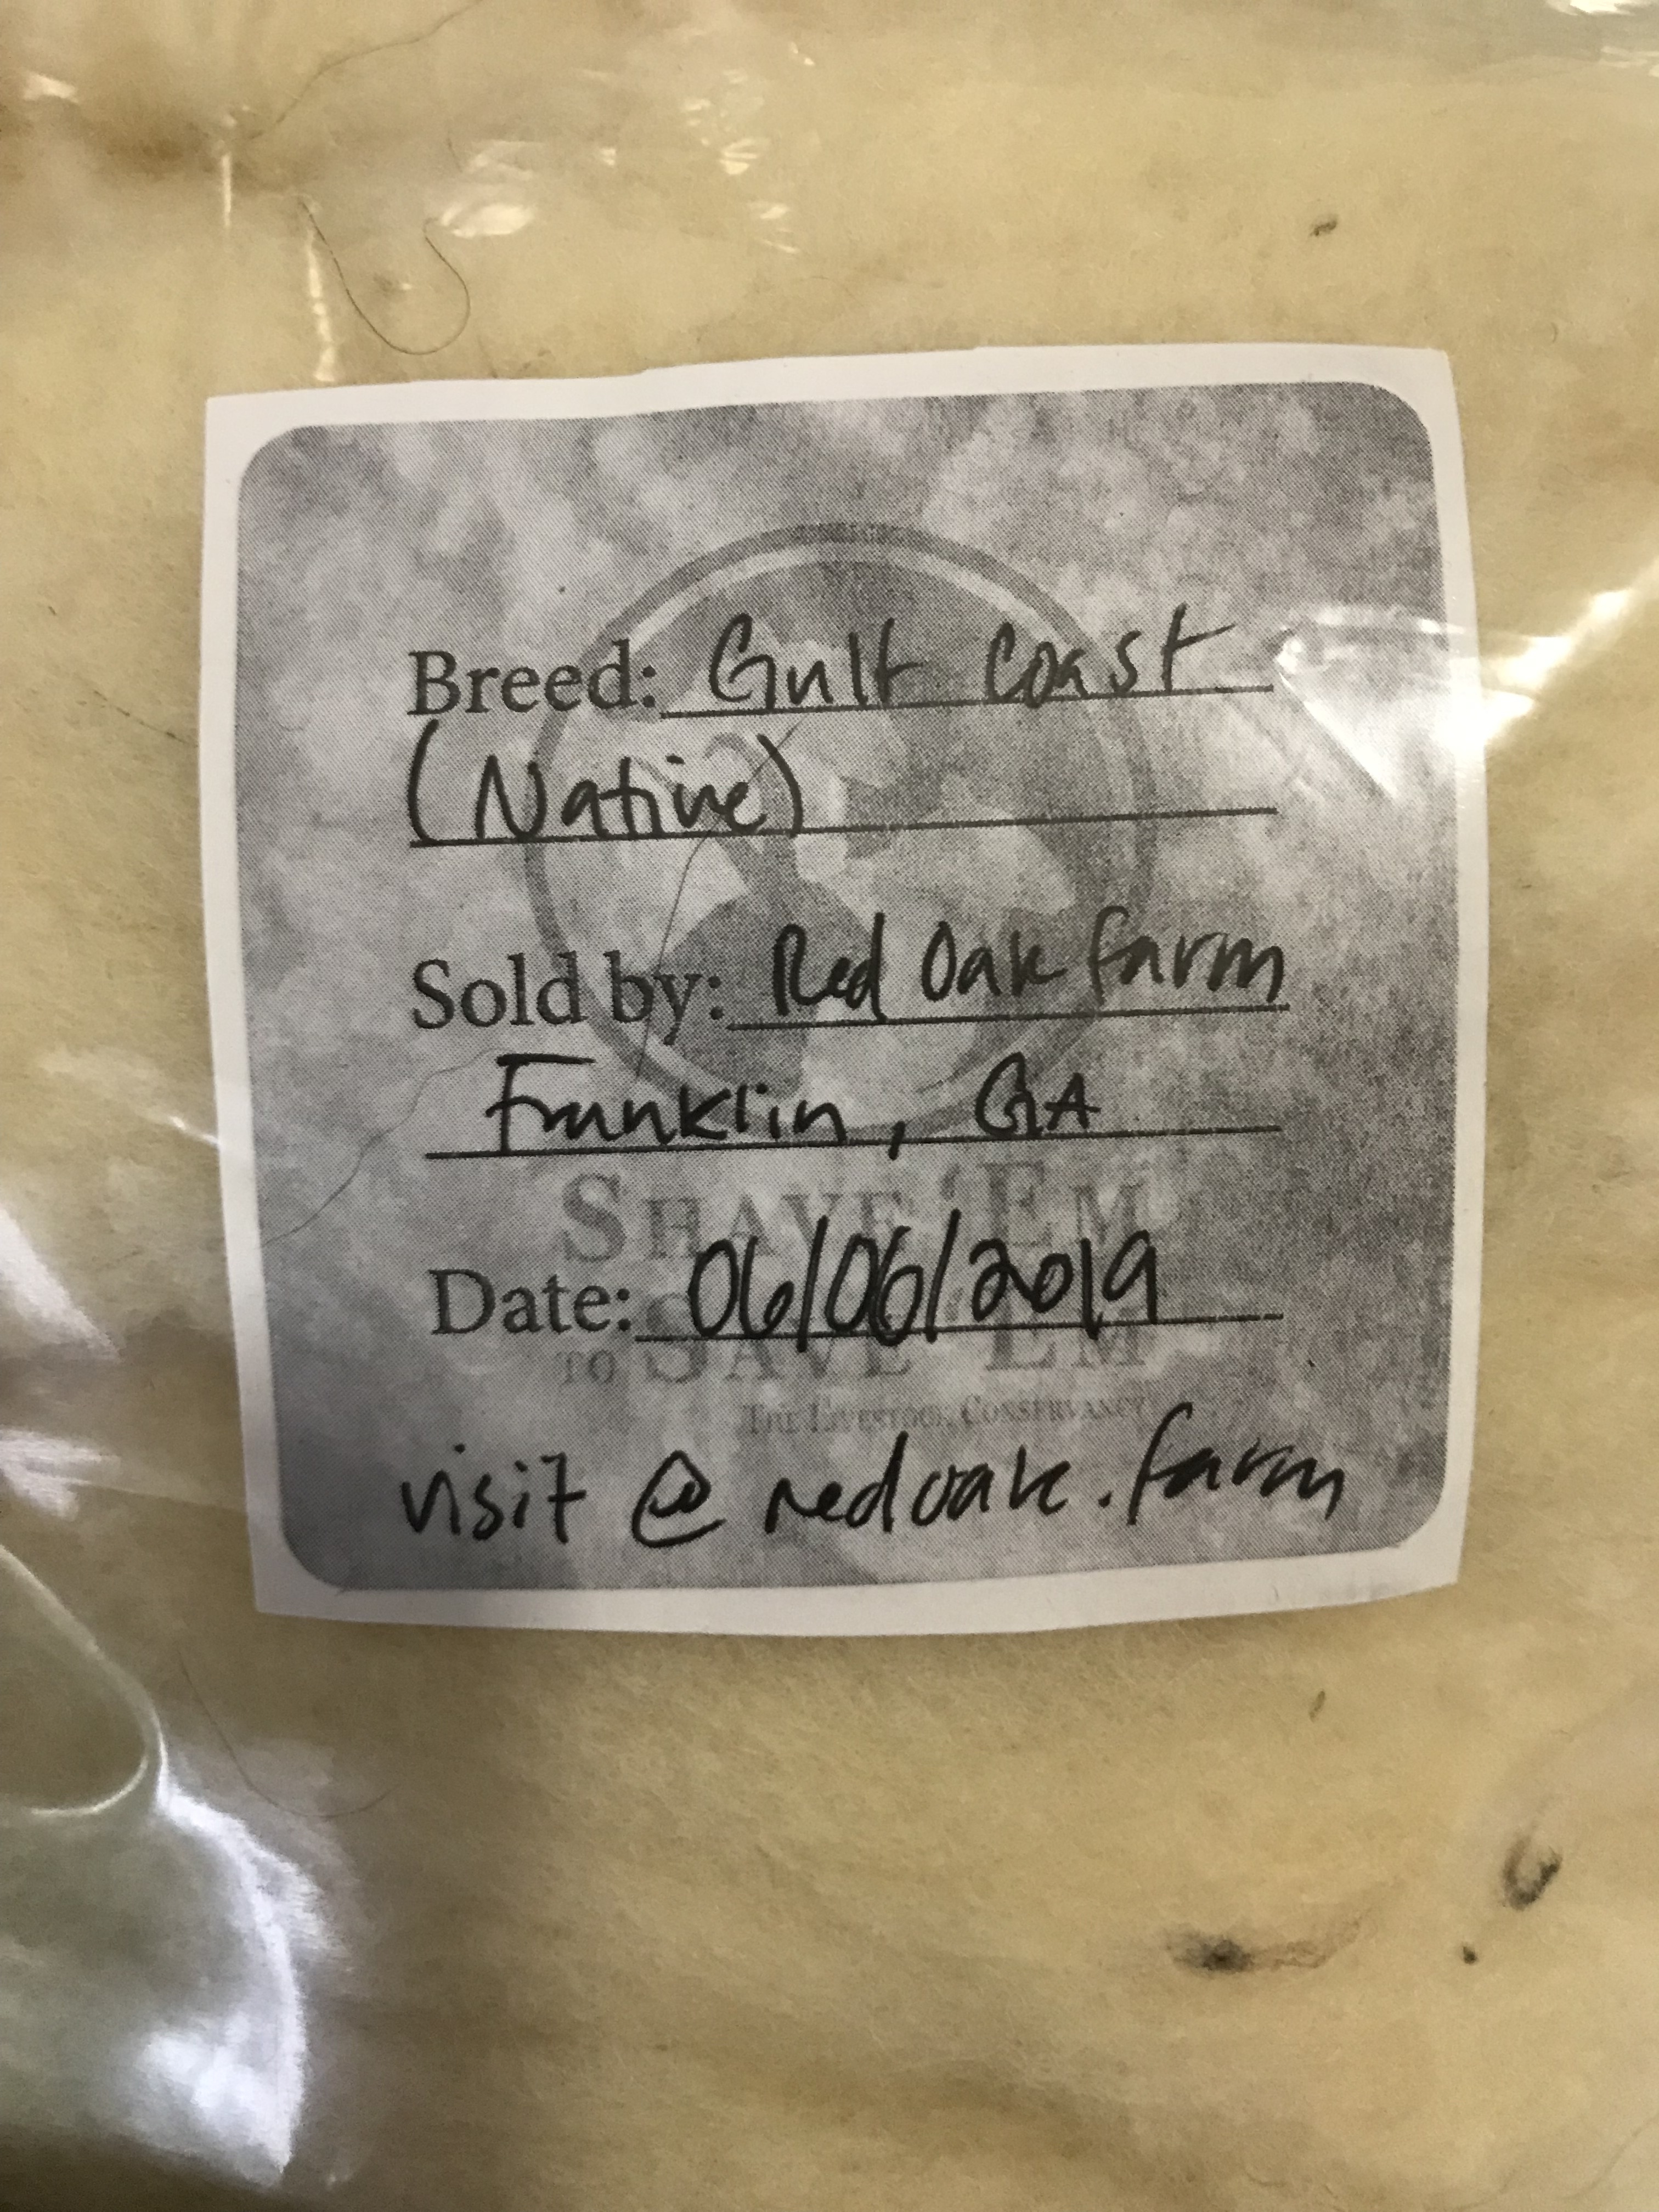
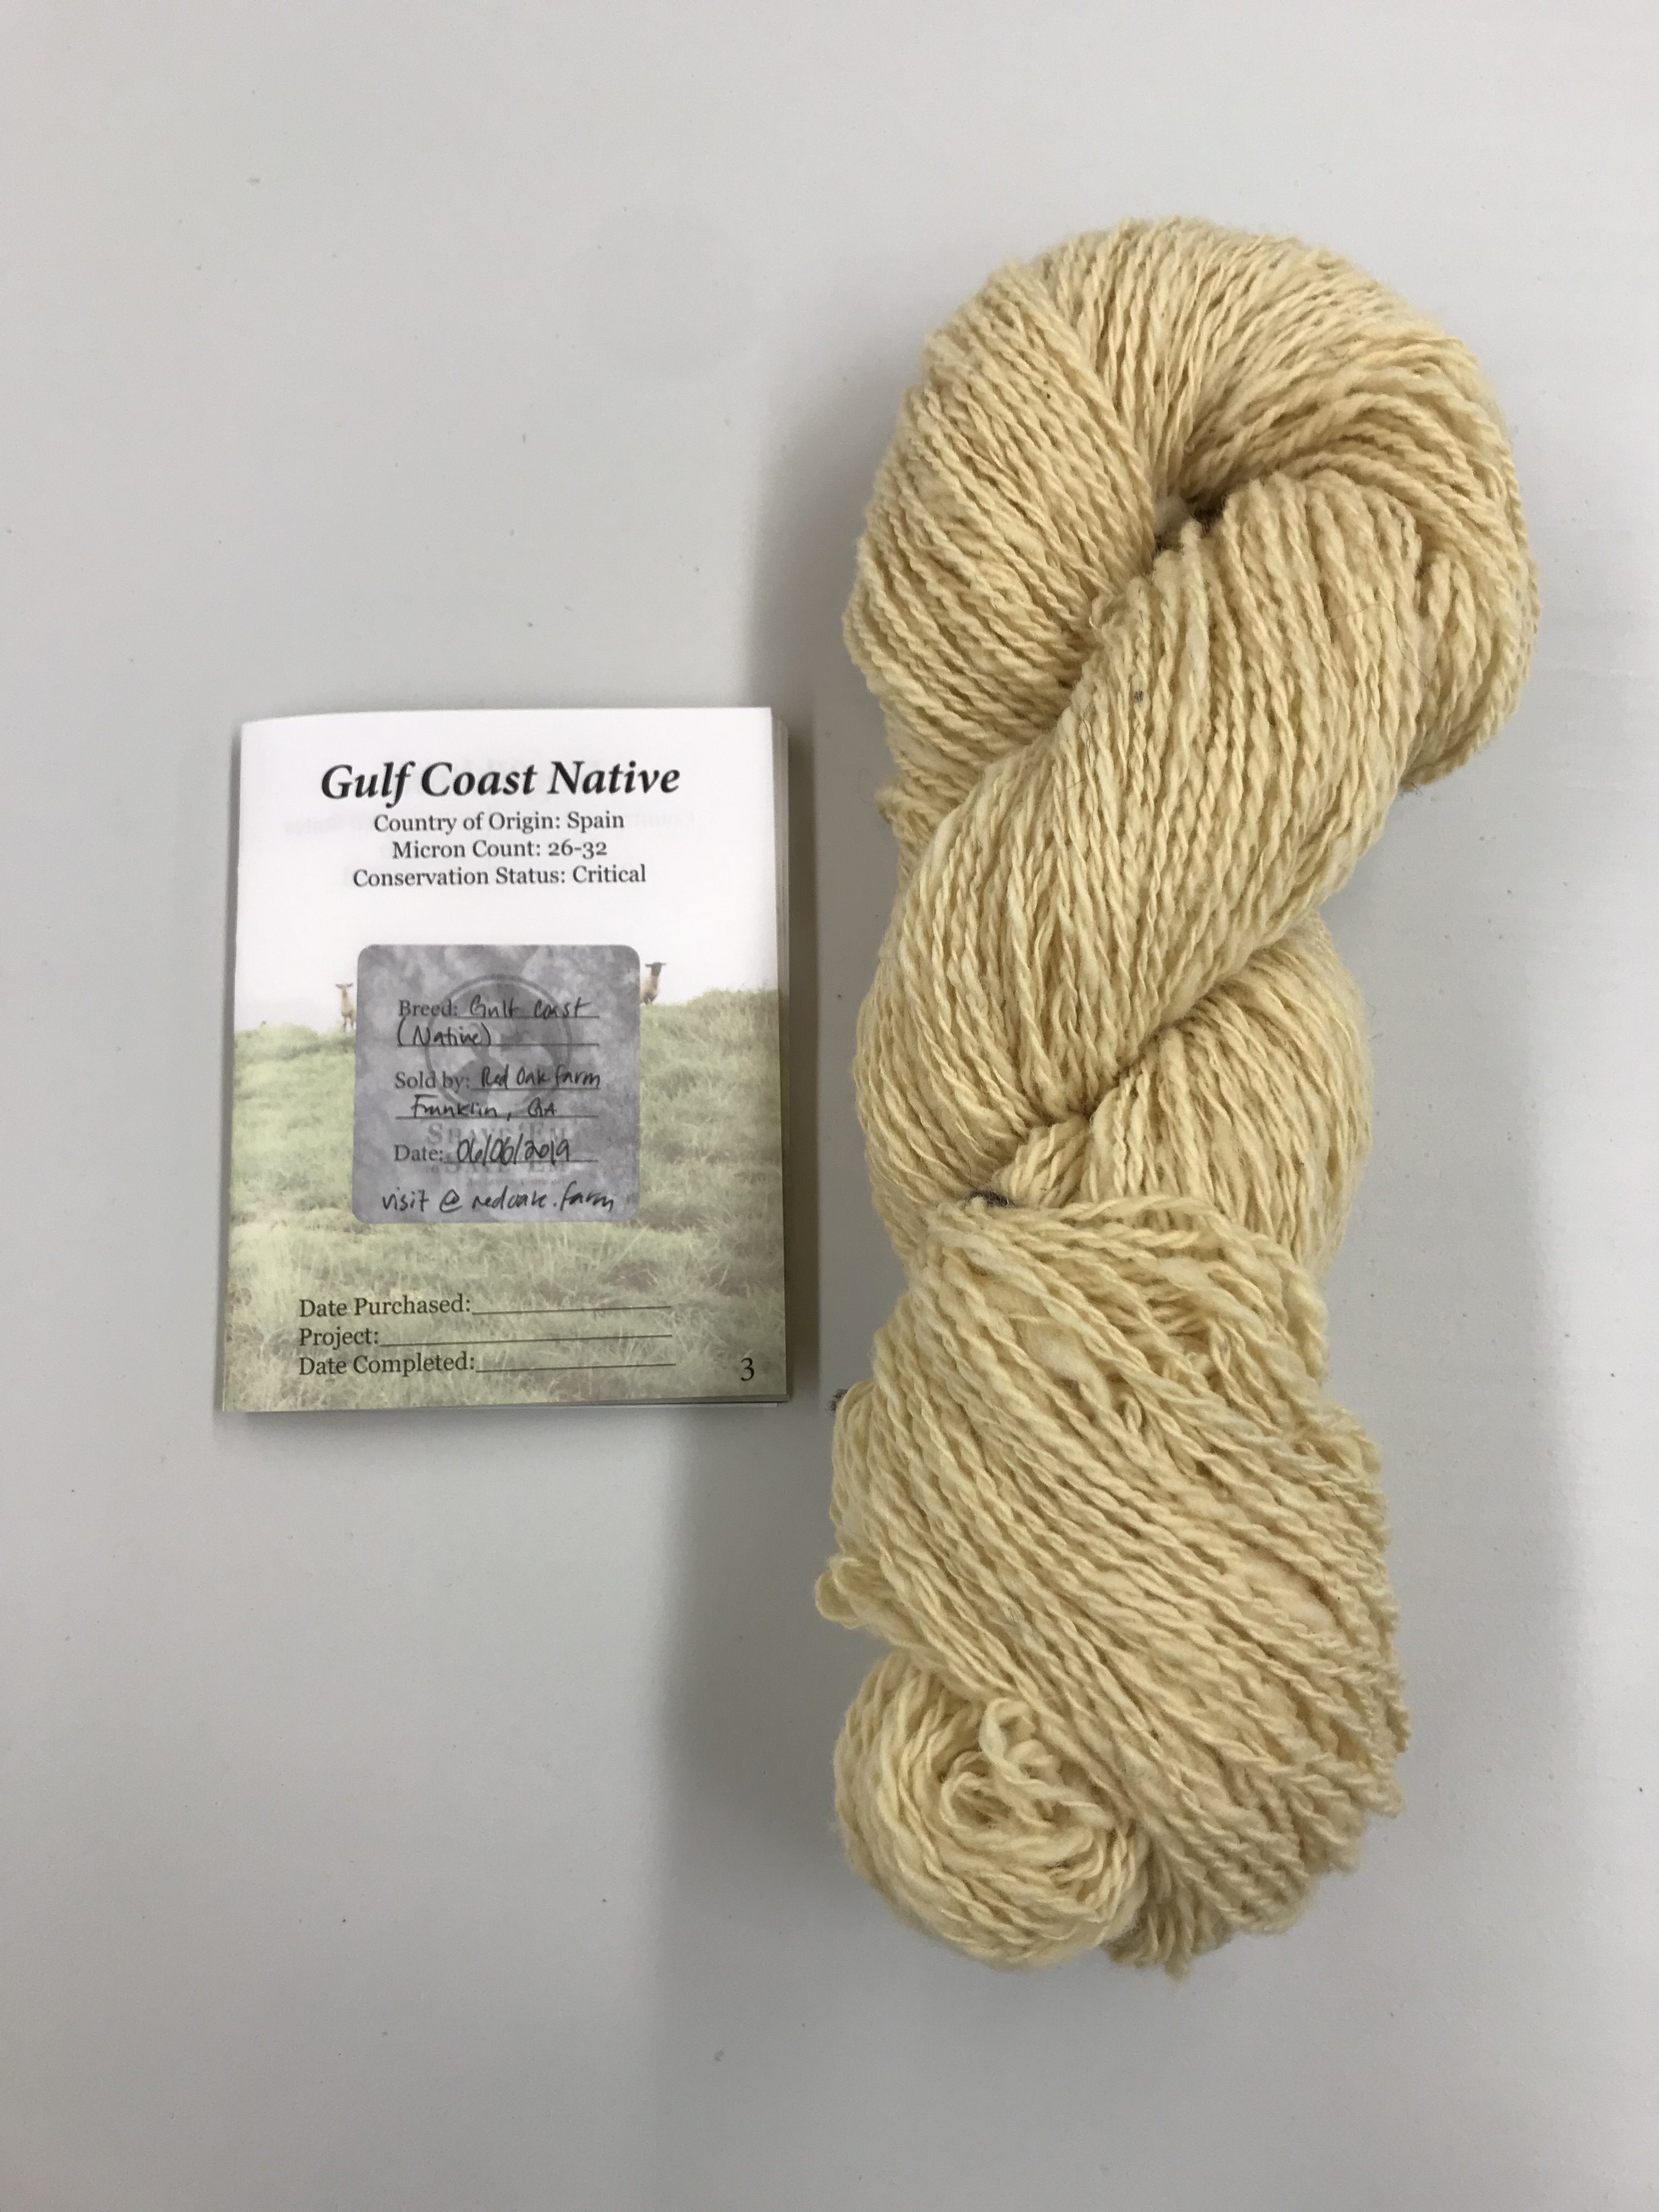
Breed 4 – Gulf Coast Native
These sheep descended from half-wild sheep living in the southeast United States. After WWII they were displaced by larger, more productive breeds which were now able to survive the heat and parasites with the help of modern medications. But the Gulf Coast Native breed had evolved a natural resistance to internal parasites and foot rot which affect the more recent breeds. In addition, they can eat many undesirable noxious plants such as kudzu and honeysuckle.
I again chose the 4 ounce roving. This time from Red Oak Farm.
I had saved some of the SE2SE fiber, including the Gulf Coast Native, for a spinning retreat in Baraboo WI in October. It was fun to share the challenge with other spinners who had not heard of it.
Another spinner suggested that I tie the skein on the niddy-noddy with the ends of the yarns for a better look. I agree the picture is better without the contrasting distraction of colored ties.
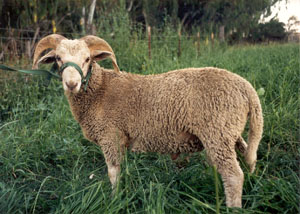
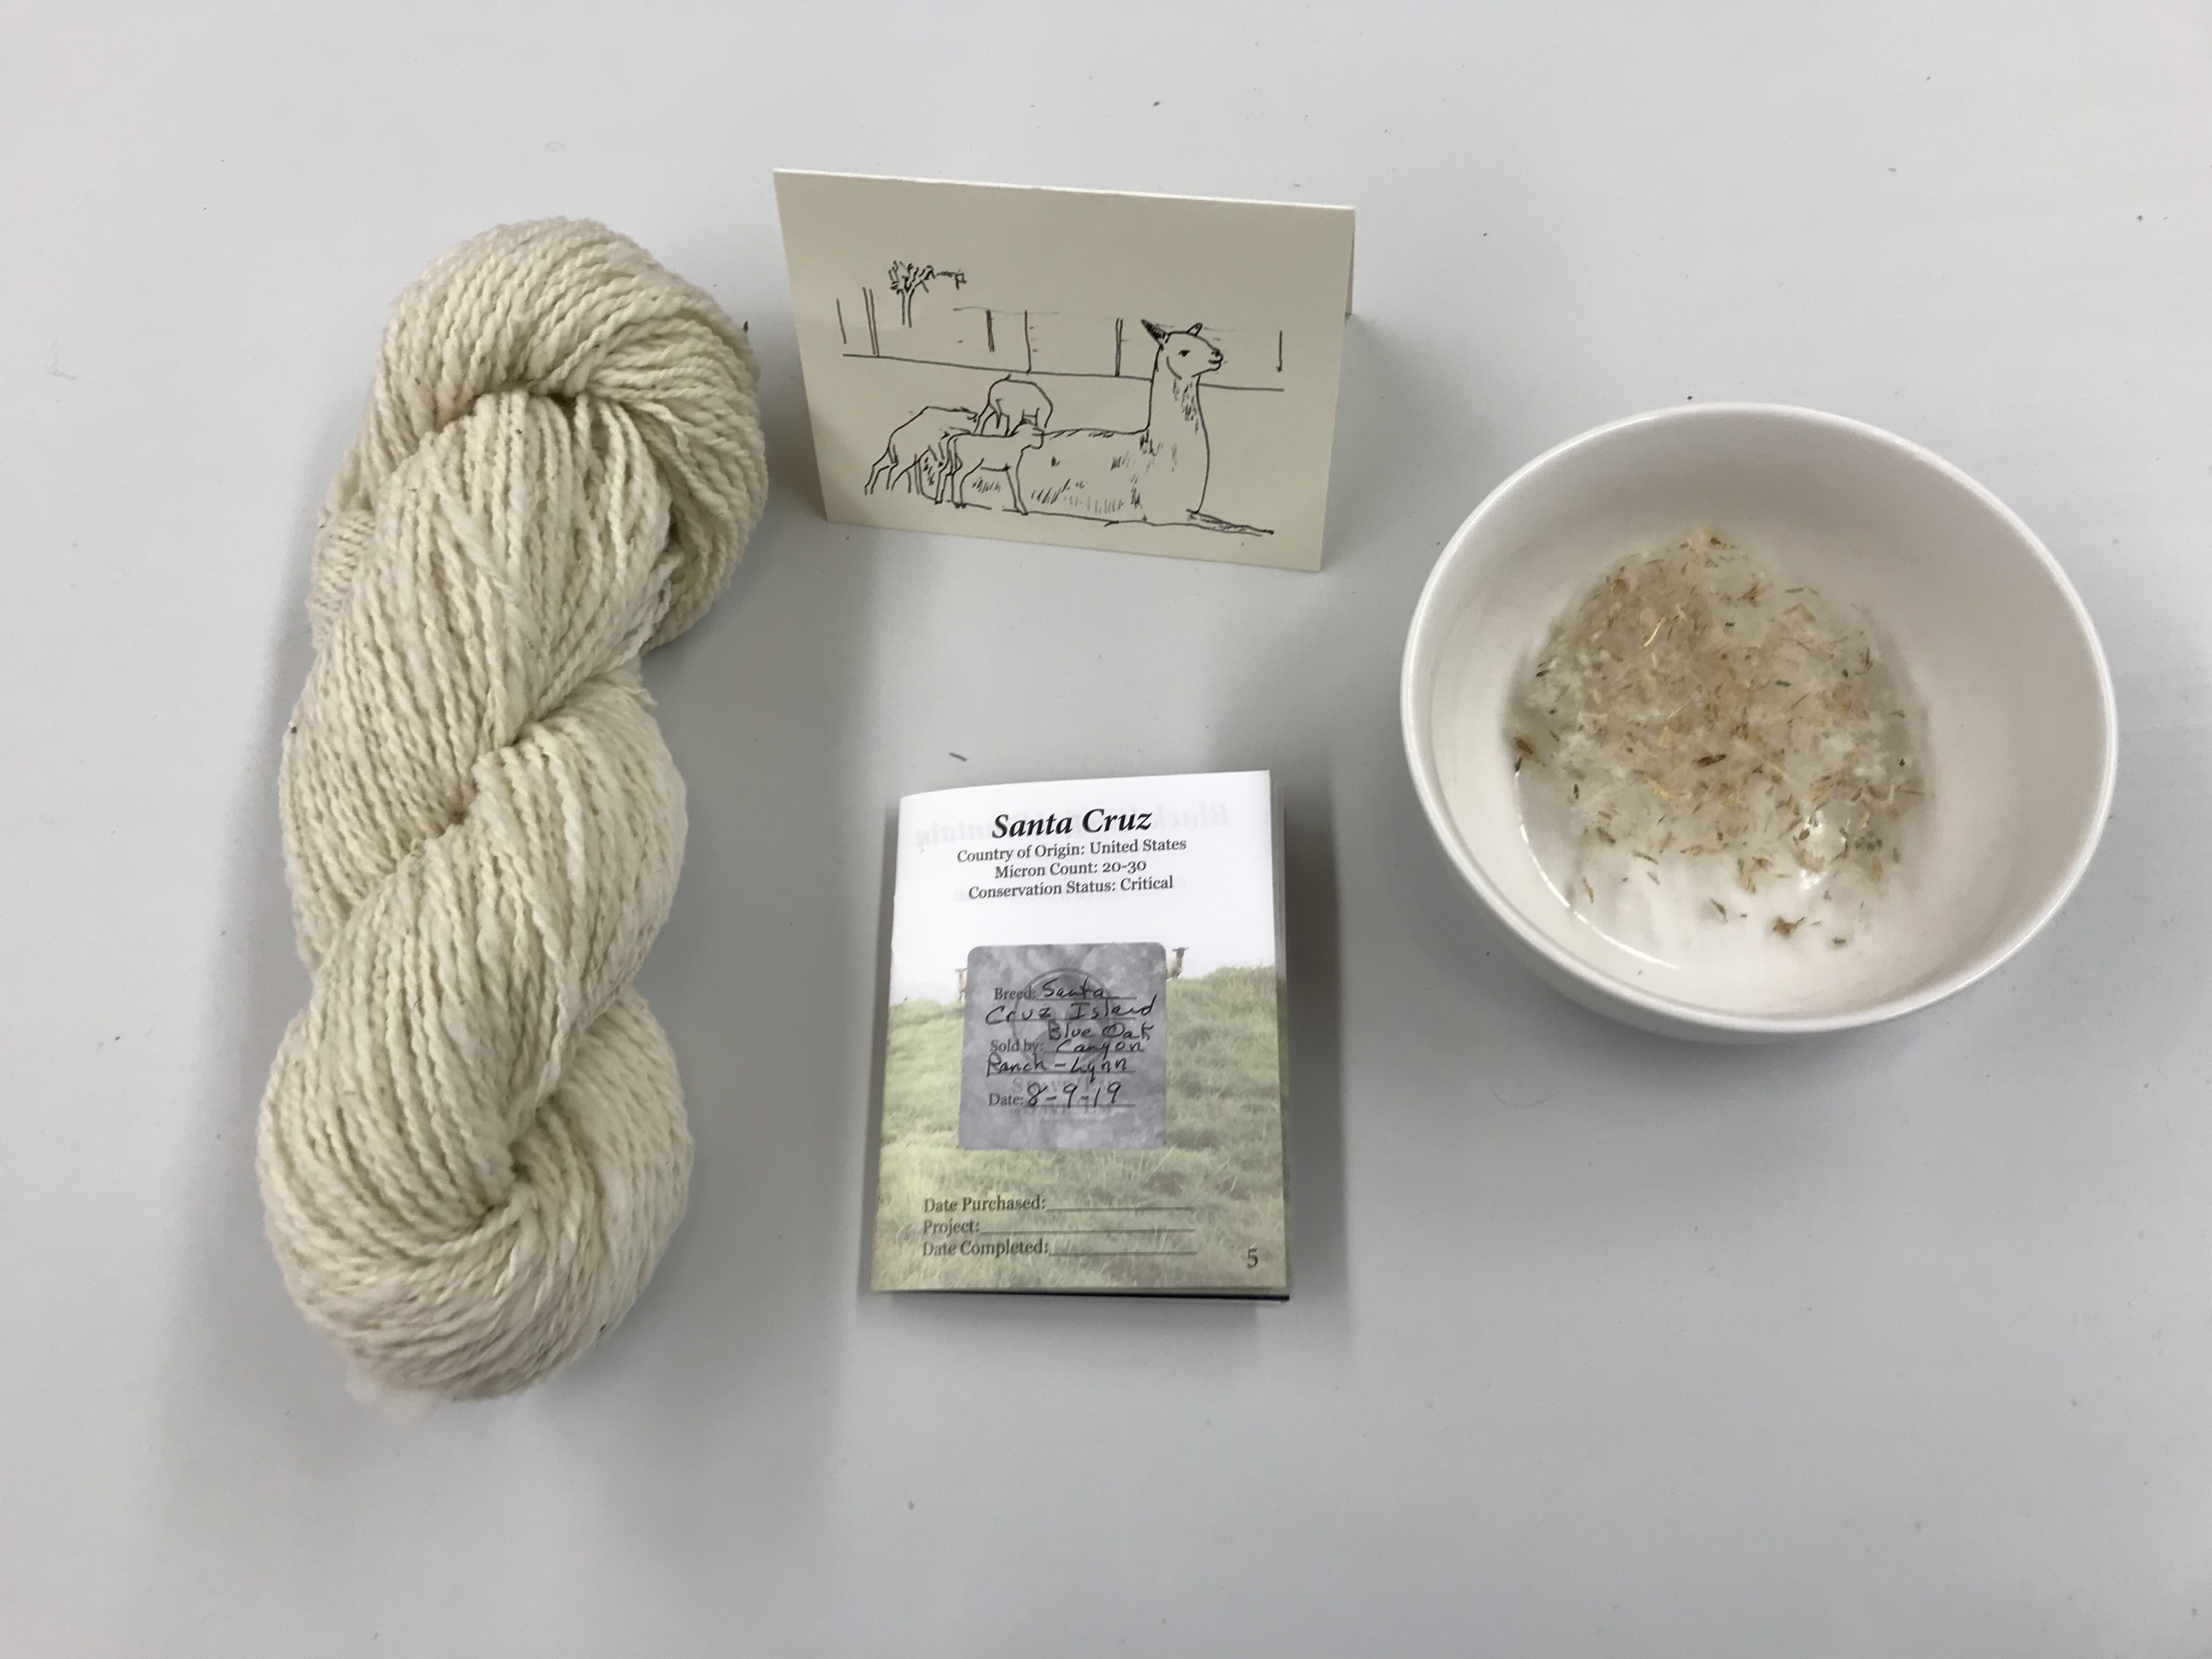
Breed 5 – Santa Cruz Island
These sheep are named for Santa Cruz Island, one of the channel islands off the coast of California. There is some question about the history of the sheep but like other breeds isolated on islands they are hardy and well adapted to their environment. They have all been removed from the island. Most were slaughtered on site, but five California shepherds brought some sheep off the island. Because they have been removed from the environment in which they were adapted, they will not remain the same. New pressures will lead to the differential survival of future generations with different traits being favored. They will still be valuable as a source of genetic diversity.
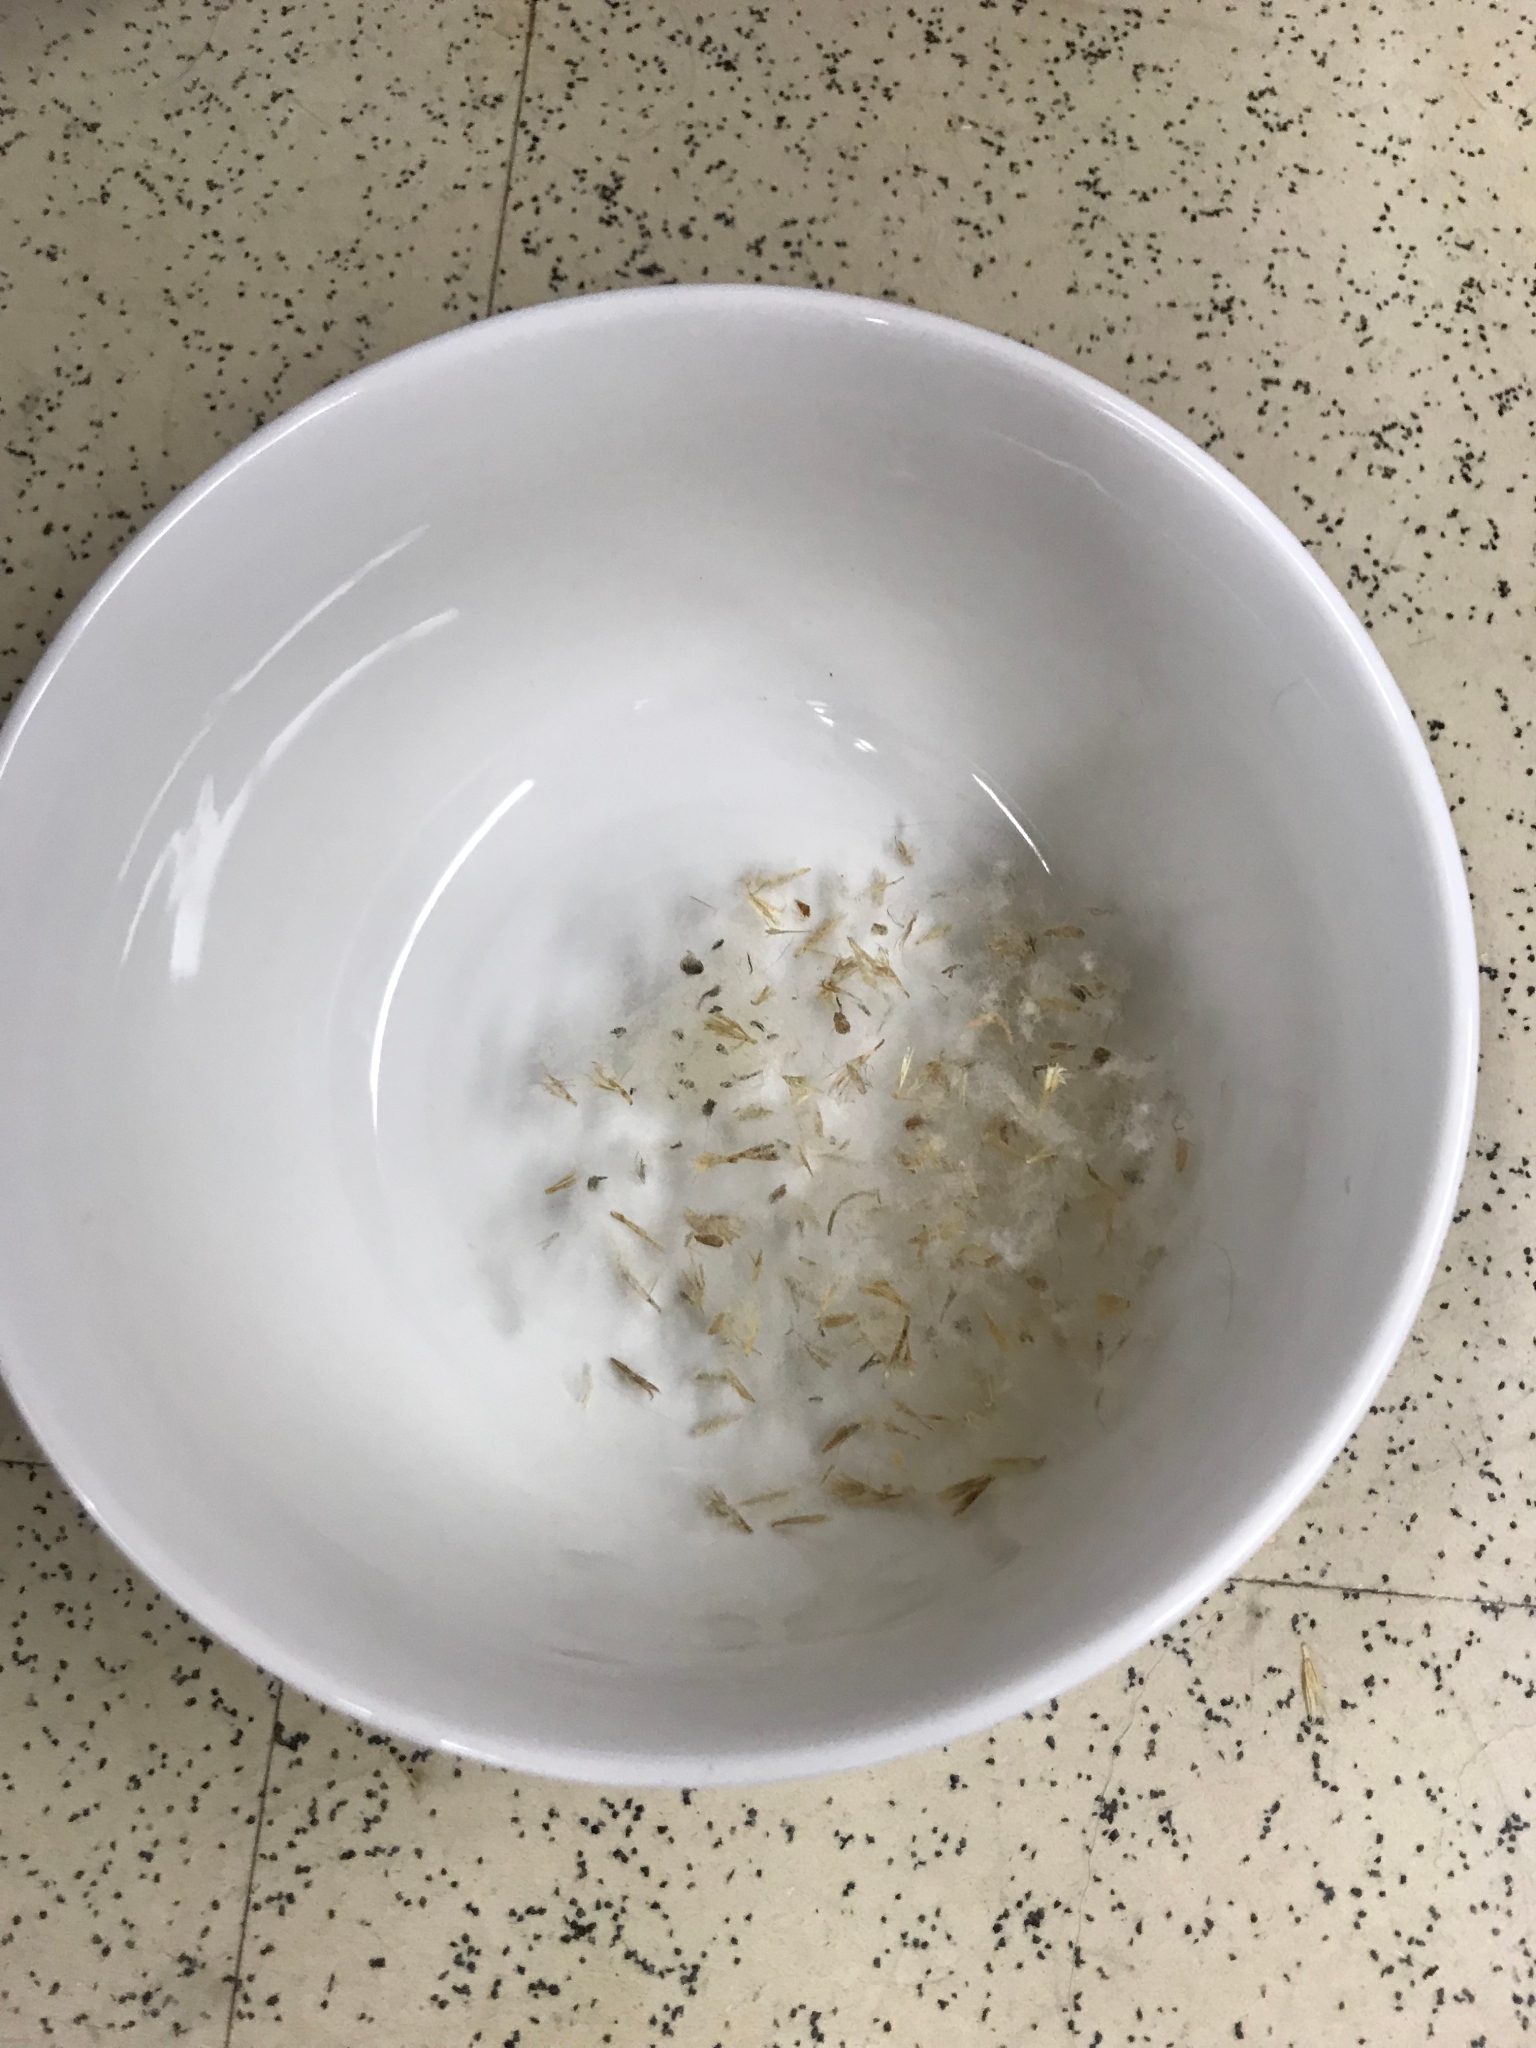
This yarn, from Blue Oak Canyon Ranch, was very fun to spin. It was spongy and springy. There was a bit more VM in this sample than in some others but I like spinning and didn’t mind picking it out as a went along.
One of the other spinners did ask why I had a “bowl of oats” sitting next to me.😂
Someone told me that this fiber cannot be spun commercially. Take that for what it’s worth. This was one of my favorites because it was so unique.
It was great to finish my first five projects including the critically endangered breeds. My plan is to weave the yarn into “walking around bags” for my siblings and myself. As I looked over the yarn I discovered that there were many light natural colors and I needed some contrast for the patterns. I decided to spin up the Jacob next because of it rich brown color.
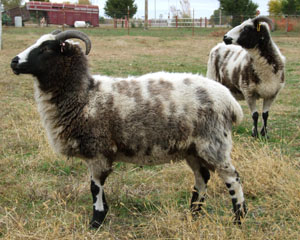
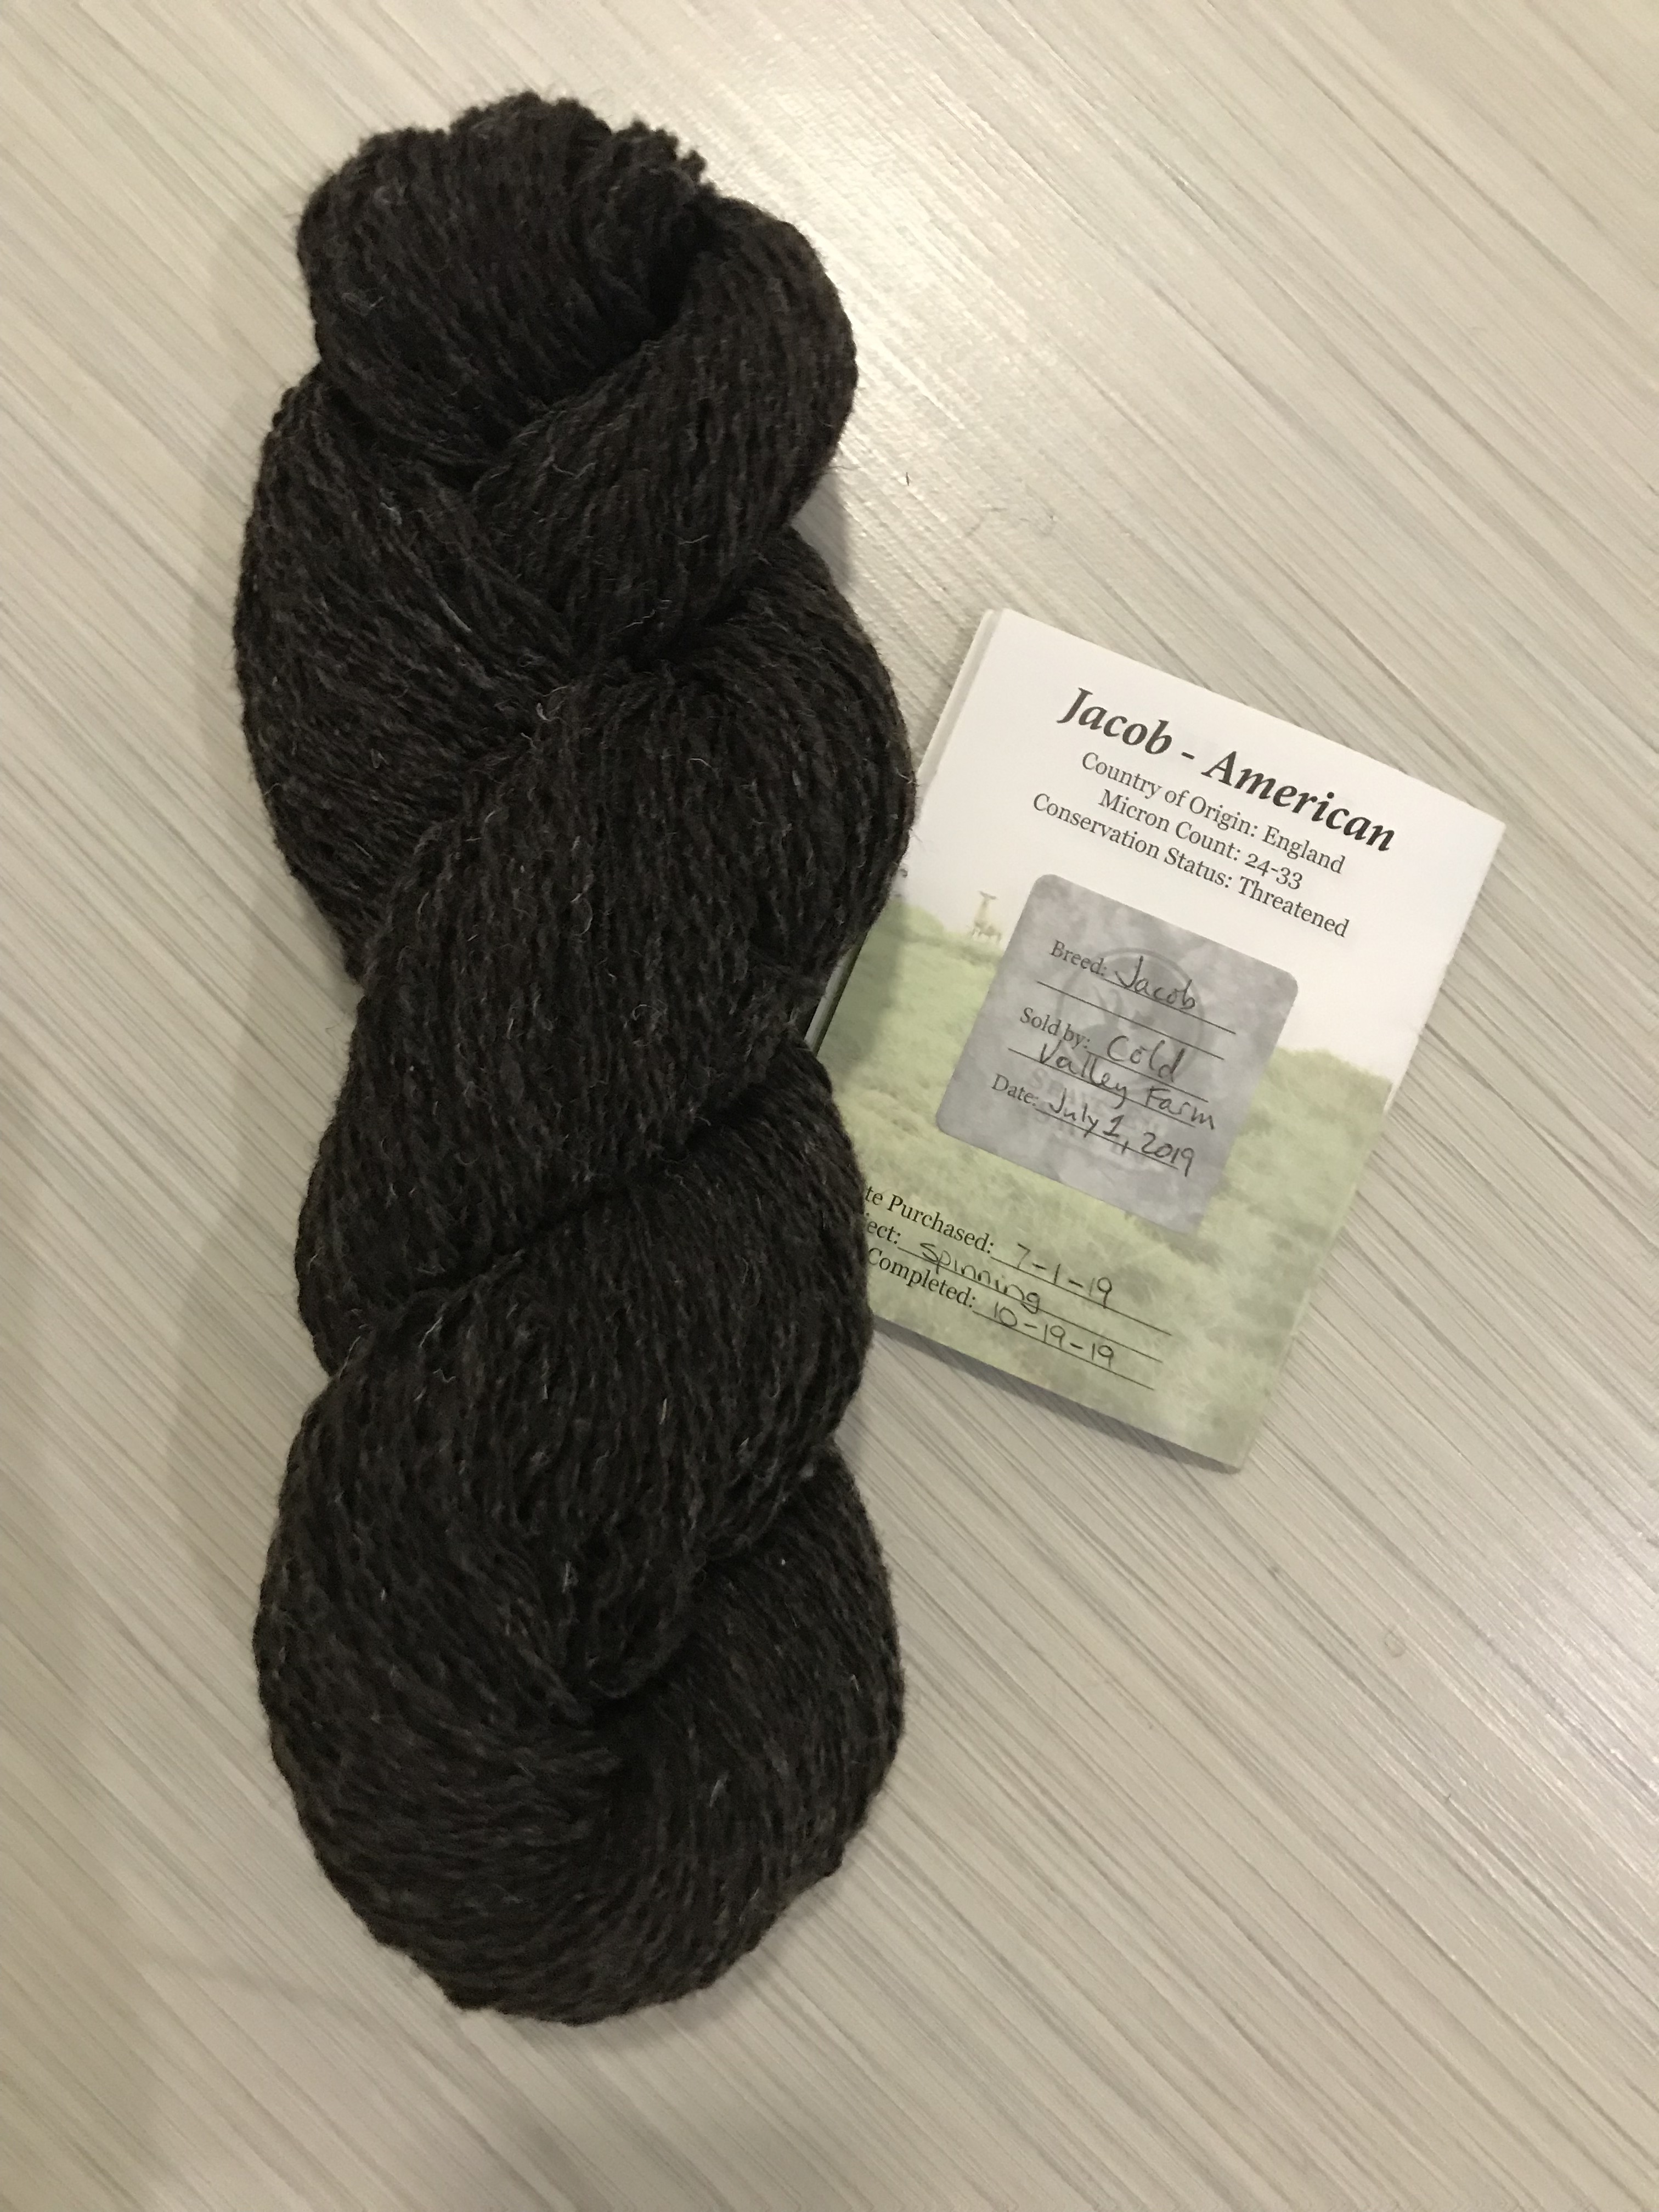
Breed 6 – Jacob
Sheep with spots! The fiber from this breed comes in many colors. Sometimes the colors are kept separate and sometimes they are mixed. They are sometimes kept as “ornamental” sheep.
The fiber that I purchased, 4 ounce roving from Cold Valley Farm was a rich, dark brown. It was easy to spin and will make a great addition to my woven bags as a contrast to the lighter fiber previously spun.
From here on out, I guess I will spin whatever catches my fancy. Today I ordered four more breeds on Etsy. Now I have the fifteen projects needed to complete the challenge. I will post them here as edits as I get them done.
If you are a spinner perhaps you will like this idea and join the challenge. In addition to the stated goals, I feel that it has really helped me grow as a spinner and contributed much to my knowledge of wool fiber.
As always, your polite and helpful comments are welcome.
Update:
Well, I finally finished all 15 breeds. Here are some pictures and thoughts.
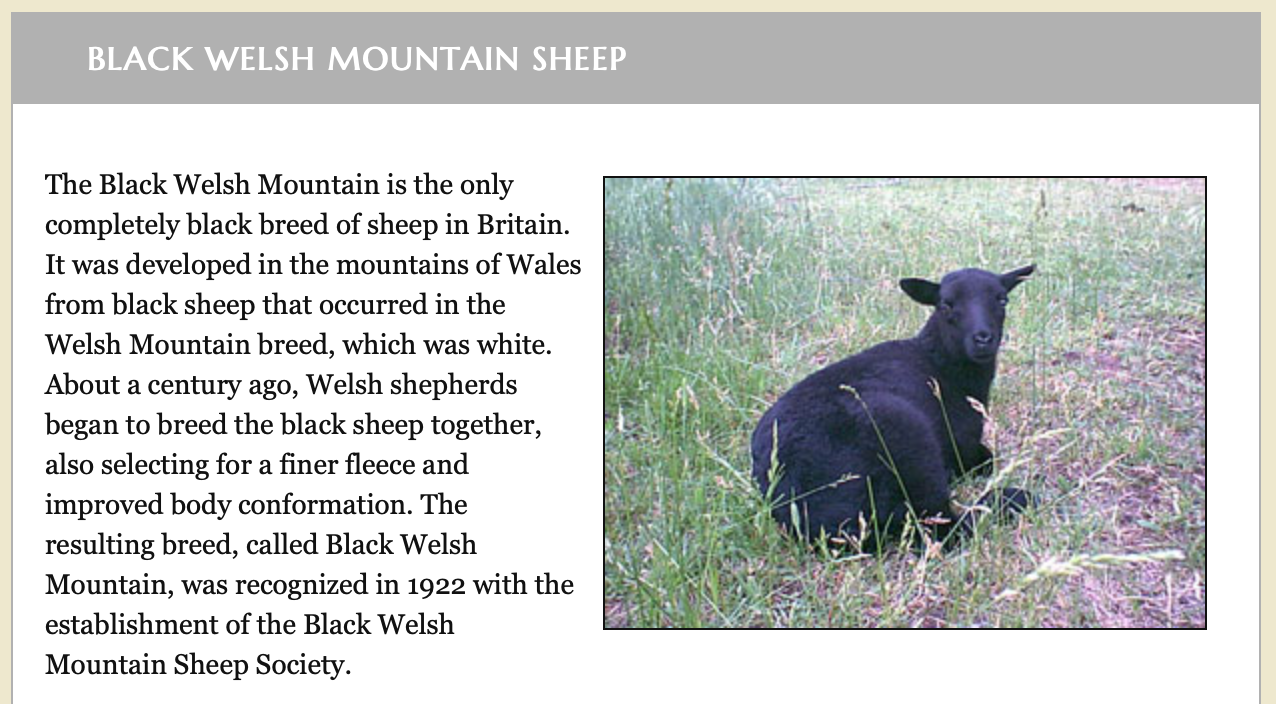
Breed 7- Black Welsh Mountain
This information is from the Livestock Conservancy website:
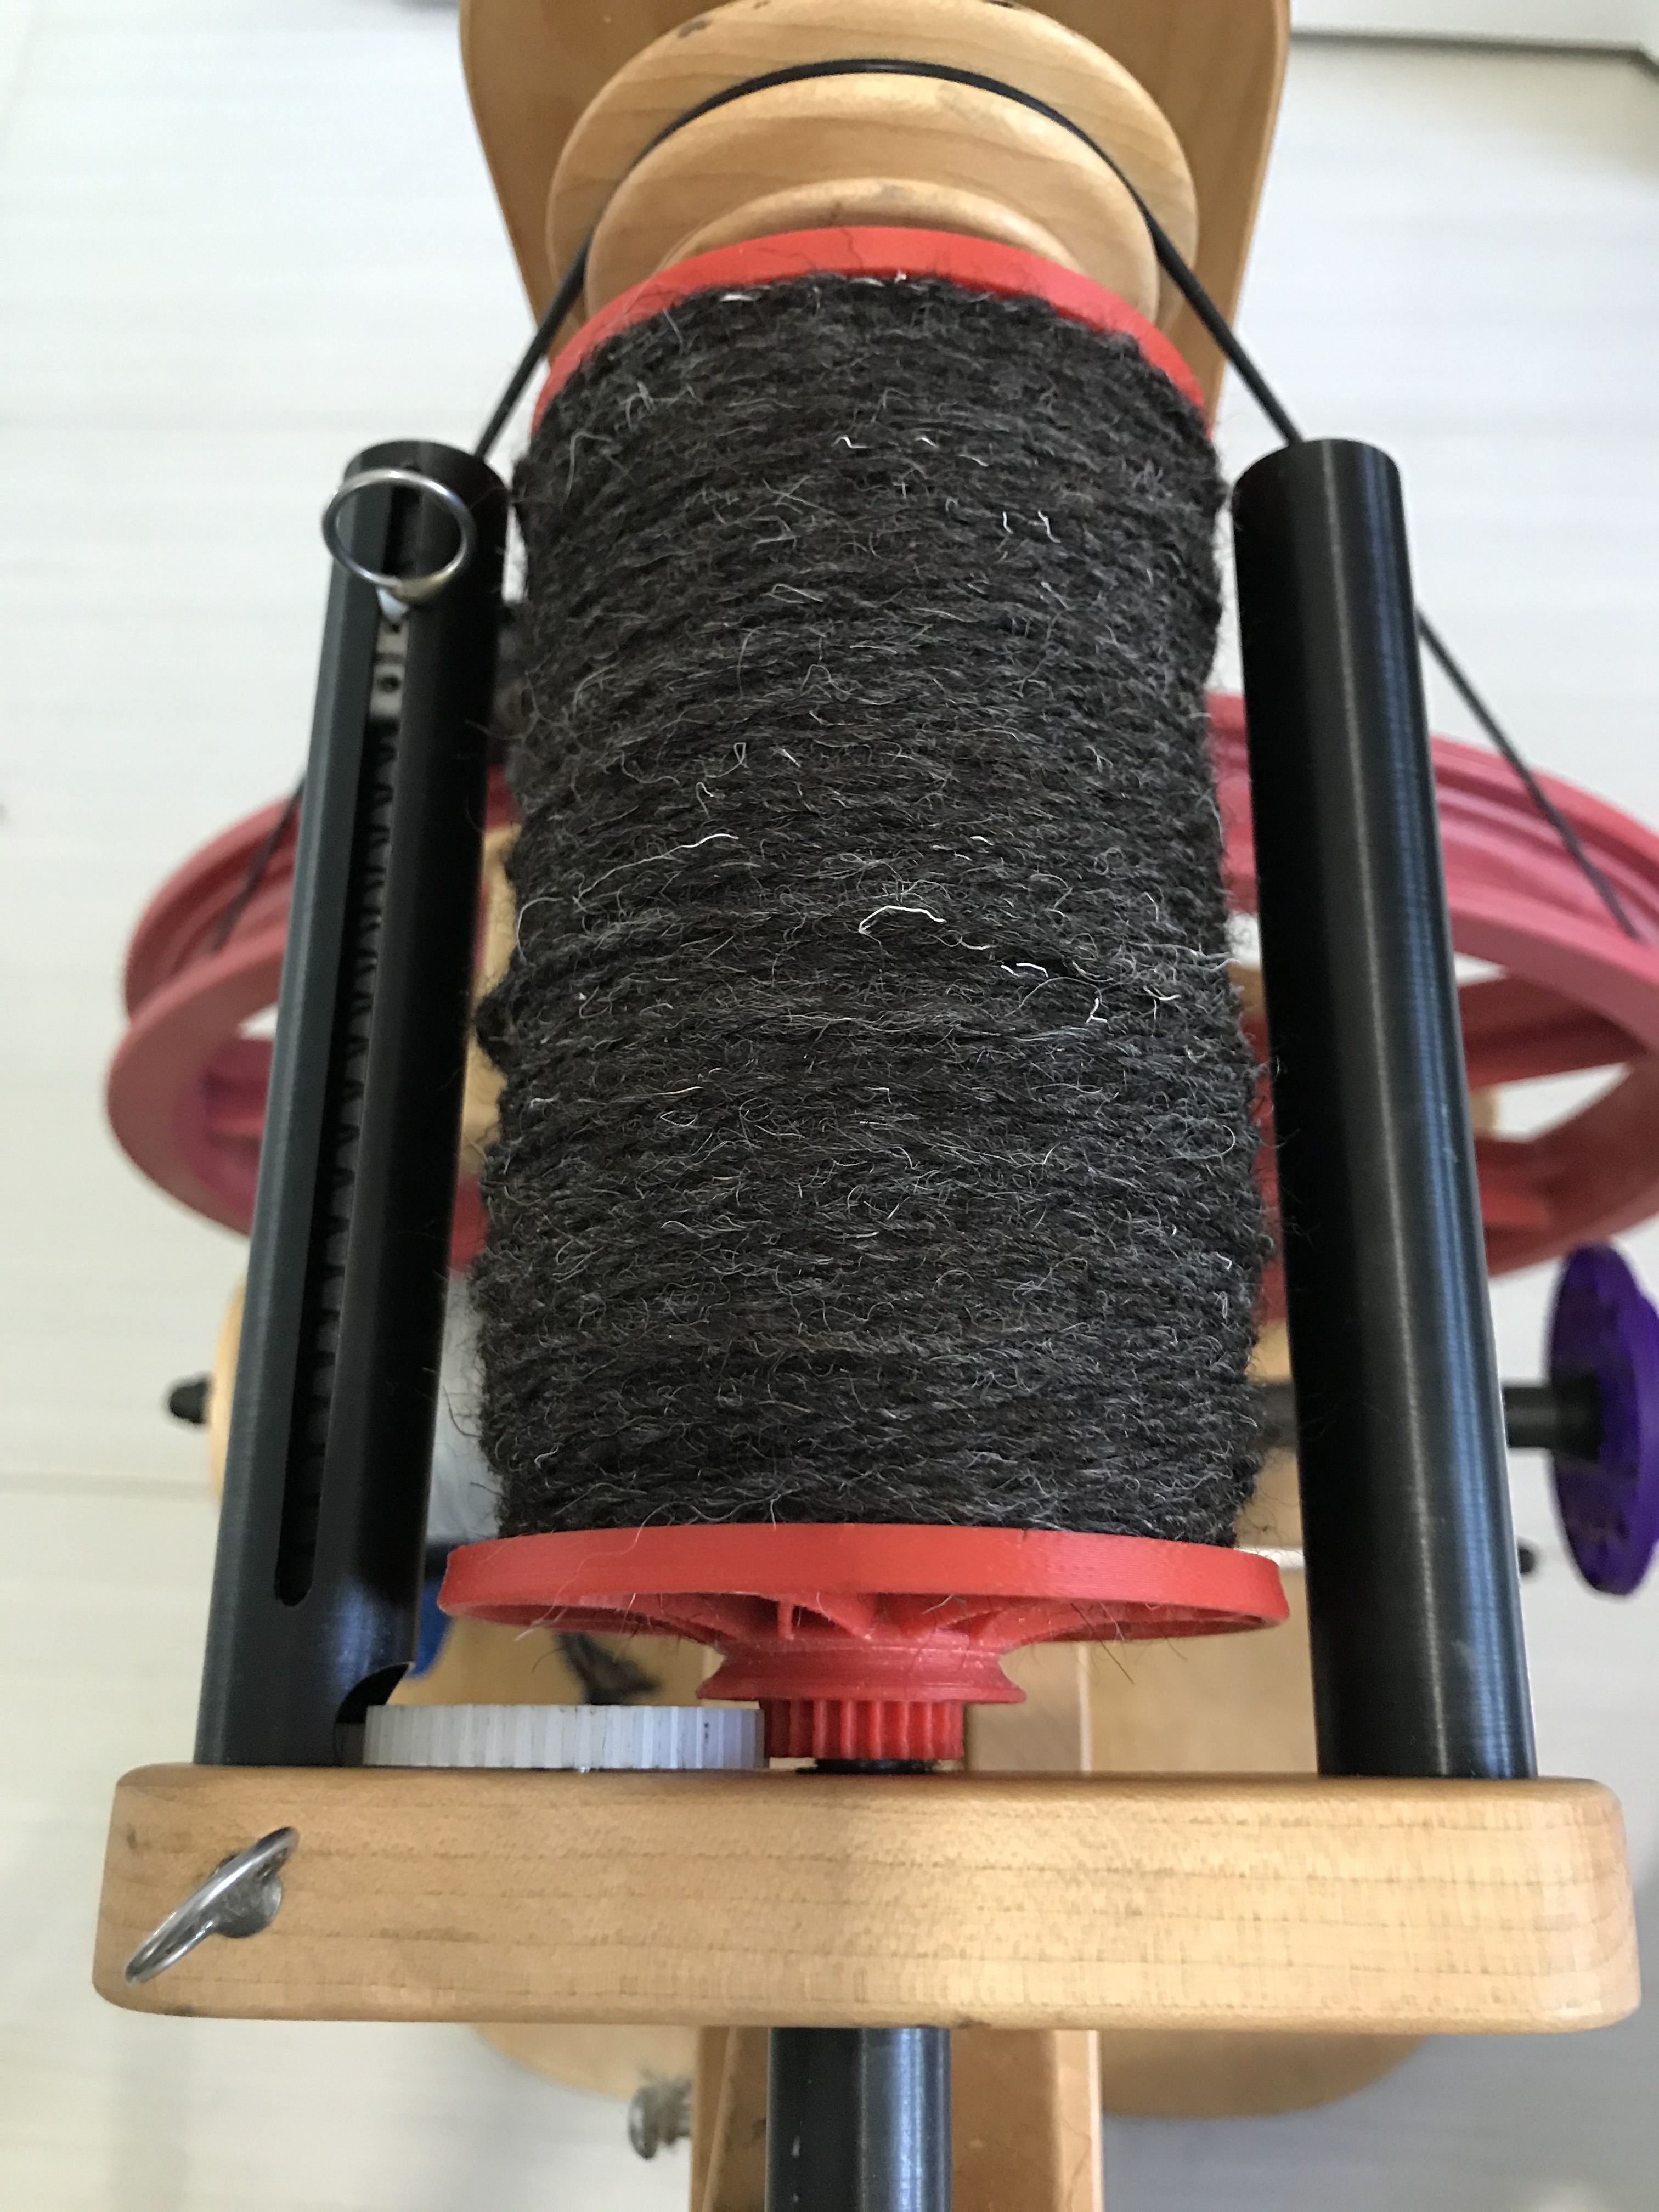
This is the darkest wool that I spun. It is beautiful.
This close up really shows the variation in the fibers. These are black sheep that were bred from white ancestors.
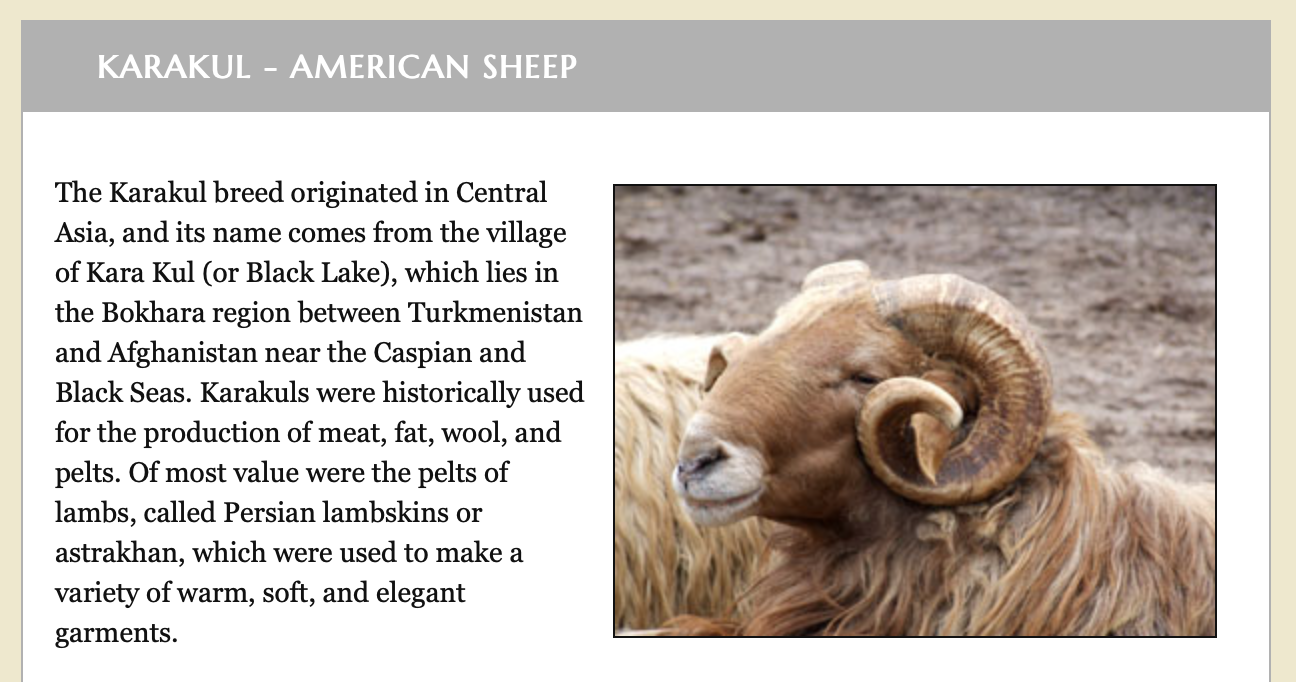
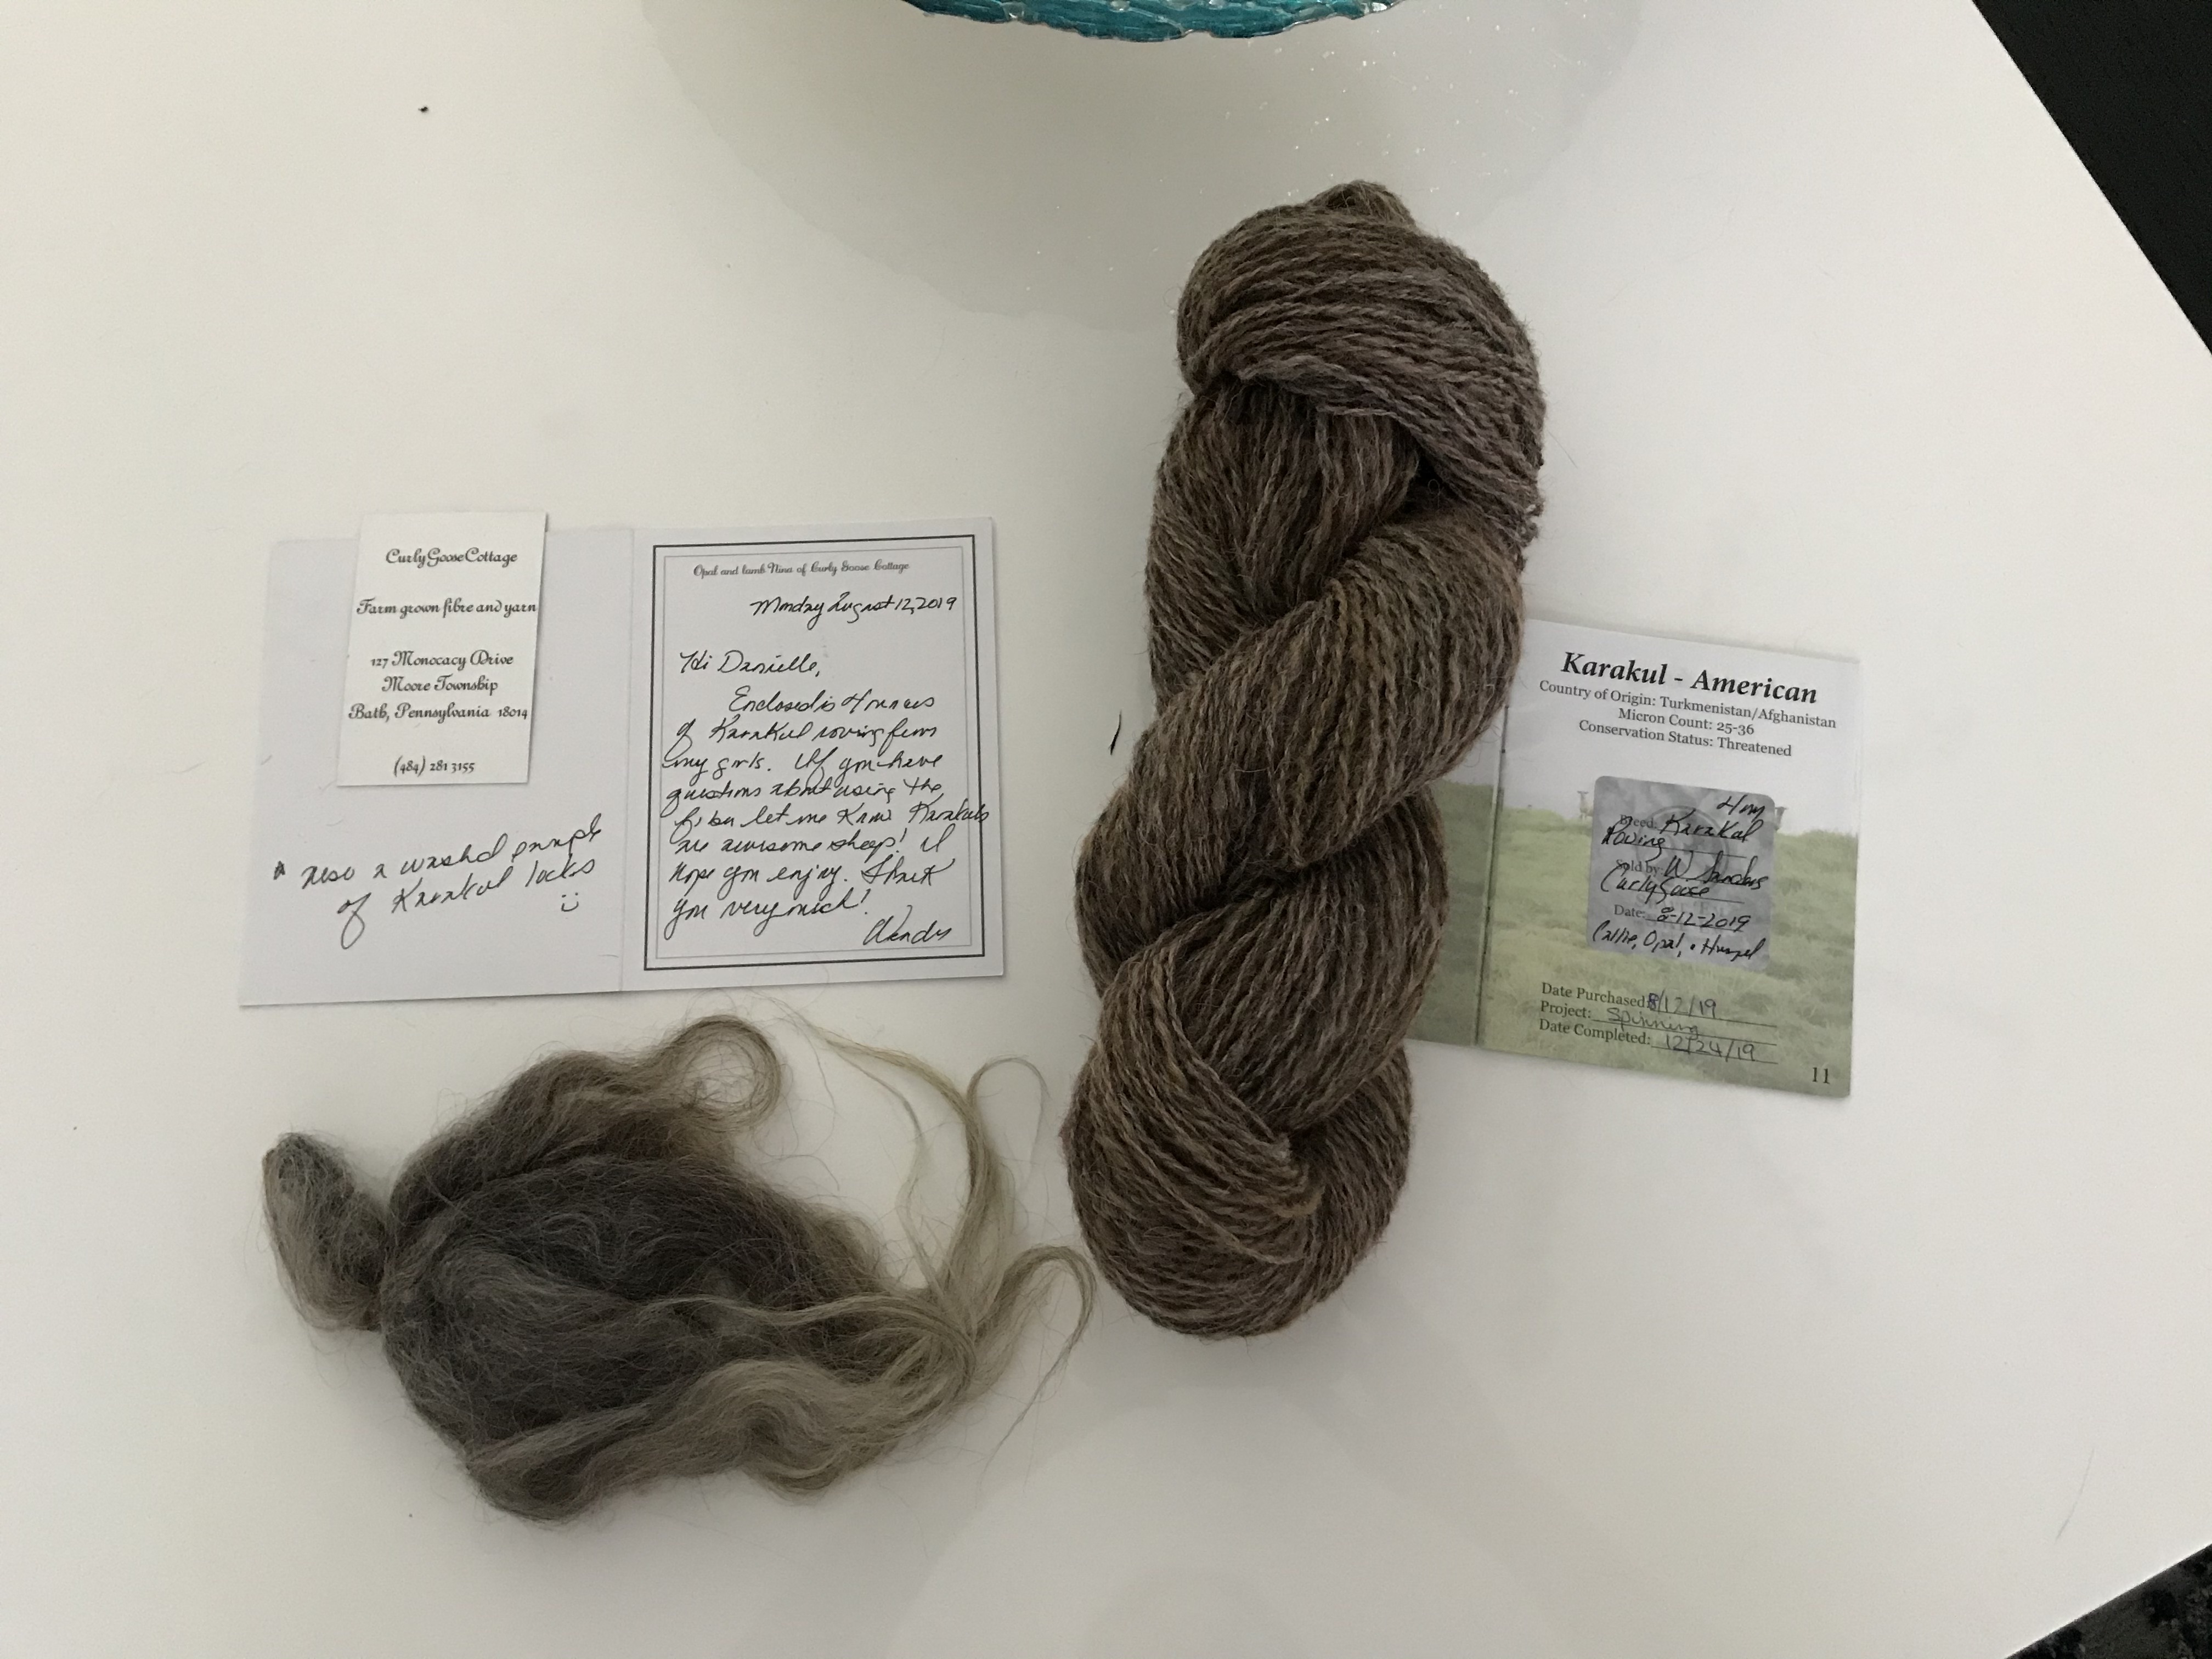
Breed 8 -Karakul American
This information is from the Livestock Conservancy website:
While most of the sheep I read about are managed for their wool or meat, these are sometimes used as pelts. The wool is very curly when the lambs are young (and even unborn).
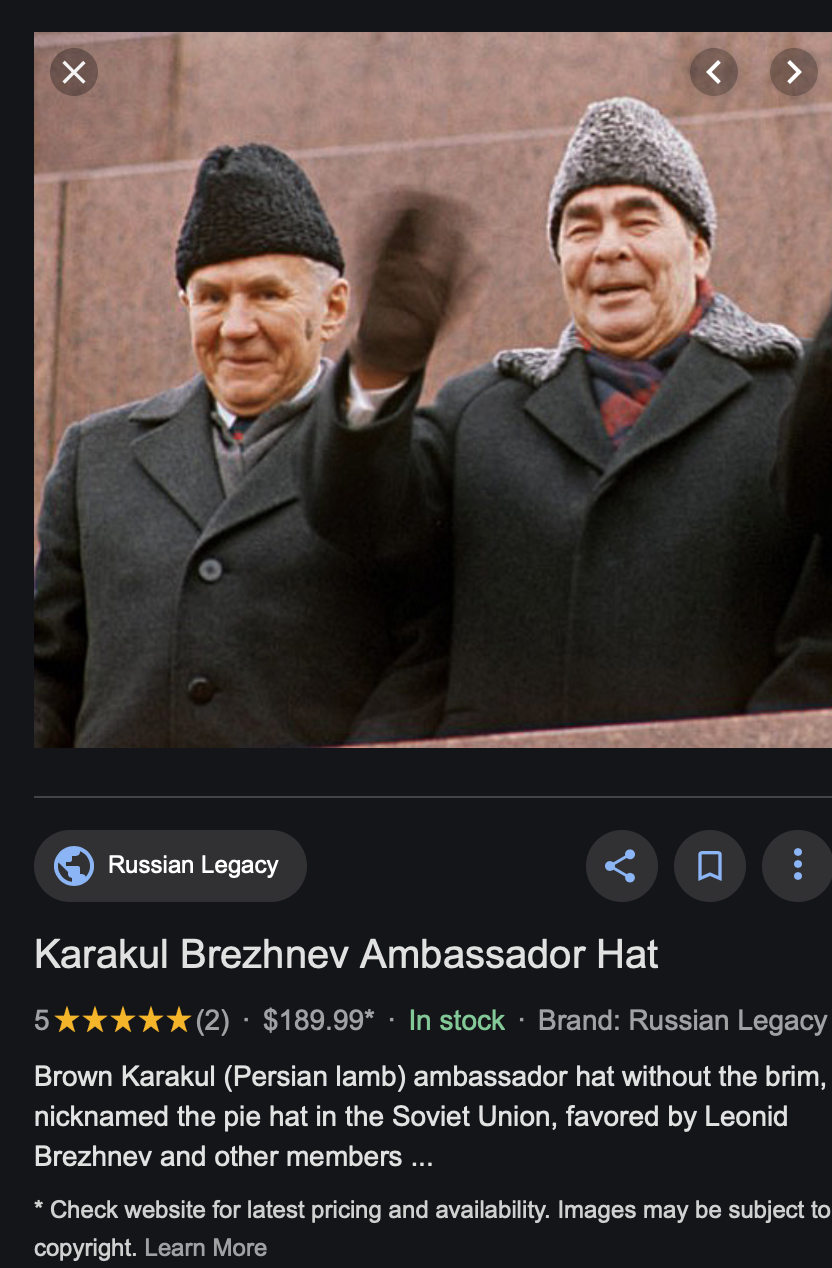
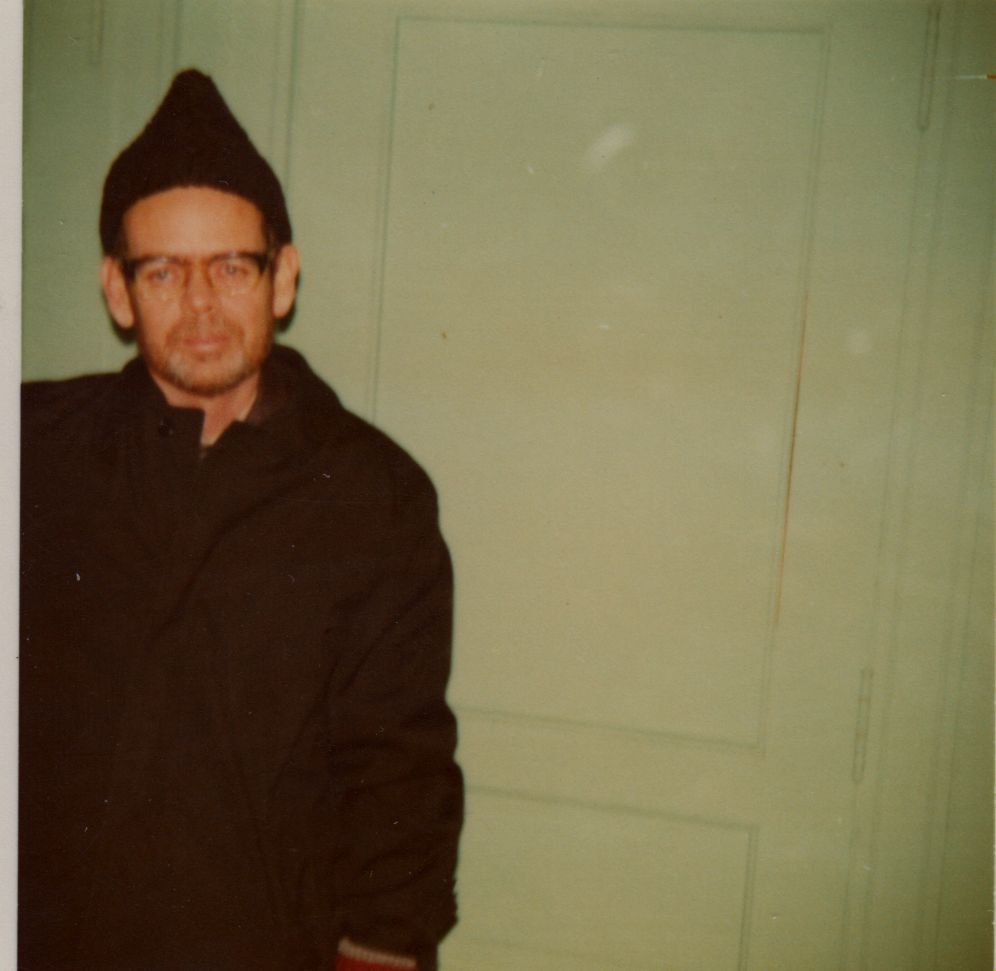
In the 1970s several Russian officials were pictured in Karakul hats and they became very fashionable.
I even remember my father wearing something similar. I wonder if his was real wool or artificial.
This was the only sample that I bought that had some dyed fibers. All the rest are natural color, but I think this is very pretty.
It spun up very nicely and the provider even sent along a few extra locks. I didn’t spin those yet, but I can’t wait to try.
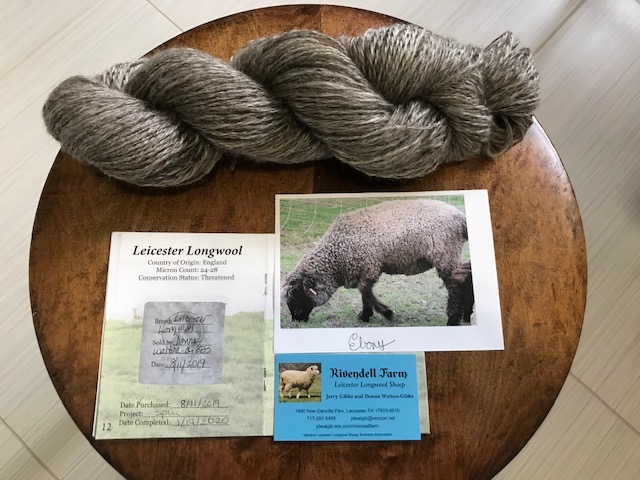
Breed 9 -Leicester Longwool
This information is from the Livestock Conservancy website:
This wool was so long! And Donna, the provider, sent me a picture of Ebony, the sheep that provided the wool. I love that.
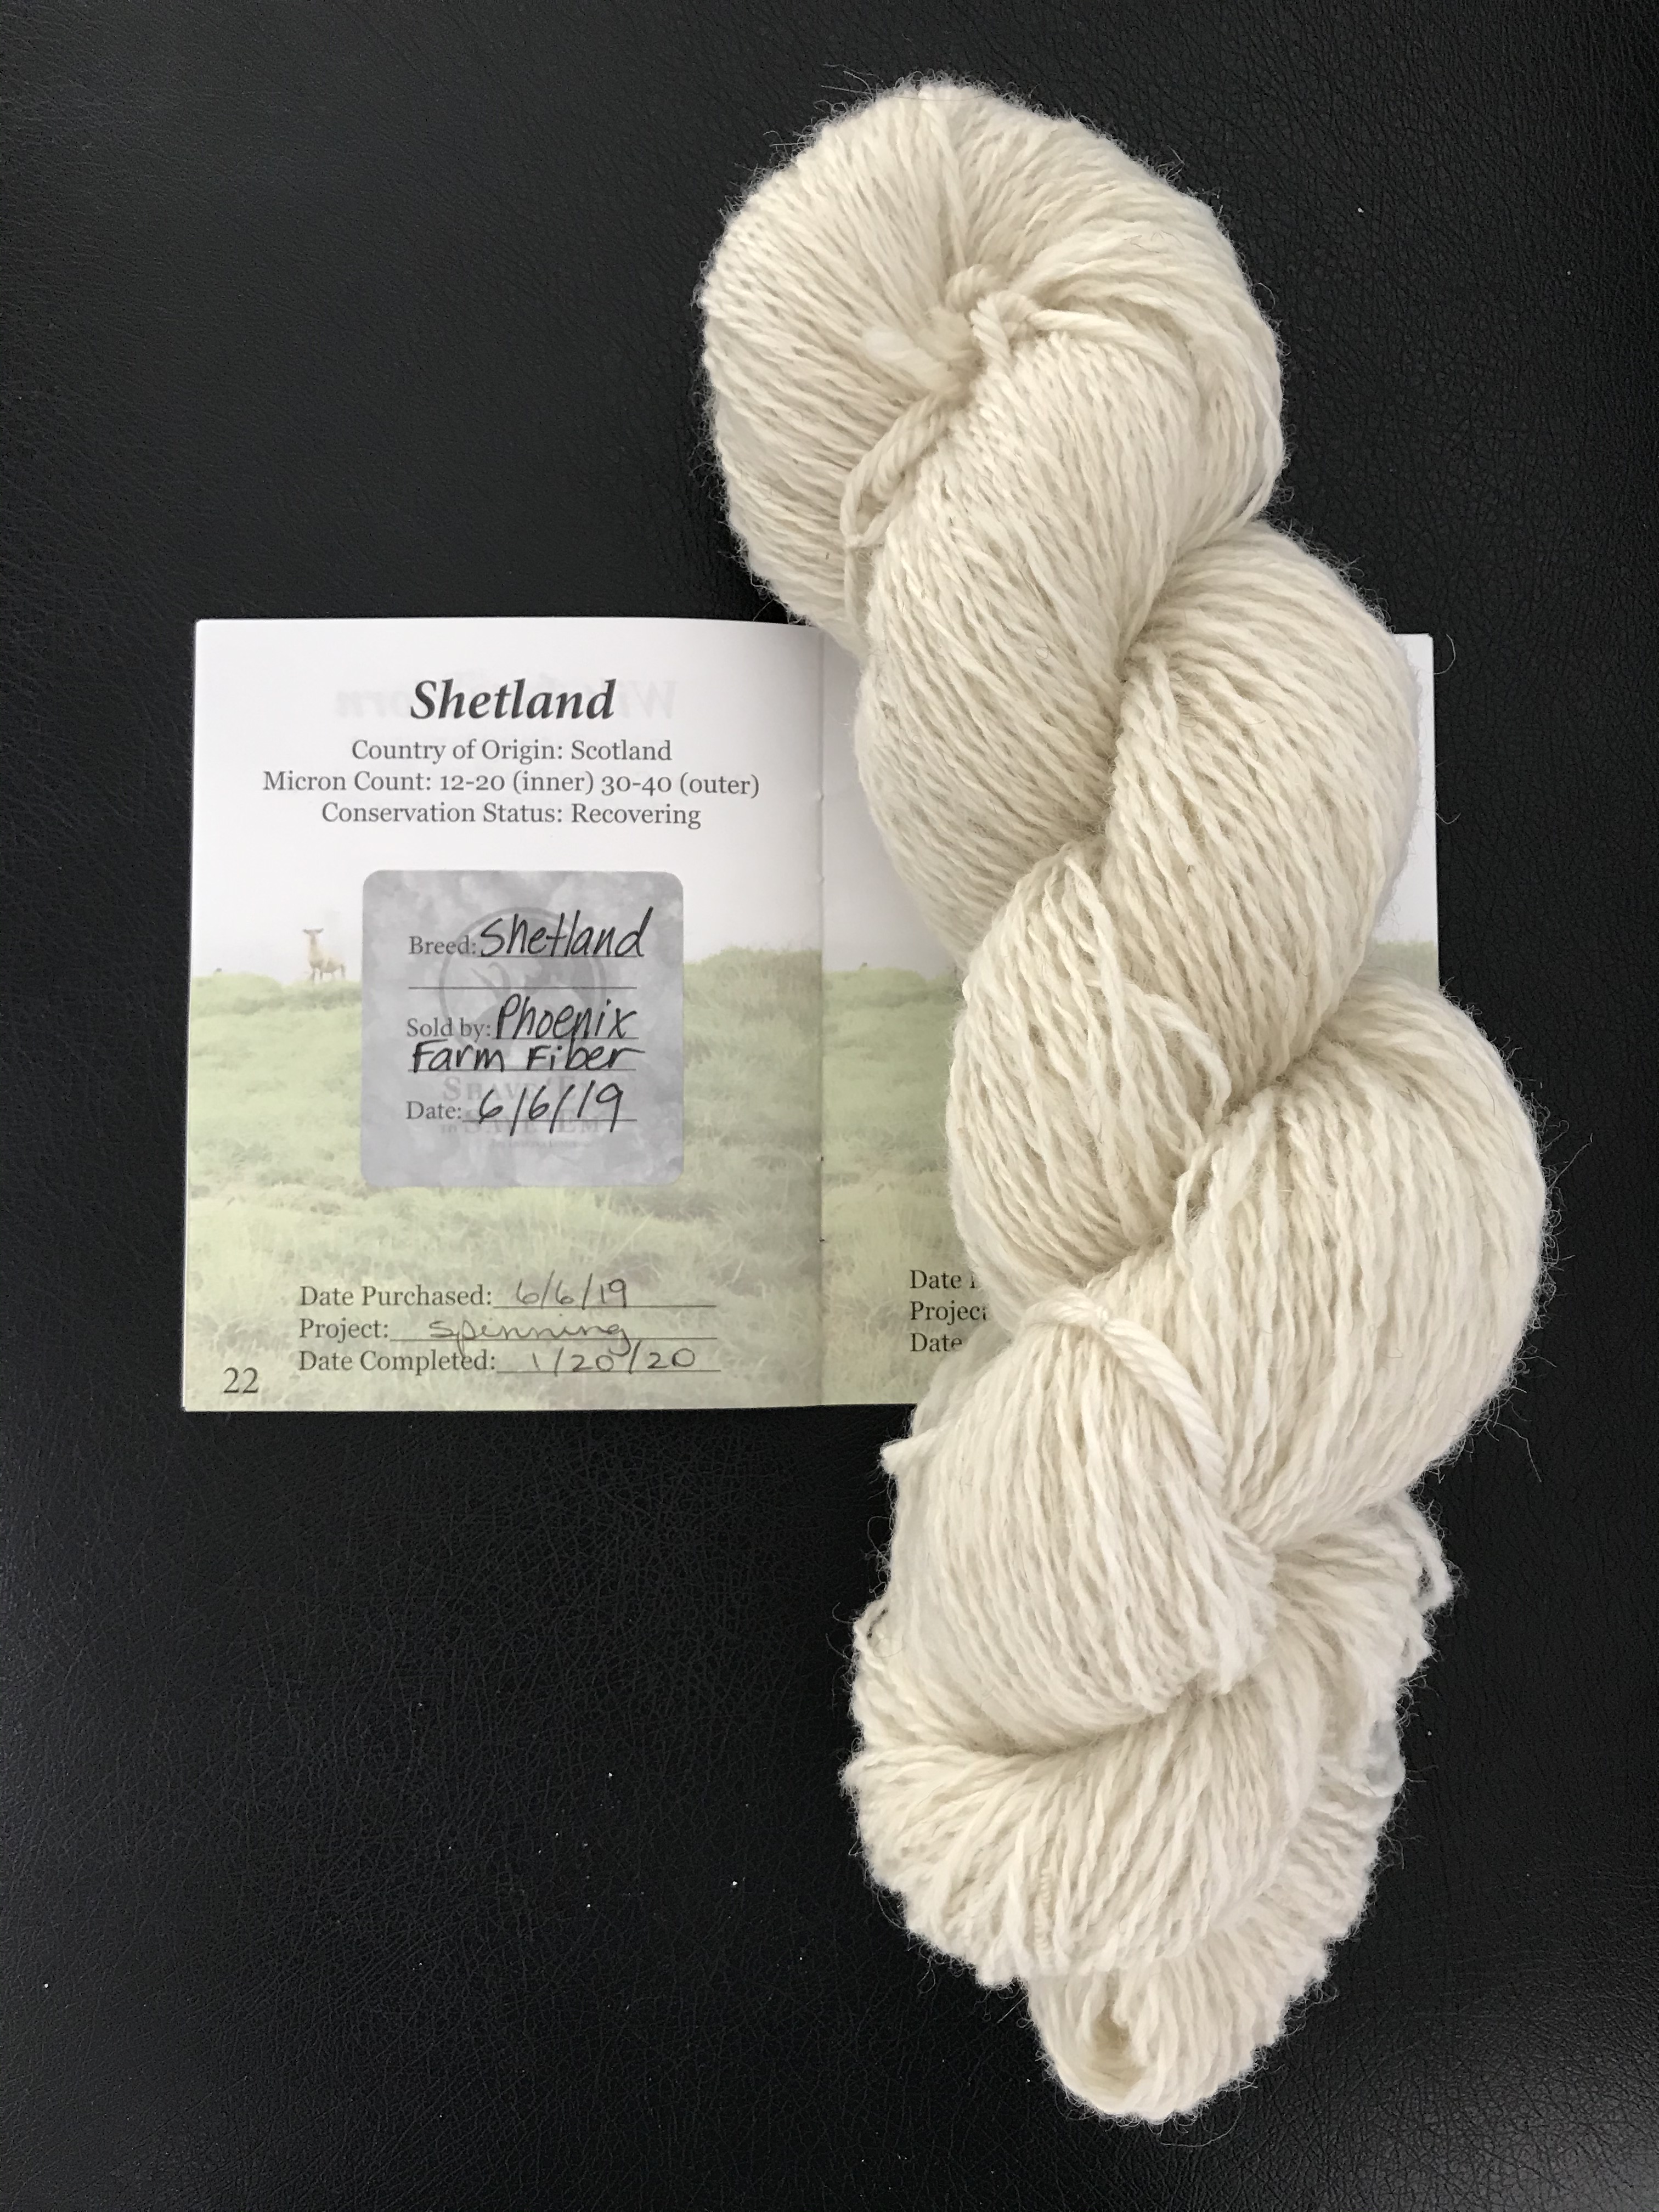
Breed 10 -Shetland
This information is from the Livestock Conservancy website:
I love this yarn but I think it might be a little under-spun.
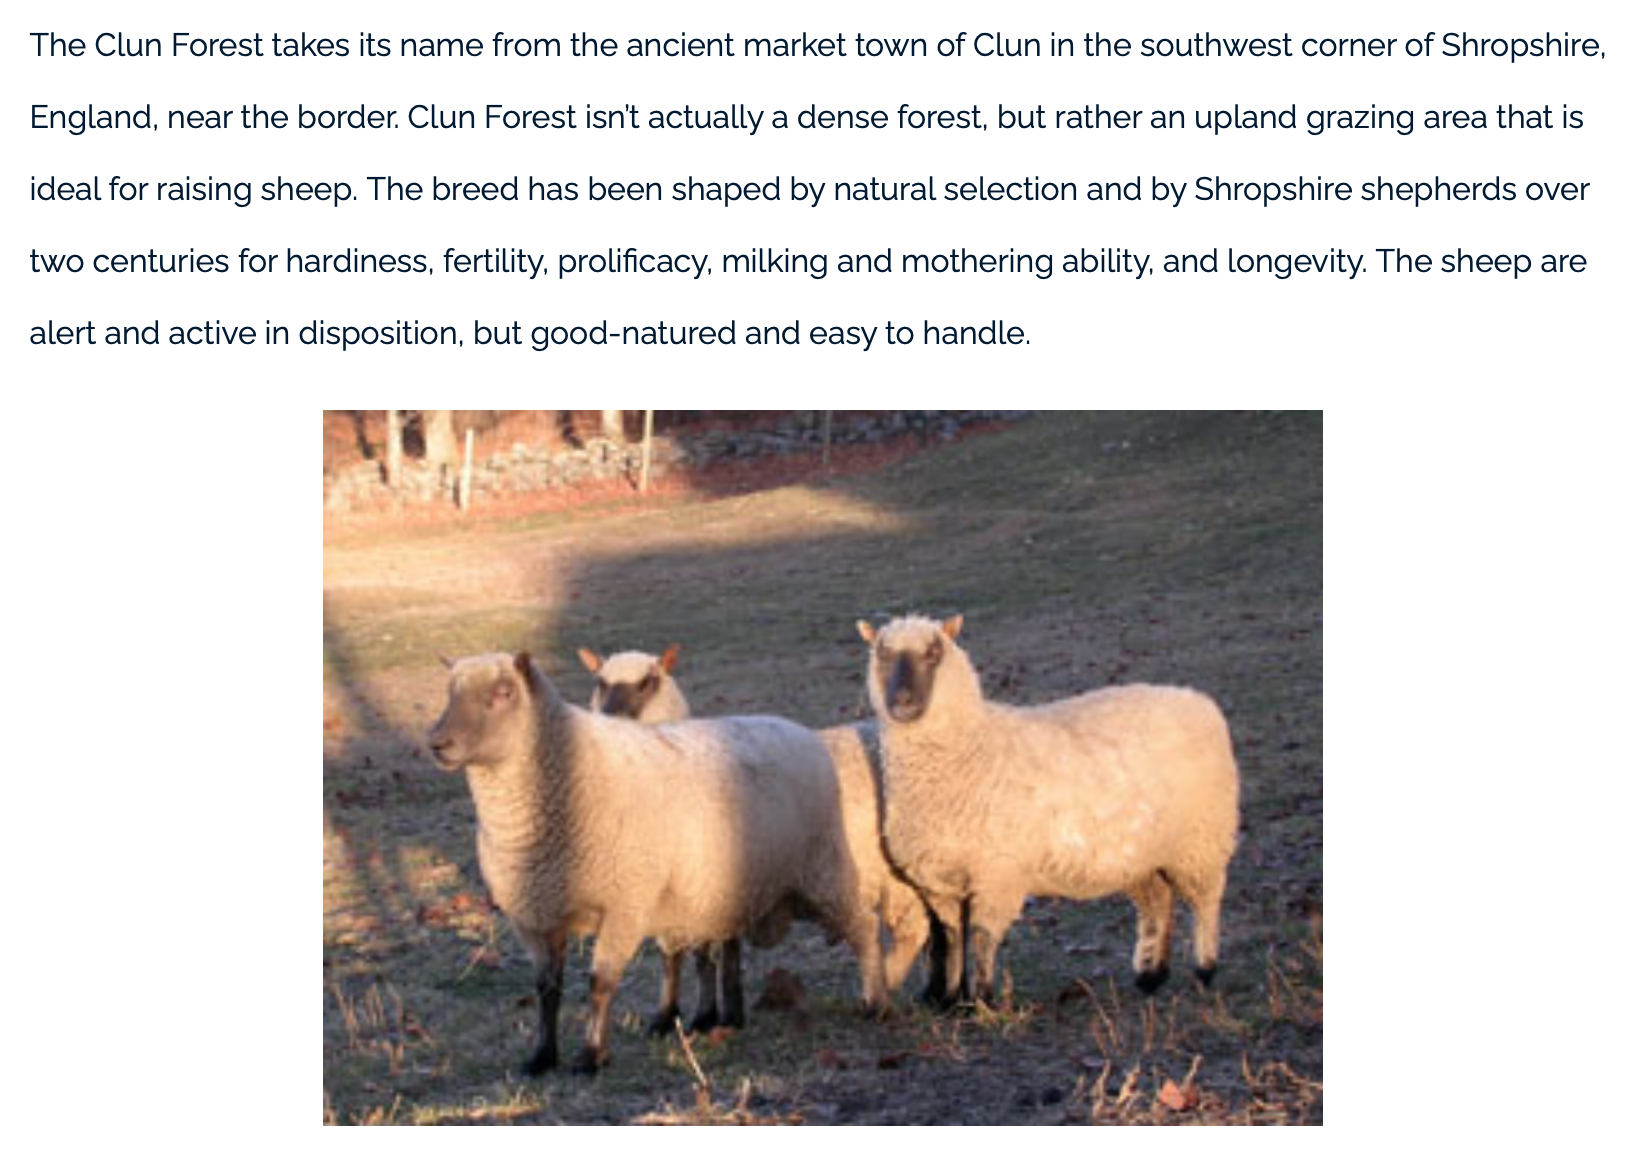
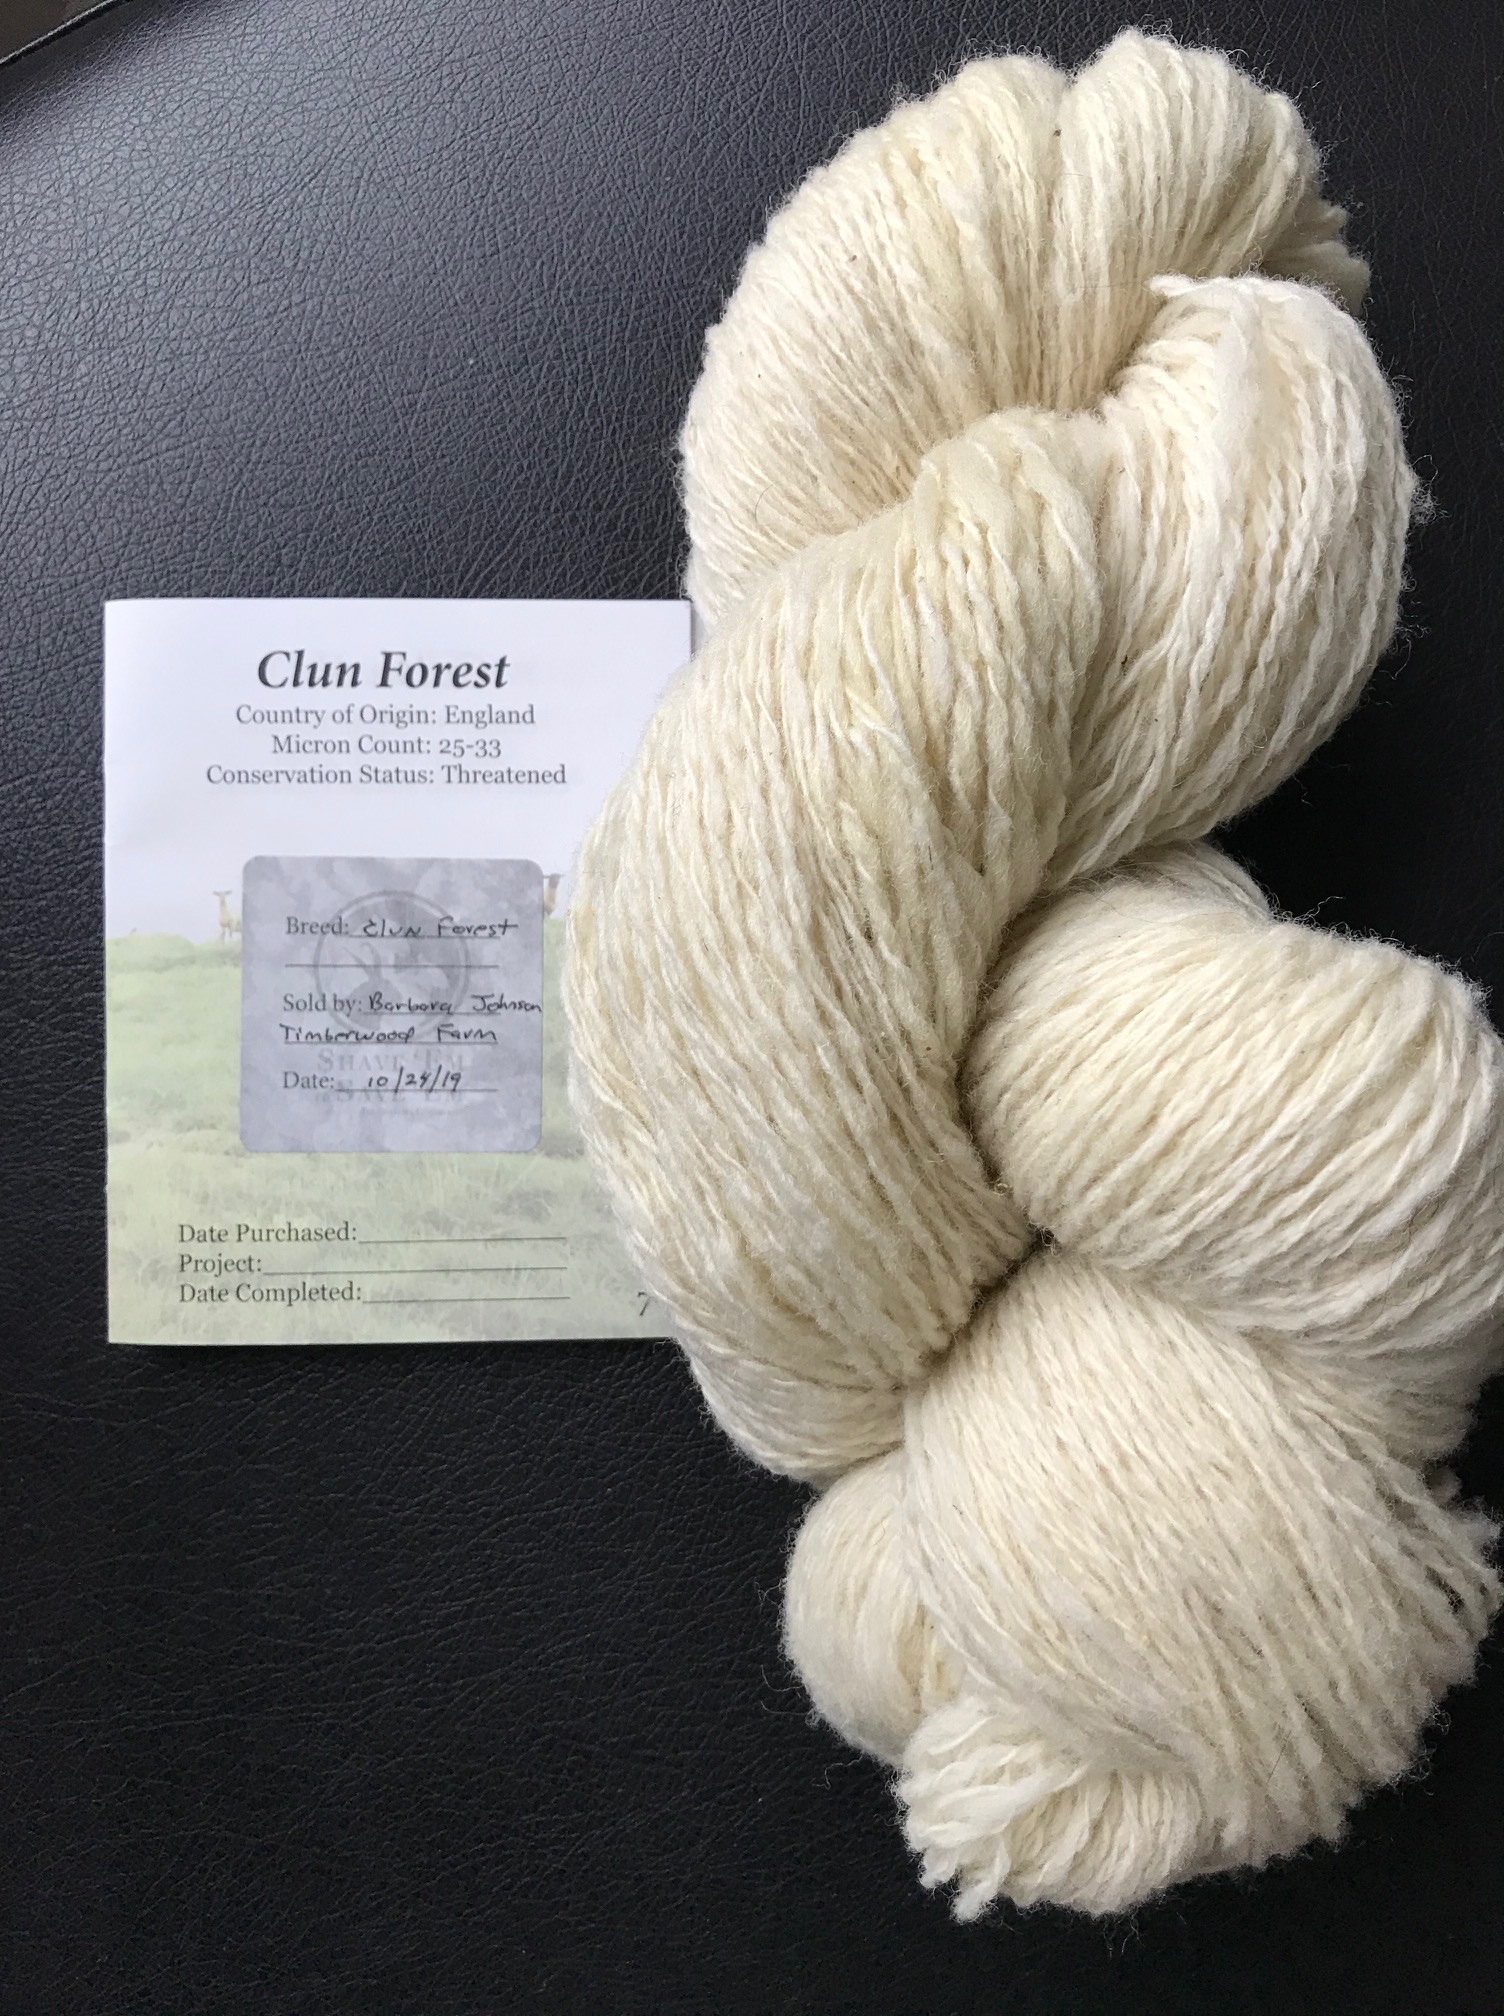
Breed 11 -Clun Forest
This information is from the Livestock Conservancy website:
Another nice fiber!
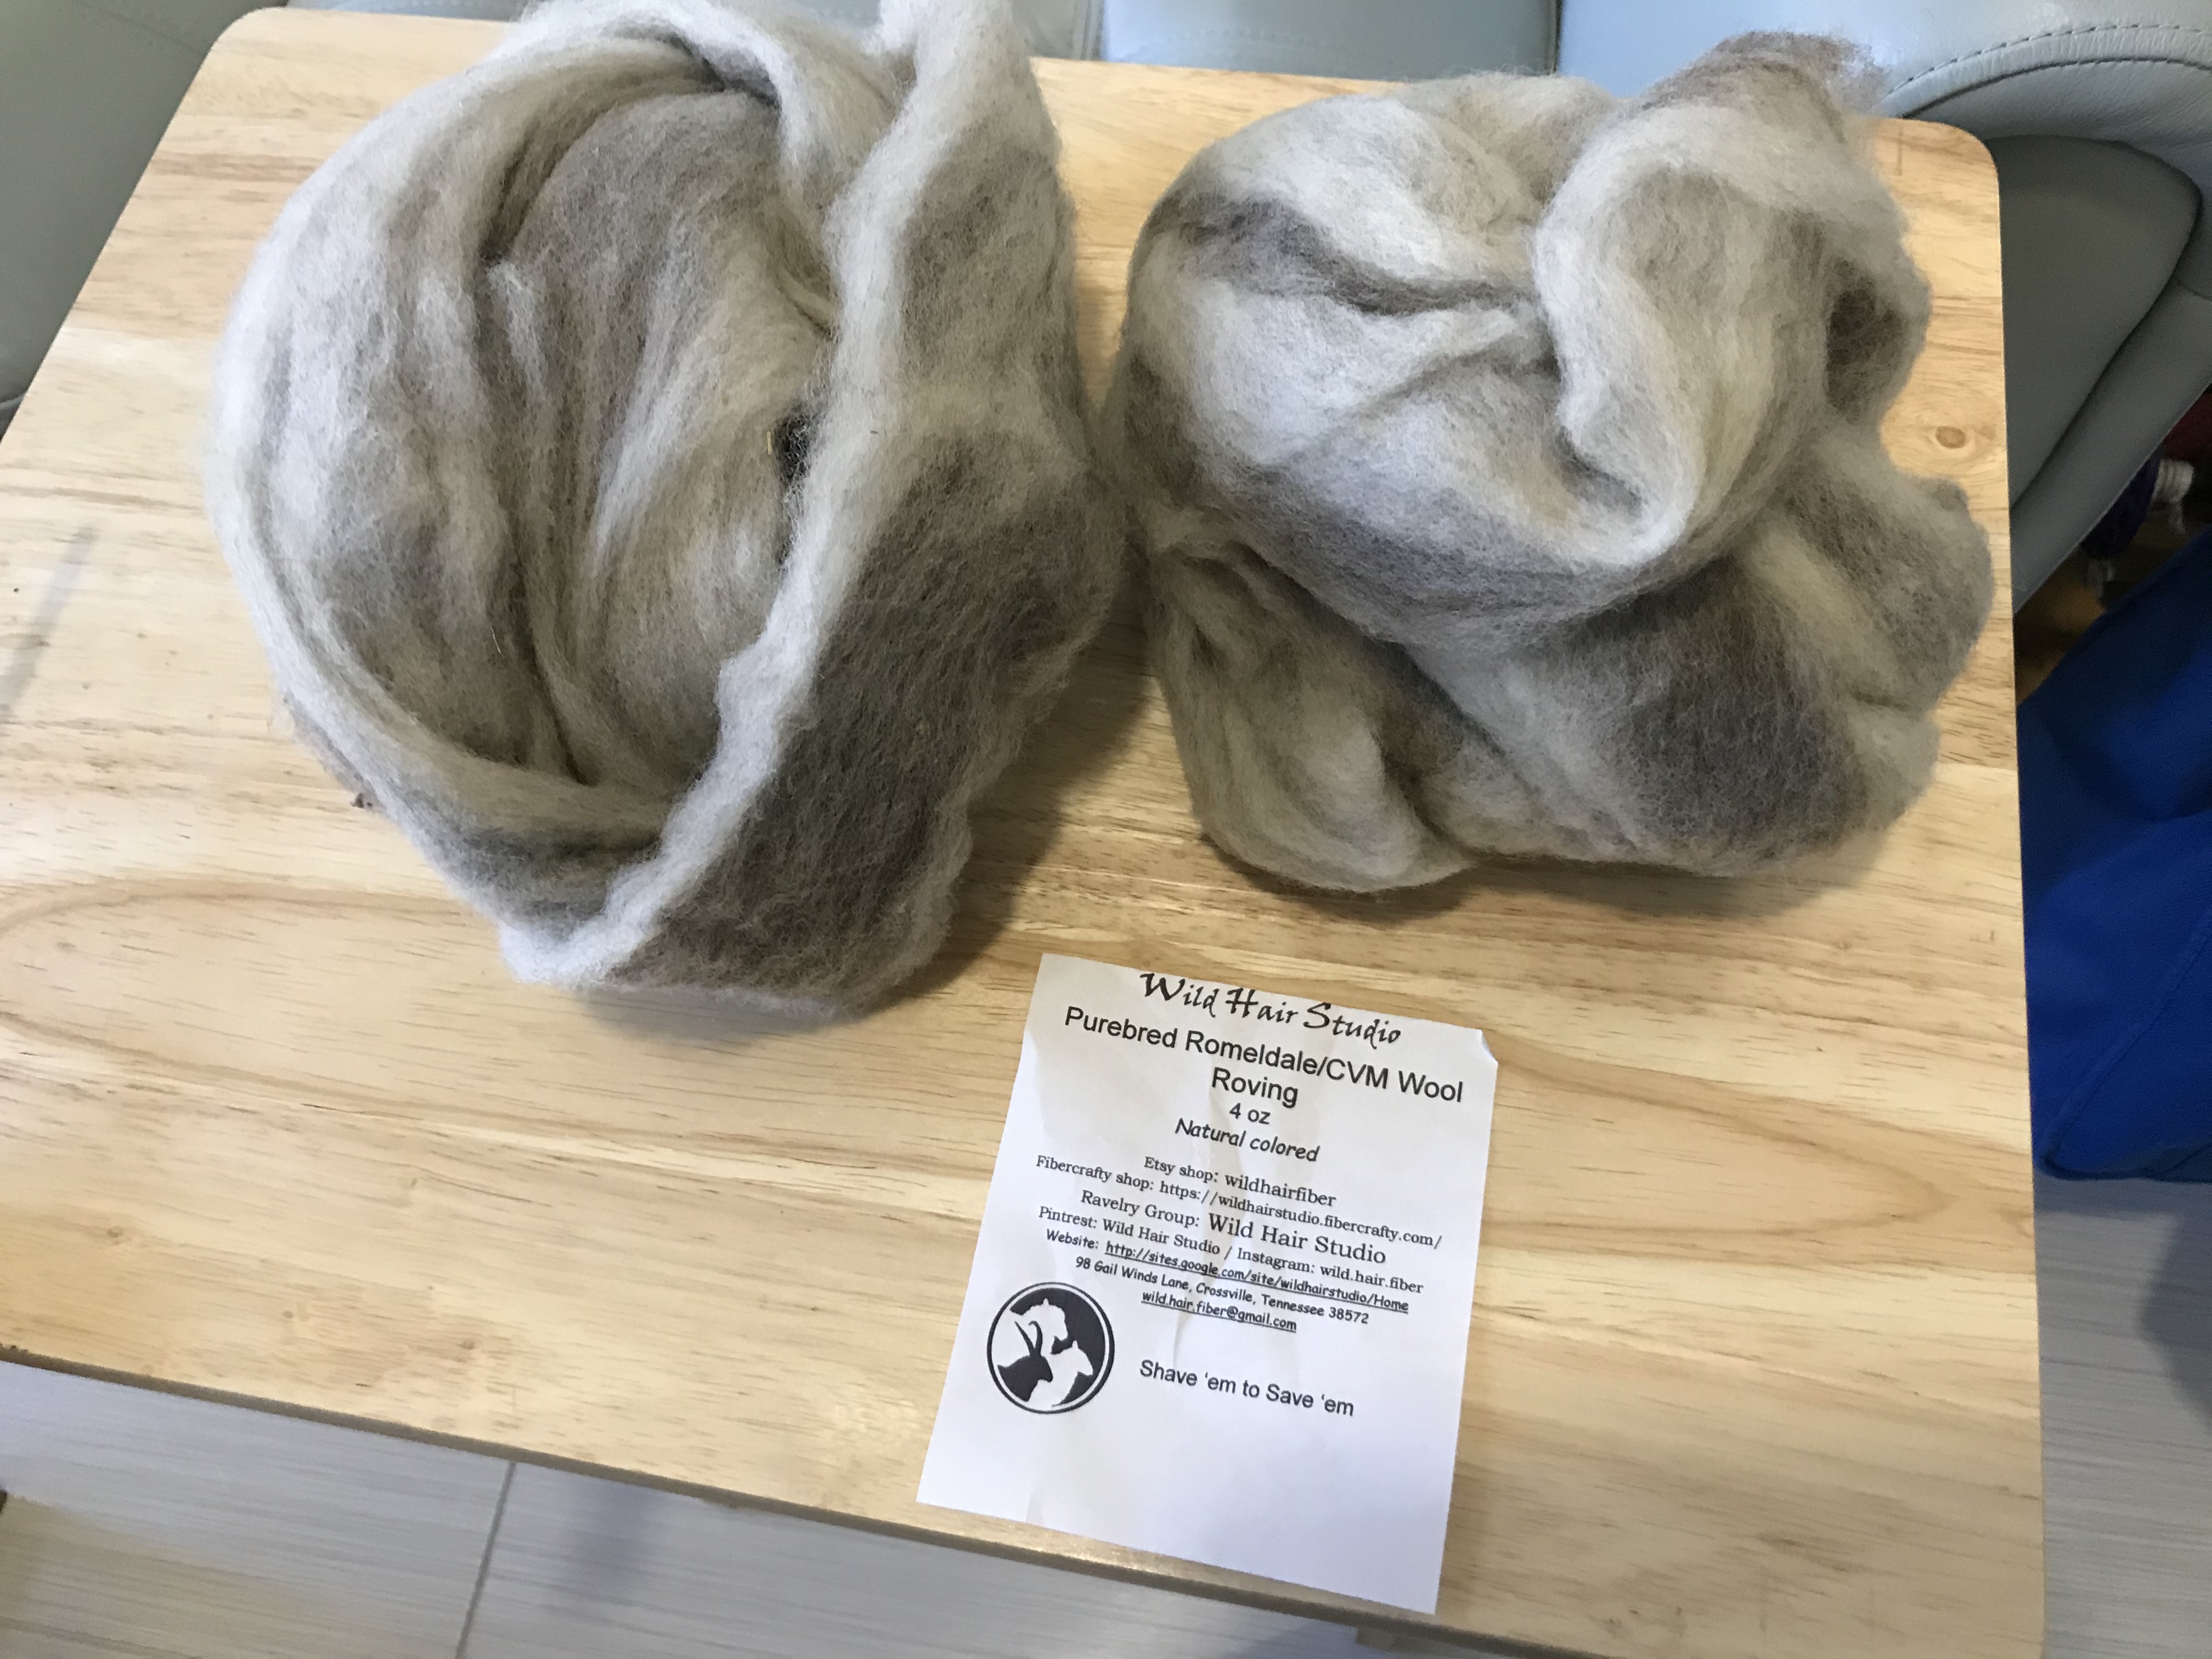
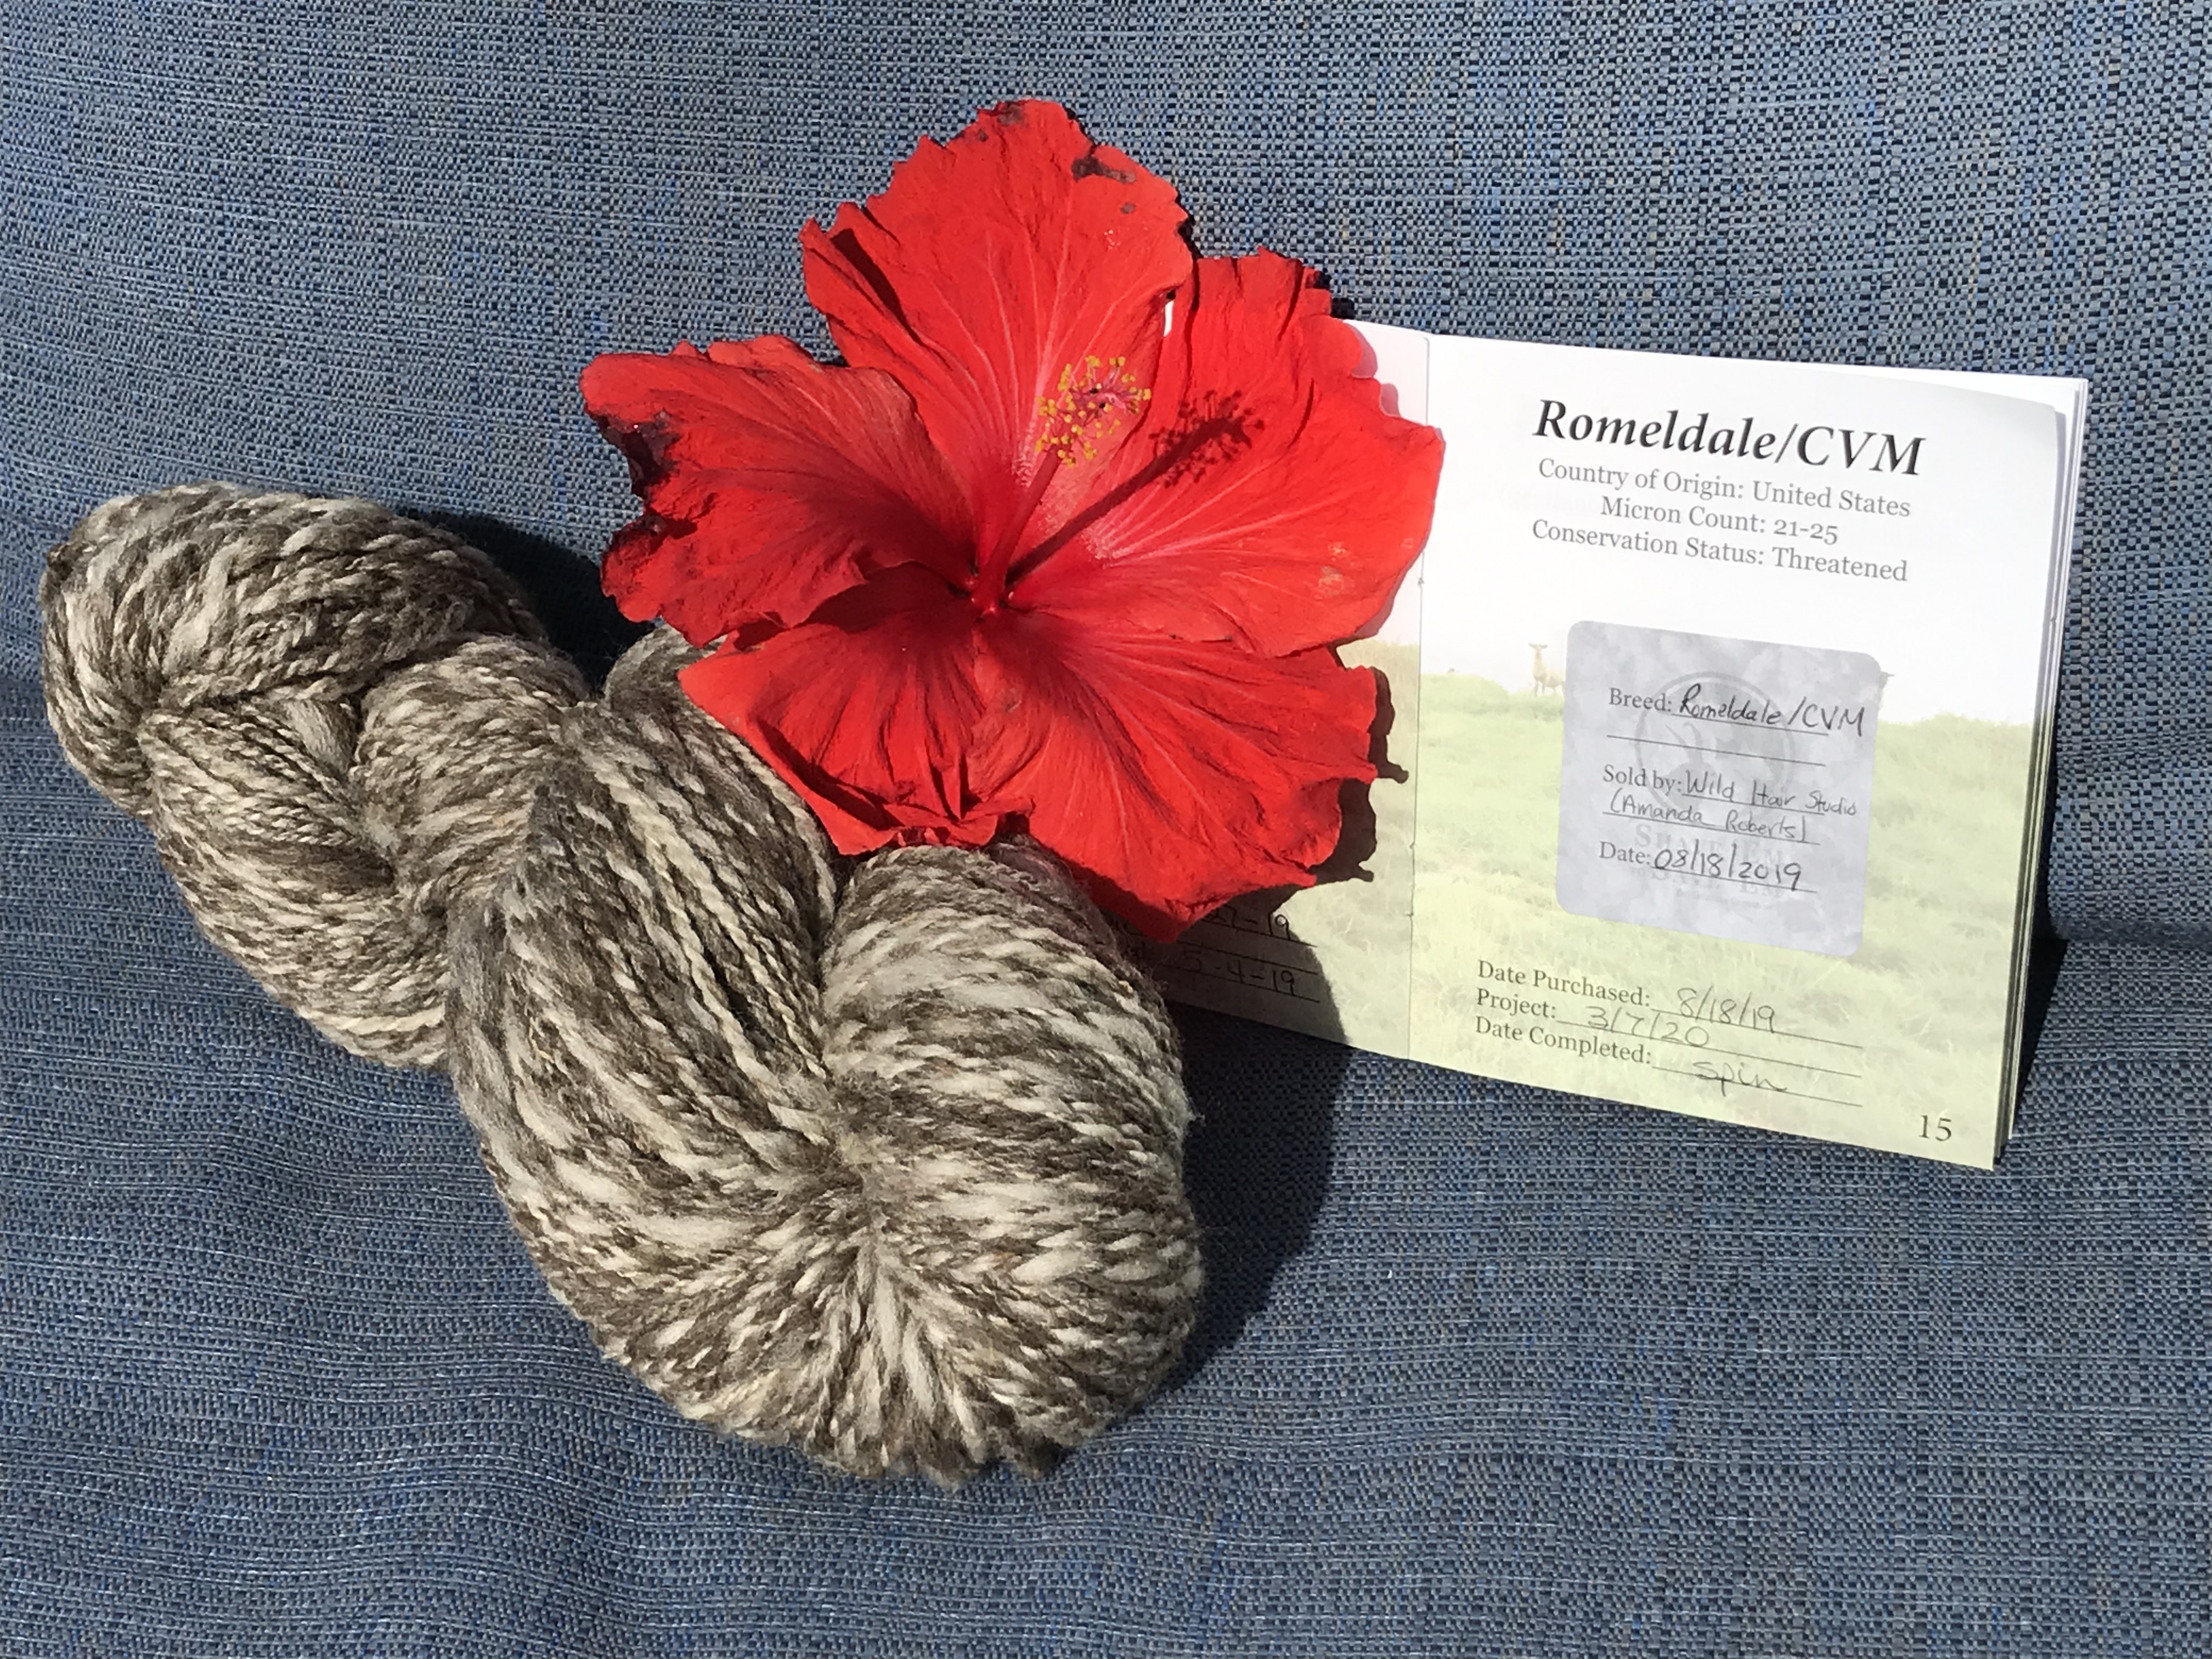
Breed 12 -Romeldale/CVM
This information is from the Livestock Conservancy website:
This roving is so pretty. And it was fun to spin. I know I say that about all the breeds, but they really were fun. And I learned a lot!
I love the variation in this yarn.
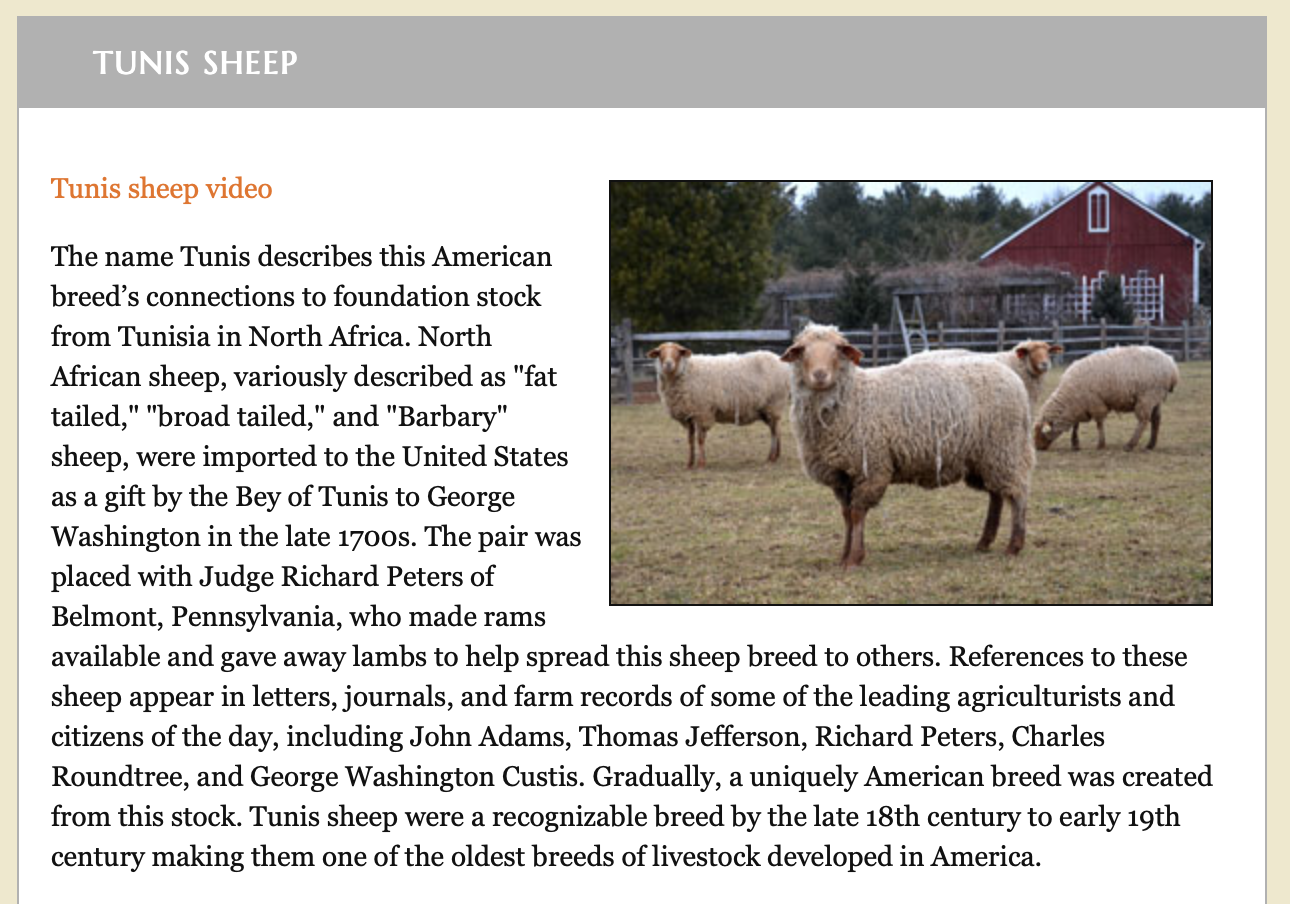
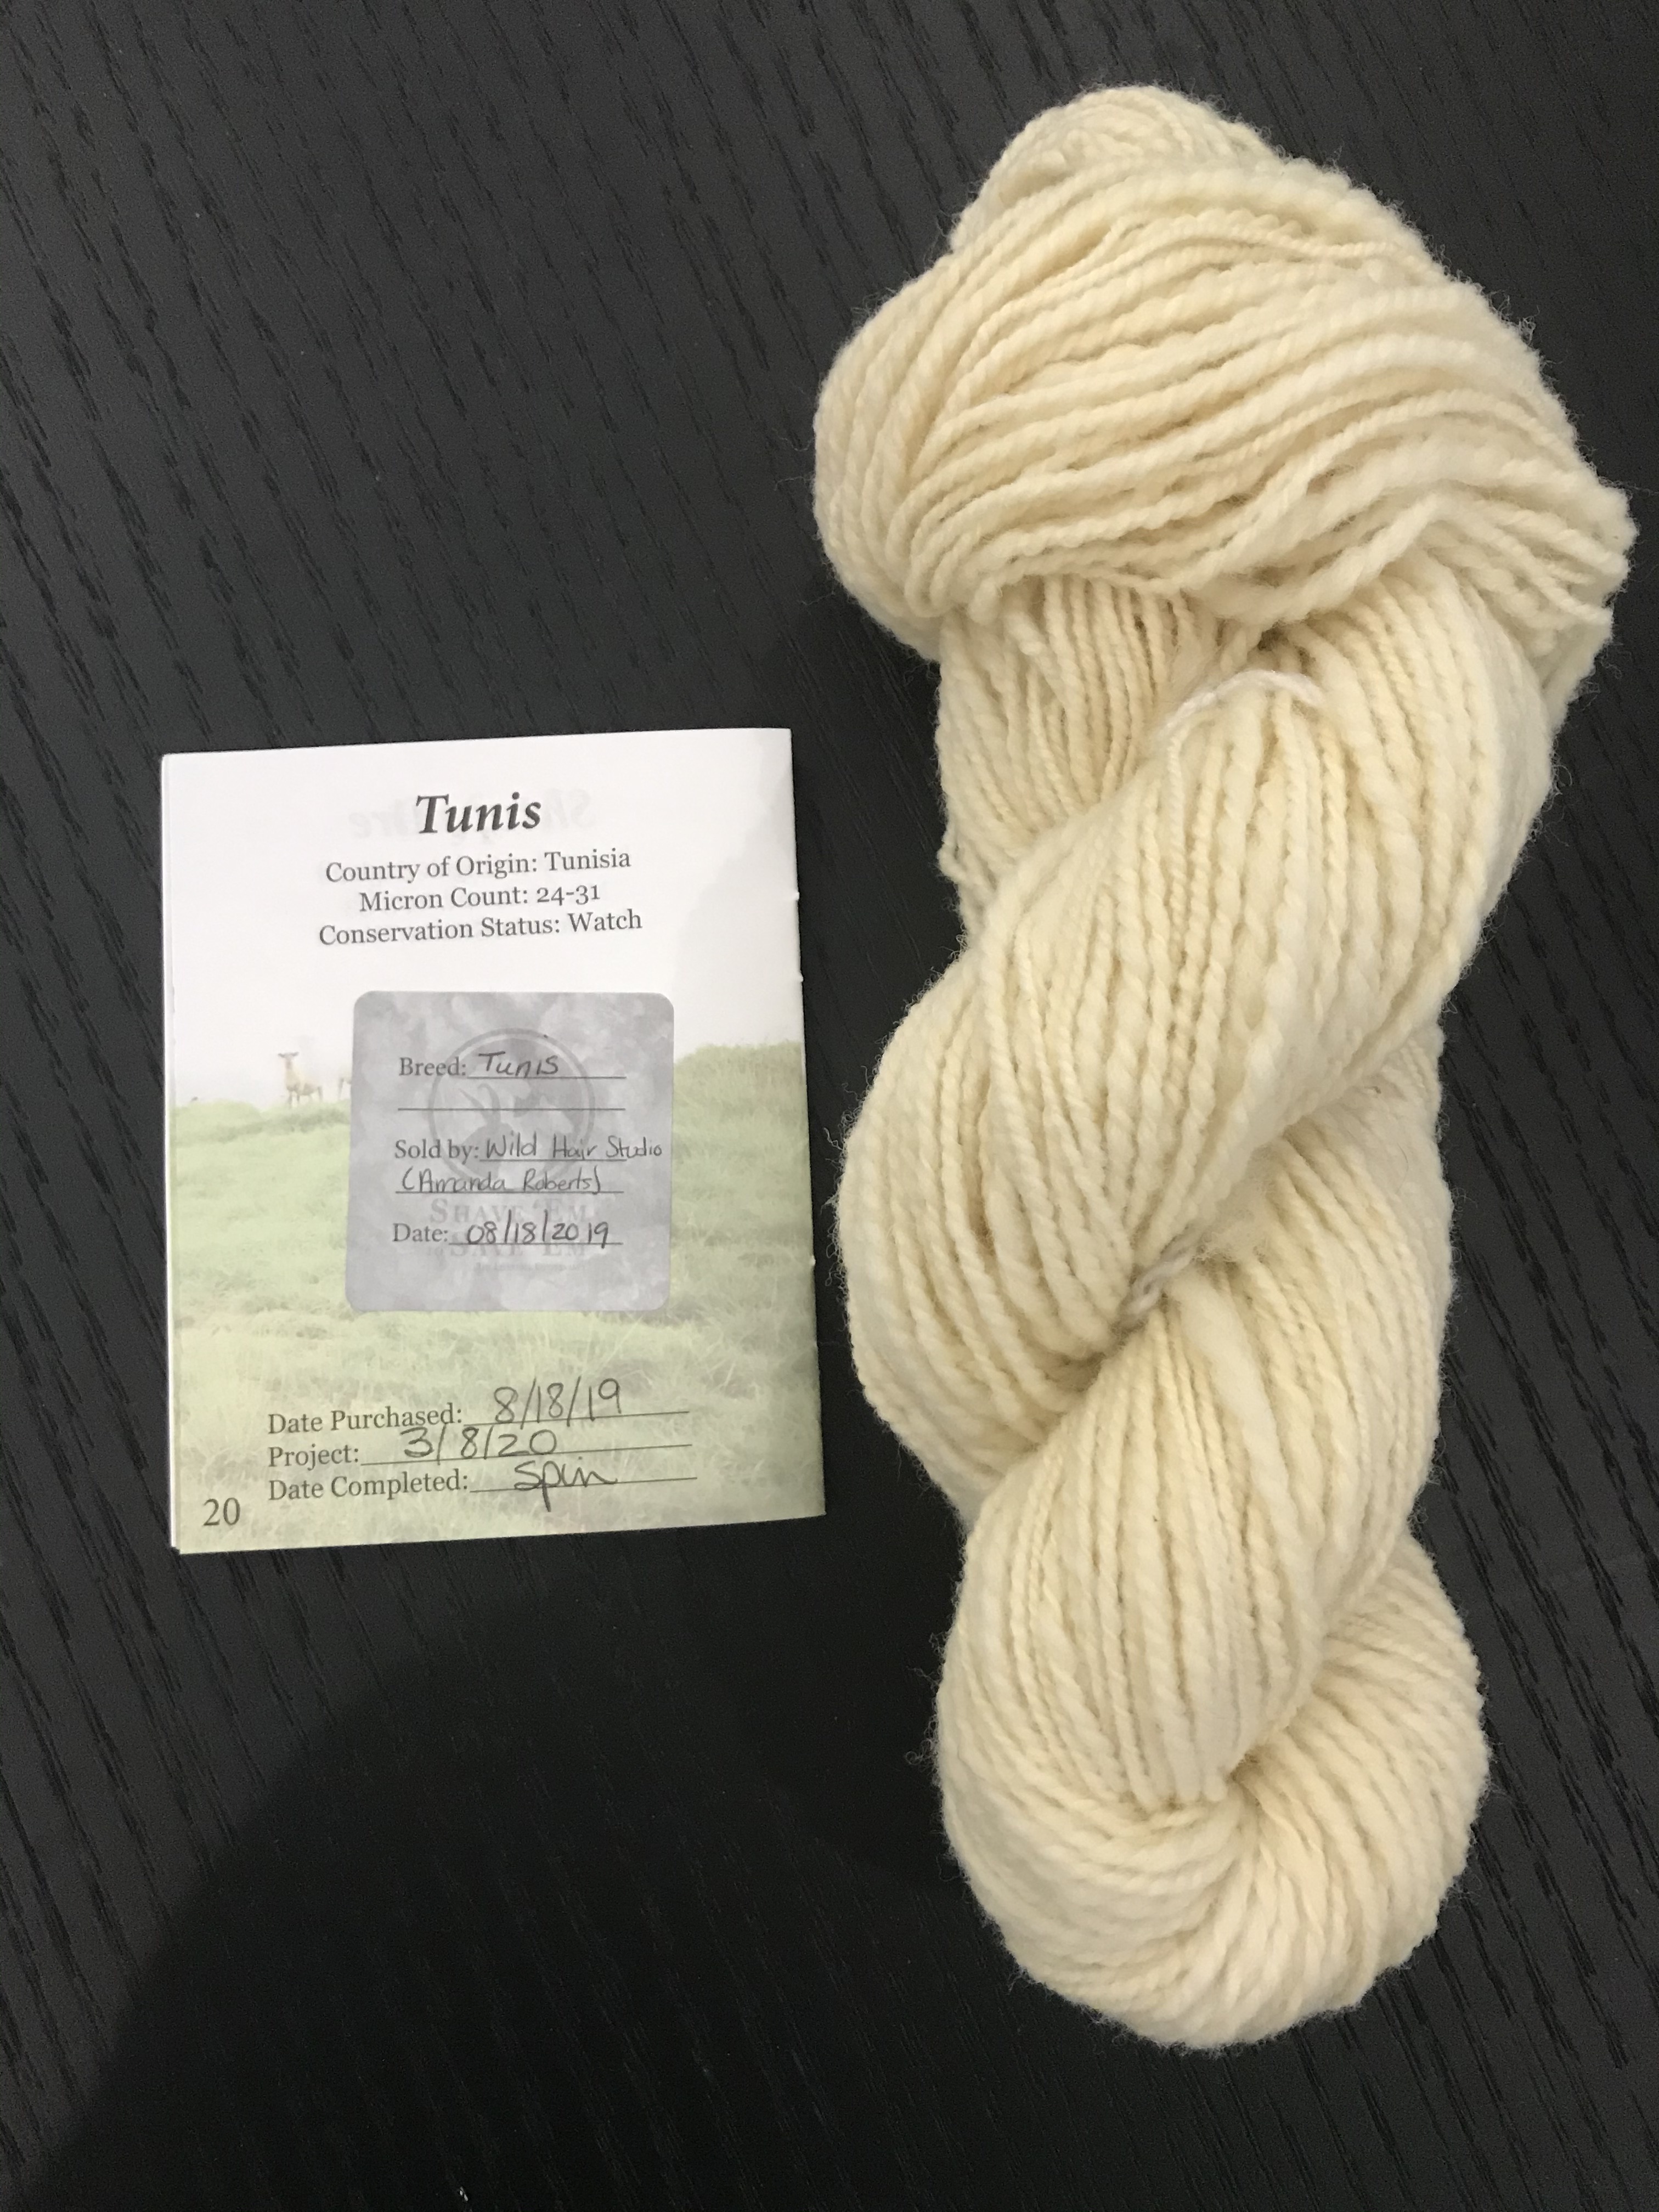
Breed 13 -Tunis
This information is from the Livestock Conservancy website:
Several events and visits that I had planned were canceled due to COVID-19. As a result, I found myself with more time on my hands. I finished the last three breeds in one weekend, but I didn’t take many extra pictures. This Tunis is very spongy and springy. I practiced spinning it a little more than I had been.
Breed 14 -Lincoln
This information is from the Livestock Conservancy website:
I was surprised how small this 4 oz roving was. It was very dense. I got fewer yards of this than some of the other, fluffier breeds.
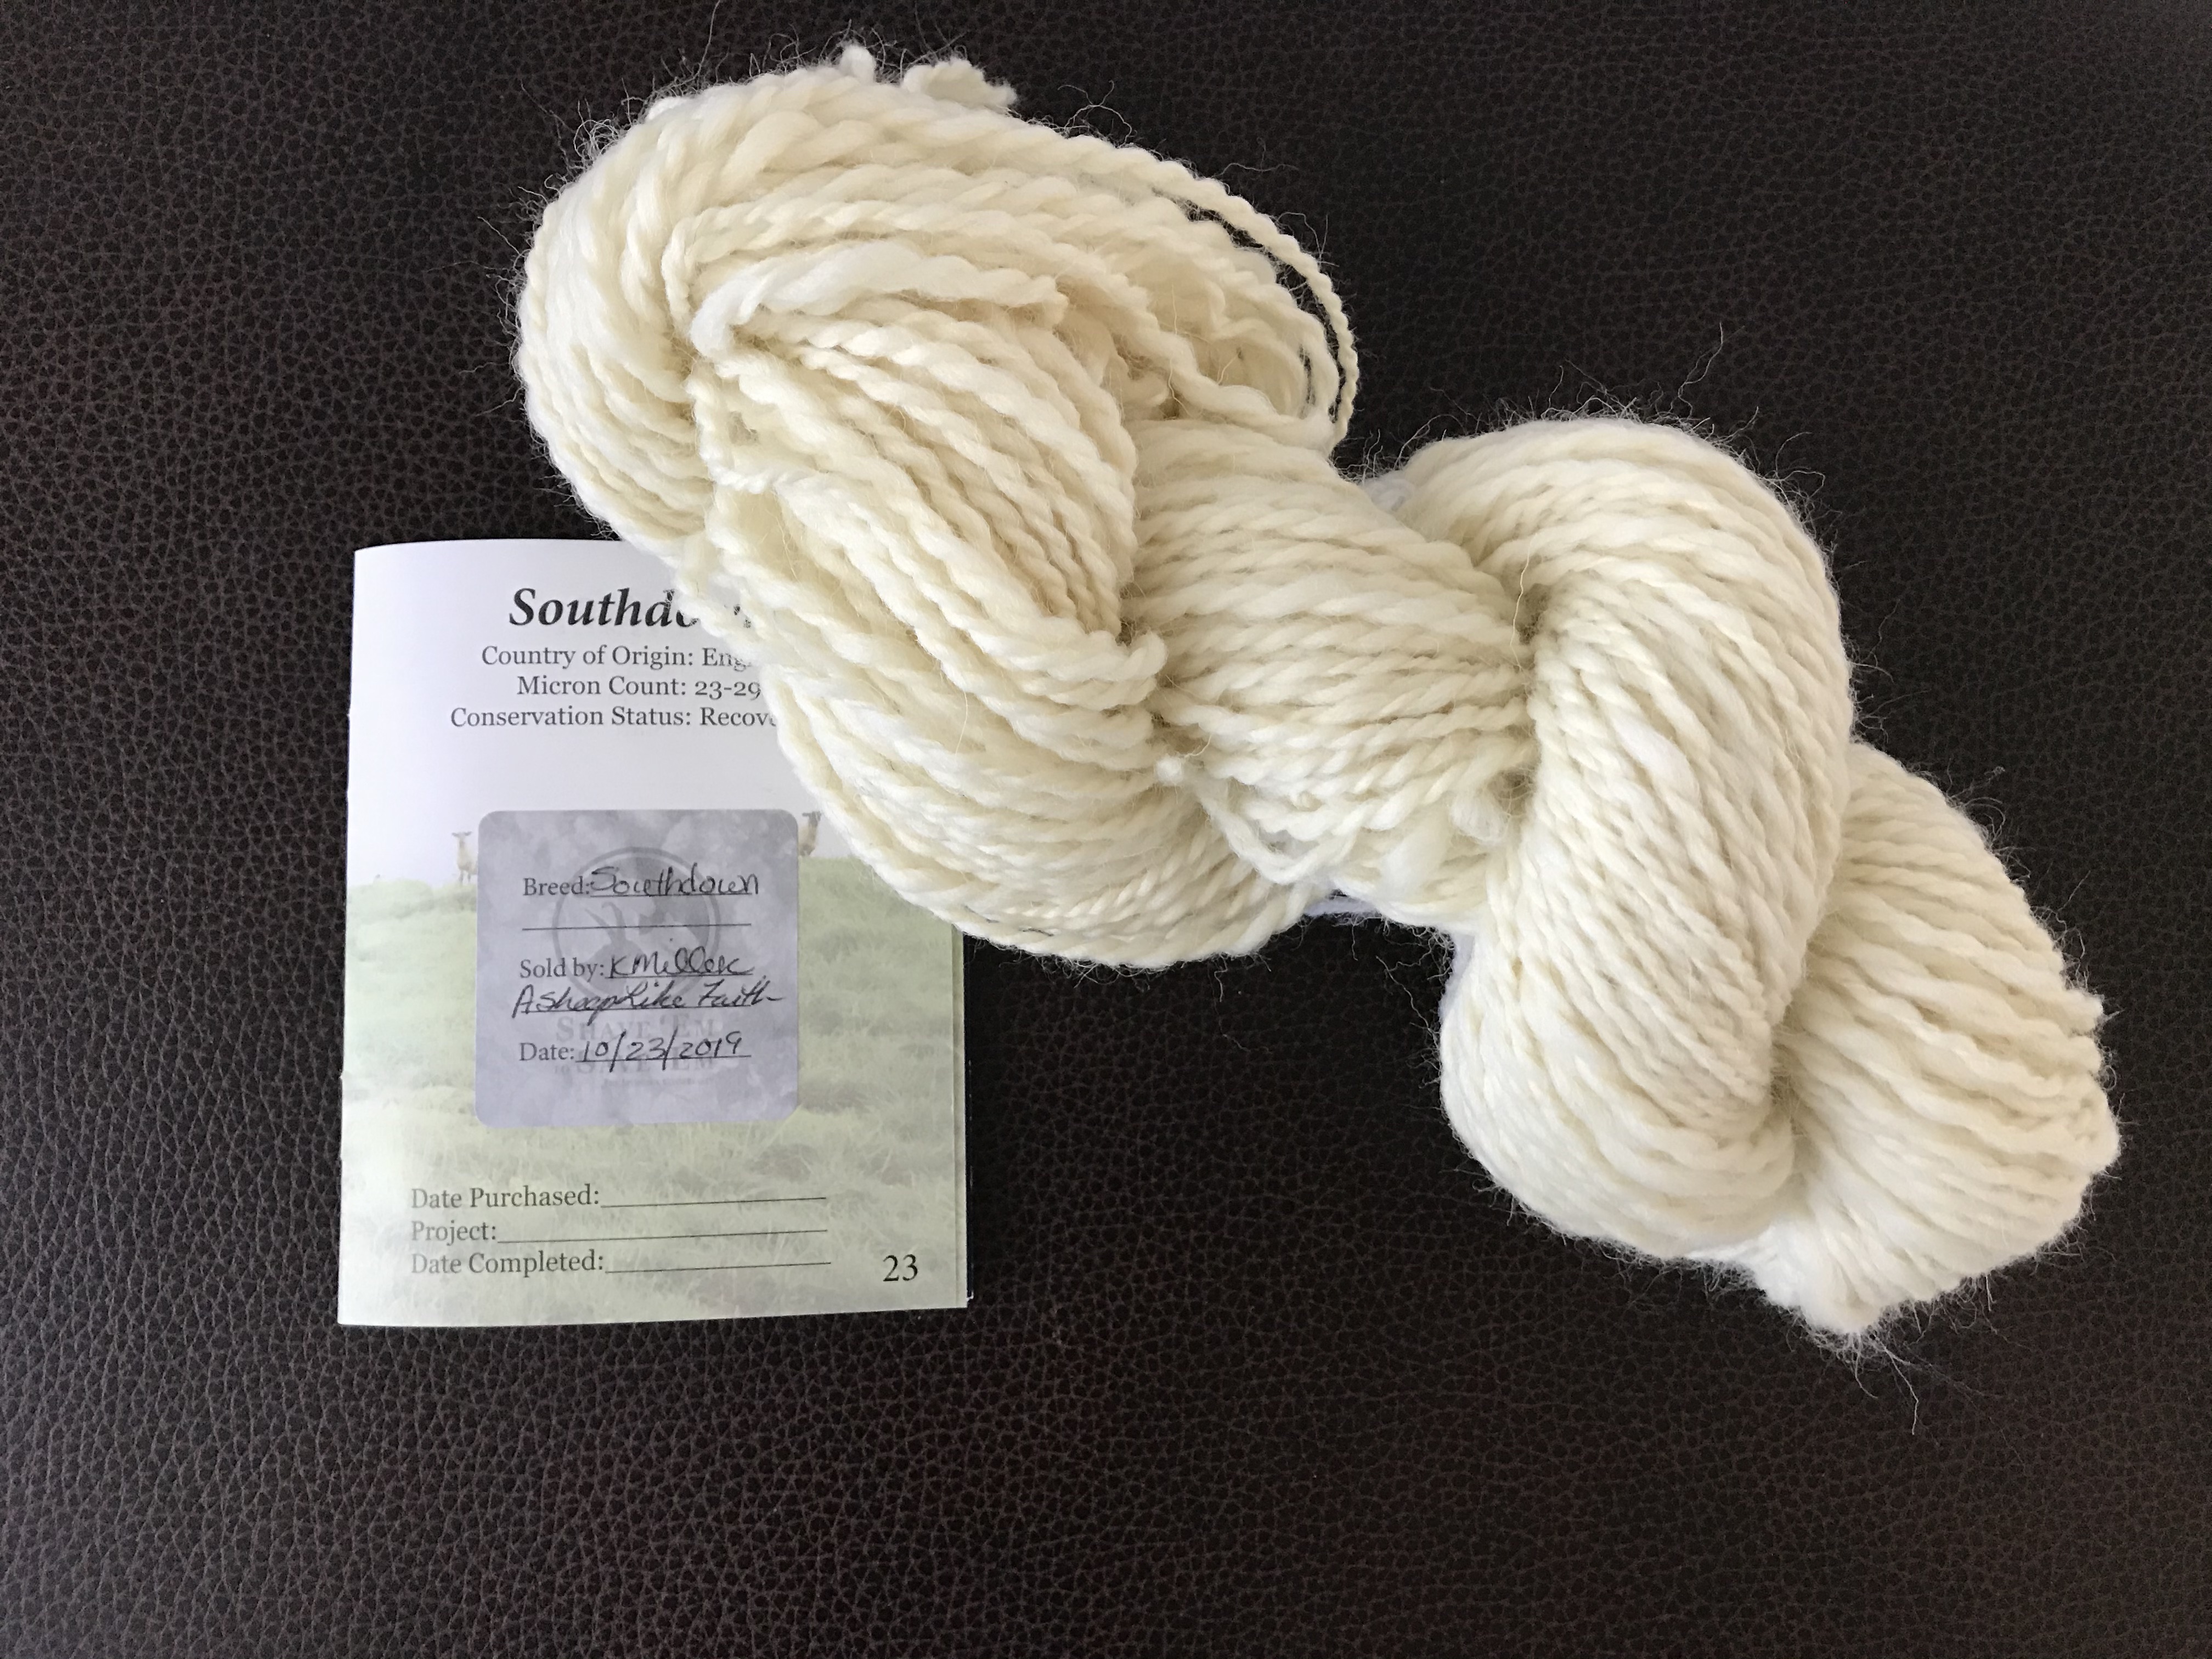
Breed 15 -Southdown
This information is from the Livestock Conservancy website:
Another dense fiber.
Well, now that the 15 breeds are done, I could do the rest just for fun. Some are “hair breeds” and I’m not sure I’m ready for that. But I may return and add some more stickers to my book.
Here is a picture of all 15 breeds, in the order that I spun them. It is remarkable how different they are from each other. From left to right (2-ply yardage for a 4 oz roving): Navajo Churro (308), Hog Island (226), Florida Cracker (260), Gulf Coast Native (210), Santa Cruz Island (190), Jacob (202), Black Welsh Mountain (212), Karakul (254), Leicester Longwool (220), Shetland (290), Clun Forest (400!!), Romeldale/CVM (188), Tunis (146), Lincoln (78), Southdown (116).
The yardage ranged from a low of 78 yards (Lincoln) to a high of 400 yards for the Clun Forest. That stuff just seemed to go on and on!
Thanks for reading. As always, your polite and helpful comments are welcome.
Here are four placements woven on the same warp. Three are variations of huck lace and the fourth is plain weave. This pattern caught my fancy from the beginning. The placemats looks so elegant. Not everyone uses placemats, but I … Continue reading →
The first style is a poncho woven in two rectangular pieces and sewn together.
The second style is a wrap that I have come to know is called a ruana. This one can also be woven as two rectangles sewn together or it can be woven as a double weave.
Both are easy to weave since they are rectangles. It has been SO much fun weaving these wraps because there is no end to the number of design options available. As long as they end up the right size, anything goes. You can use any combination of yarns and any size reeds/heddles. They can be woven on floor looms, table looms, and rigid heddle looms.
To get started I looked at many patterns and designs. The first poncho I made was a bit small so I adjusted for the second one. I had several people try on the styles to see which one worked best. I settled on a small set of sizes depending on the persons preferences. The sizes given are after it has been taken from the loom and wet finished. Depending on the sett and fiber used, the size in the loom is larger.
All of the wraps I have made so far are plain (tabby) weave. It will be fun to try additional weave structures as well as combinations of colors and textures in the future.
Poncho Size
The basic poncho is composed of two rectangles 22″ wide and 35″ long. The difference in length and width contributes to the size of the head opening. Once you know the correct size head opening keep this difference the same. If you make the piece three inches longer it should also be three inches wider. On the other hand, if you want to make the head opening larger or smaller, increase or decrease the difference. To make the opening larger, increase the length more than the width. To make the opening smaller increase the width more than the length.
Ruana Size
The basic ruana is composed of two rectangles 22″ wide and 56″ long. This fits most adults pretty well. If you make the pieces wider, the wrap comes down farther on the arms and there is more cloth in wings. If you make the pieces a little longer the wrap falls closer to the knees. I just ask the person “normal or wide” and “longer or shorter”?
Here are pictures and descriptions of the wraps I have made so far.
First Poncho – Practice
I made this one on my 25″ rigid heddle loom using the full width and a long stick shuttle. I warped it on an 8 dent heddle. The warp is a cream colored acrylic (unknown origin) with 10% of the ends Lion Brand Shawl-in-a-Ball color Namaste. The accent threads were distributed randomly. The weft is all cream acrylic. The fringe is 3″ long and each end is hemstitched 3×2 threads.
This poncho was a bit too small in the neck opening but fits a child so it did not go to waste.
My rigid heddle loom was just barely wide enough if I used the whole width. So for the rest of the wraps I used my 36″ wide, 4 harness floor loom.
Abby’s Poncho
For my second attempt I switched to the floor loom, adjusted the dimensions, and used a single yarn for all the warp and weft. In this case, the yarn I used was Caron Simply Soft in an off-white tweed color. The yarn itself had enough interesting variation that no other accent was needed.
I have been reading how others provide a little tension when winding on the warp when there is no one around to help. This idea with cans seemed simple but it didn’t work. Right after this picture was taken the yarn popped off the top of all the cans.
Kathy’s Poncho
When my friend saw the first poncho I made she expressed an interest in one. I asked what color and she said teal. So here is the poncho I made her. This one is also done with an 8-dent reed. The warp is an acrylic yarn (unknown) and the weft is Shawl-in-a-Ball color Healing Teal.
I forgot to take pictures while I was working on it so I had to ask her to send me some. I love the way her pictures show two different ways you can wear the poncho.
Purple Poncho
This poncho was the first thing I wove with my new 5-dent reed. The warp is Vanna’s Choice in the color Imperial Mauve and the weft is Home Spun in the color Tutor. I have tried weaving with the Home Spun before to weave a scarf. It looked pretty but felt like a thick rug. So I knew enough this time to “set” the weft in place rather than beating it in vigorously. The results were good. The poncho is fluffy and has a nice drape.
There is a lot of variation in color in this yarn. As a result the two piece of the poncho look quite different from each other. Since the poncho is symmetrical front and back, it can be worn with which ever set of colors you like facing the front. Perhaps in the future I will make one where the two rectangles are completely different from each other, though complimentary. After all, a small bit of the back piece is visible from the front depending on how the poncho is worn.
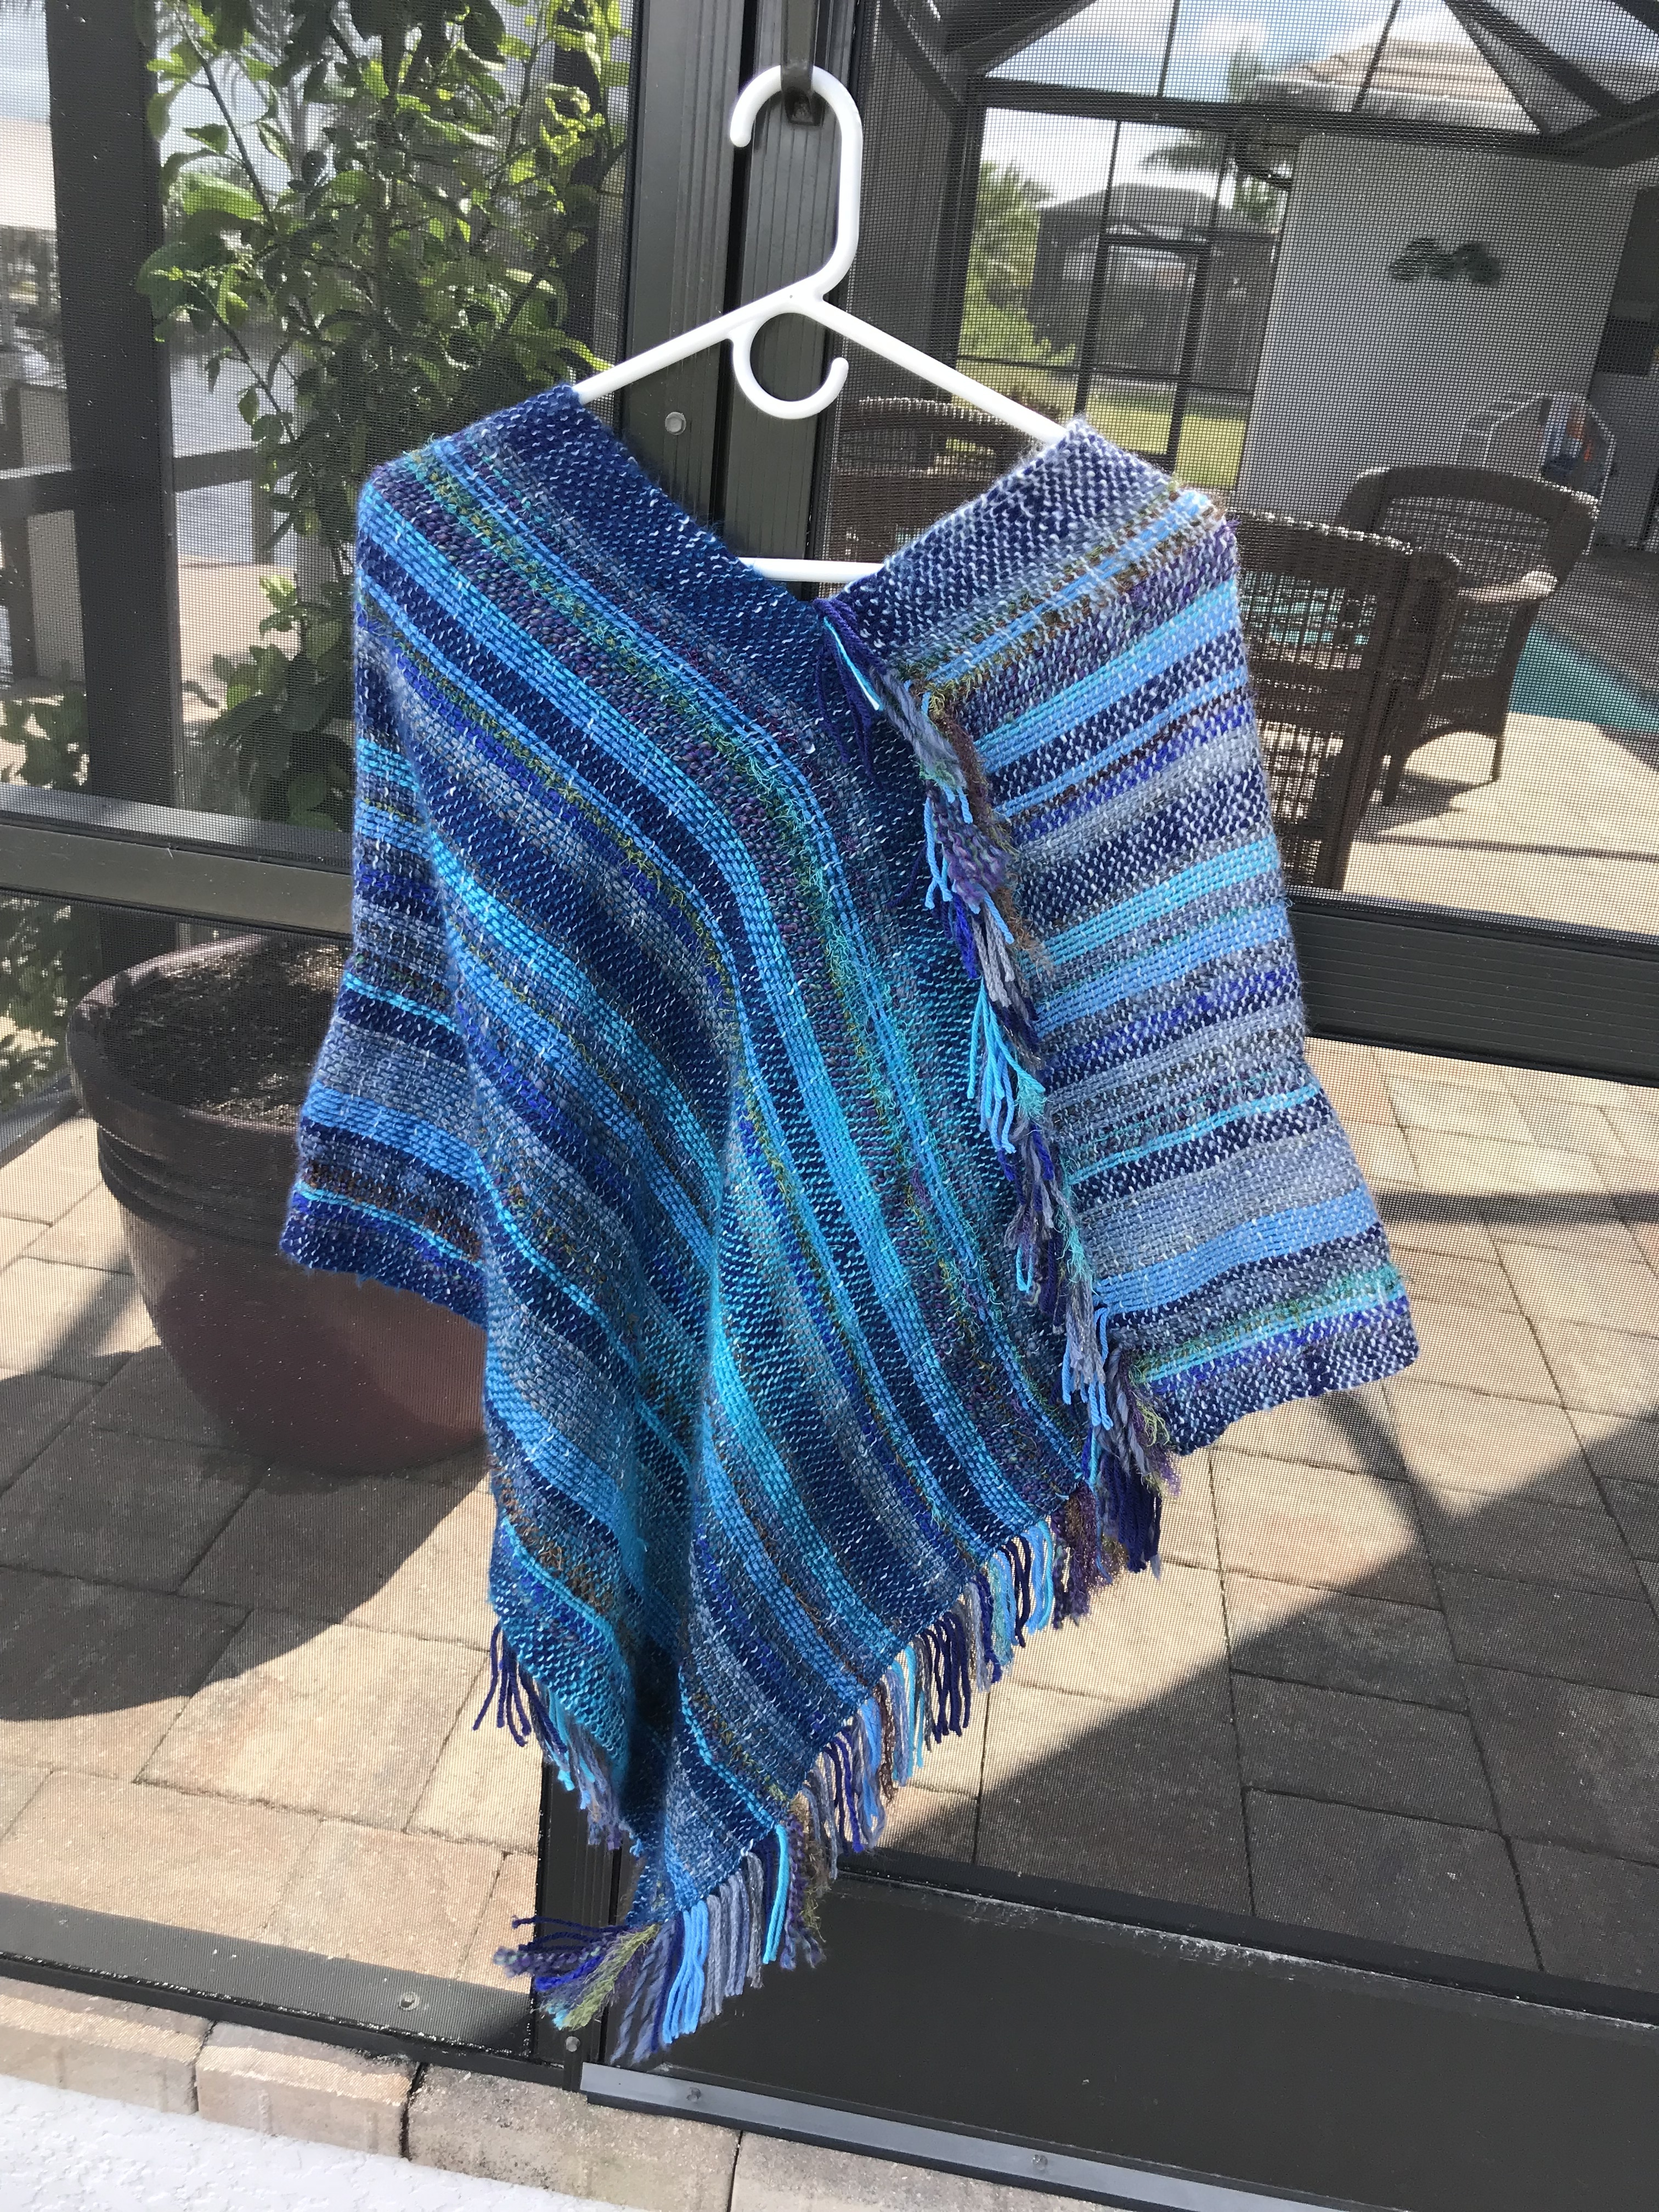
Saori Style Blue Poncho
Saori style weaving is so pretty. As much as I read about it, it is hard to find a single definition. Most agree that it is a free form style with no rules. In this wrap I used a variety of warp threads, all in the blue family. It was great fun. The weft is Shawl-in-a-Ball in color Healing Teal.
I am still a pretty new weaver and one of things I struggle with is how to warp with multiple types of yarn. Some advise that you tie off each color on the warping board creating a single warp that can be threaded in order. I wanted to “design at the reed” rather than figure out the order of the thread ahead of time. So I measured out all the warp for each yarn separately and then sat down and tried to put it all together. At first it looked like it was going to be an impossible mess. But after I straightened it out, the warp started to behave.
I hoped that by choosing a light weight weft thread, the characteristics of the warp would show better. I think it was a good idea. Though some of the “hairy” warp threads seems trapped by the weft. In the end I went along and brushed them a little to release the fluffy fibers.
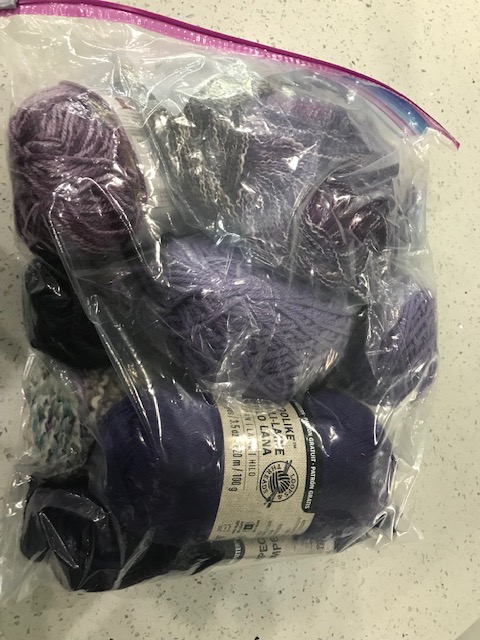
I have been collecting a bag of purplish yarns to make another wrap. Maybe this next one will be a shawl.
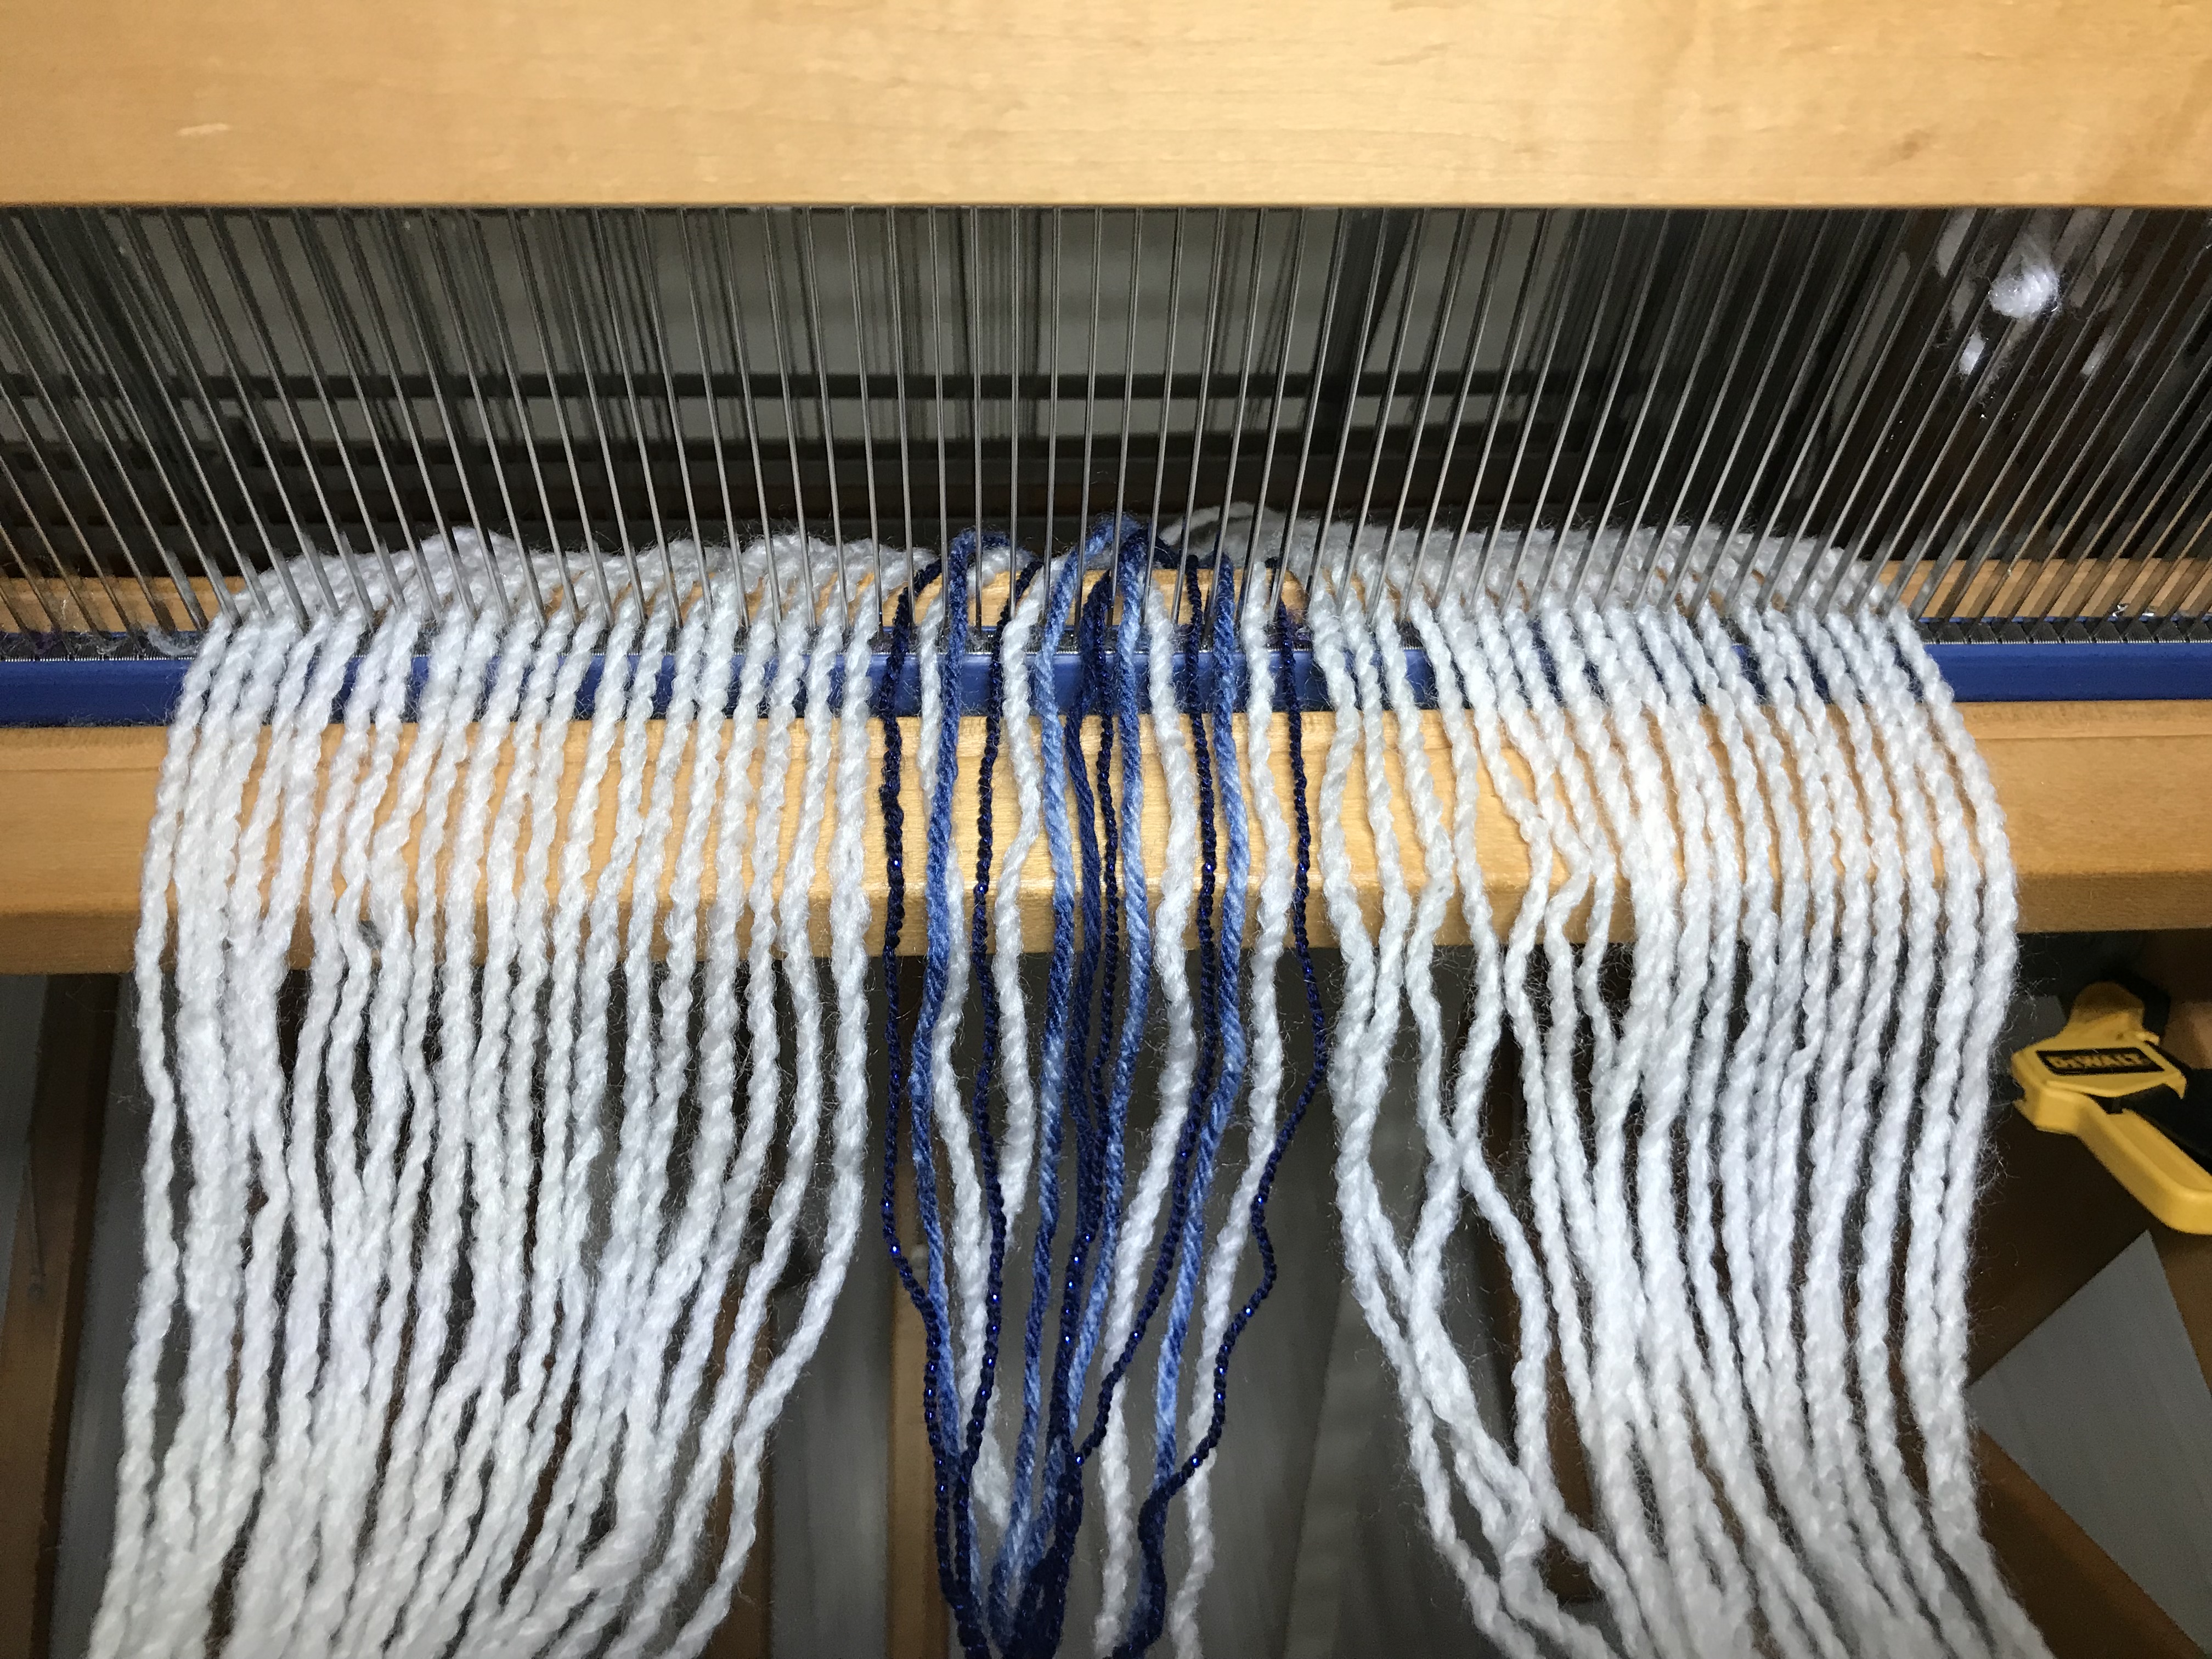
Anna’s Poncho
After seeing the first poncho with the sparkly brown threads, Anna decided she would like one with navy sparkly accents. The warp is Loops and Threads Barcelona in color Arctic and various blue yarns some of which sparkle. The weft is all Barcelona Arctic. You can see that it has some cream and gray variegations. One of the things that I learned was that yarns like this, with long variegations, are hard to match up between skeins. So now I always start a new skein for each half of the poncho and wind the bobbins in such as way as to keep the variegations in order (wind a bobbin from the skein then rewind it onto another bobbin).
In this poncho the accent color represents 20% of the warp threads. The picture above shows details of the stripe pattern.
When I’m using a variegated yarn I often use this large stick shuttle so I can load lots of yarn and therefore connect pieces less often. When I am using a non-variegated yarn I like the boat shuttle much better. The light colored weft really tones down the navy stripe yarns. It’s pretty but I wish they stood out better. Hmmmm, considerations for future wraps.
I hope you like the ponchos. I am going to start the next post right away to show the ruanas.
As always, your polite and helpful comments are welcome.
The spinning retreat at Durward’s Glen was just what I needed. I have only recently learned to spin. Since returning from class at Seivers on Washington Island I had only found about 3 hours total to spin. I had plenty of wool just not enough free time.
So getting to just spin and spin was great. No cooking or cleaning, no distractions of TV, radio, internet, or phone. There was wifi in a special location, but you had to seek it out purposefully. There was virtually no cell phone service. So spinning is what we did. There were 20+ spinners, some as new to the craft as I am and some with many years experience. There were people who had taken vacation from their work, people who had closed down their shops, and those like me who are retired and free to take advantage of these opportunities.
The minute I arrived, wonderful helpful people came out to my car and helped me carry things in. I am used to shlepping my own things so this was quite a nice surprise! I don’t know how to thank everyone for being so welcoming and helpful. Lovely spinners shared their ideas, hints, and techniques freely. If I had trouble, they seemed to know and can over to offer advice.
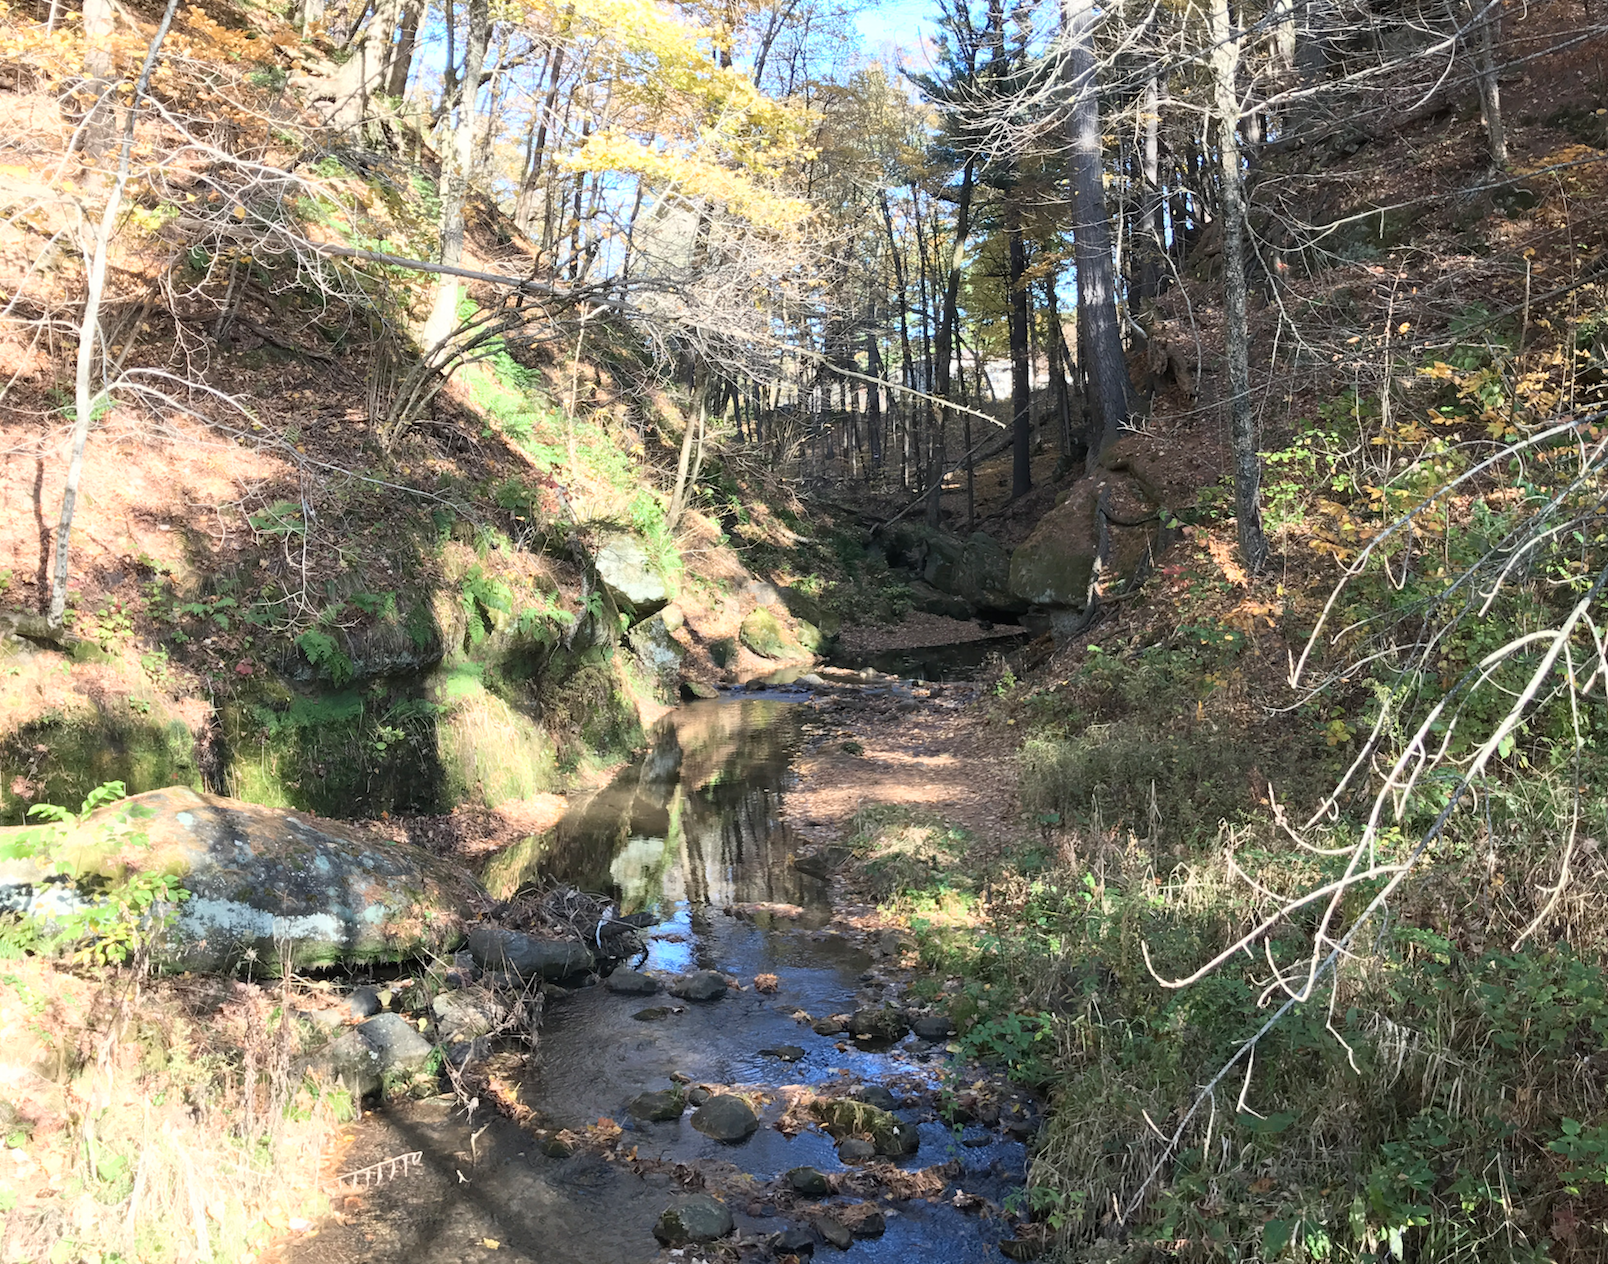
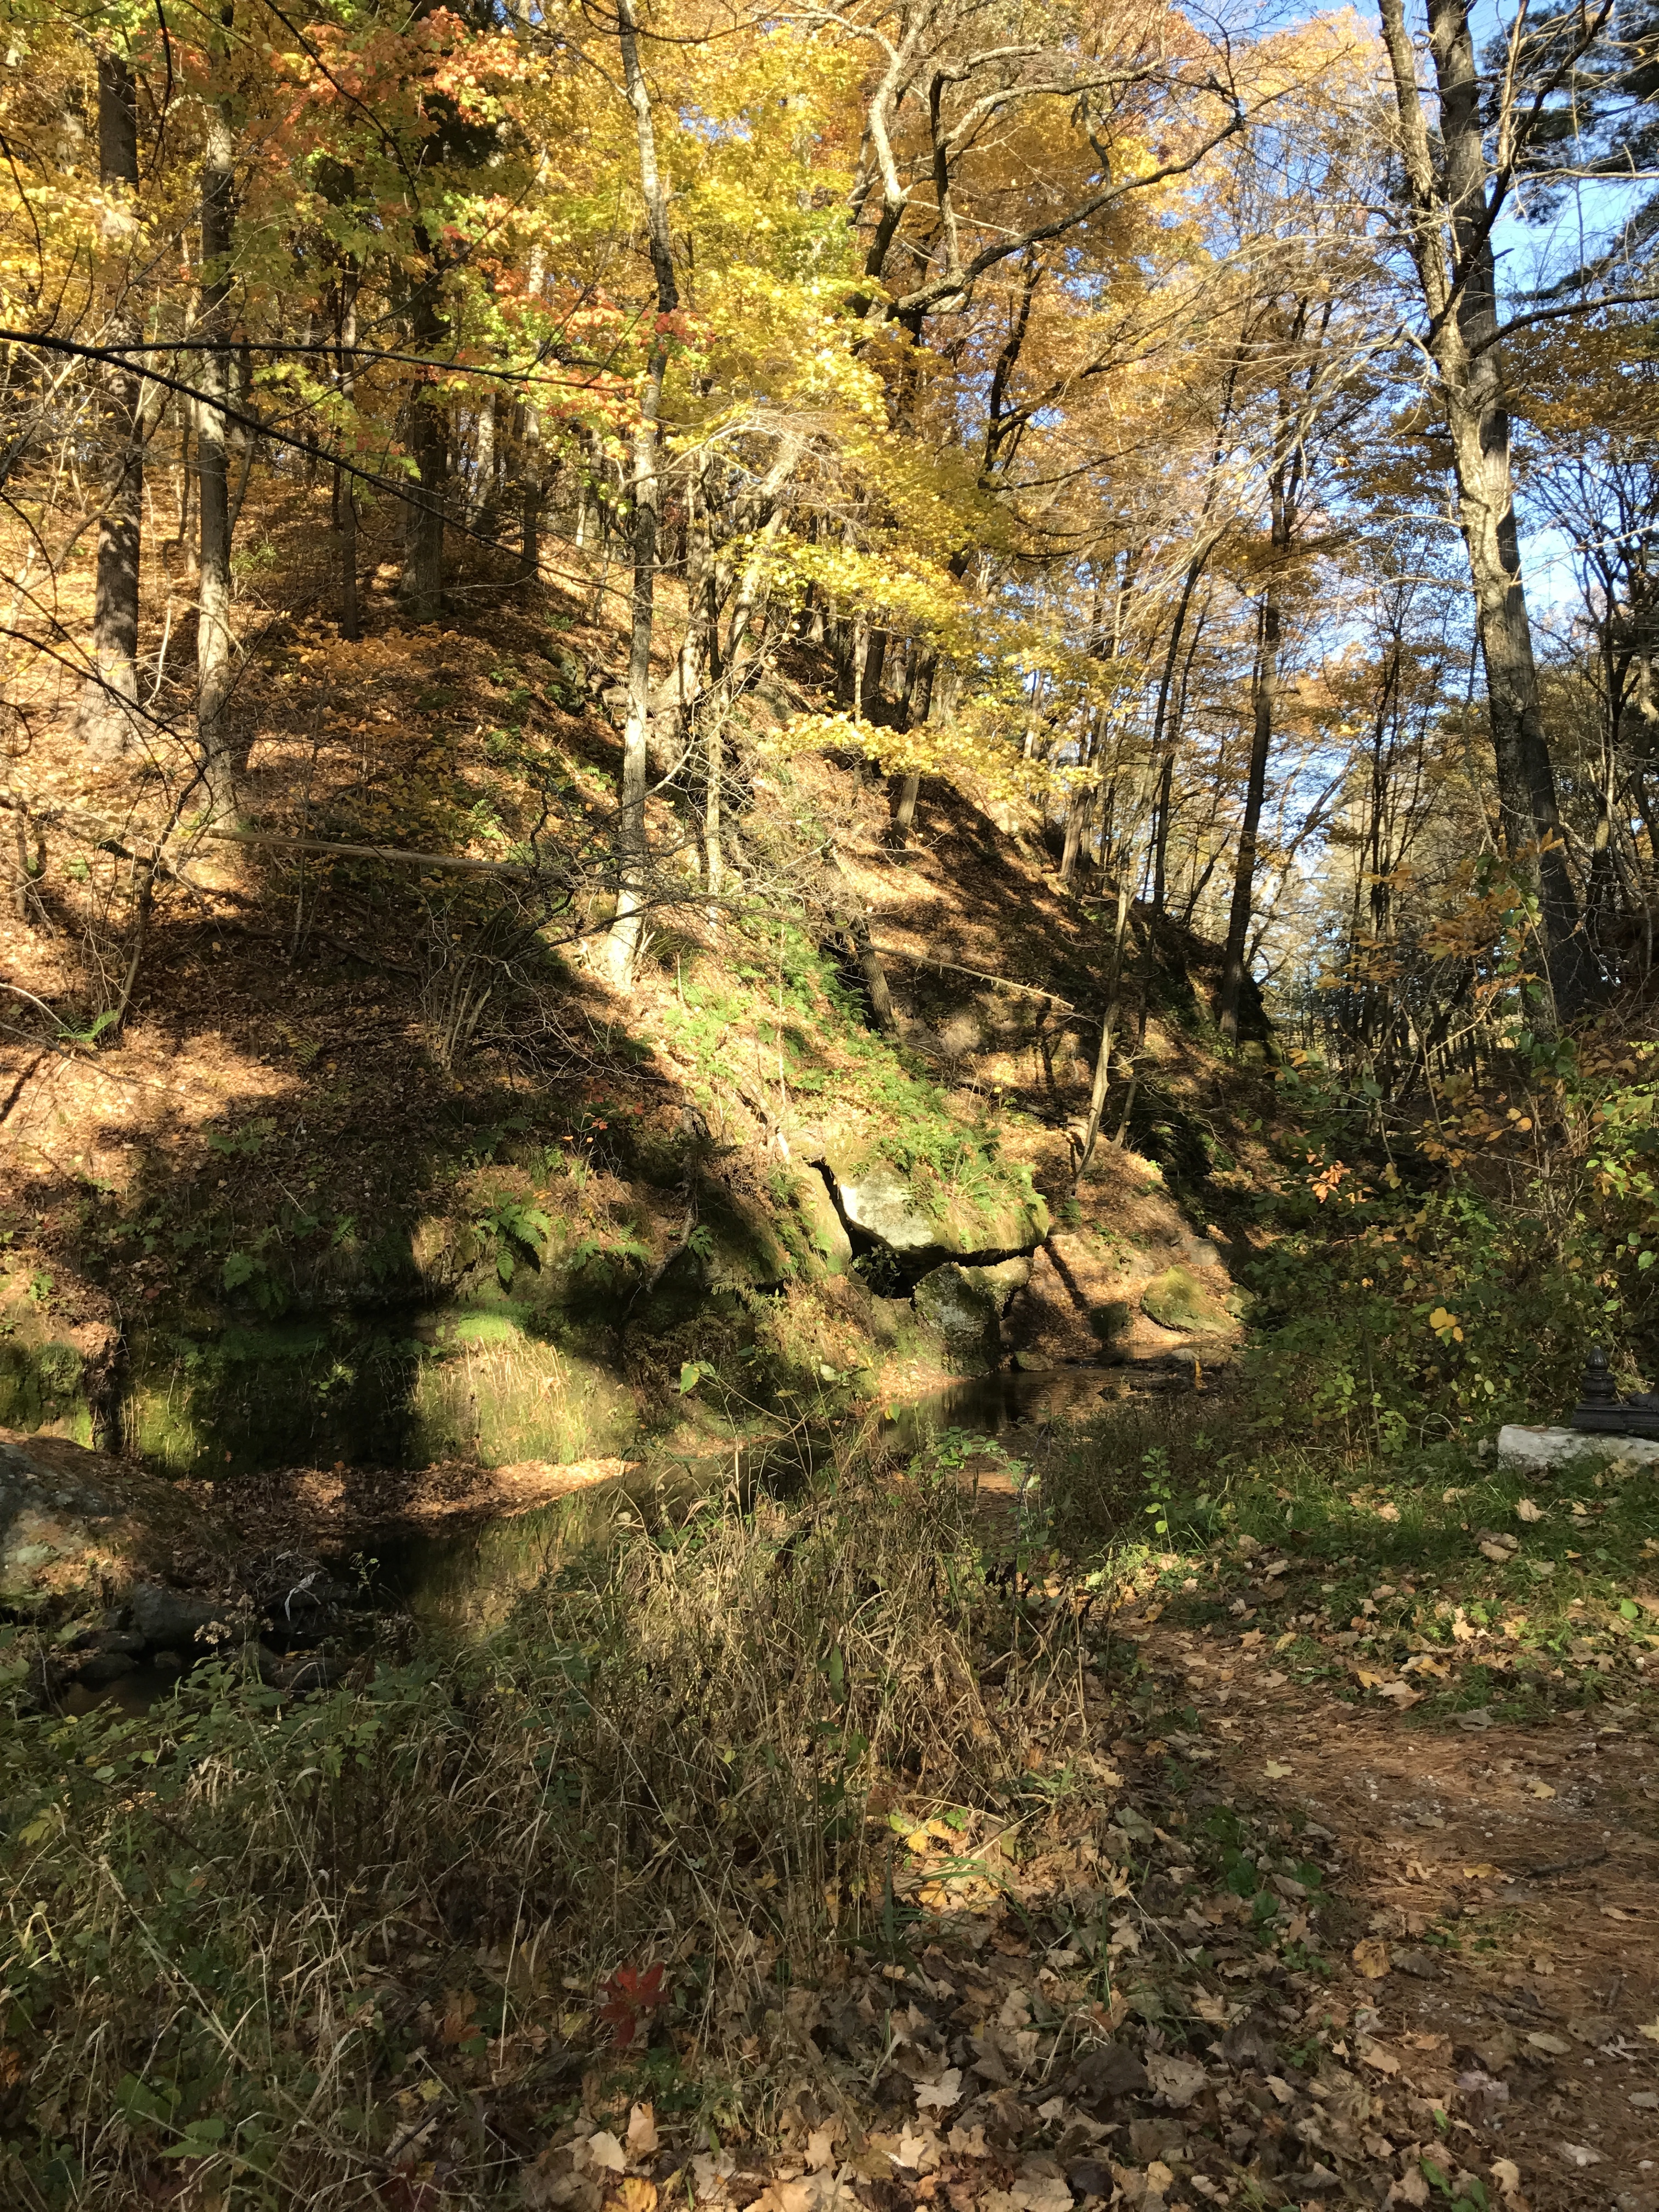
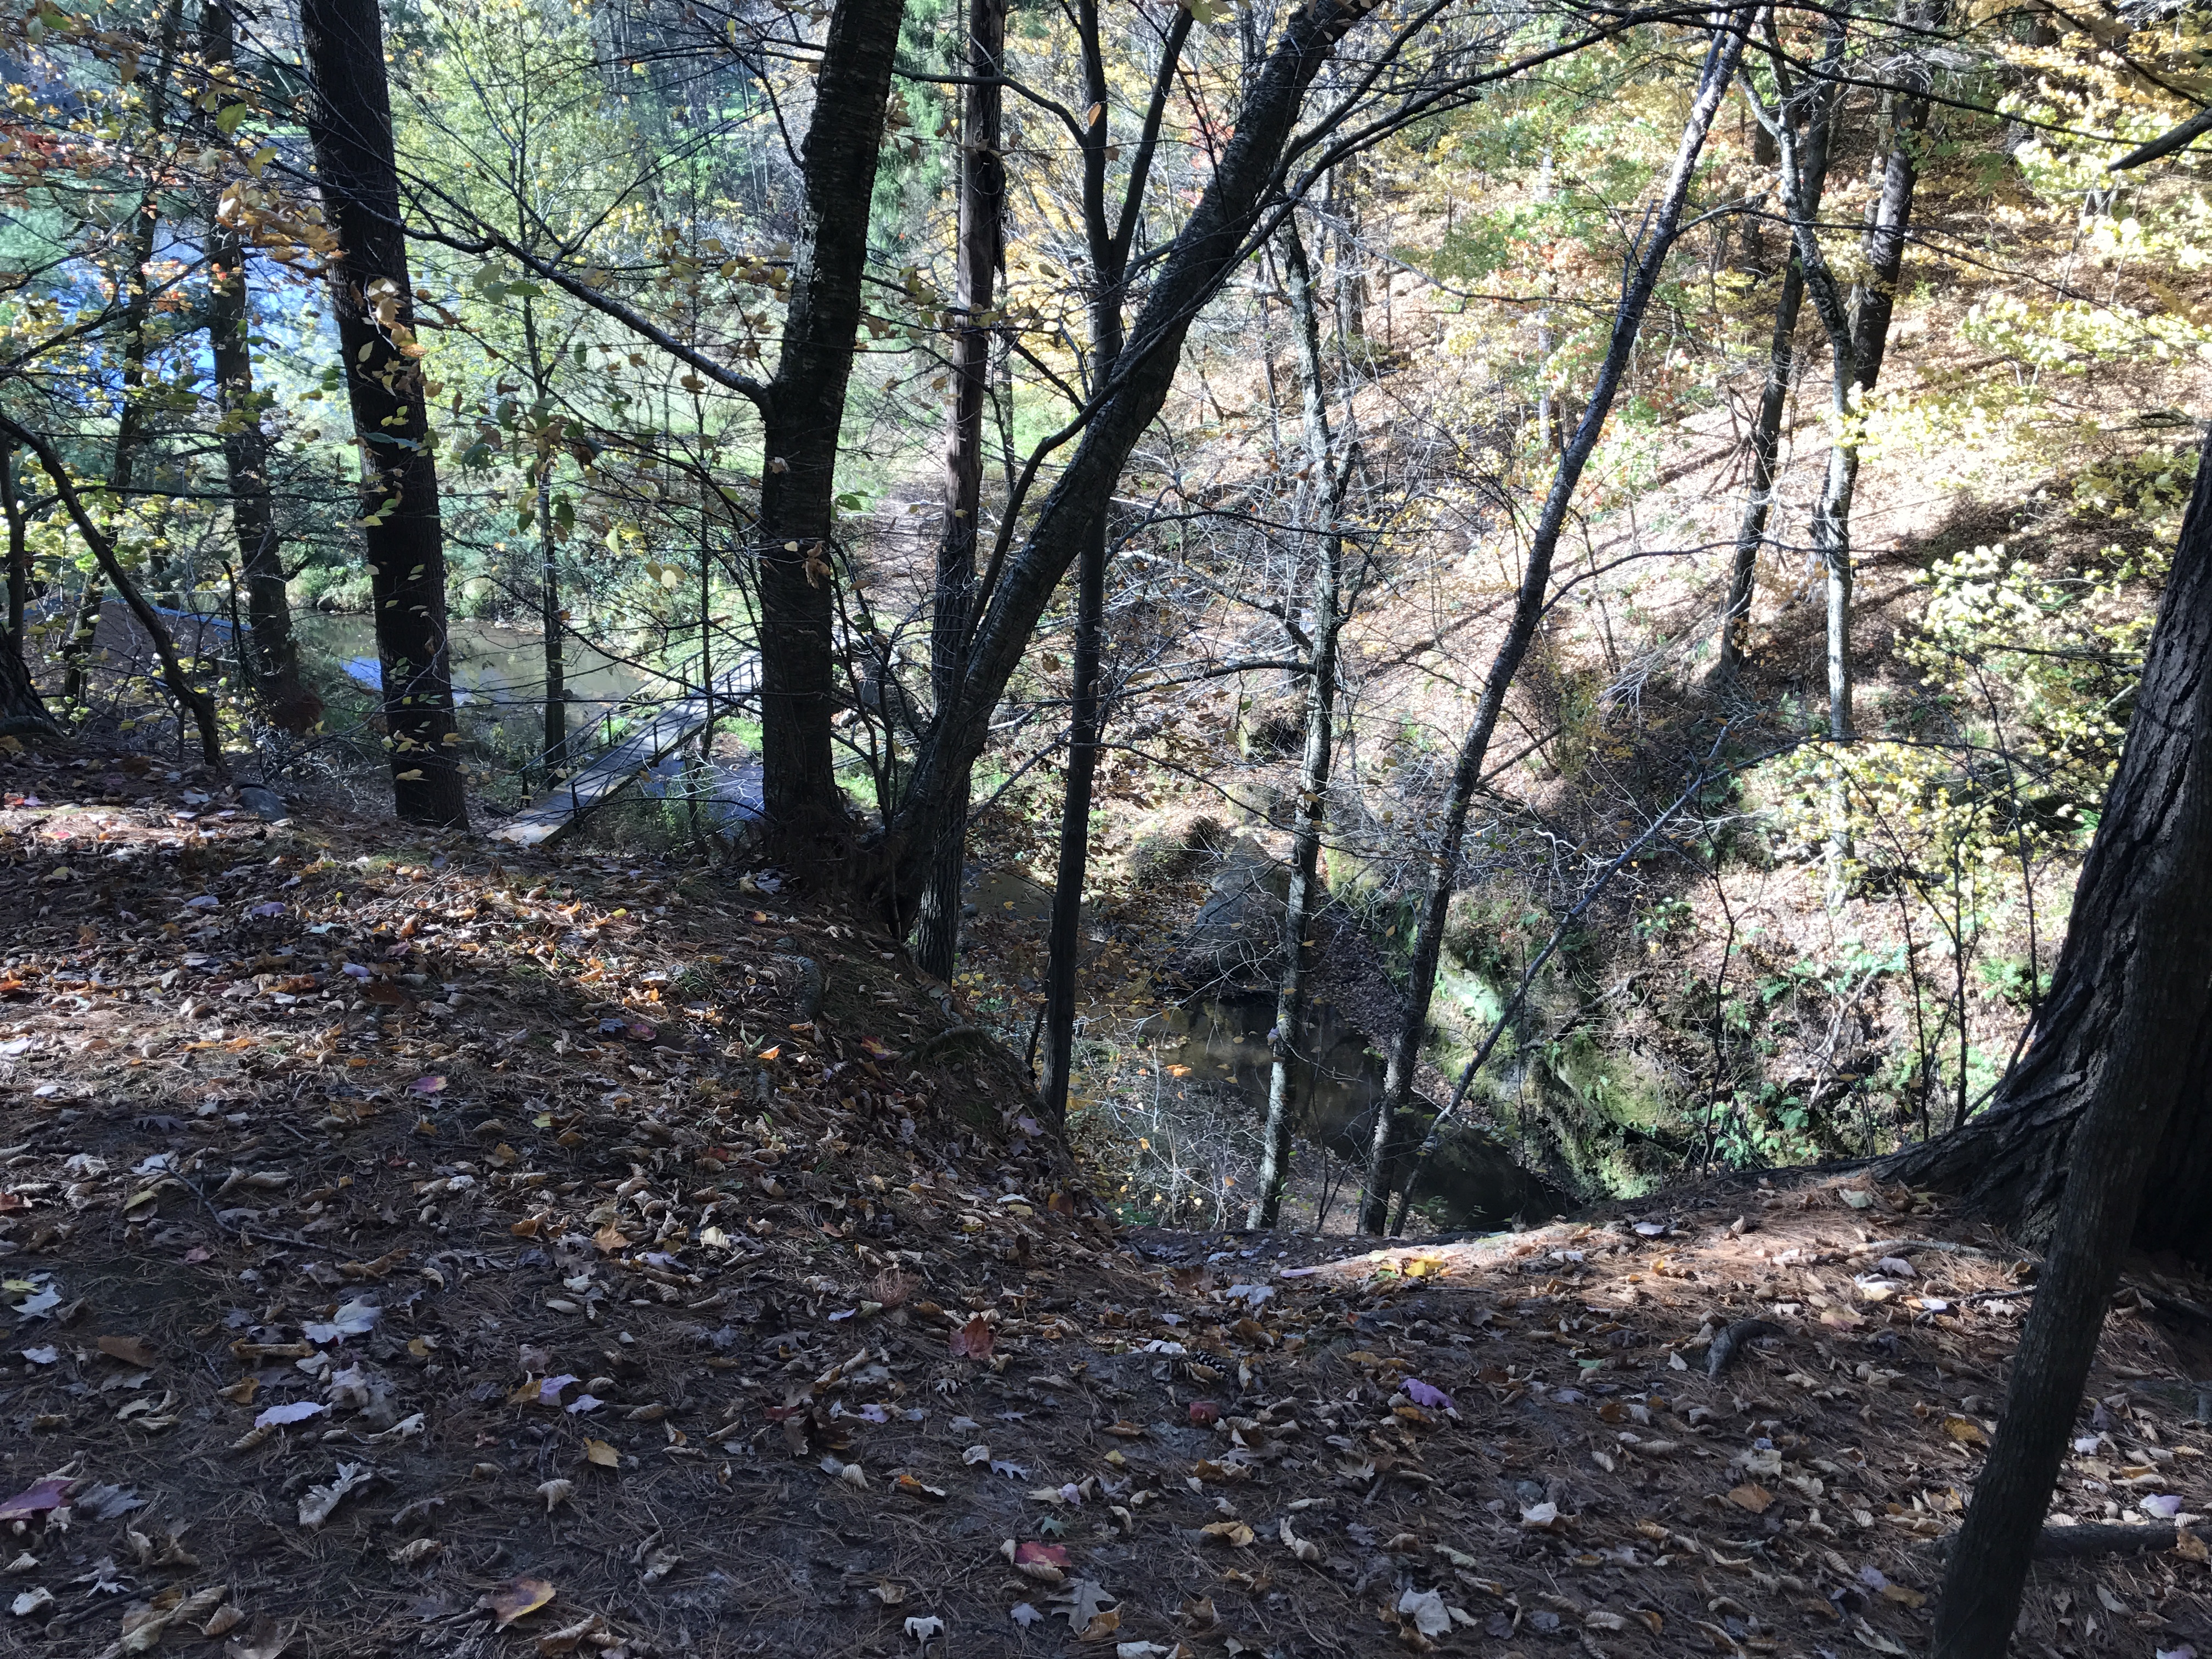
Durward’s Glen is a beautiful spot in the woods of central Wisconsin, near Devil’s Lake State Park. There are rocky hillsides and a small stream running through the property.
The best thing about the weekend was that I learned that spinning is not just a process for turning neat bundles of prepared fibers into neat pieces of yarn. My eyes were opened to so many new spinning possibilities. Actually, the best thing about the weekend was meeting these wonderful people.
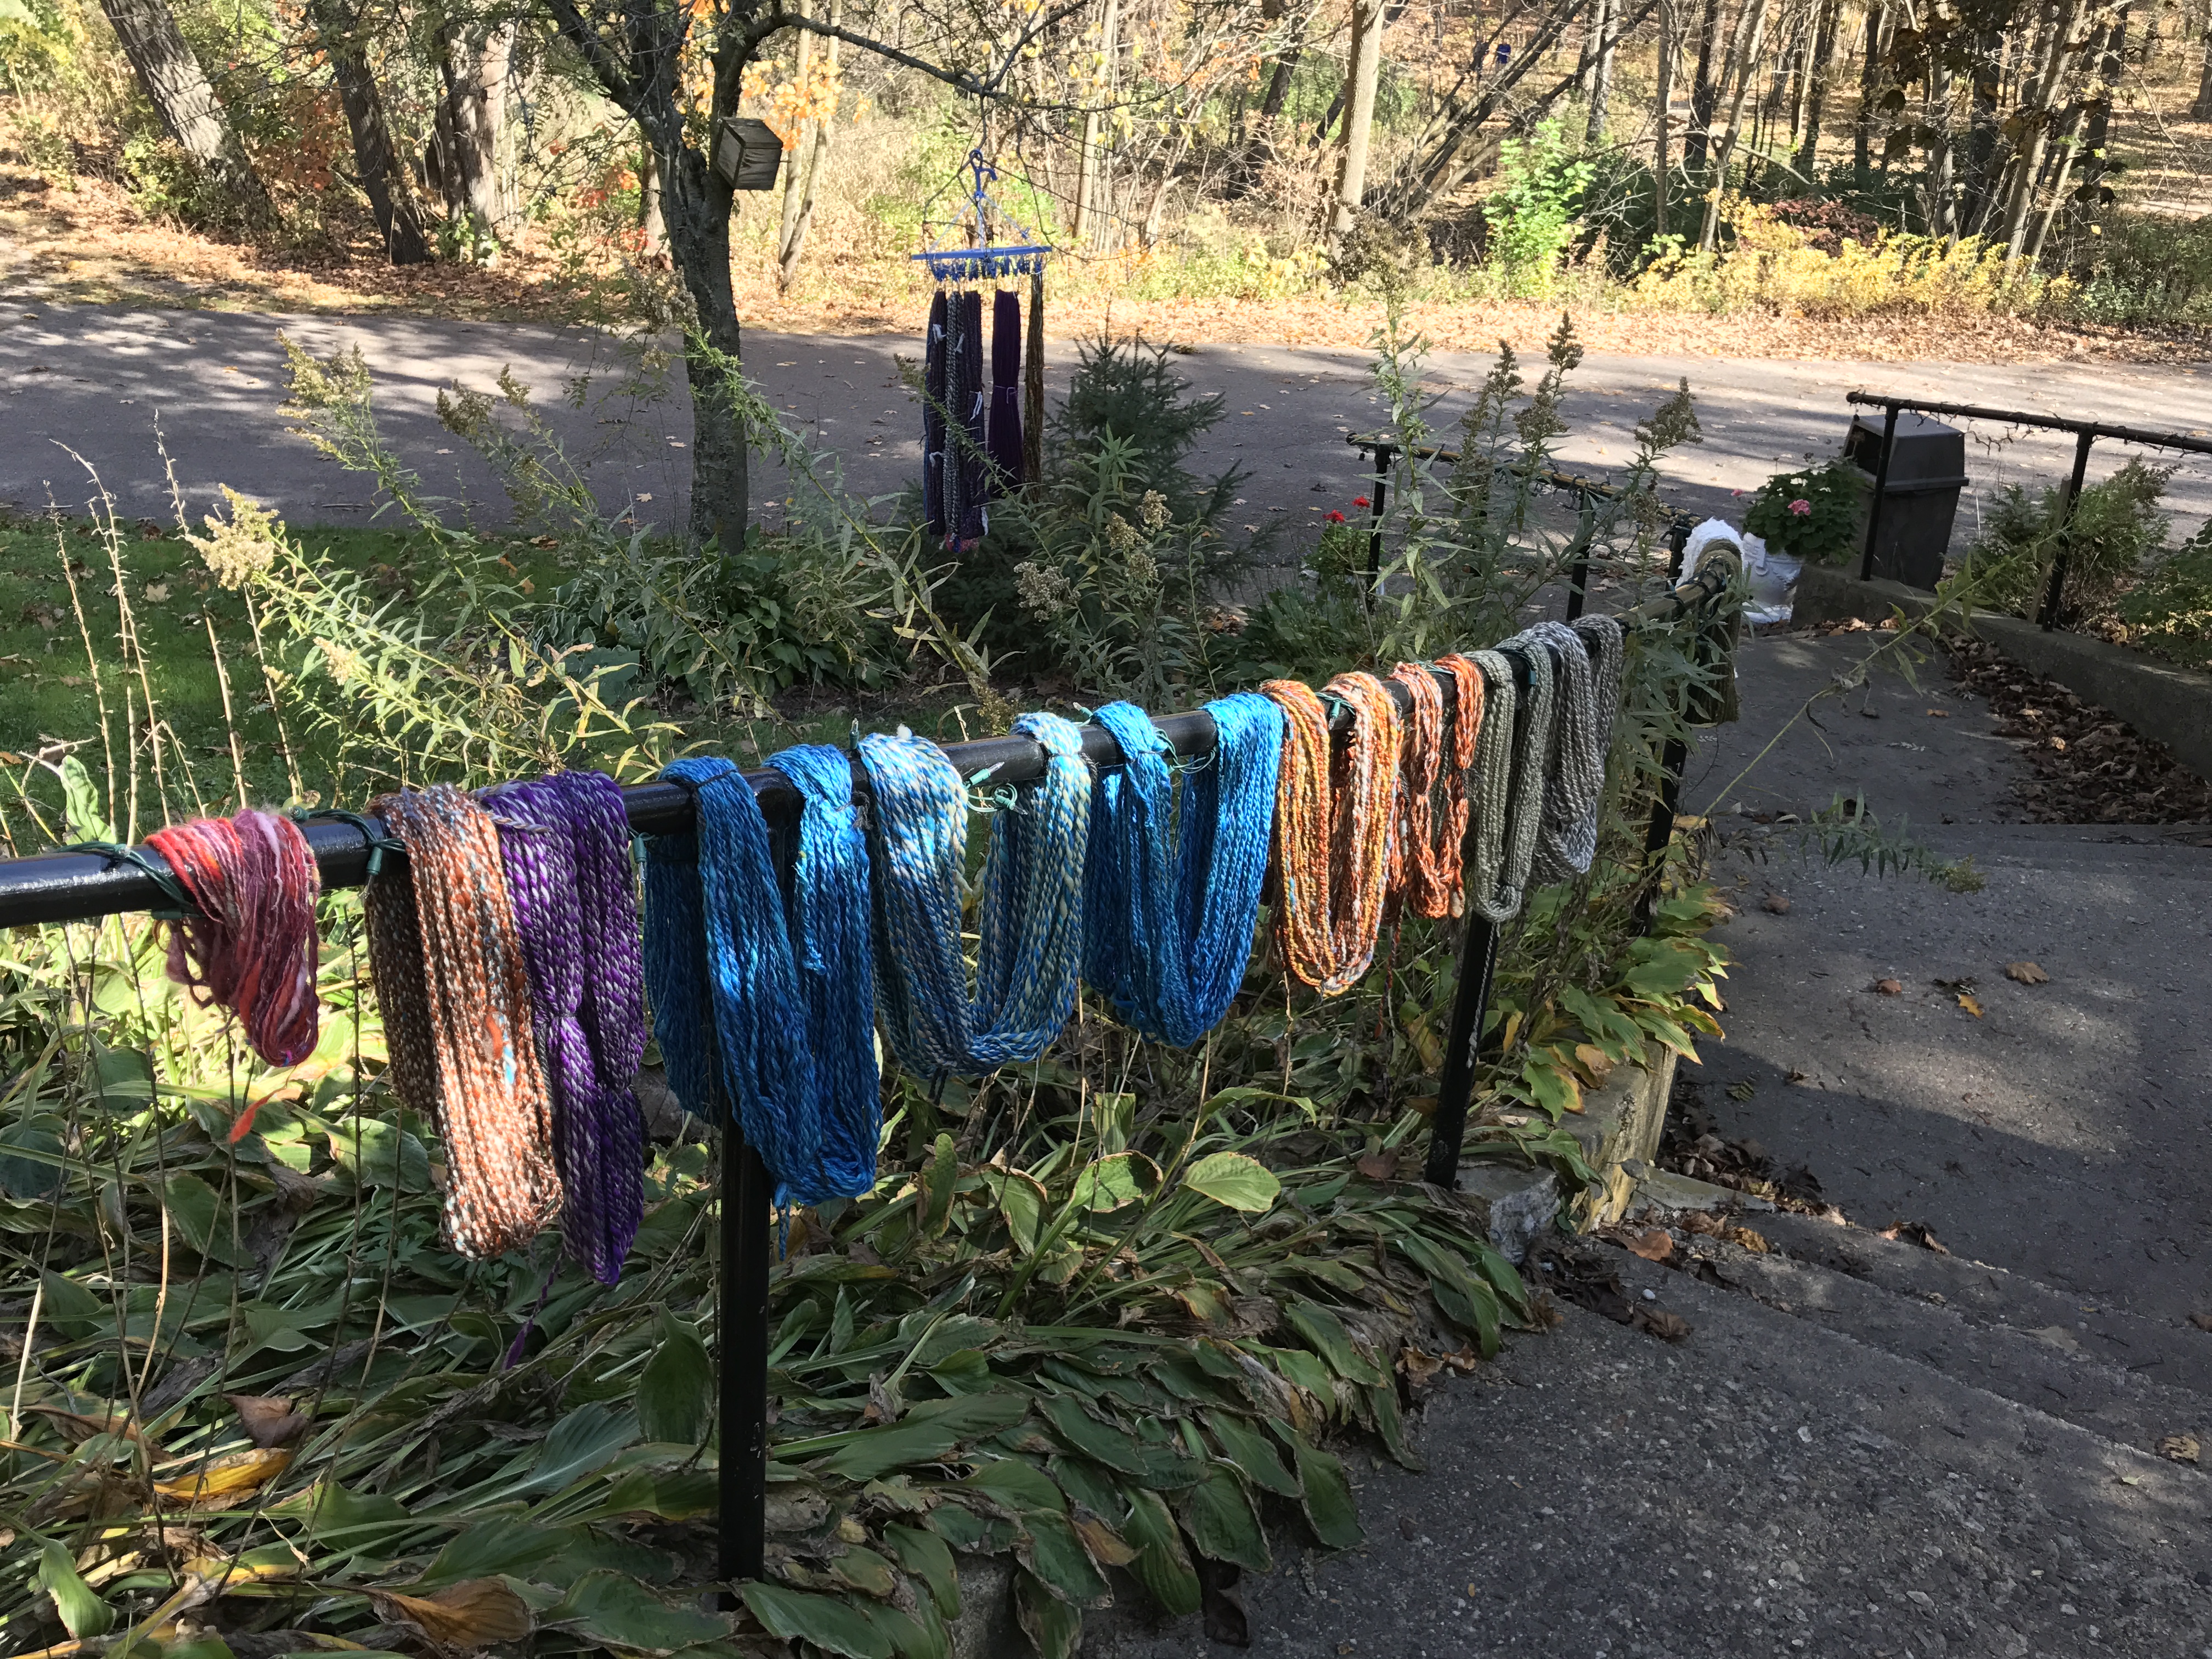
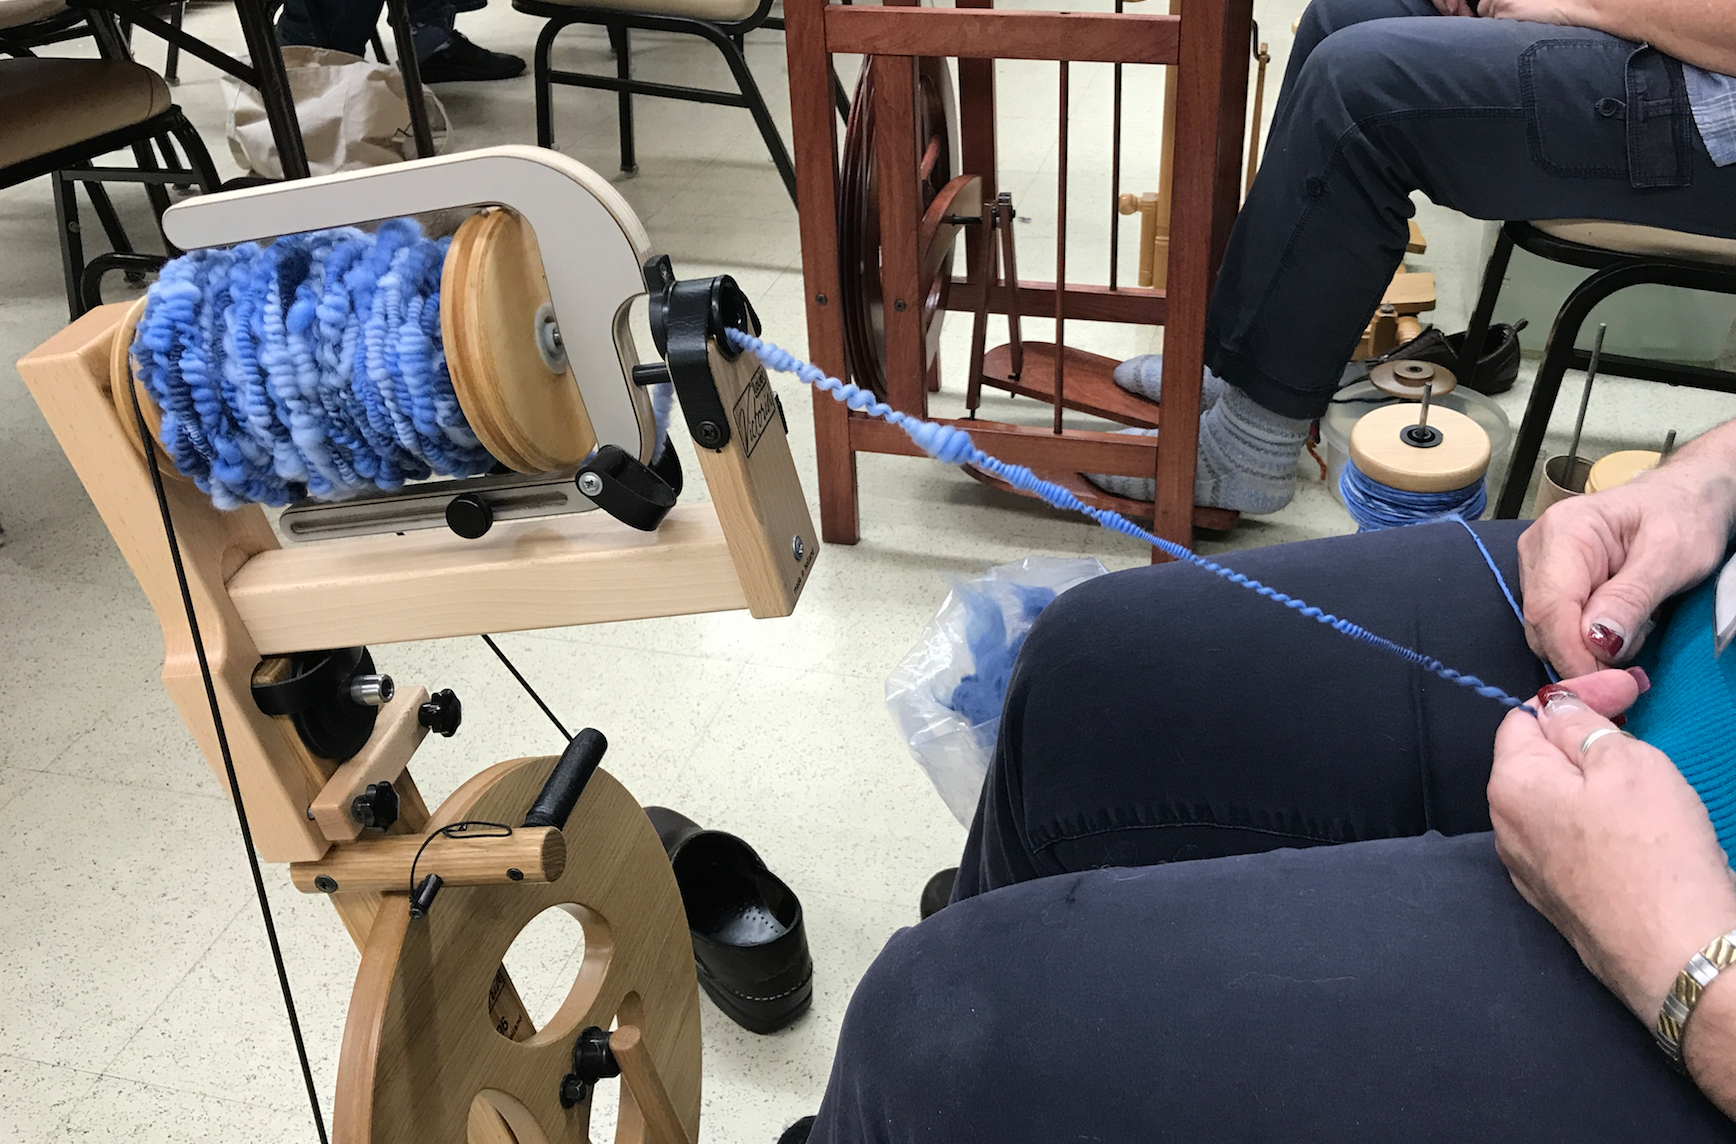
Newly Spun Yarn Drying on the Railing
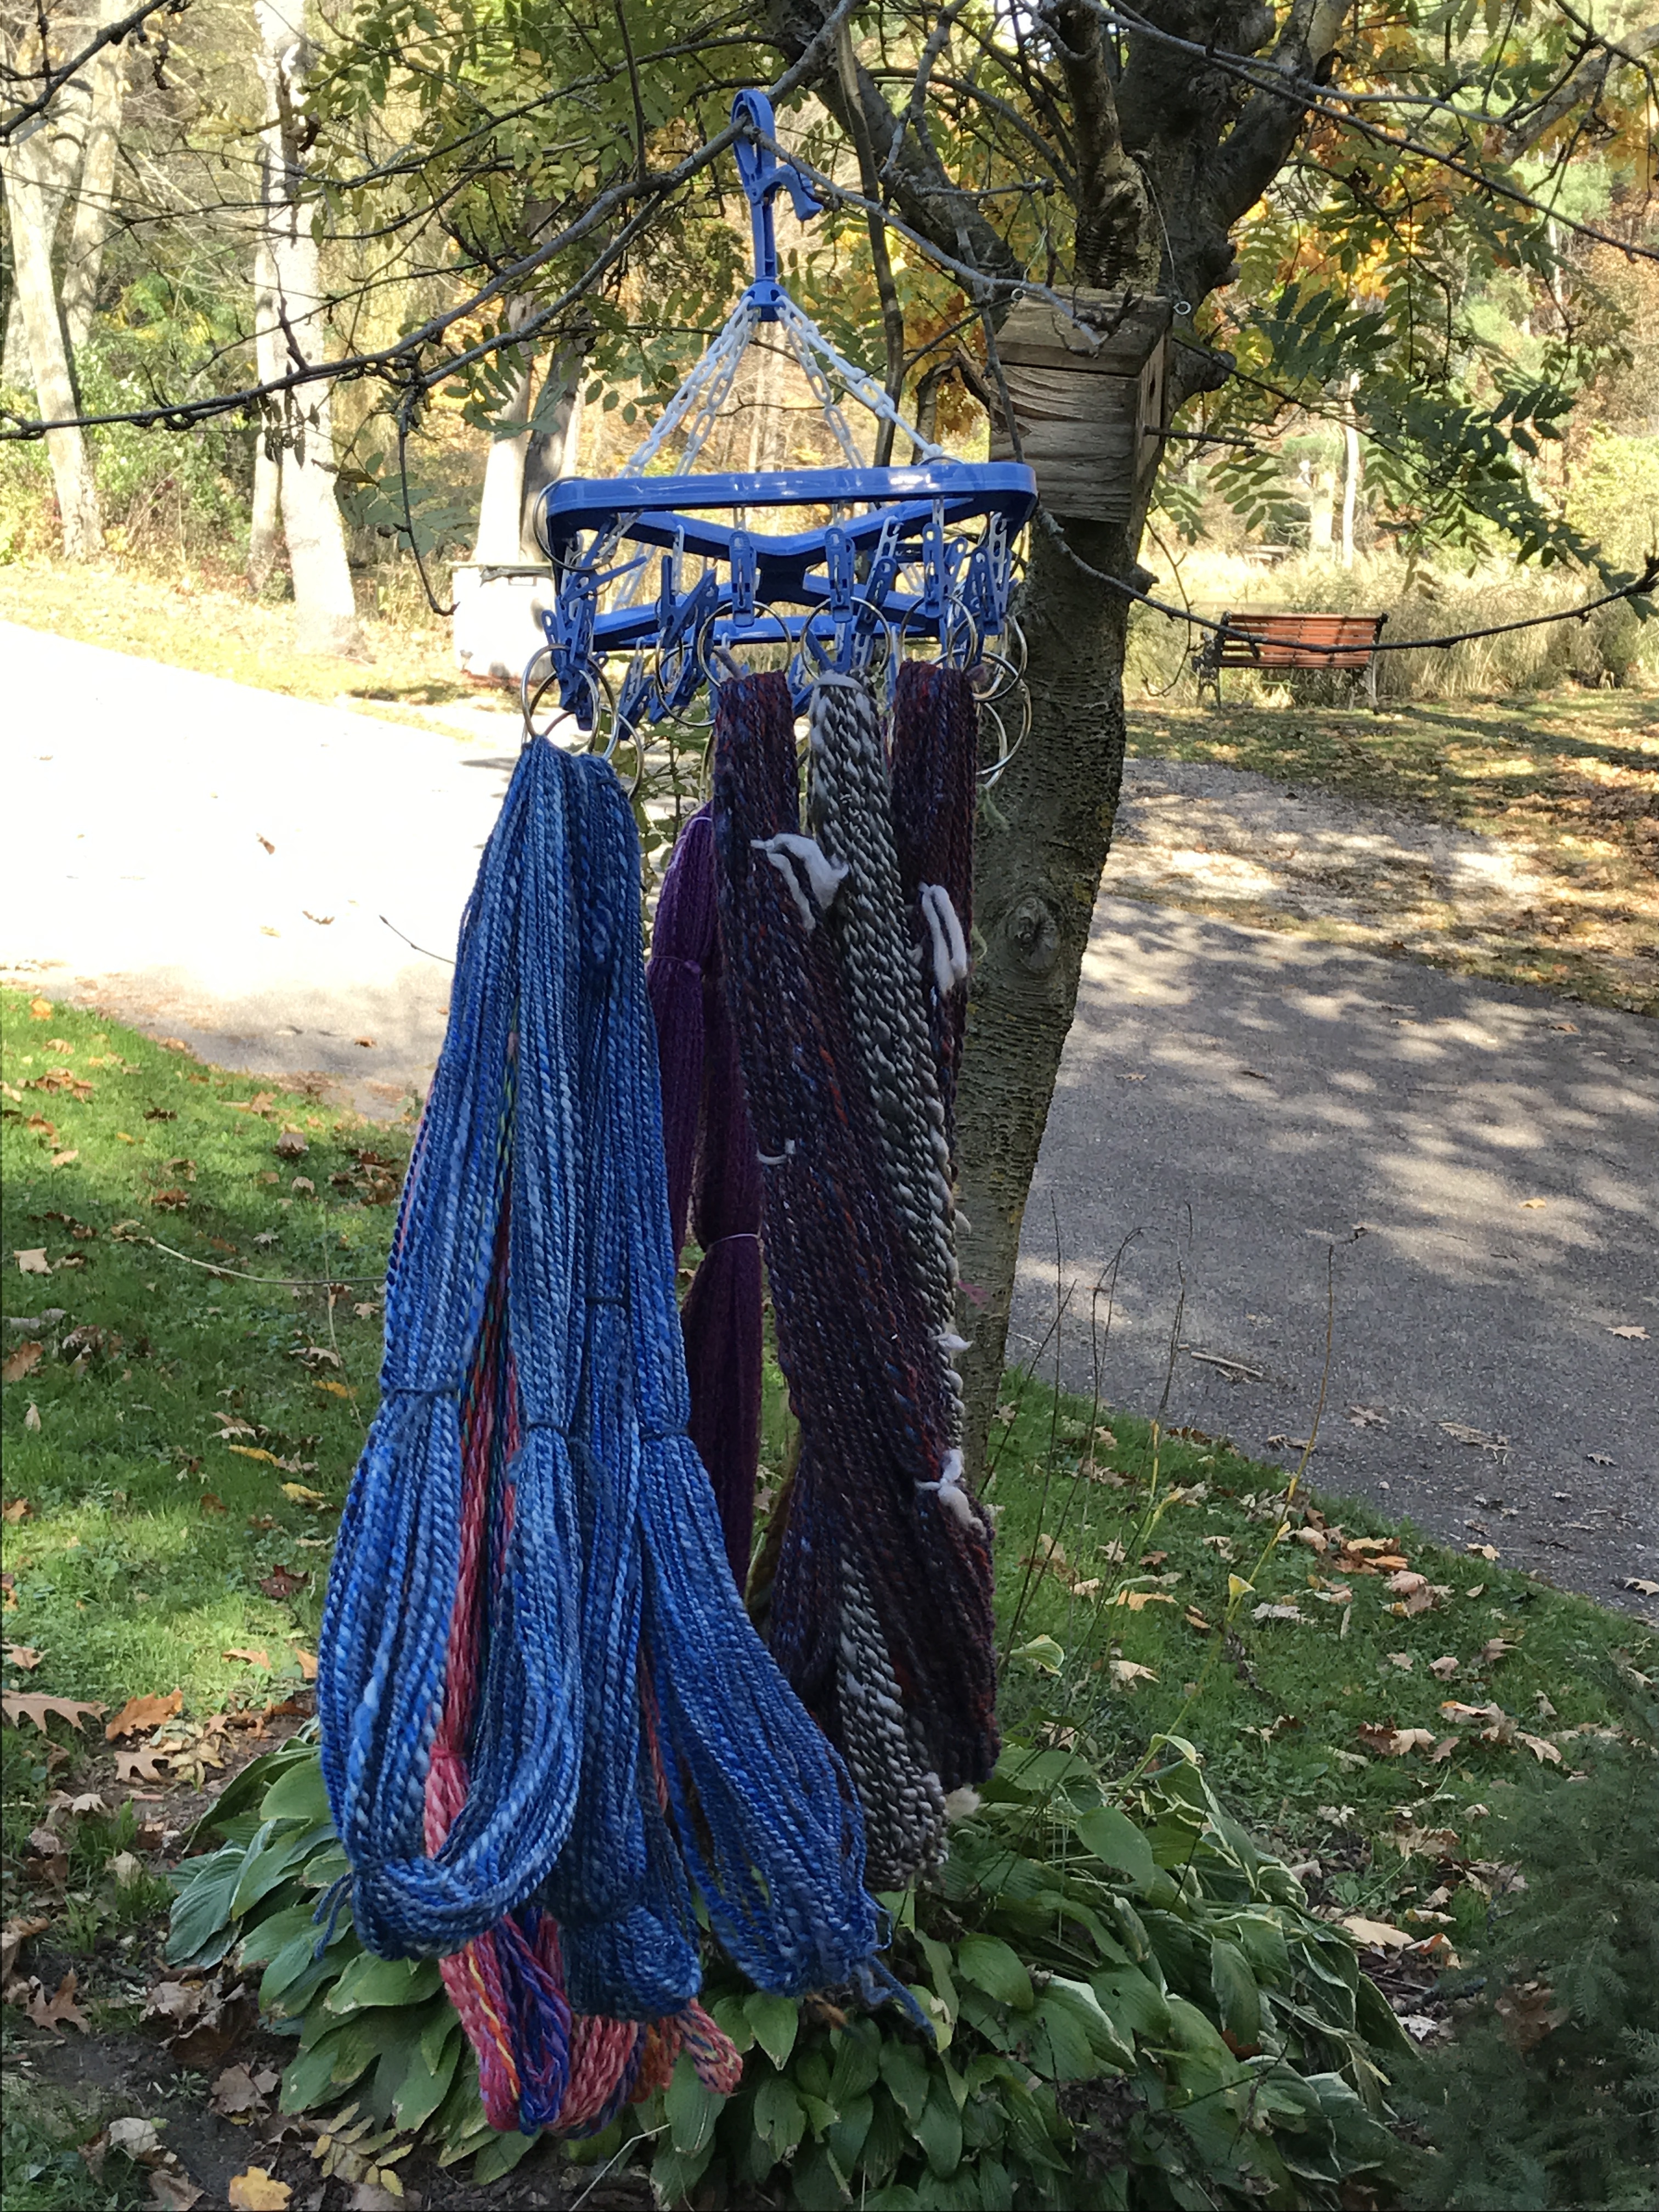
Yarn Drying in the Tree
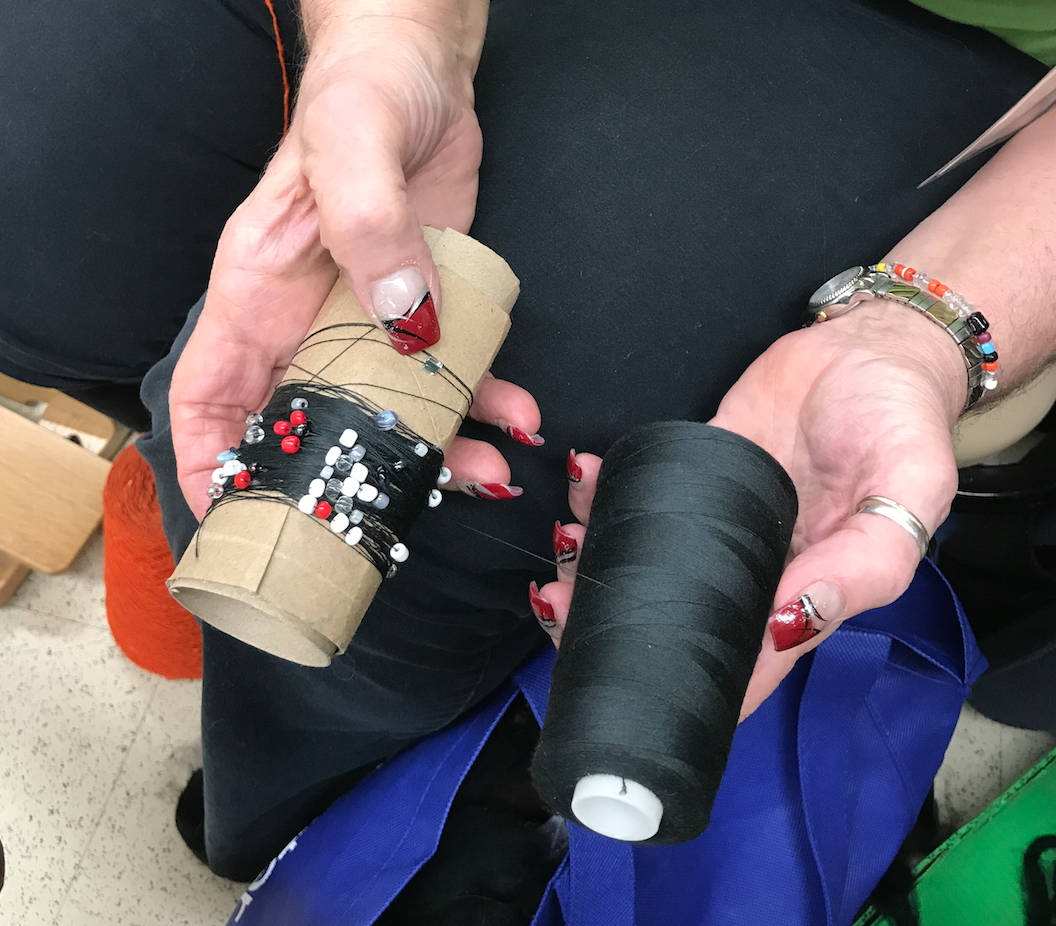
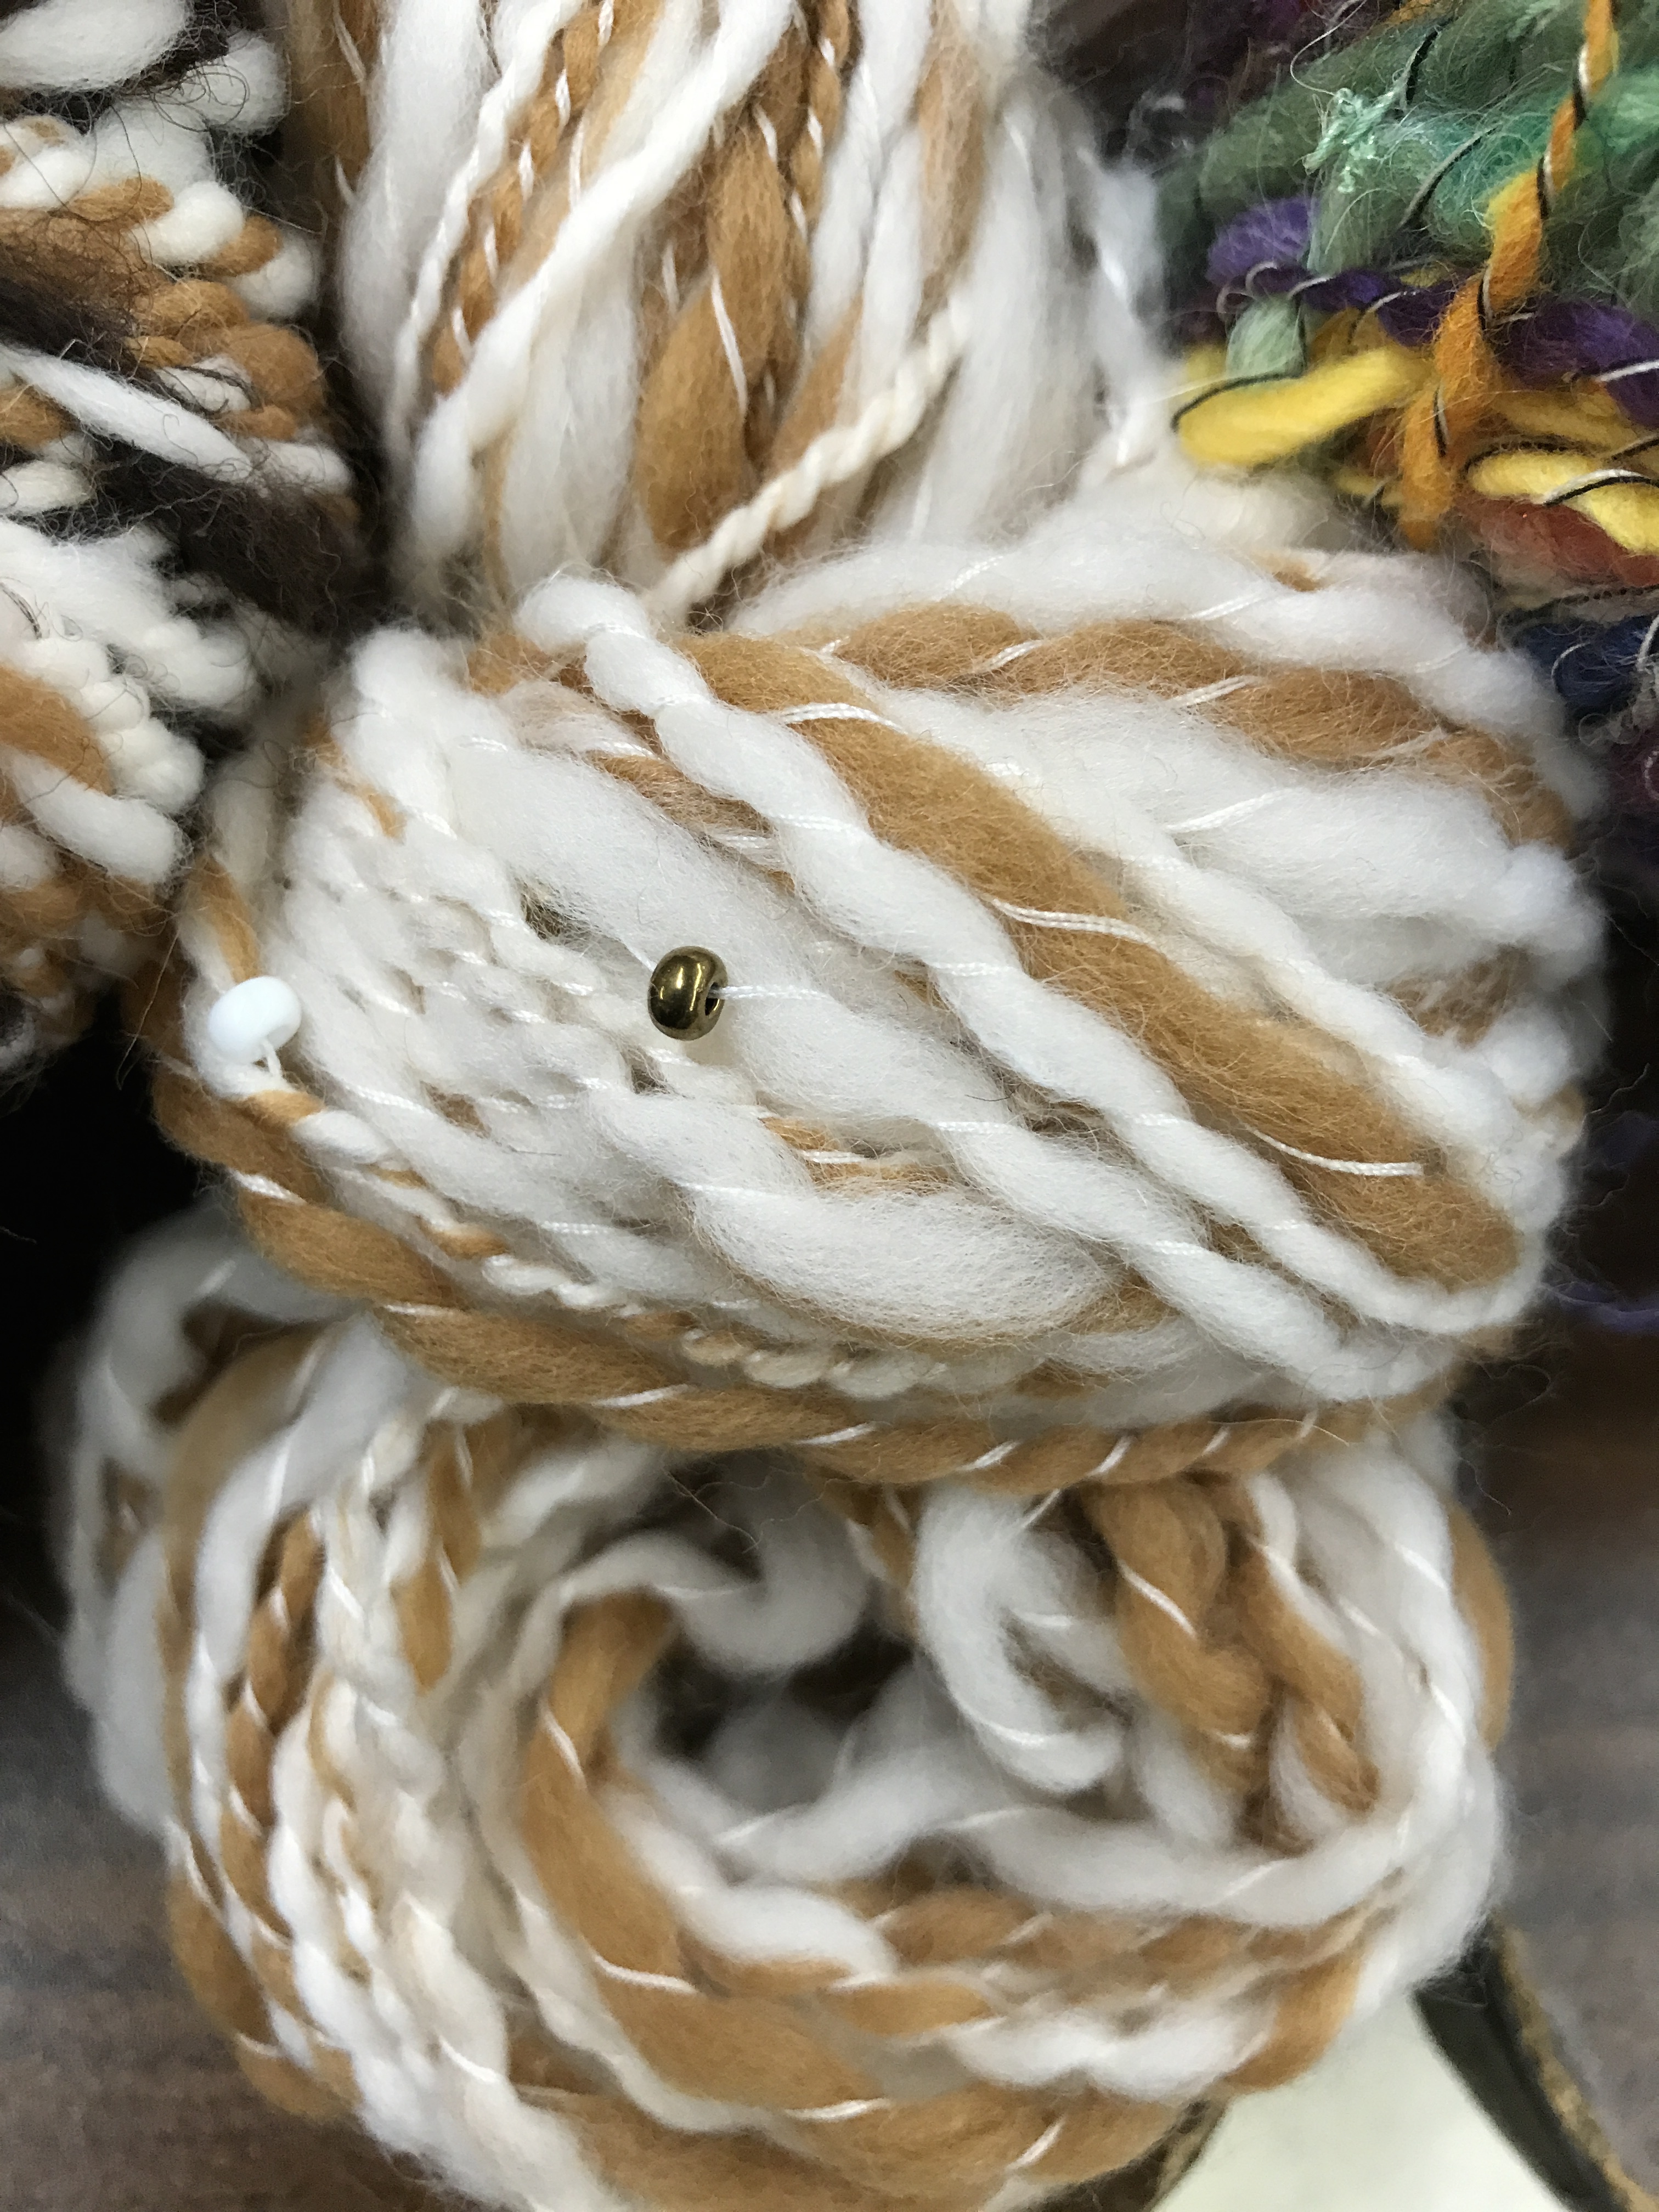
Beads on Thread Can be Plied with Yarn
Beehive Yarn
Blue Beehive
Yarn with Beads
The rooms were comfortable. The building has been used by several organizations over the years. My room came furnished with a trombone. The bath and shower are shared but there was a sink in my room.
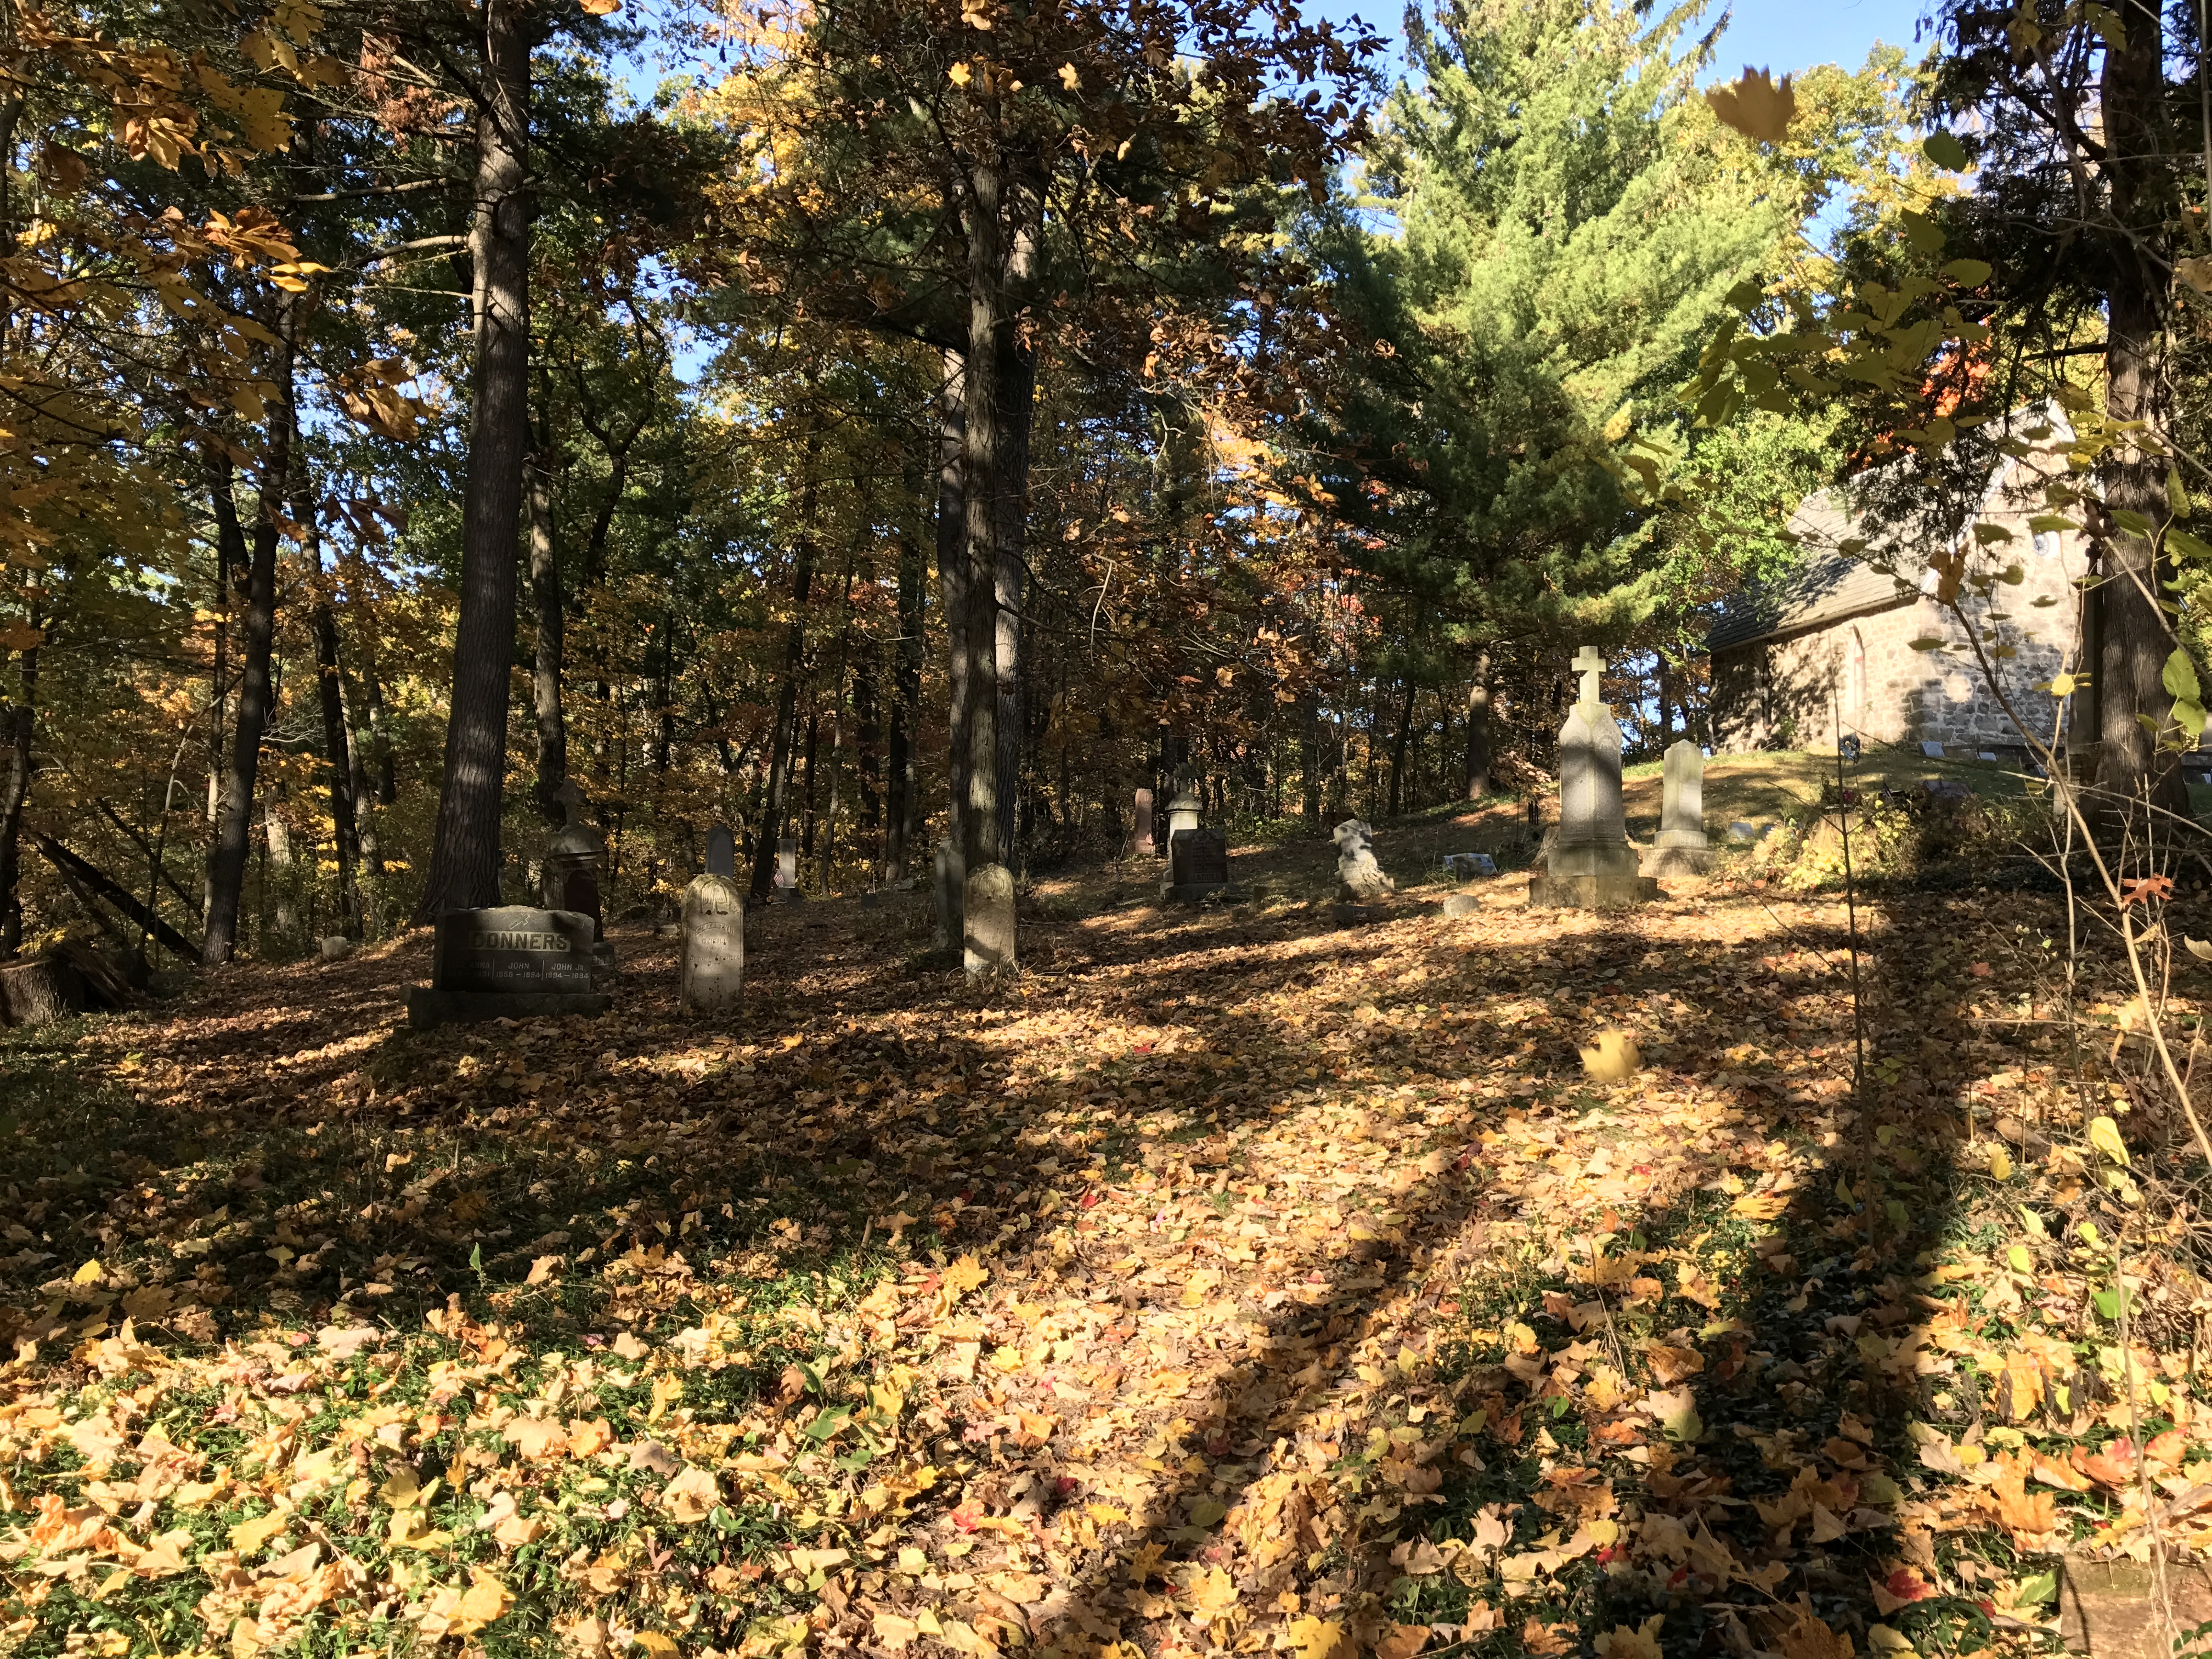
Steep Trail Down From the Cemetery to the Glen – Don’t Do This in the Dark!
The only cell phone signal was at the top of the hill at the cemetery. The first evening I declined to climb up there to make a call. I’m not scared of cemeteries, but the climb was steep and it was dark. So I waited until the second day. It was a beautiful, but short, hike. I made it a couple times a day, just for the pleasure of it.
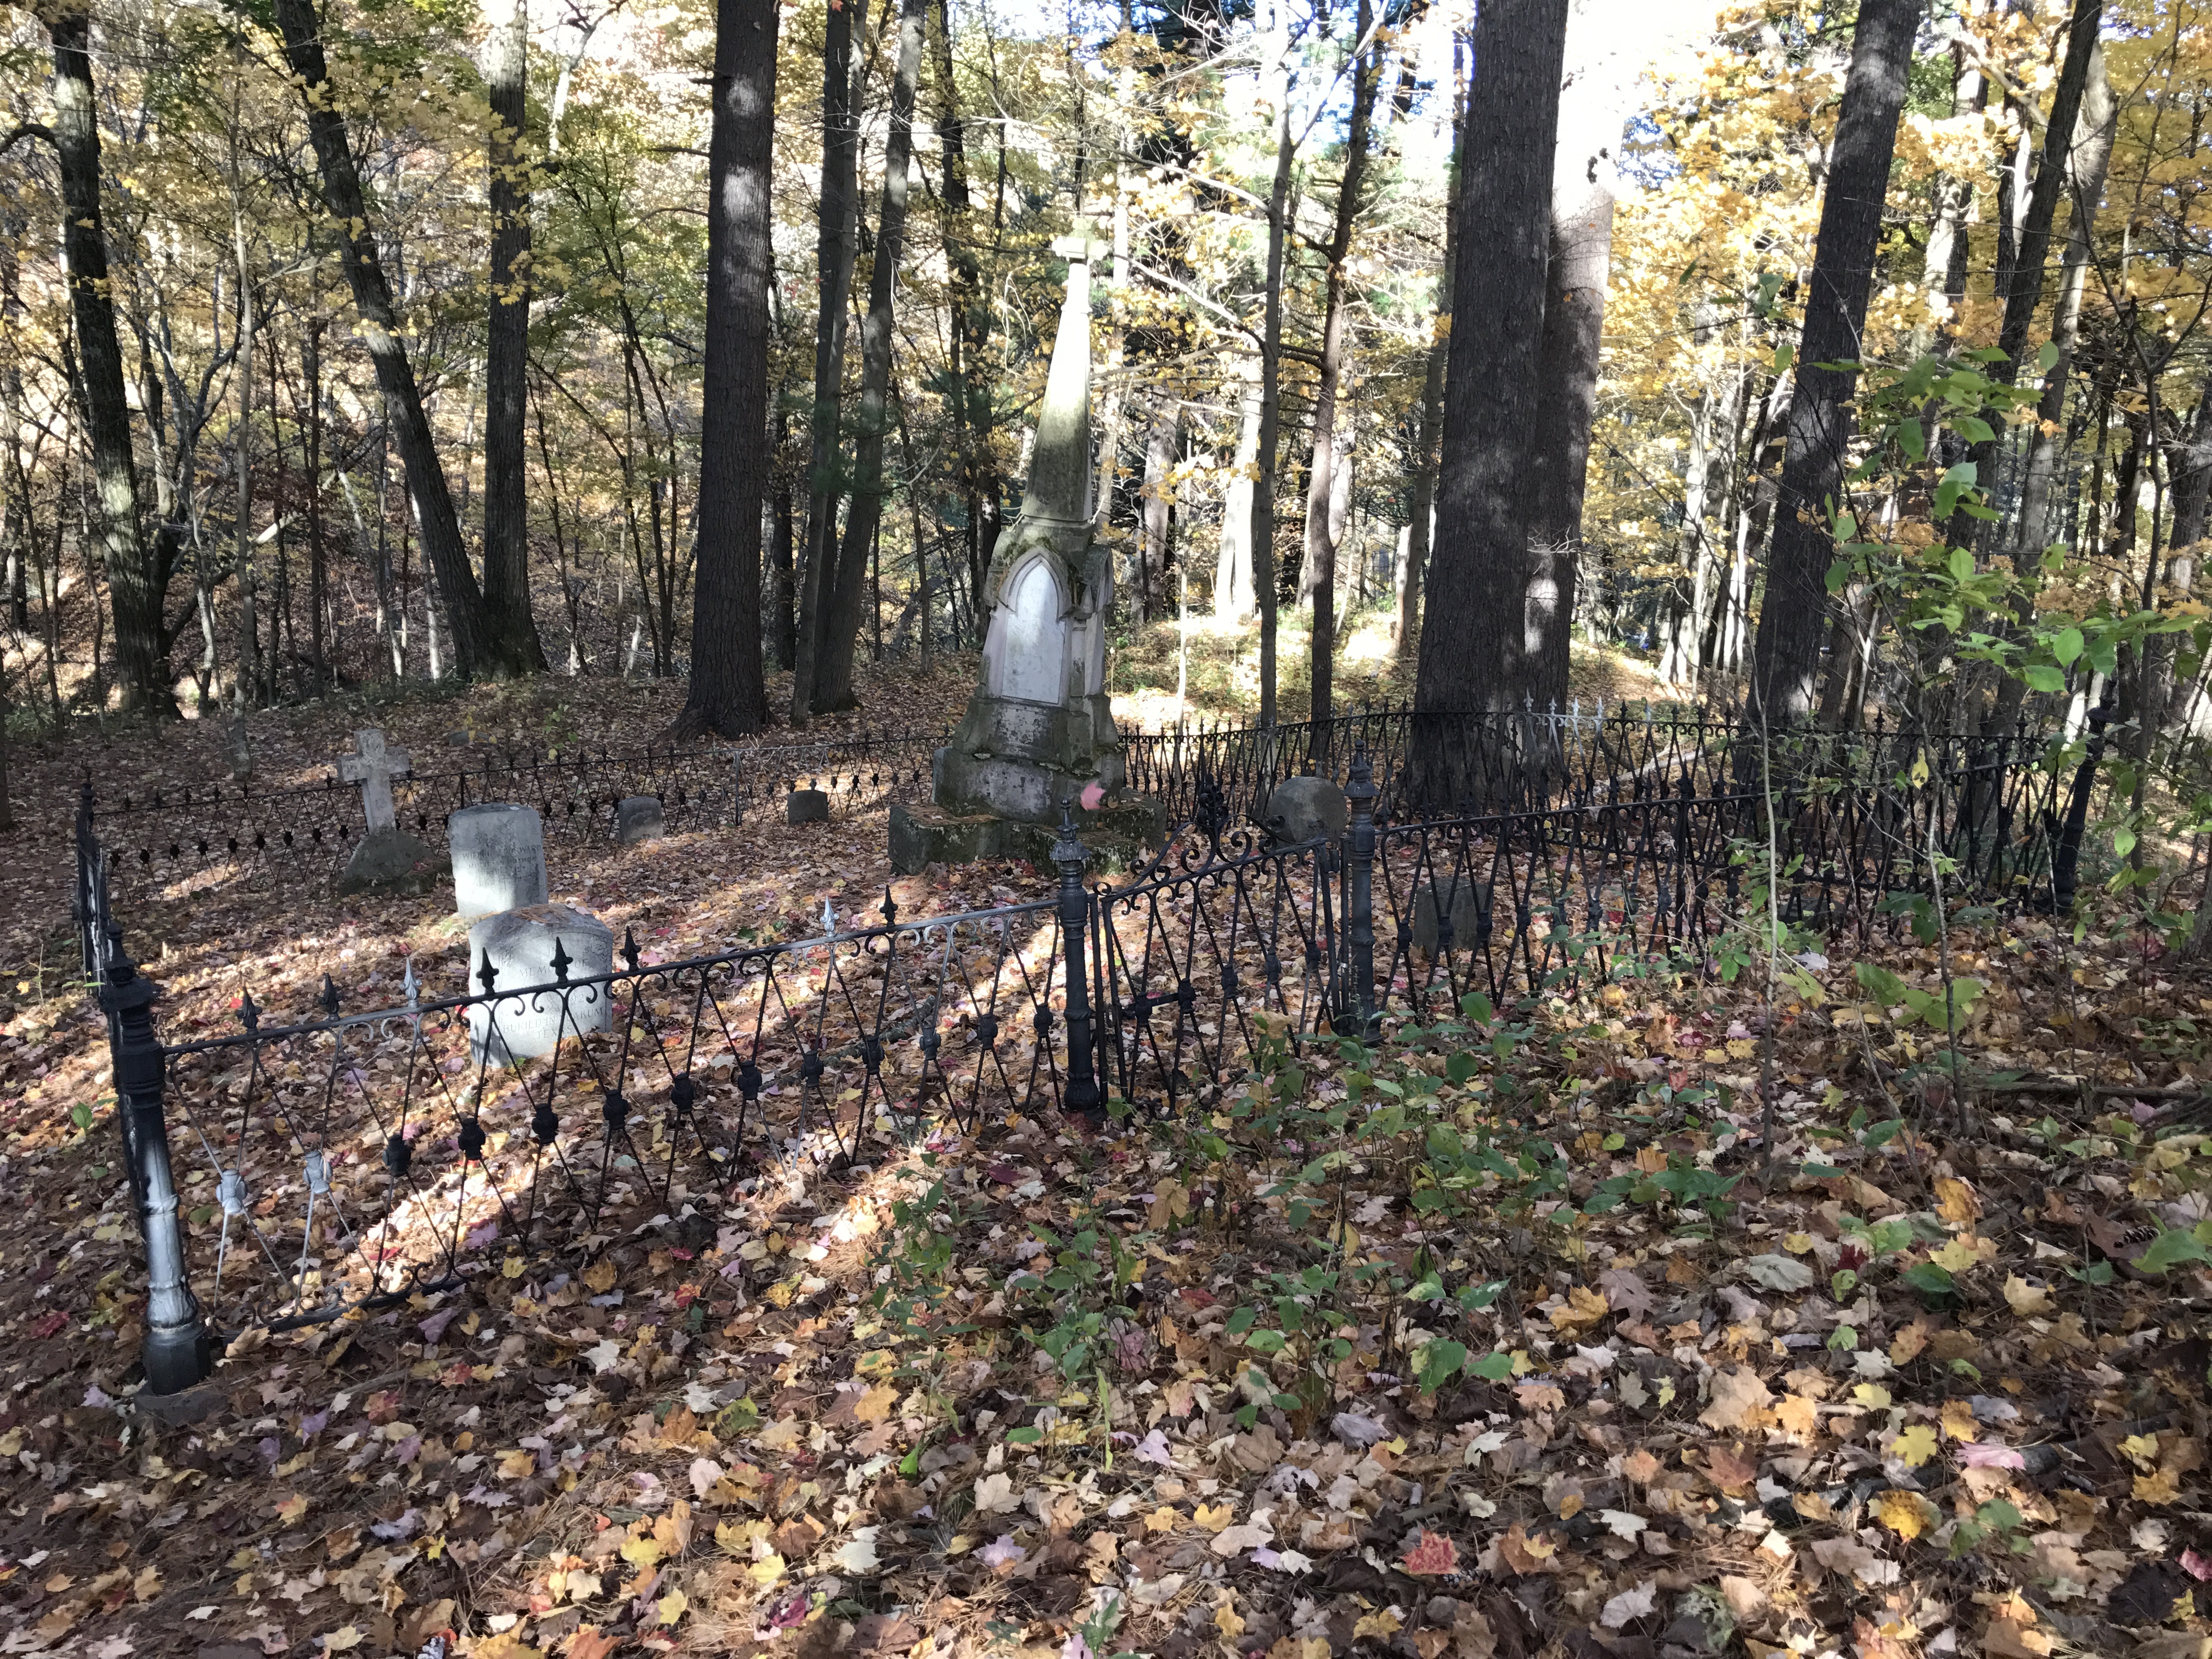
Cemetery with Good Cell Phone Reception
Durward Family Cemetery
I learned a lot about spinning equipment as well as the spinning process.
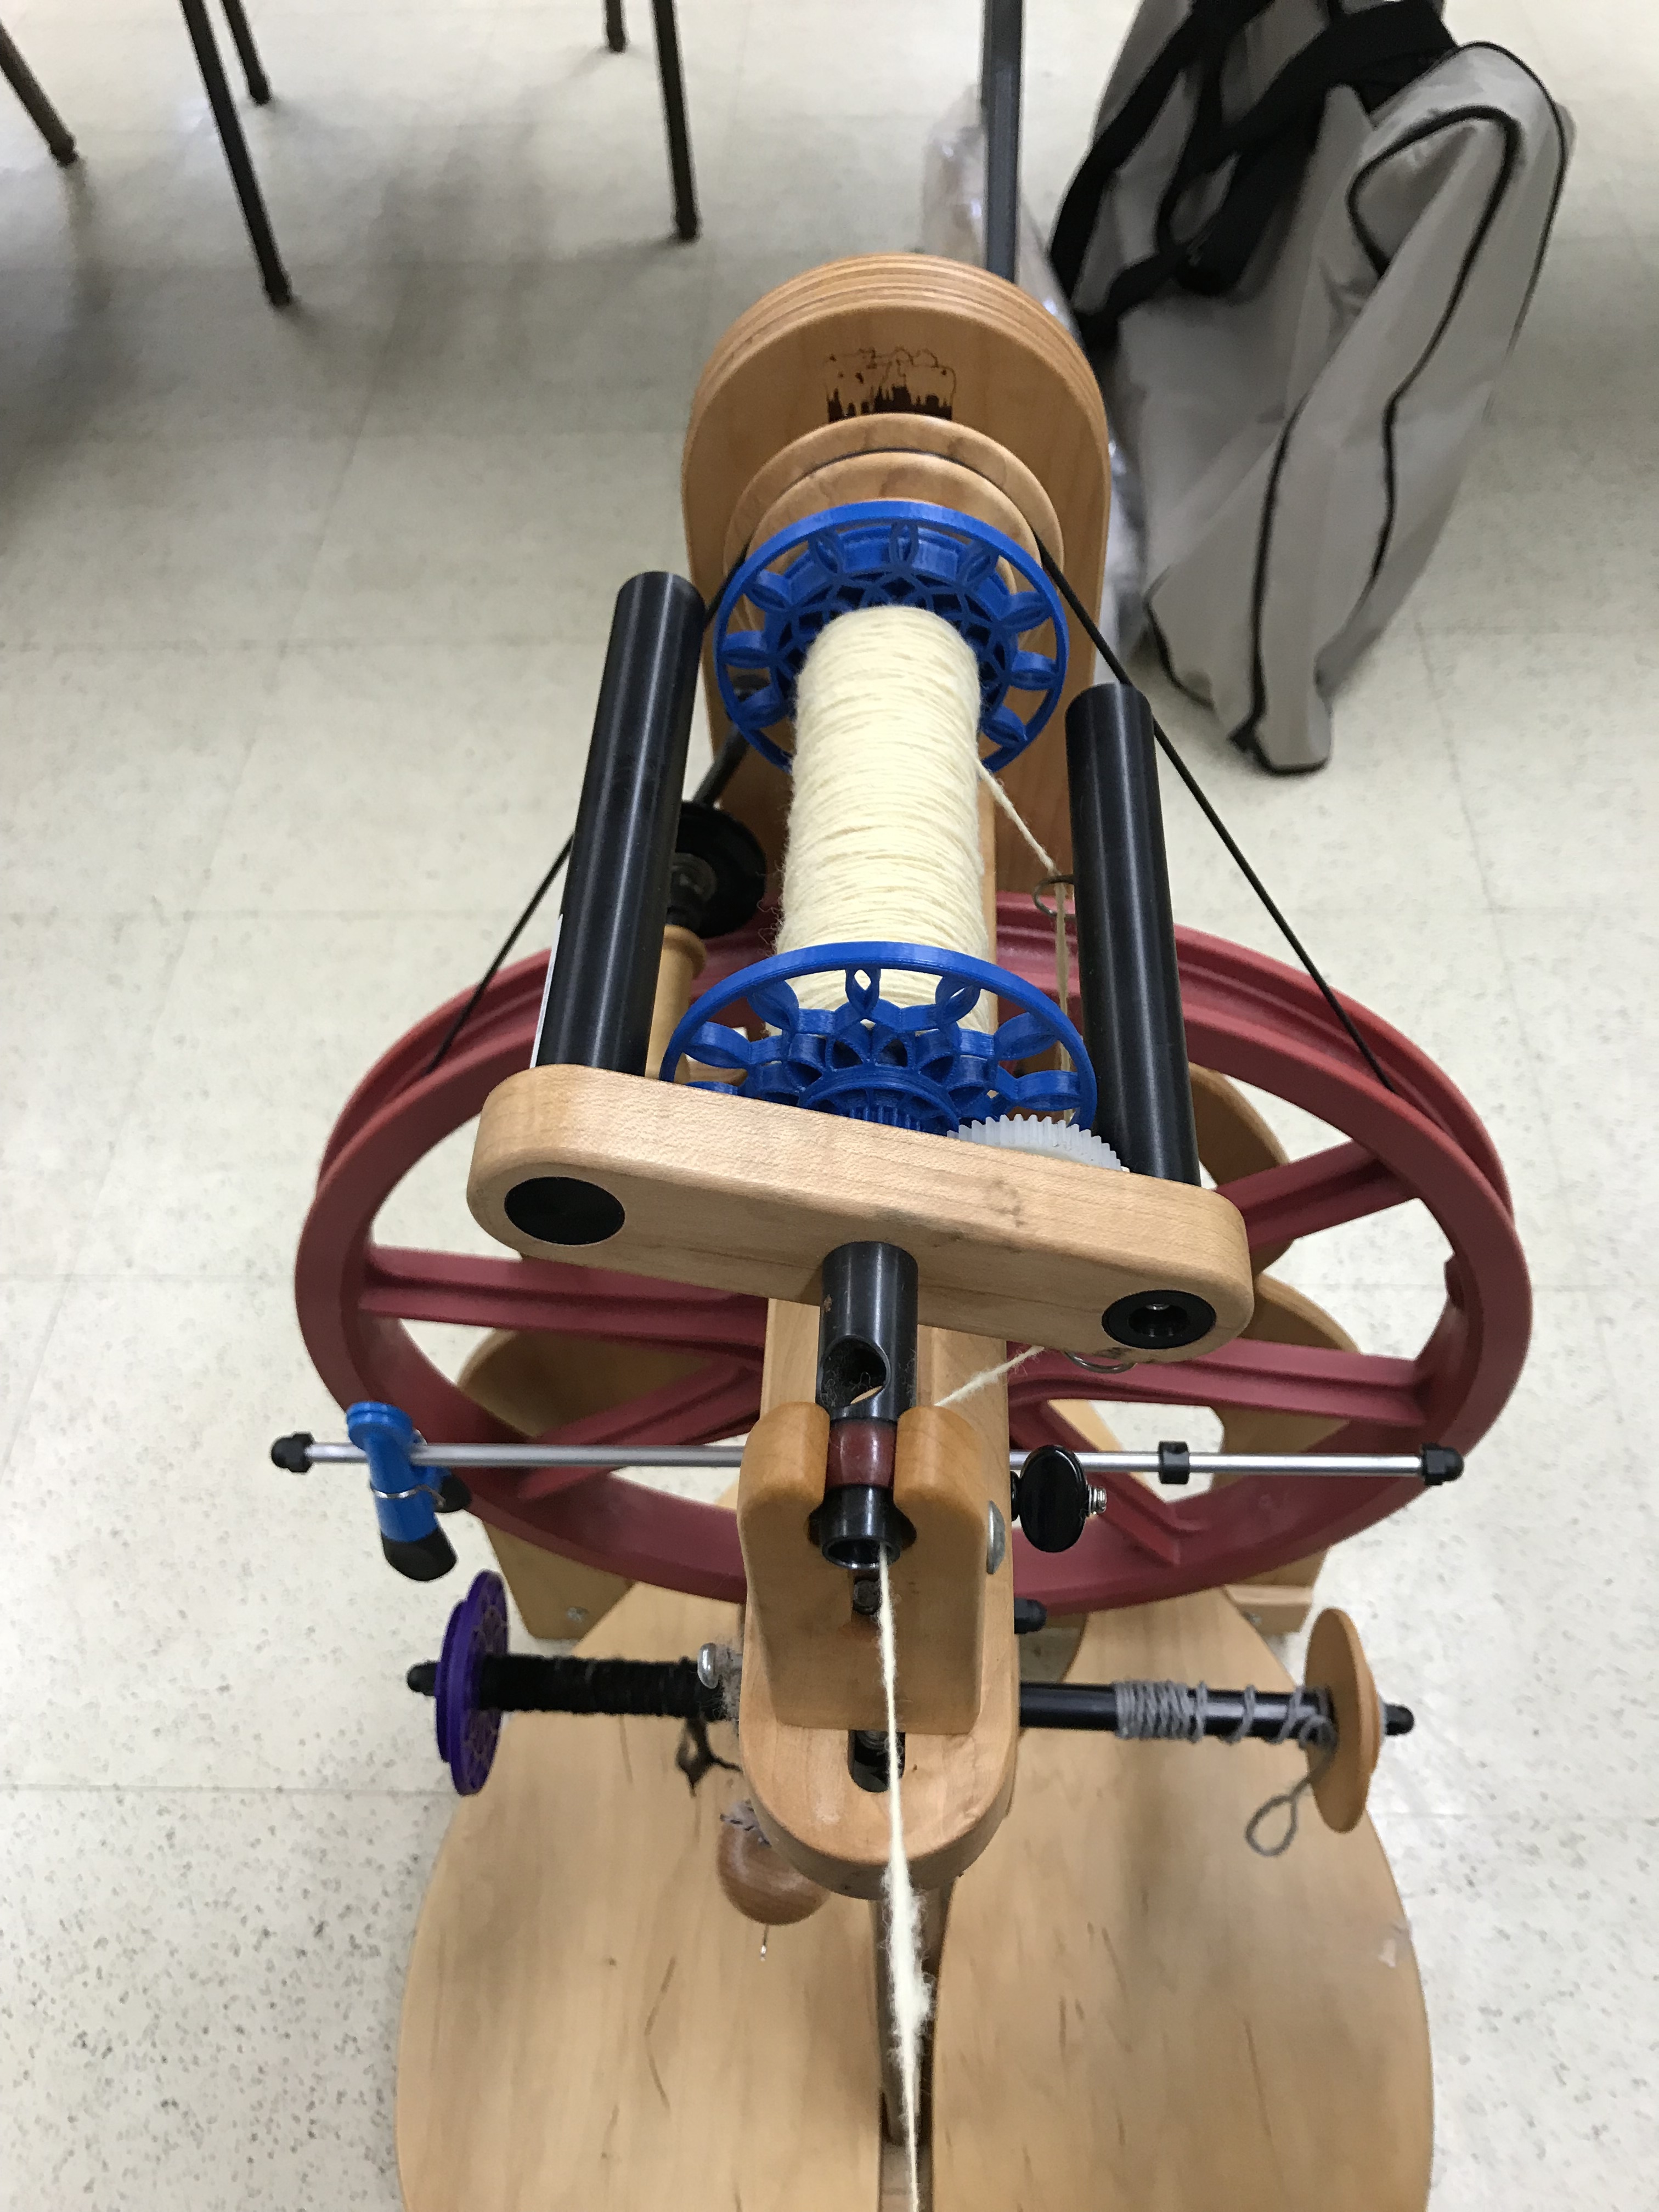
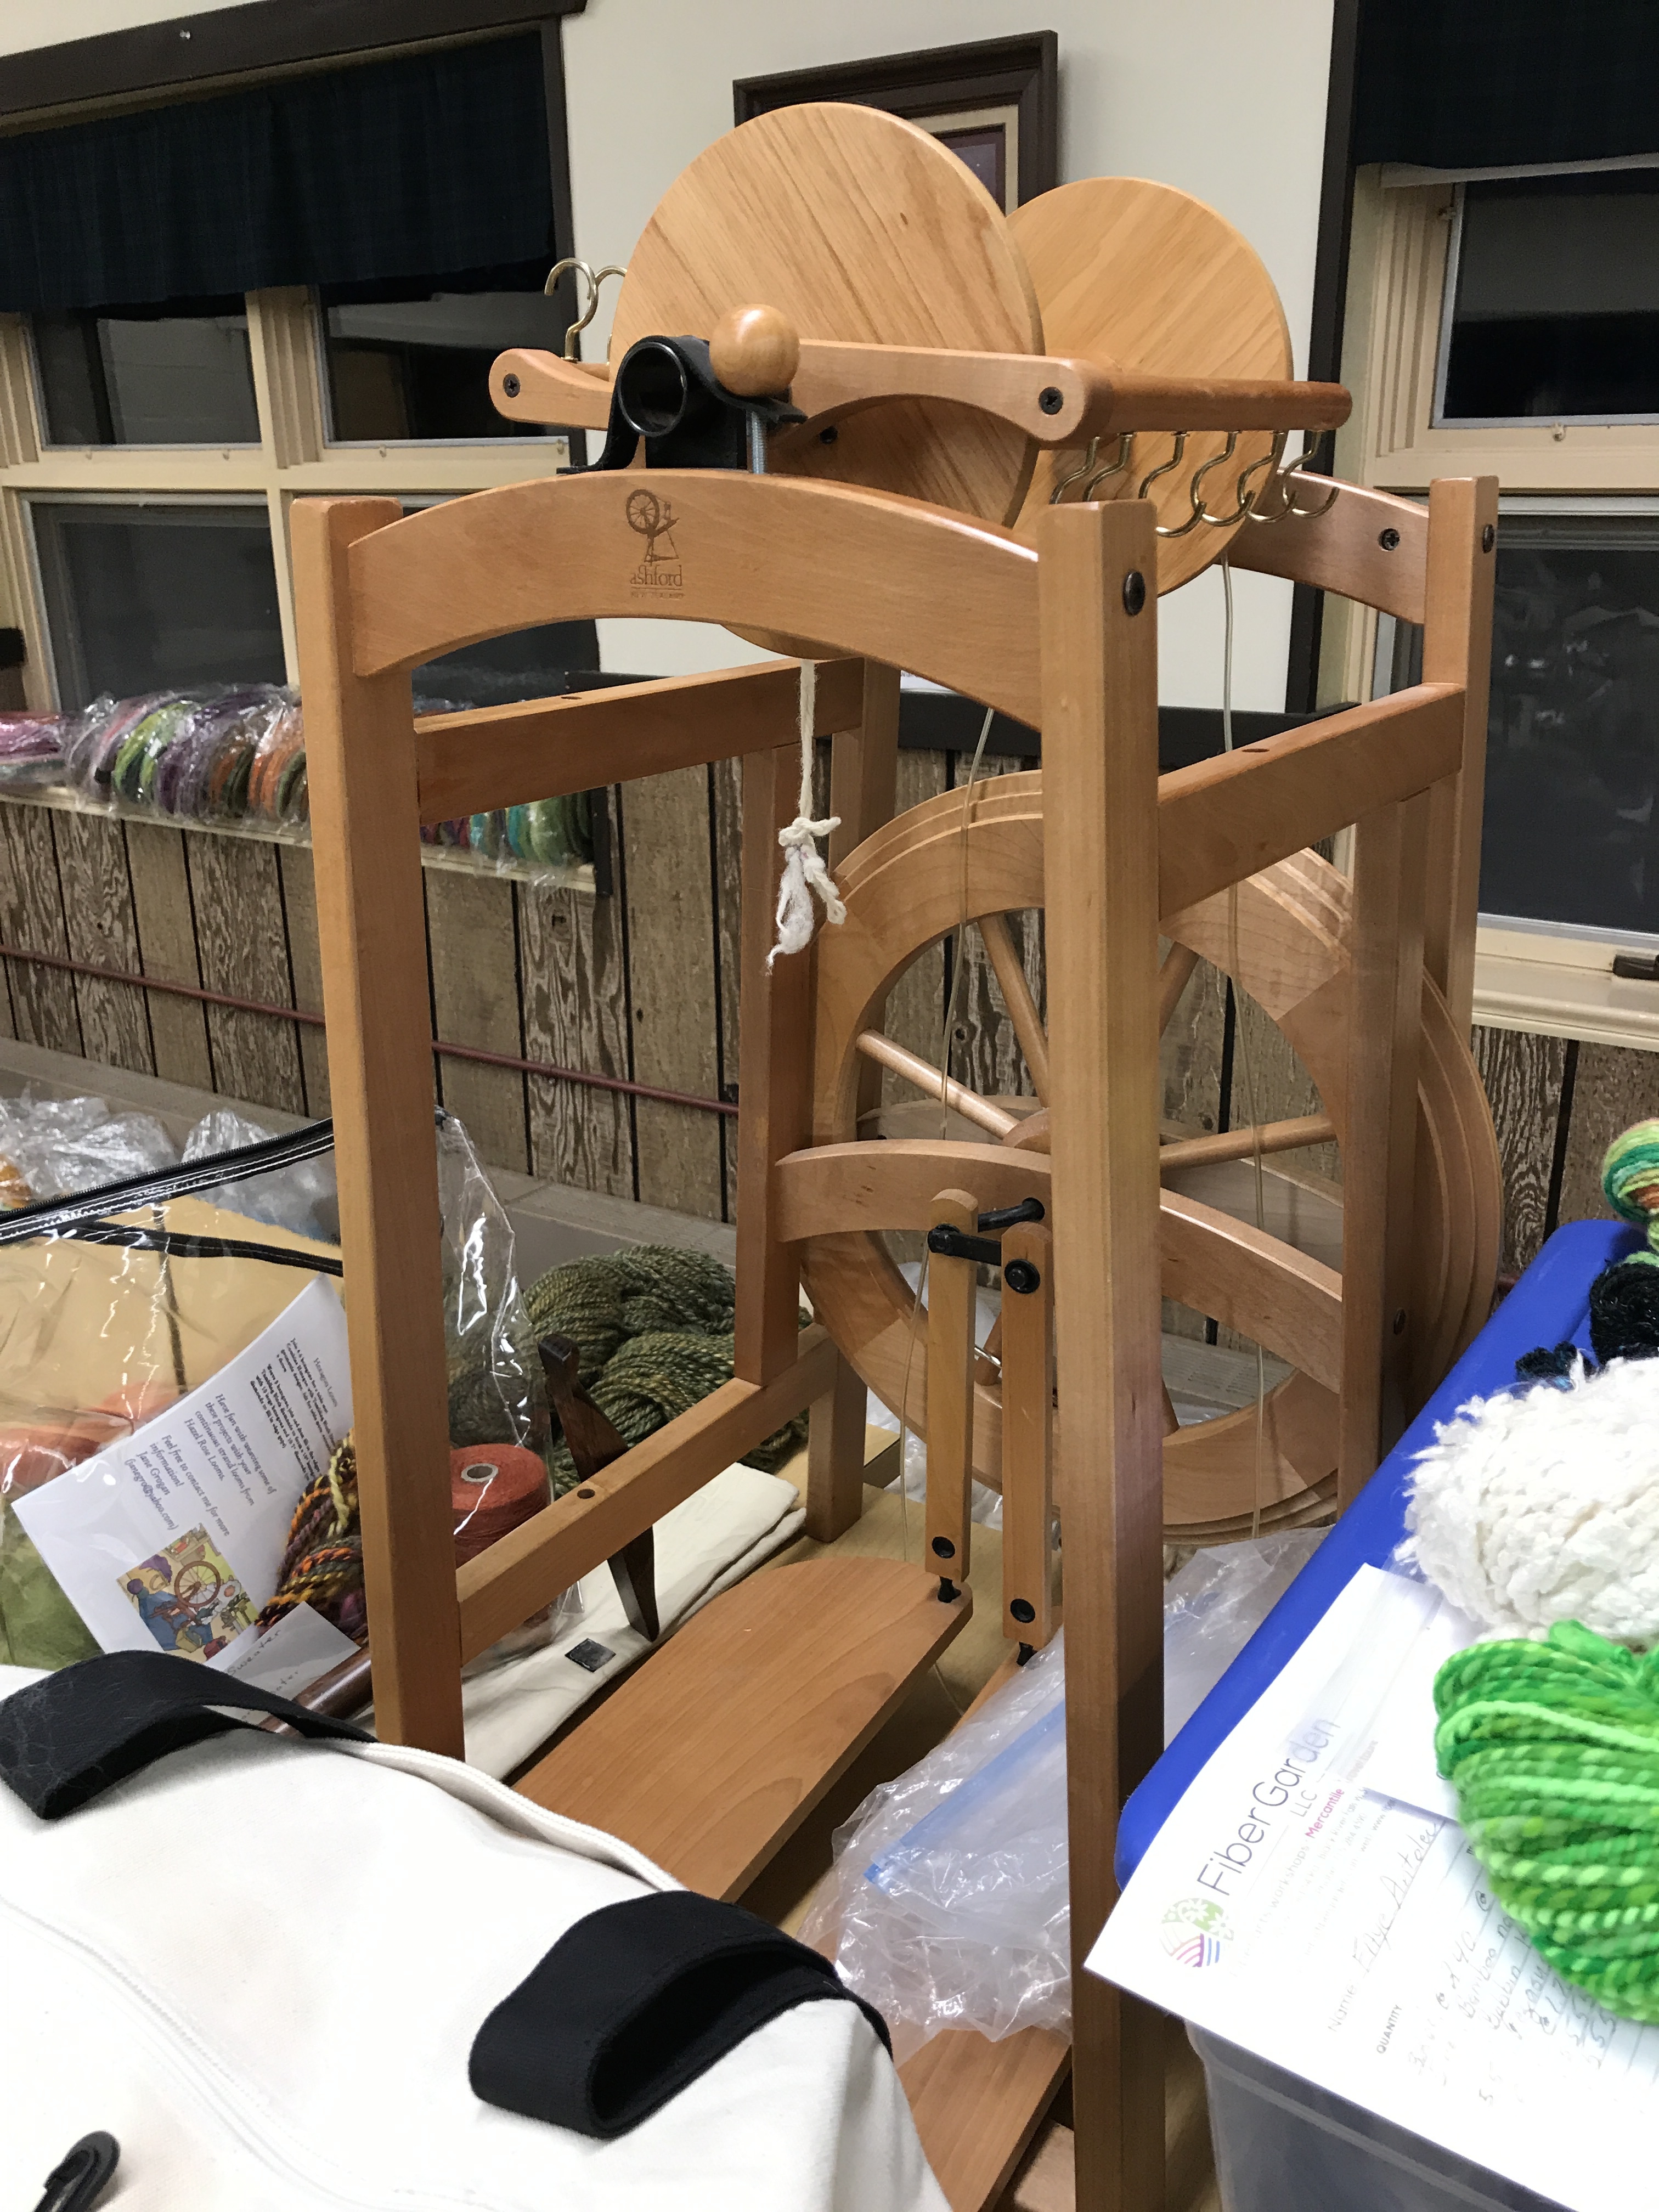
Ashford Country Spinner
The wheel I have (Louet S10 Concept) is great for small or medium weight yarns. But there are some that are much larger, like the Ashford Country Spinner. They could more easily handle thick yarn and art yarn. They have much larger openings for the yarn to pass through and much larger bobbins for the yarn to be wound on.
Lazy Kates
A lazy Kate is a device that holds bobbins full of yarn that is being plied. Some have a tension device to keep the bobbins from spinning too fast. You can buy them, but several spinners had made their own.
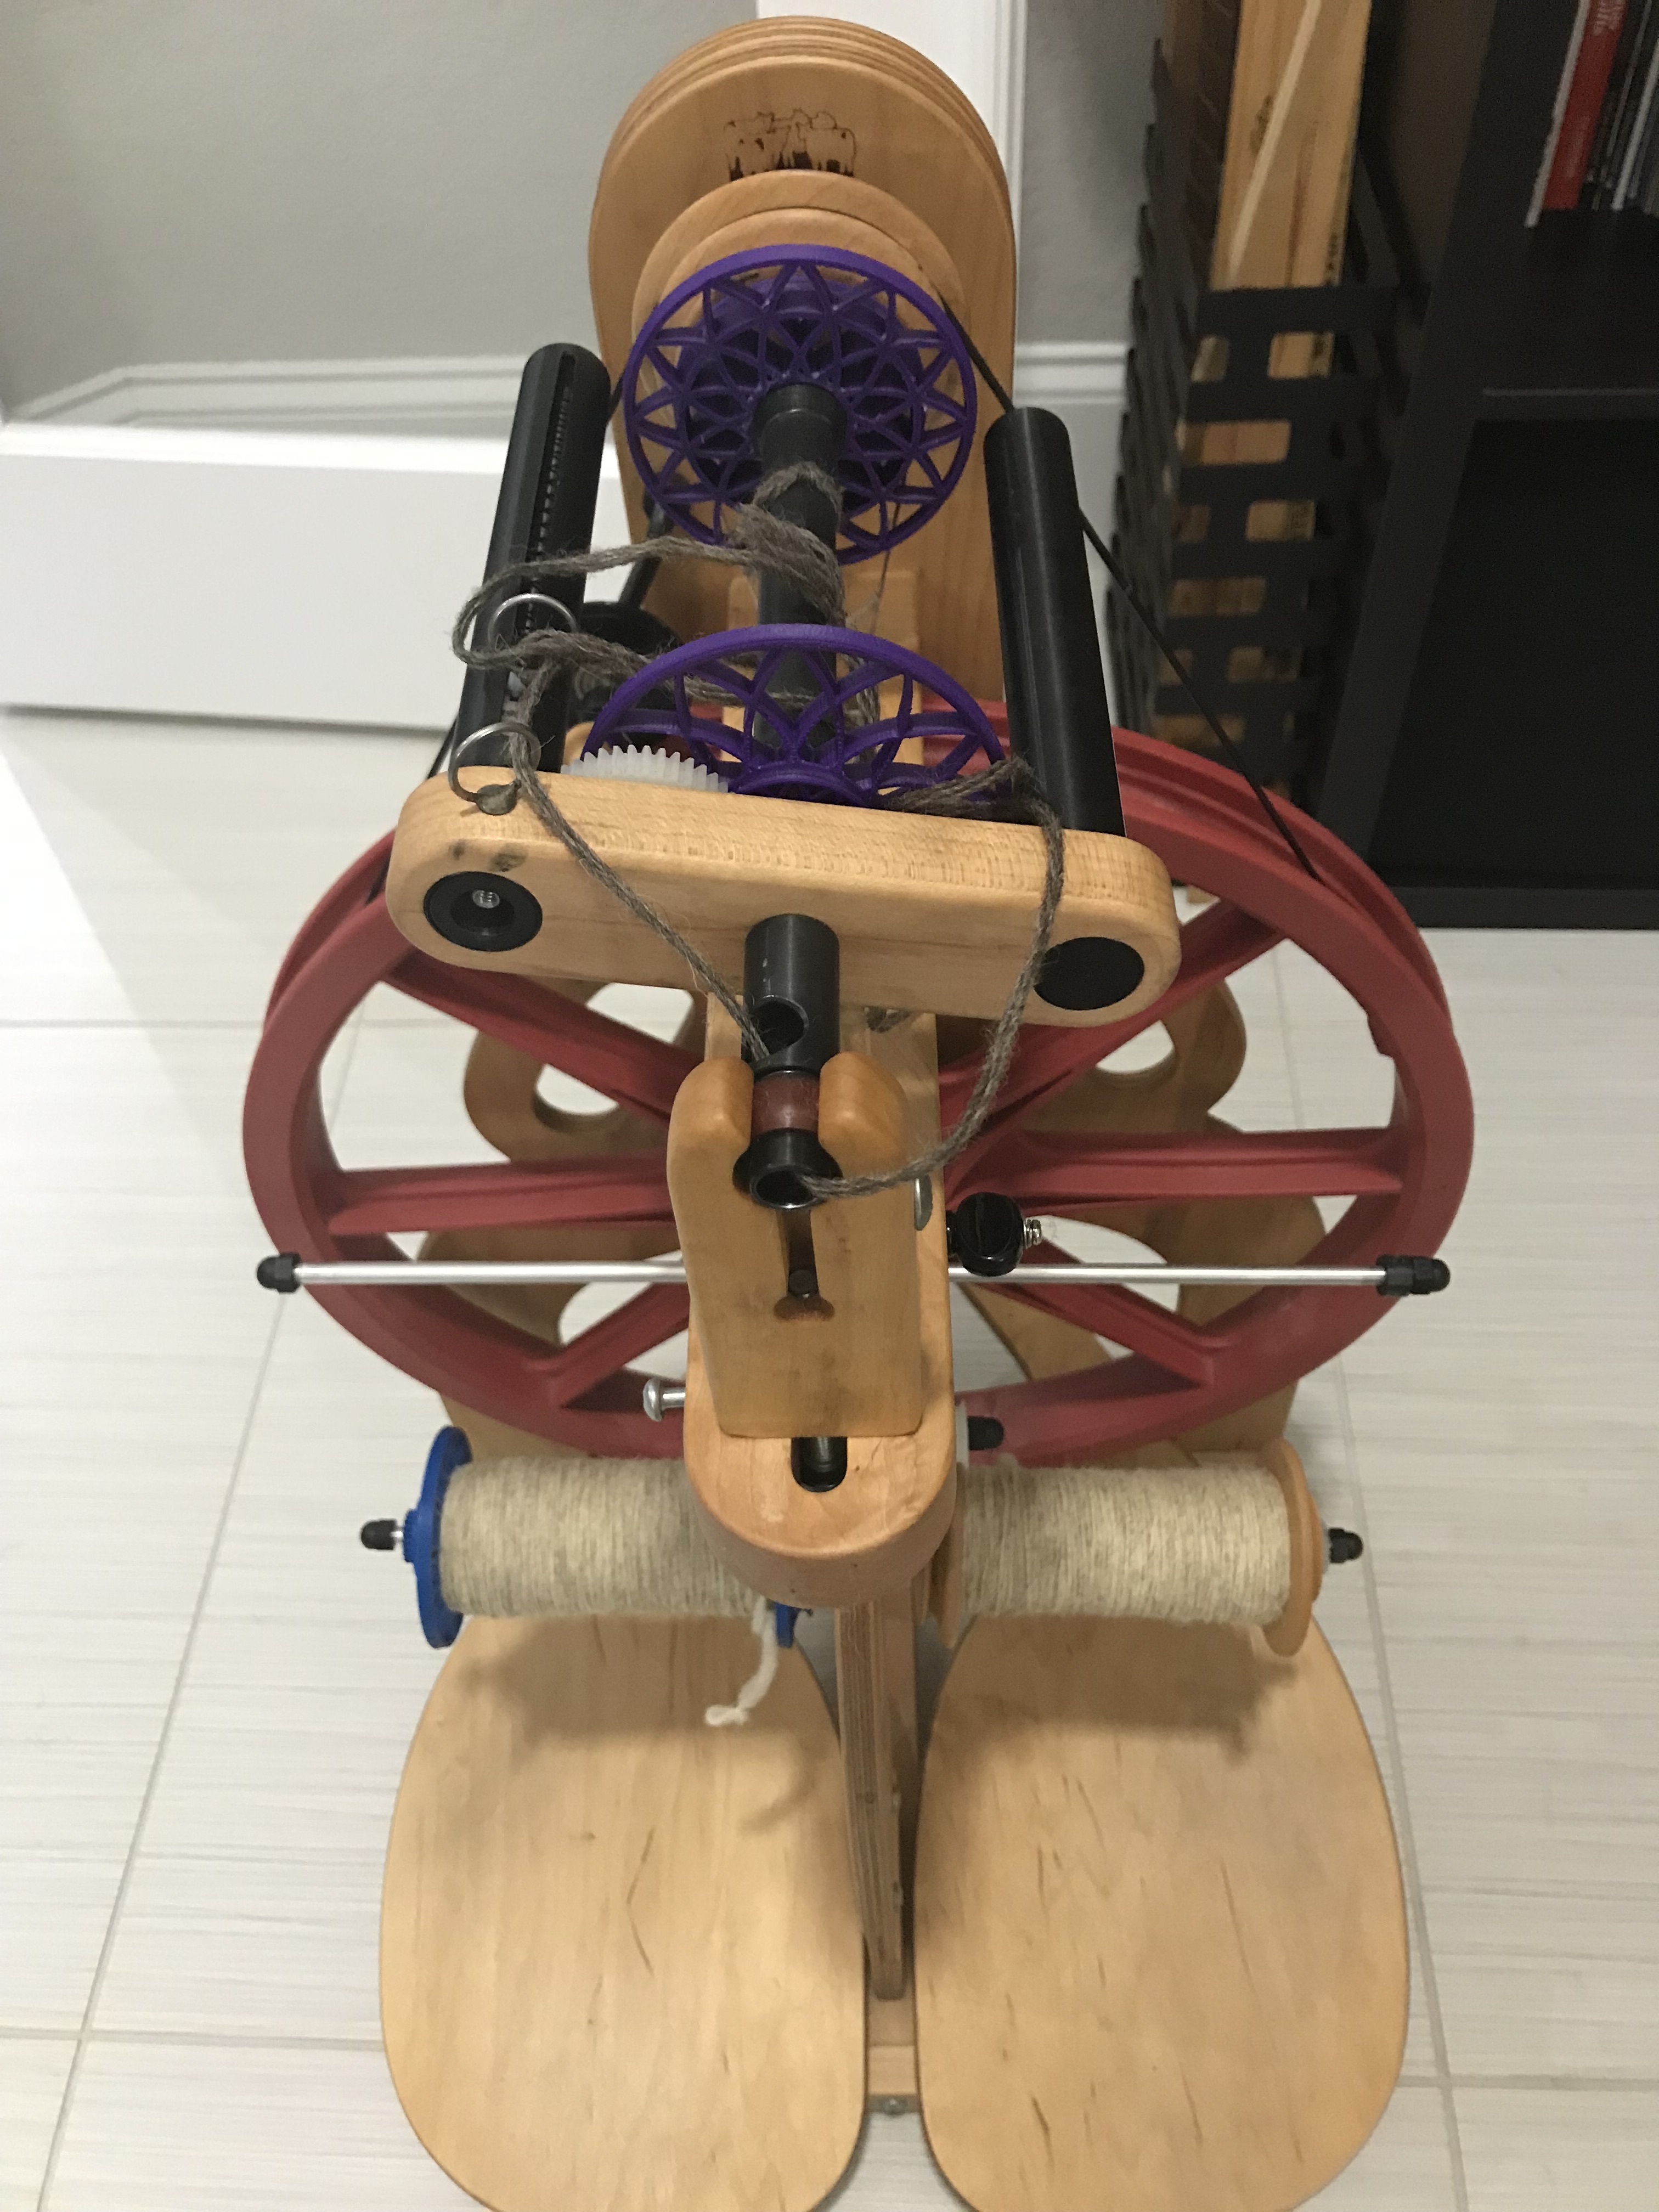
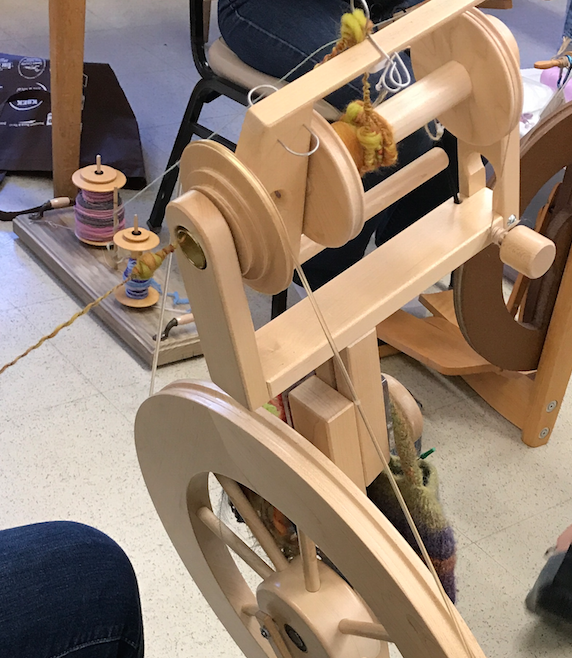
The WooLee Winder is a device that winds the yarn evenly on your bobbin. Note in the pictures above, the bobbin on the right is mine. I have to move the hooks manually to get the yarn to start winding in a new spot. If I don’t pay attention, it piles up in one spot. The WooLee Winder on the wheel at the left uses gears to move the hook back and forth automatically and wind the yarn on evenly.
Lendrum Spinning Wheel
This is a spinning wheel that I would like to own. It is a nice size and has several useful features. The bobbin is easy to change.
Deb Jones, the woman who put together the retreat, brought plenty of supplies. Bah bah, Deb’s sheep, have you any wool. Yes ma’am, yes ma’am, one hundred bags full!
Some of My Spun Yarn
Bobbin of Yarn Ready to Be Plied
These are some of the yarns I spun. I am trying to decide whether to ply the black and gray yarn with a lighter or darker color. I spun all 8 ounces that I had. It took me all day.
Continuous Strand Weaving
Pin Loom Weaving – Note the Lazy Kate on the Floor
Continuous Strand Weaving
Spinners would sometimes take a break to indulge in other crafts. Many were knitters. Several people had these small looms called pin looms and continuous strand weaving looms. They look fascinating and terribly portable. I can’t wait to try this type of weaving.
Snacks Are Always Hard to Resist
Although the meals were catered and delicious and I was never really hungry, everyone brought snacks to share.
There were also some liquid refreshments, including some 12 year old Scotch that a spinner brought back from Scotland after a spinning trip with Deb. It was pretty good!
On my last day of the retreat I was surprised to find that I was the first one downstairs. The room was usually so lively, full of spinning and chatting. It looked so different with the spinners all missing.
It was a wonderful retreat and I hated to leave. But I gained so much! I plan to return for the spring retreat. I can’t wait to begin practicing the skills I picked up during these exciting four days. There is a table in one of the rooms where the participants set out things they had made and wanted to sell. There were some remarkable items. Perhaps by the spring, I can place something there, too.
I kept notes of all the good ideas I heard people talking about. I joined Ravelry, looked online for a book about ergonomic knitting, and marked my calendar for PlyAway in Kansas and YarnOver in Minneapolis. I am afraid that I am going to have to drop one or more of my less interesting pursuits to make room in my life for spinning.
As always, your polite and helpful comments are welcome.
Sewing for 18” dolls is fun, doesn’t take much material and is a good way for new sewers to understand clothing construction. The only really expensive part are purchased patterns which can cost $20 or more. But you really don’t need purchased patterns to start sewing doll cloths. In a previous post I tried to show how you can make simple skirts and dresses for the dolls, and even their human girls, just by measuring.
Today I would like to show you another technique. You can use clothes the dolls already have to make a pattern.
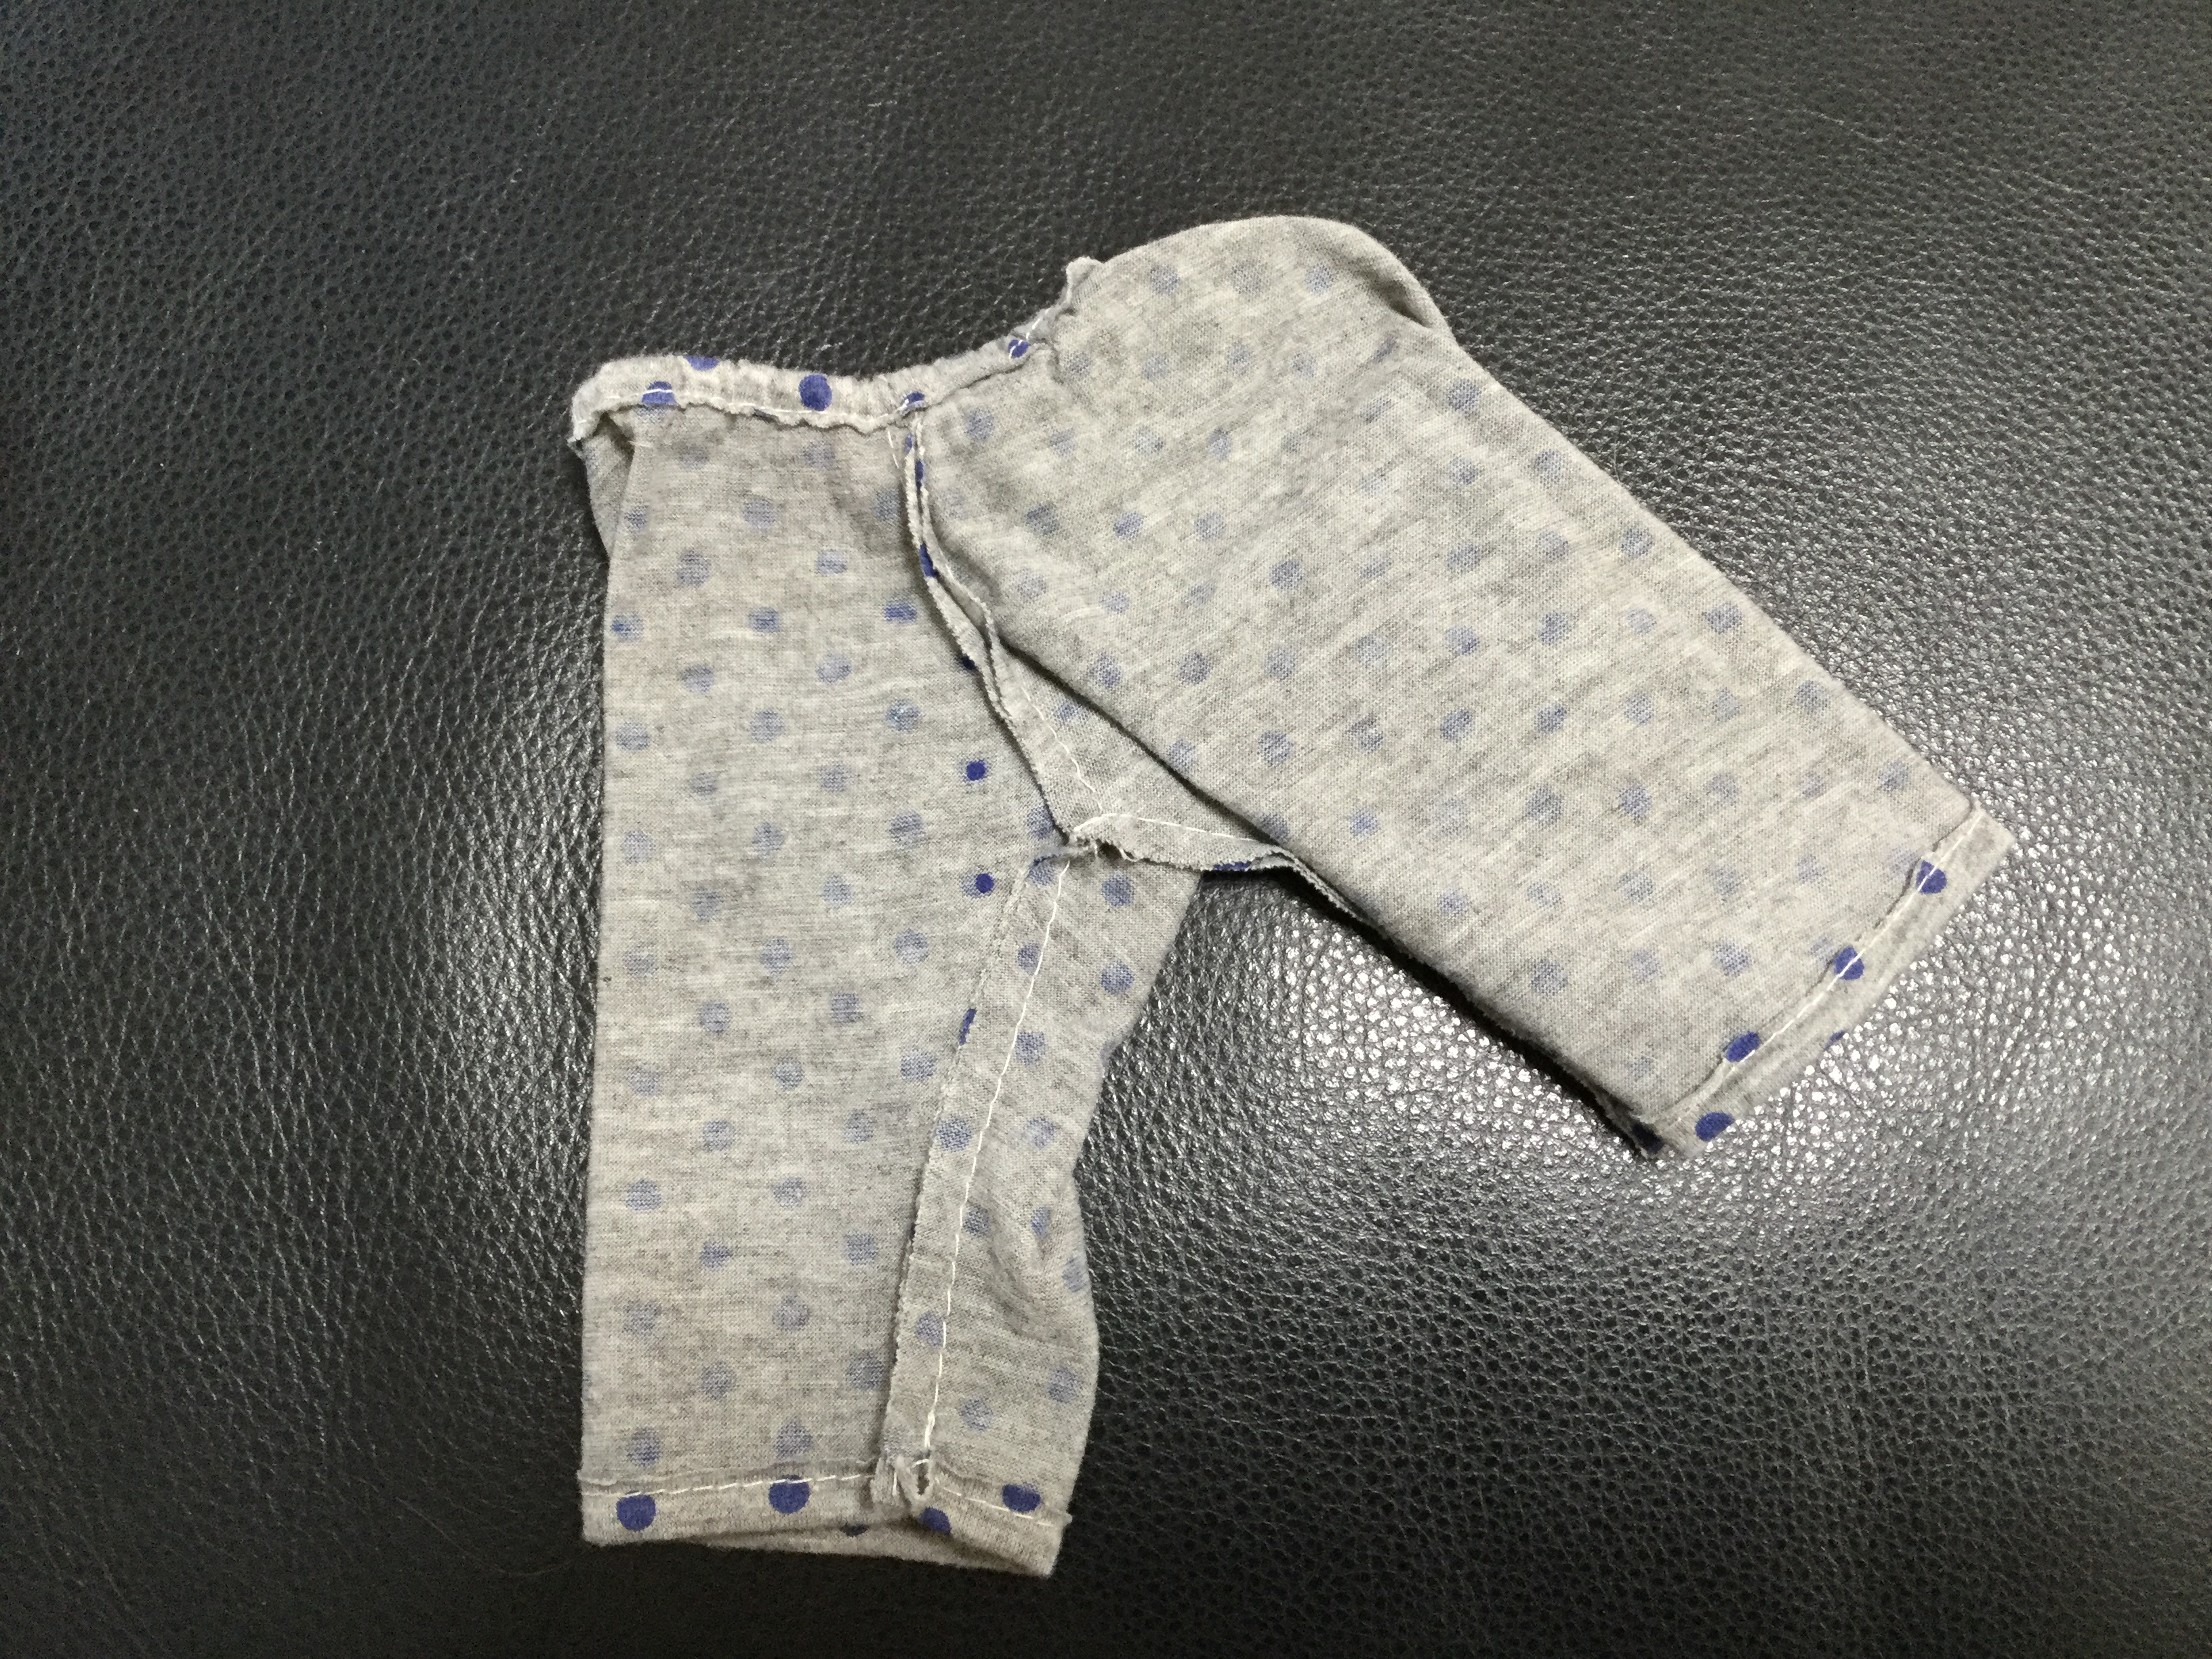
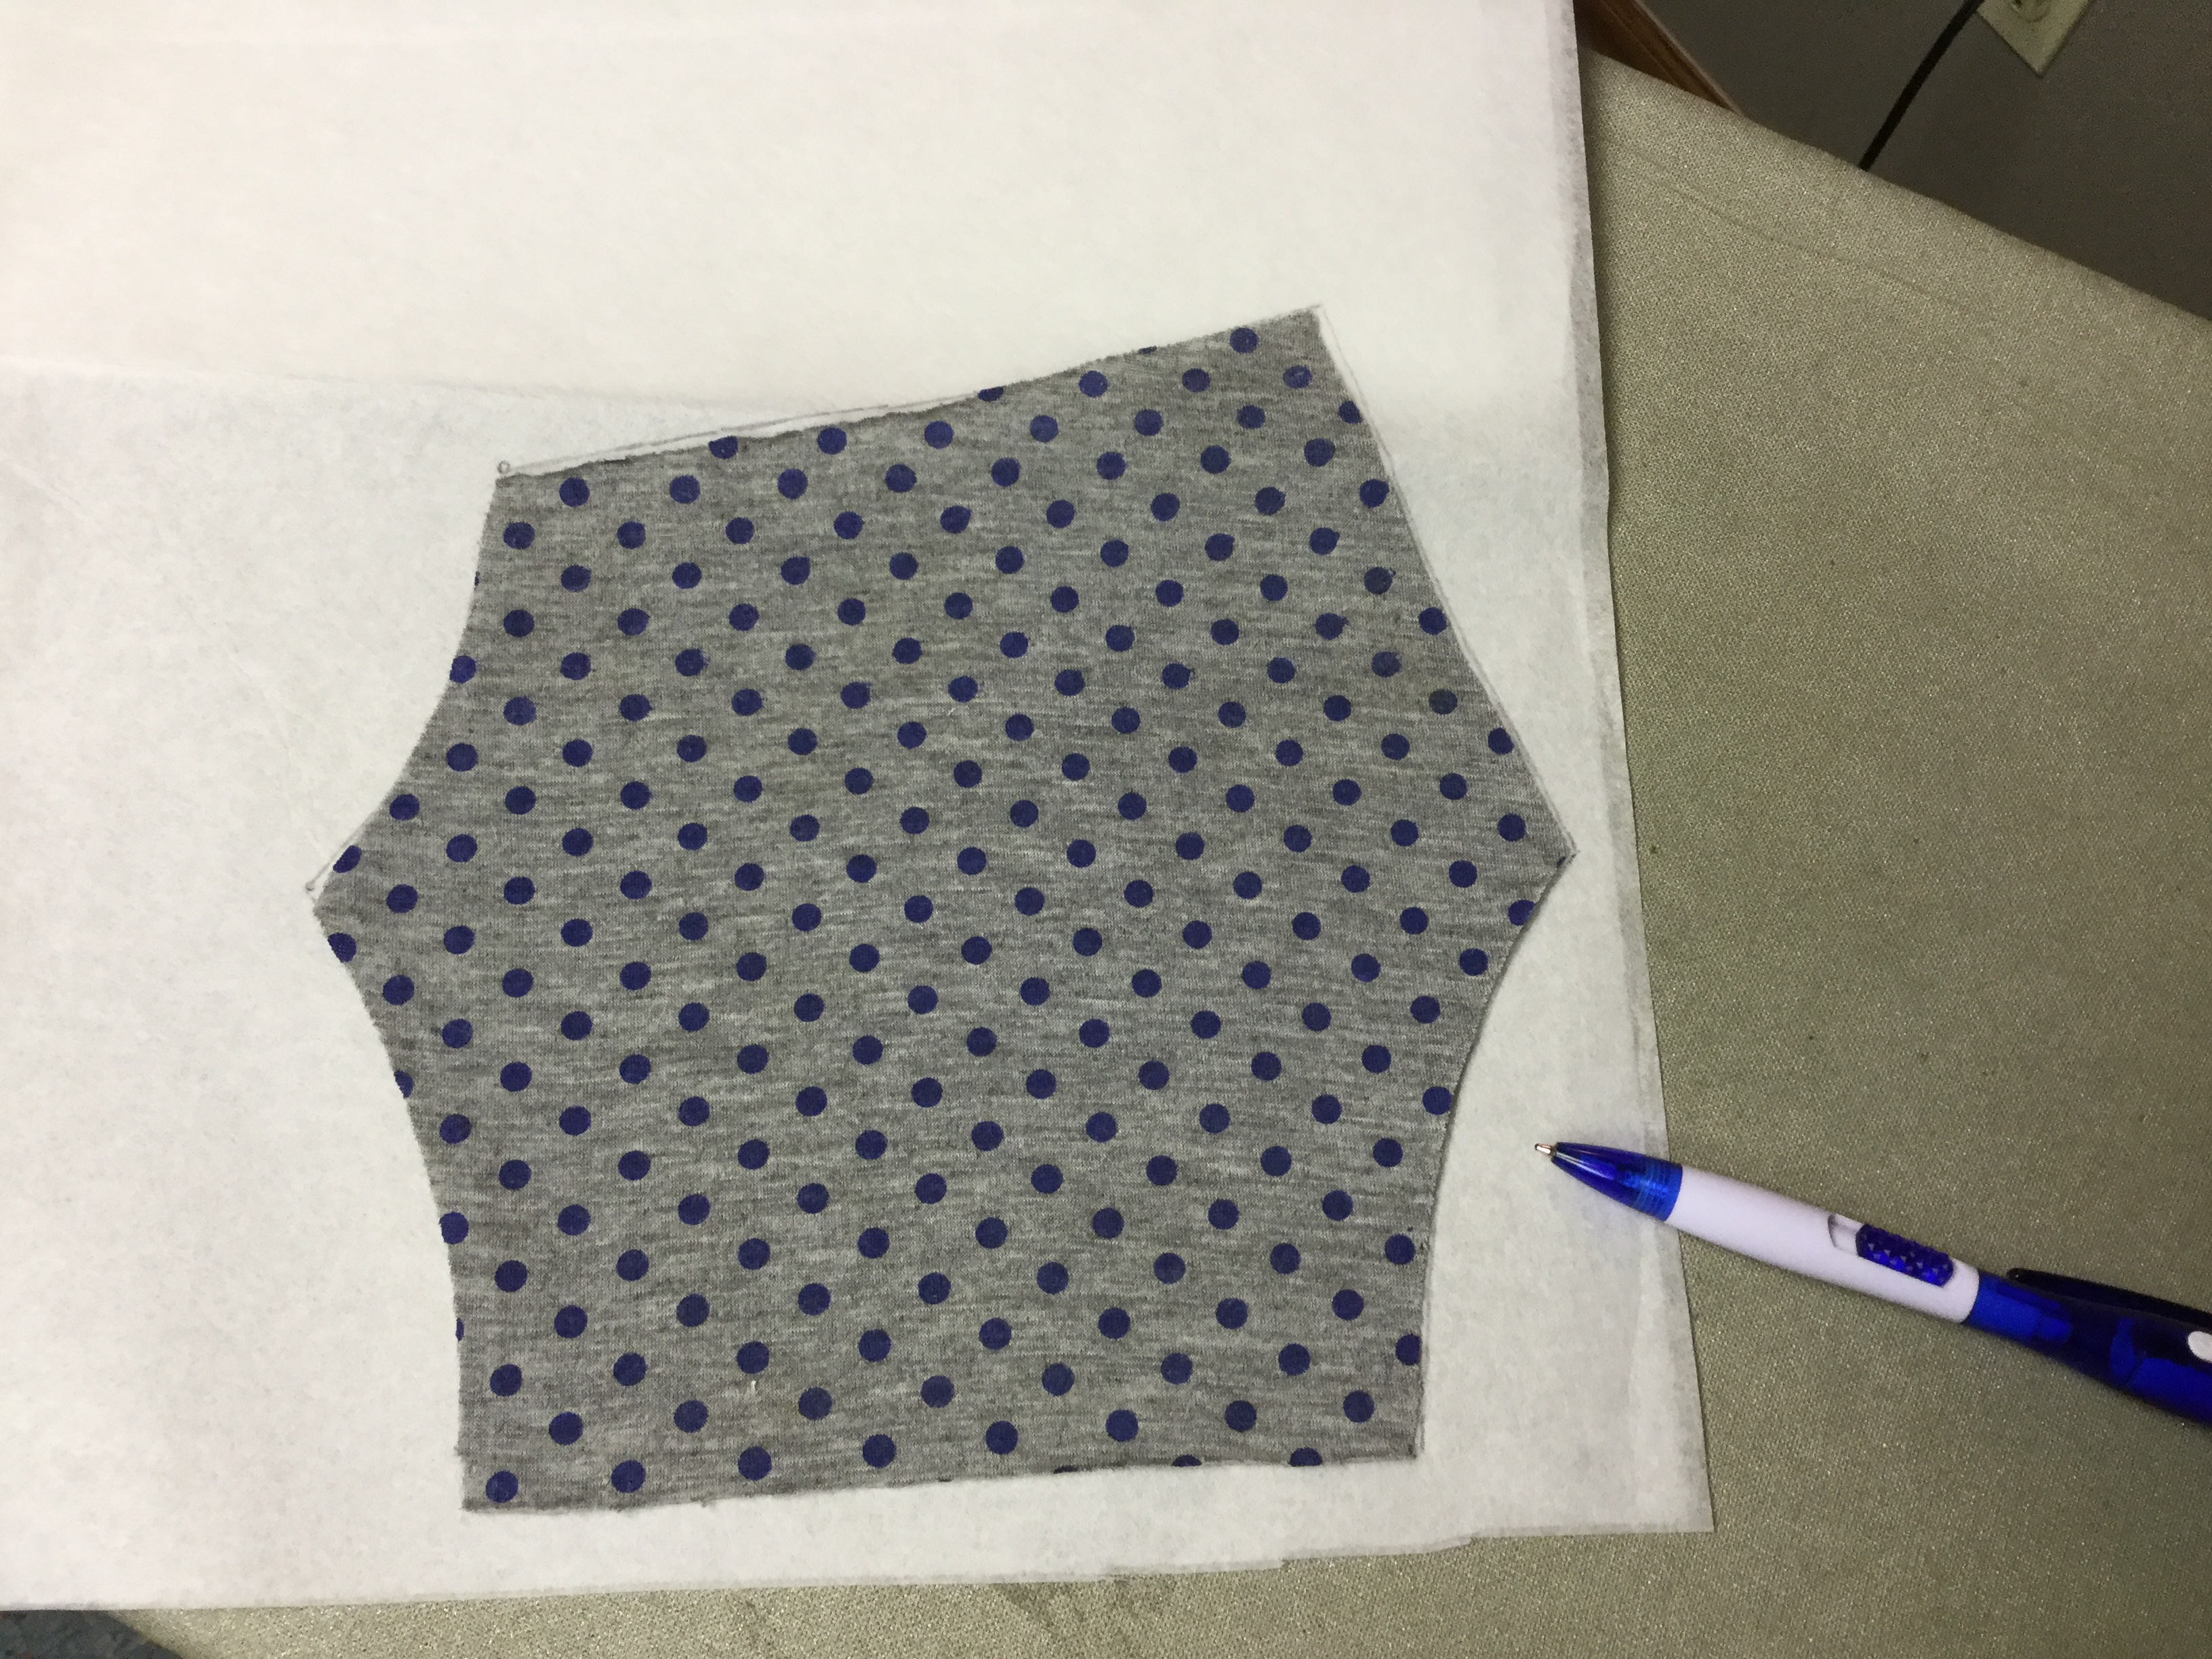
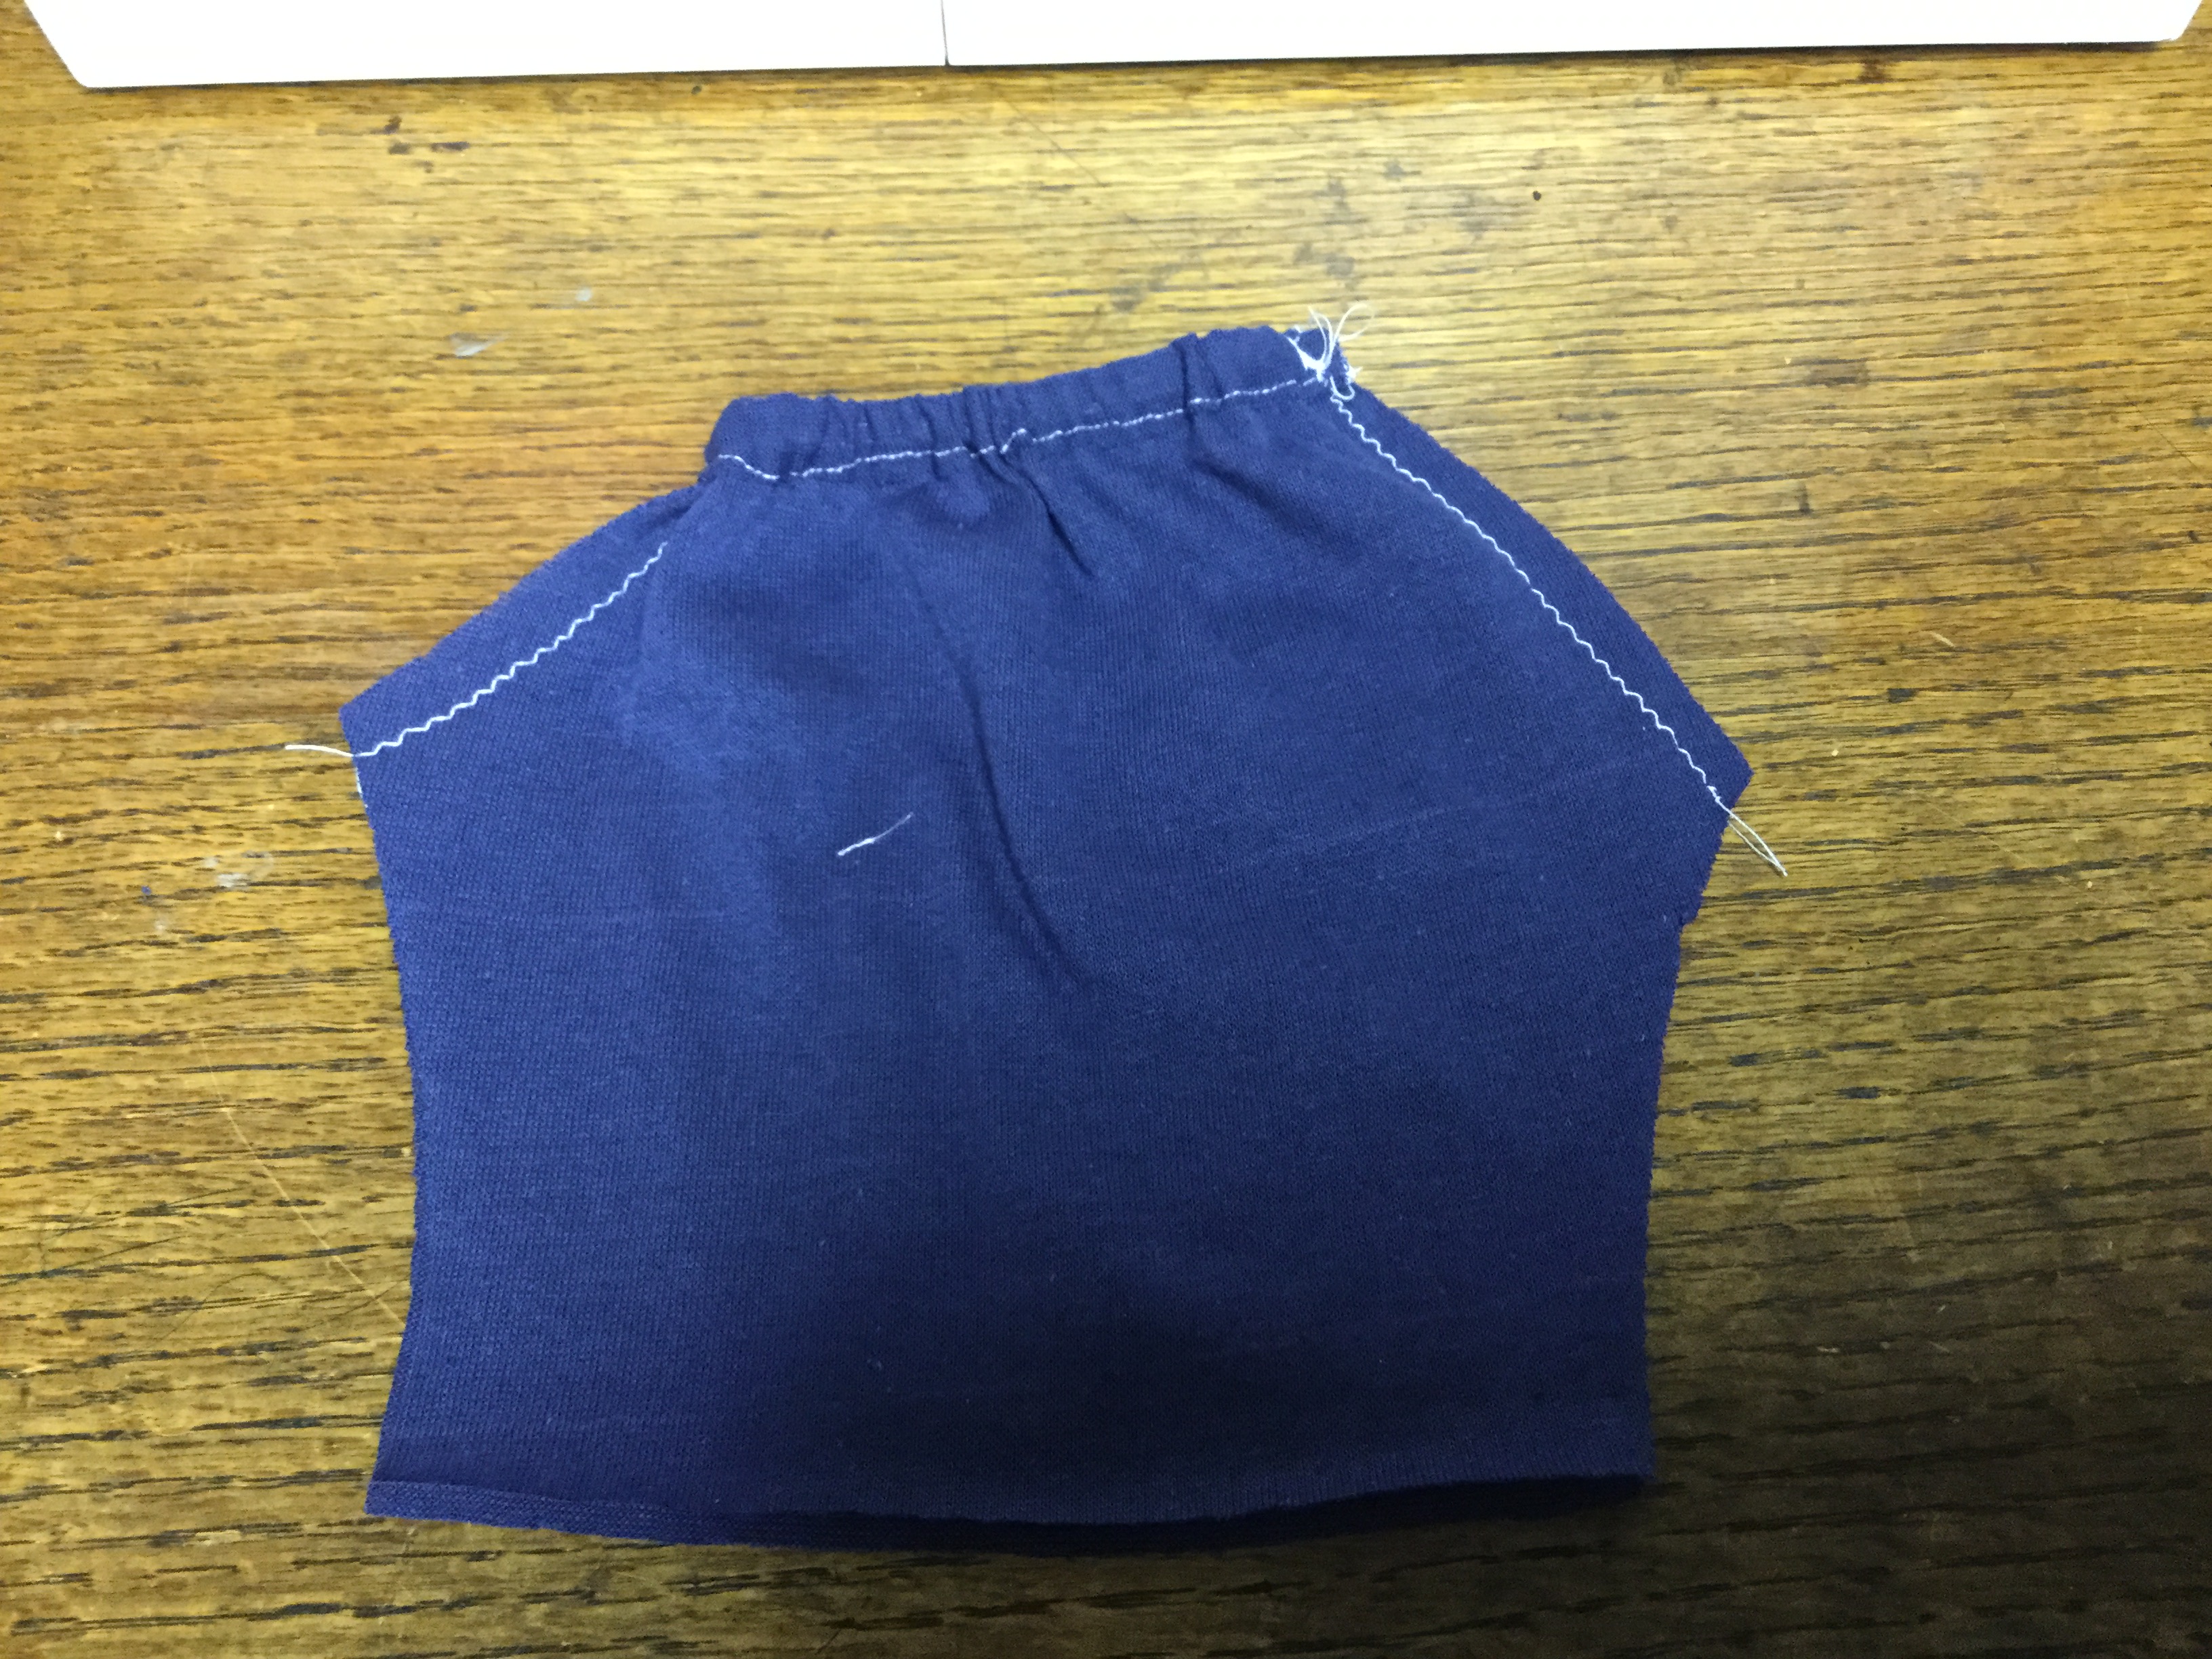
For the first example, I chose a pair of knit capri pants with an elastic waist. I found them in a bag of clothes I bought at a garage sale. The nice thing about this is that it doesn’t matter if the garments is old or stained or torn. They will work equally well for making a pattern.
Notice that the store bought clothes are not really “high quality” sewing. The seam allowances are small and the seams unfinished. The hems are just roughly turned under once with cut edges showing. Most of these clothes are mass produced using as little fabric and notions as possible.
But these are just doll clothes. No one is going to prom or a job interview here. So try to keep this in mind when you are sewing. Of course make things as neat as you can, but don’t go overboard trying to make them as good as human clothes. Also, the dolls are not really concerned with comfort, so a thick seam won’t bother them. The goal of this post is to show how young sewers can make inexpensive doll cloths. They should be easy for little hands to get on and off the dolls.
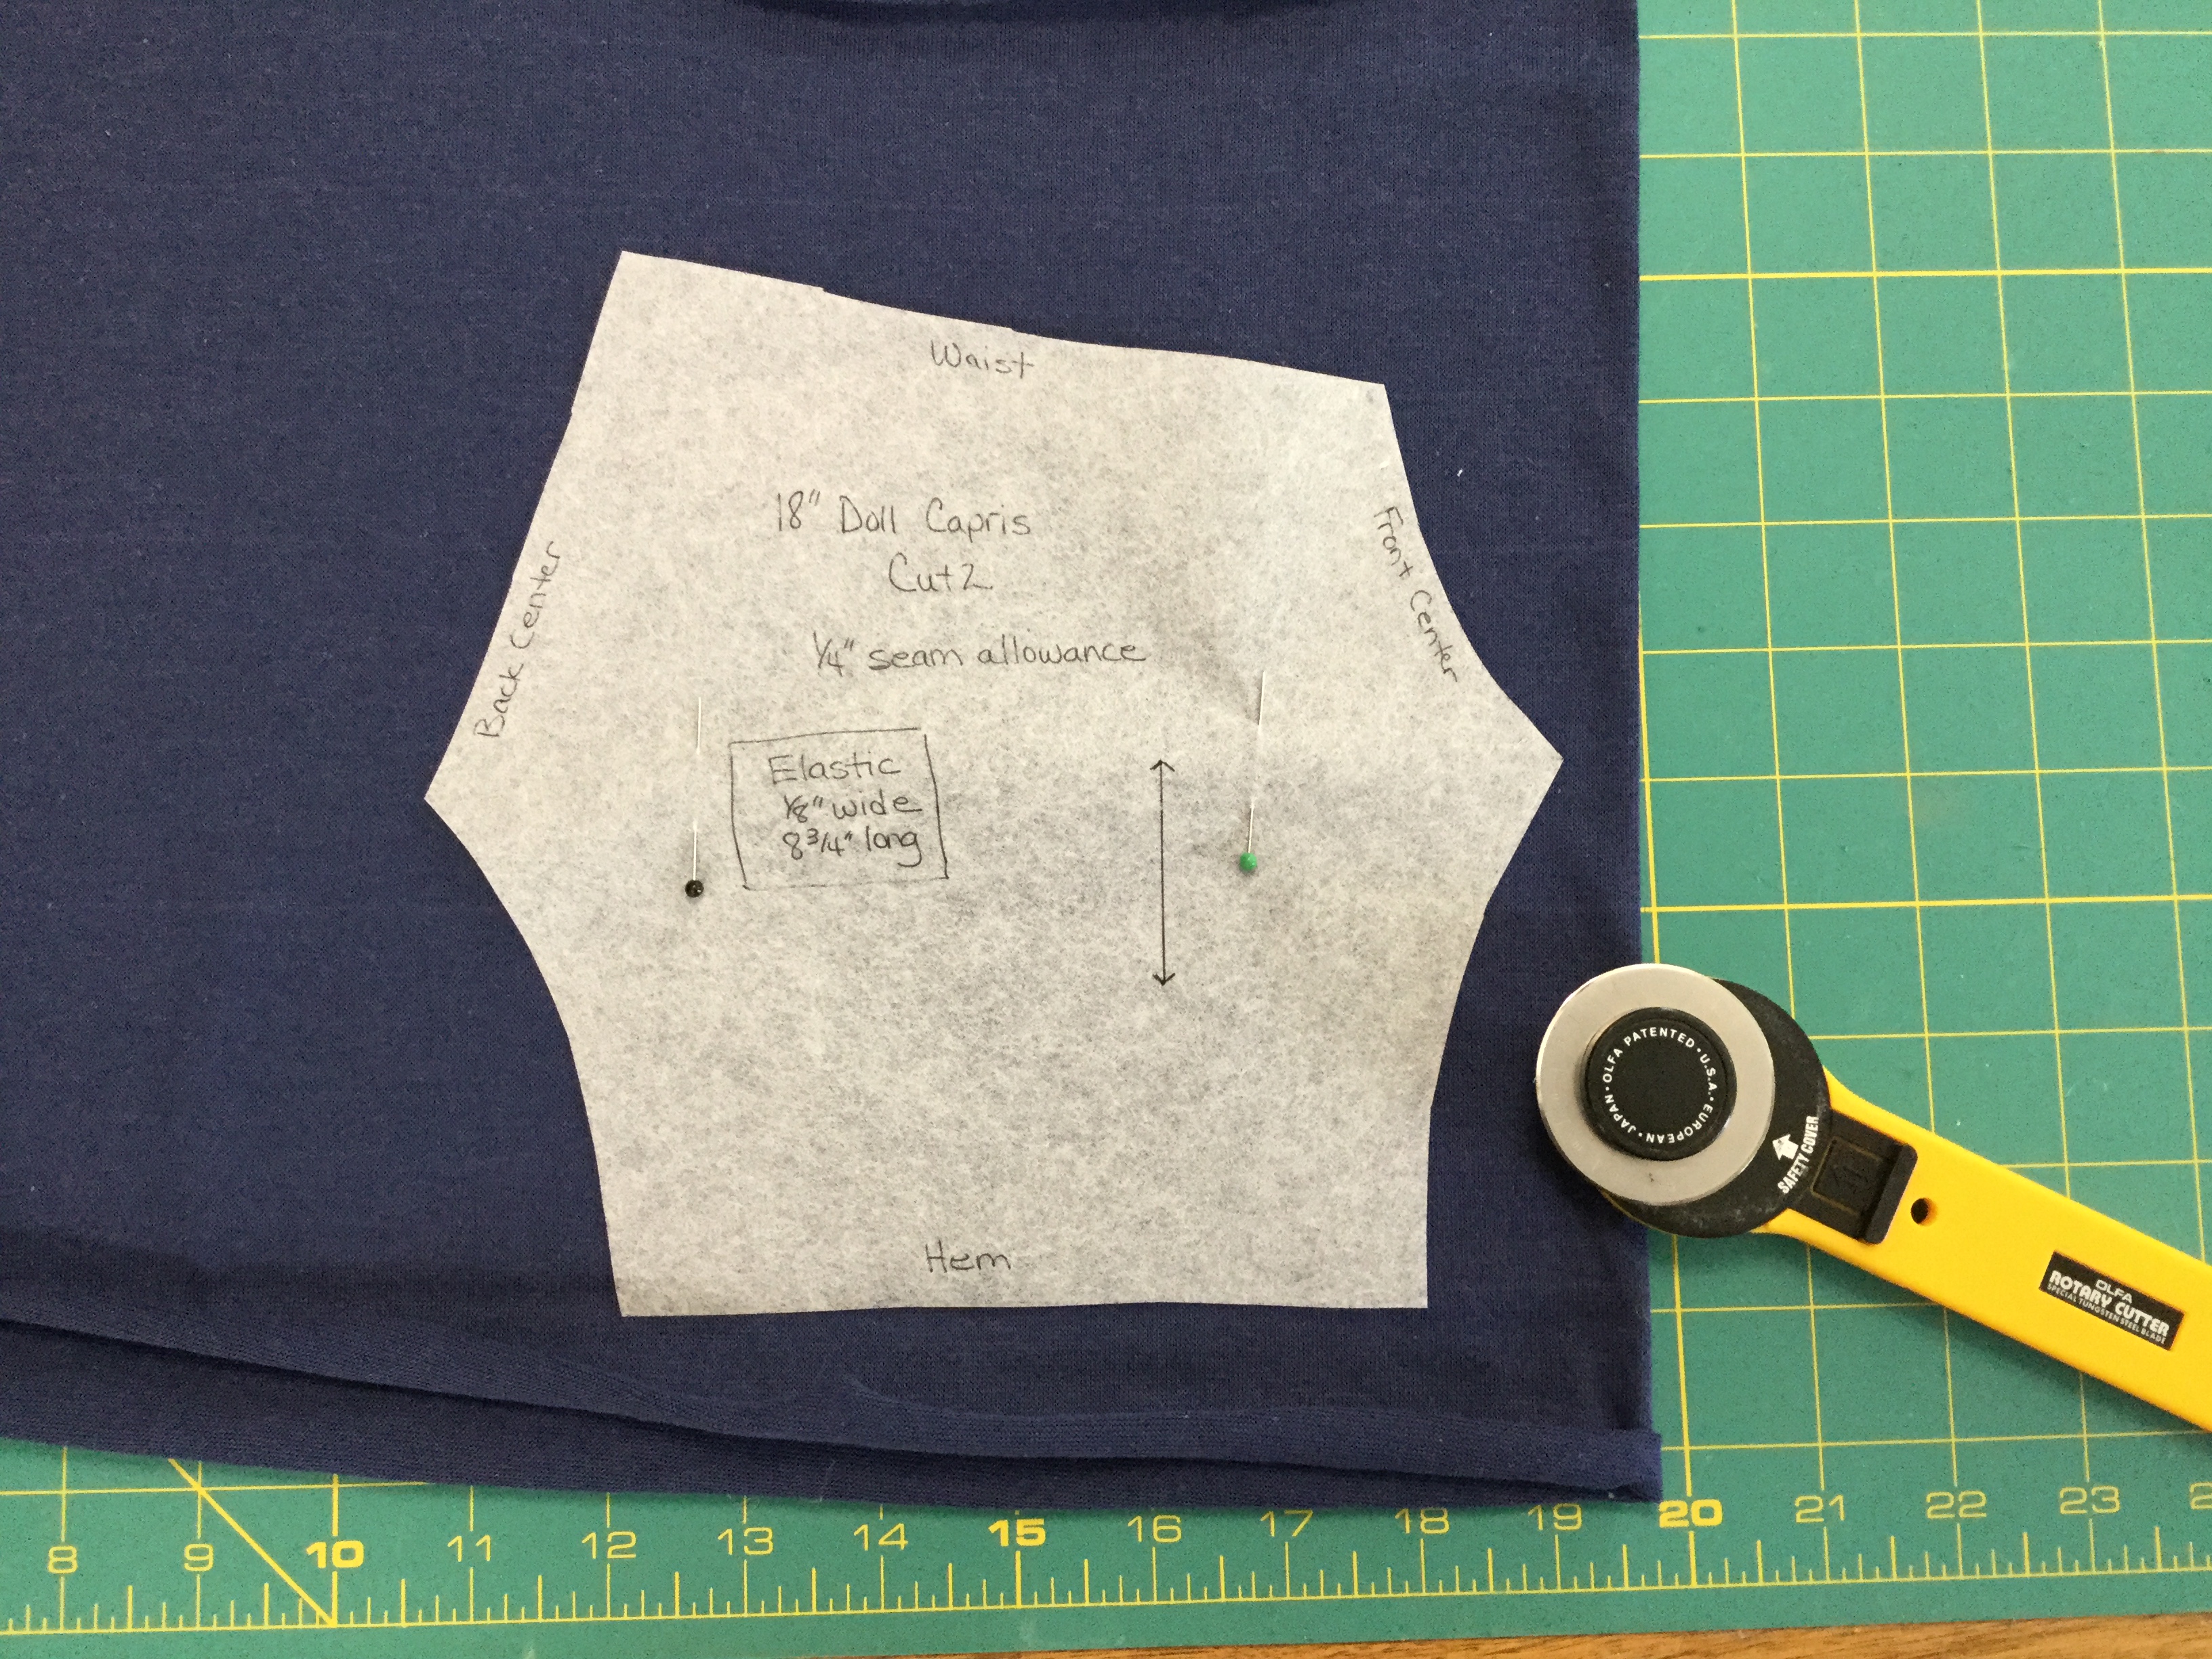
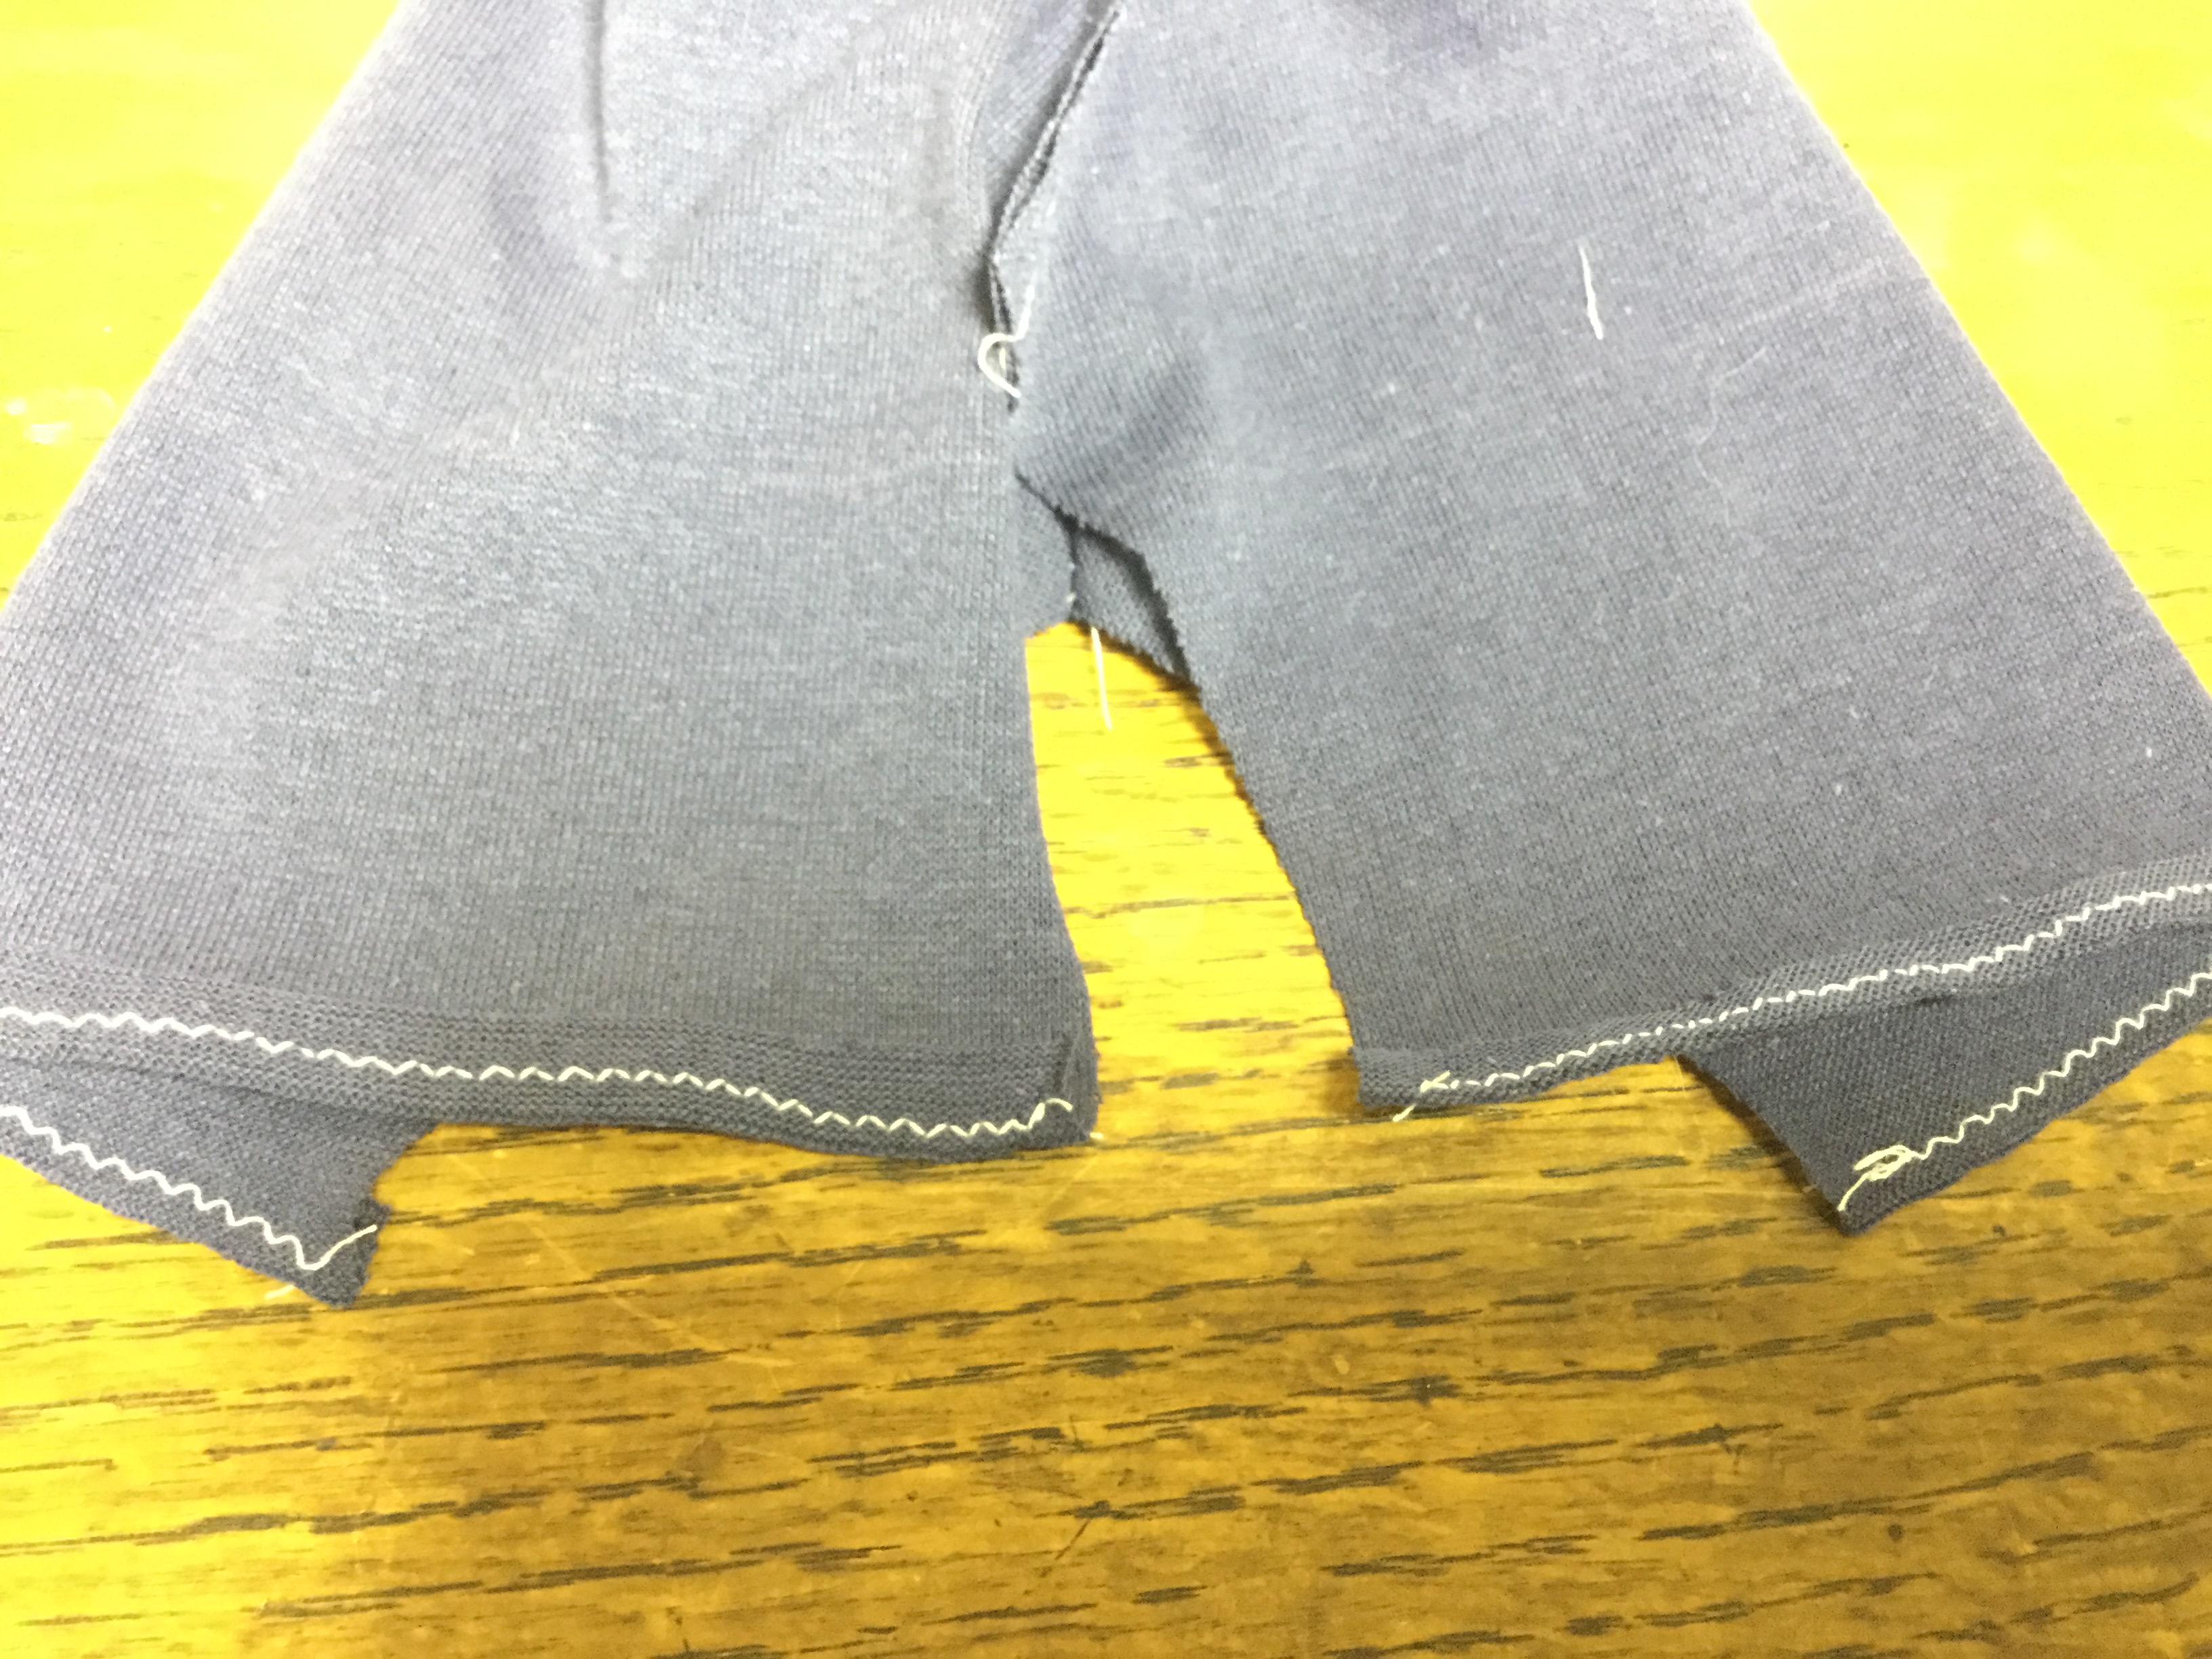
The first step is to take apart the garments. This little device is called a seam ripper. It fits nicely under stitches to break them.
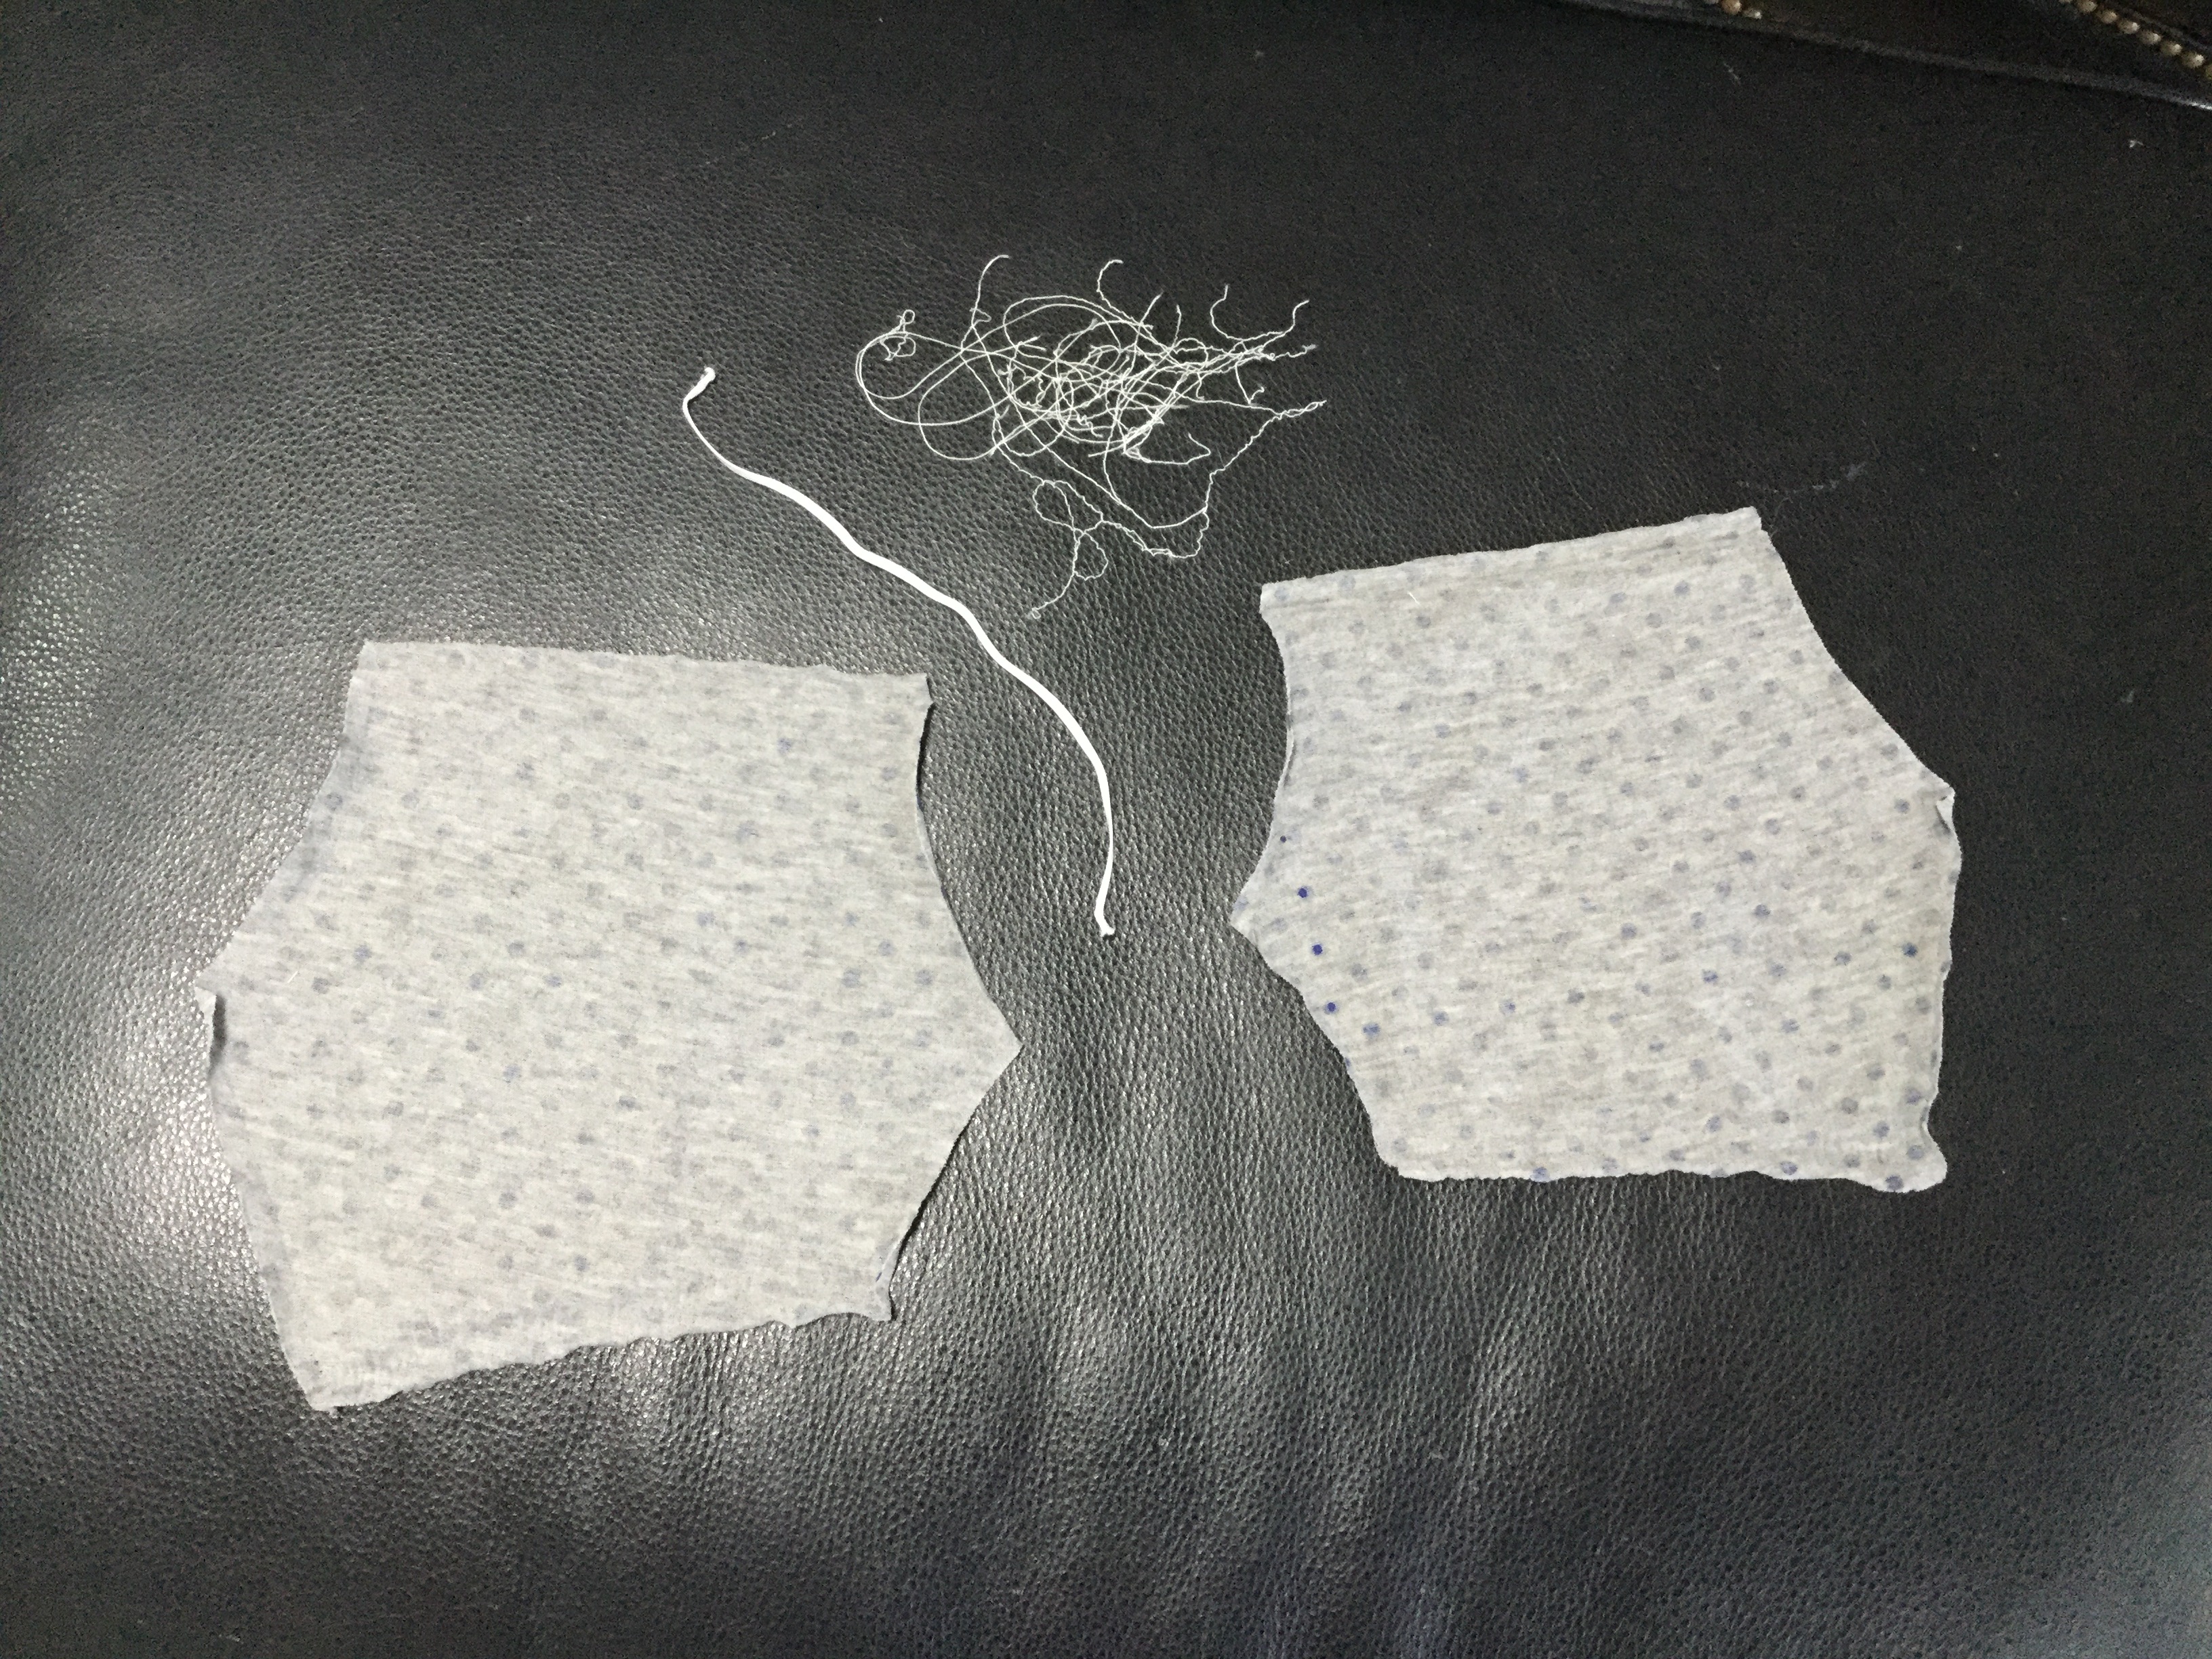
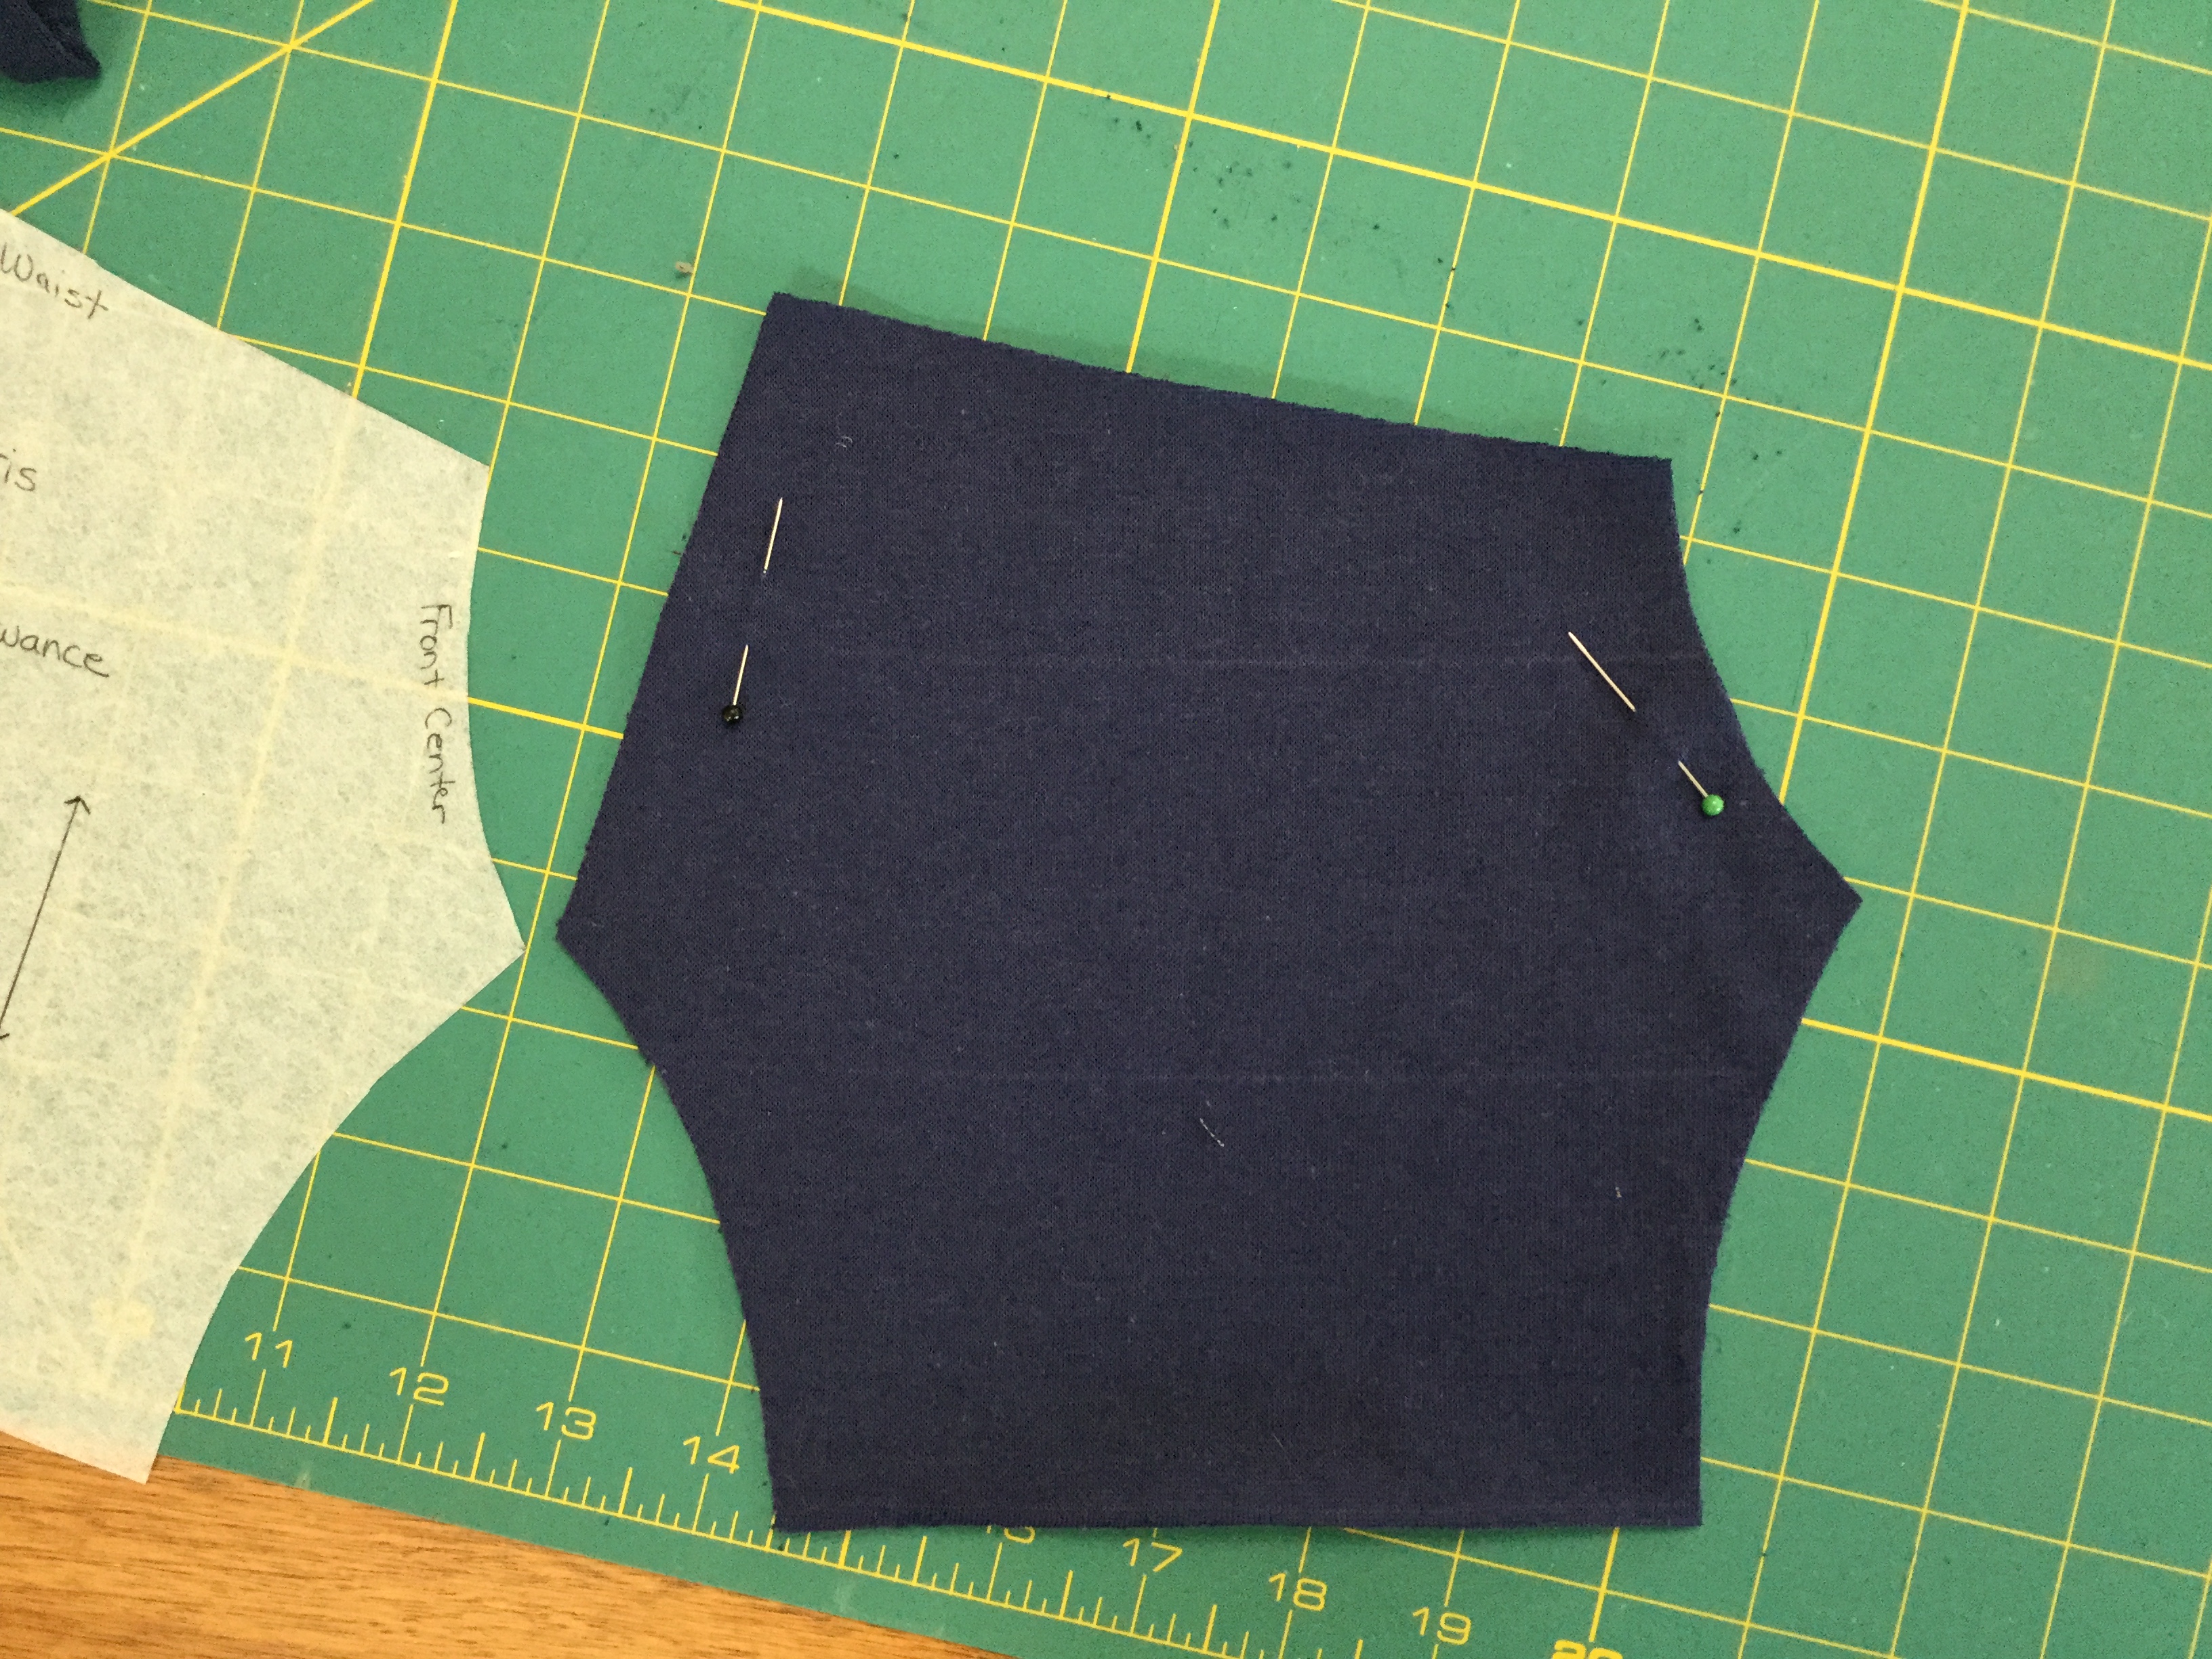
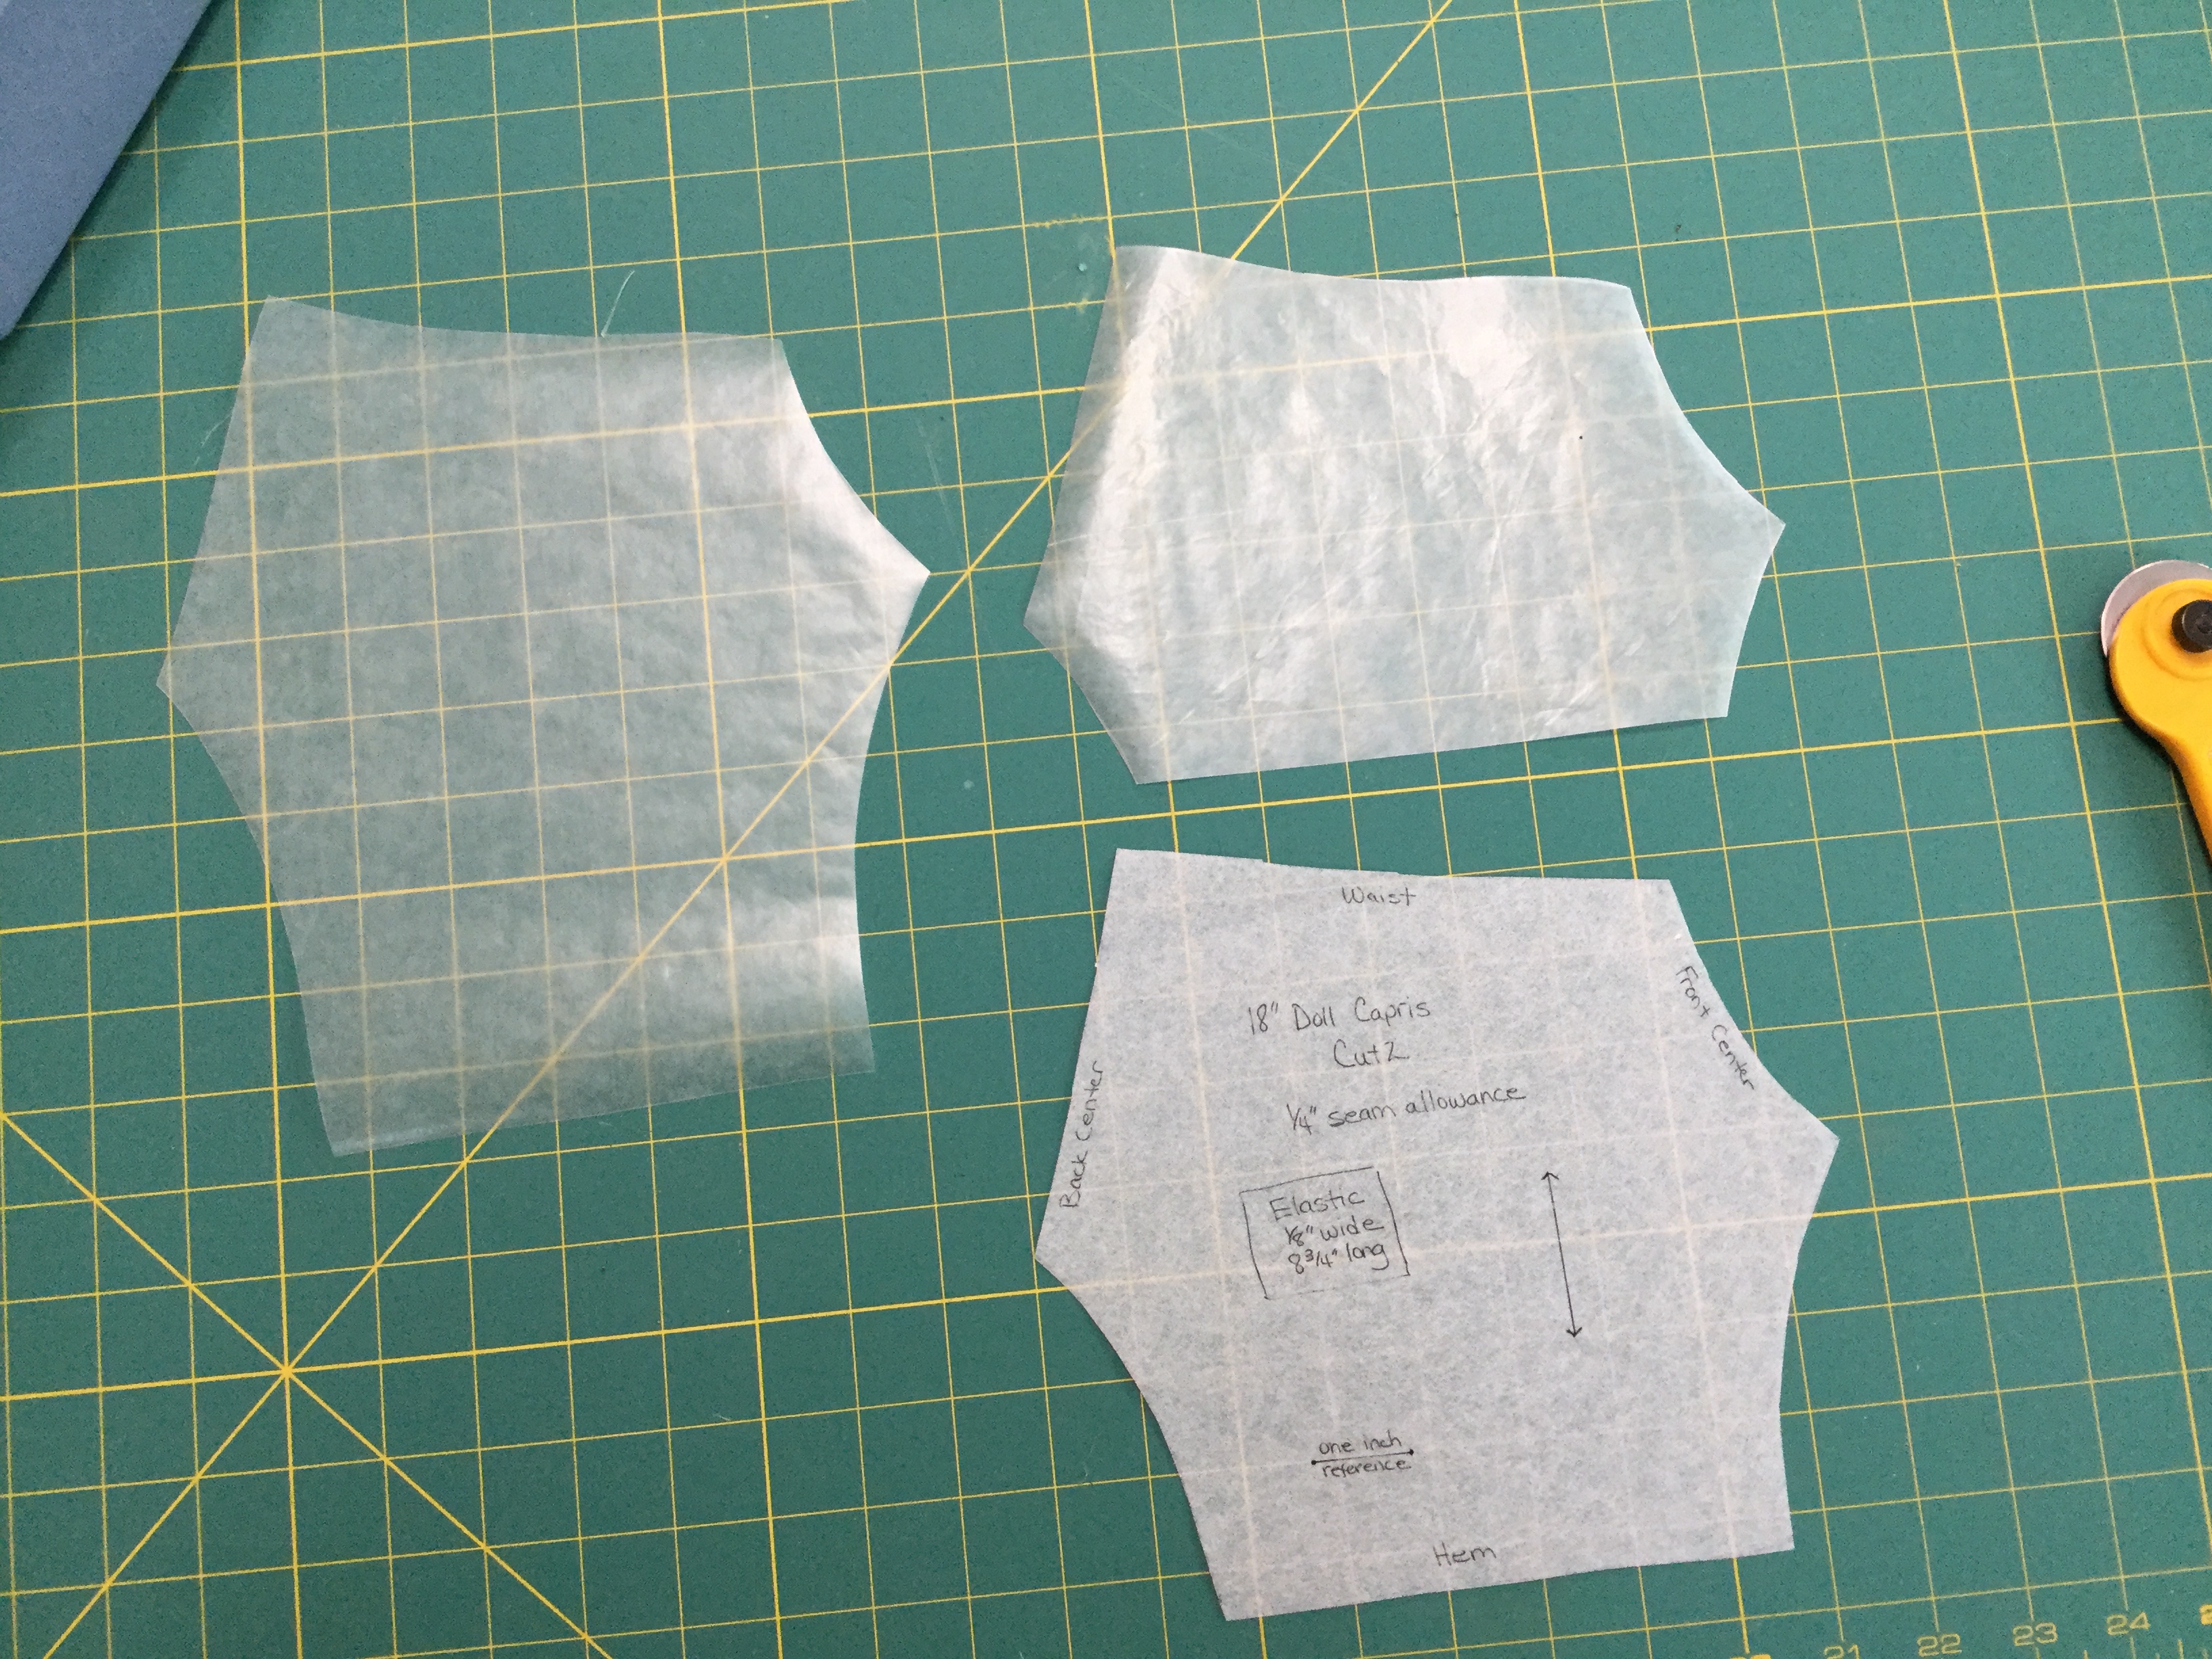
Carefully pick the seams apart and when you are done, you will have a pile of loose thread, two cut garment pieces, and a piece of elastic. Measure the elastic. In this case it is 1/8” wide and 8 3/4” long. It is actually is pretty good shape so you could use it again. Looking closely at the two fabric pieces reveals that they are identical. We can copy one to the pattern and use it to cut two pieces.
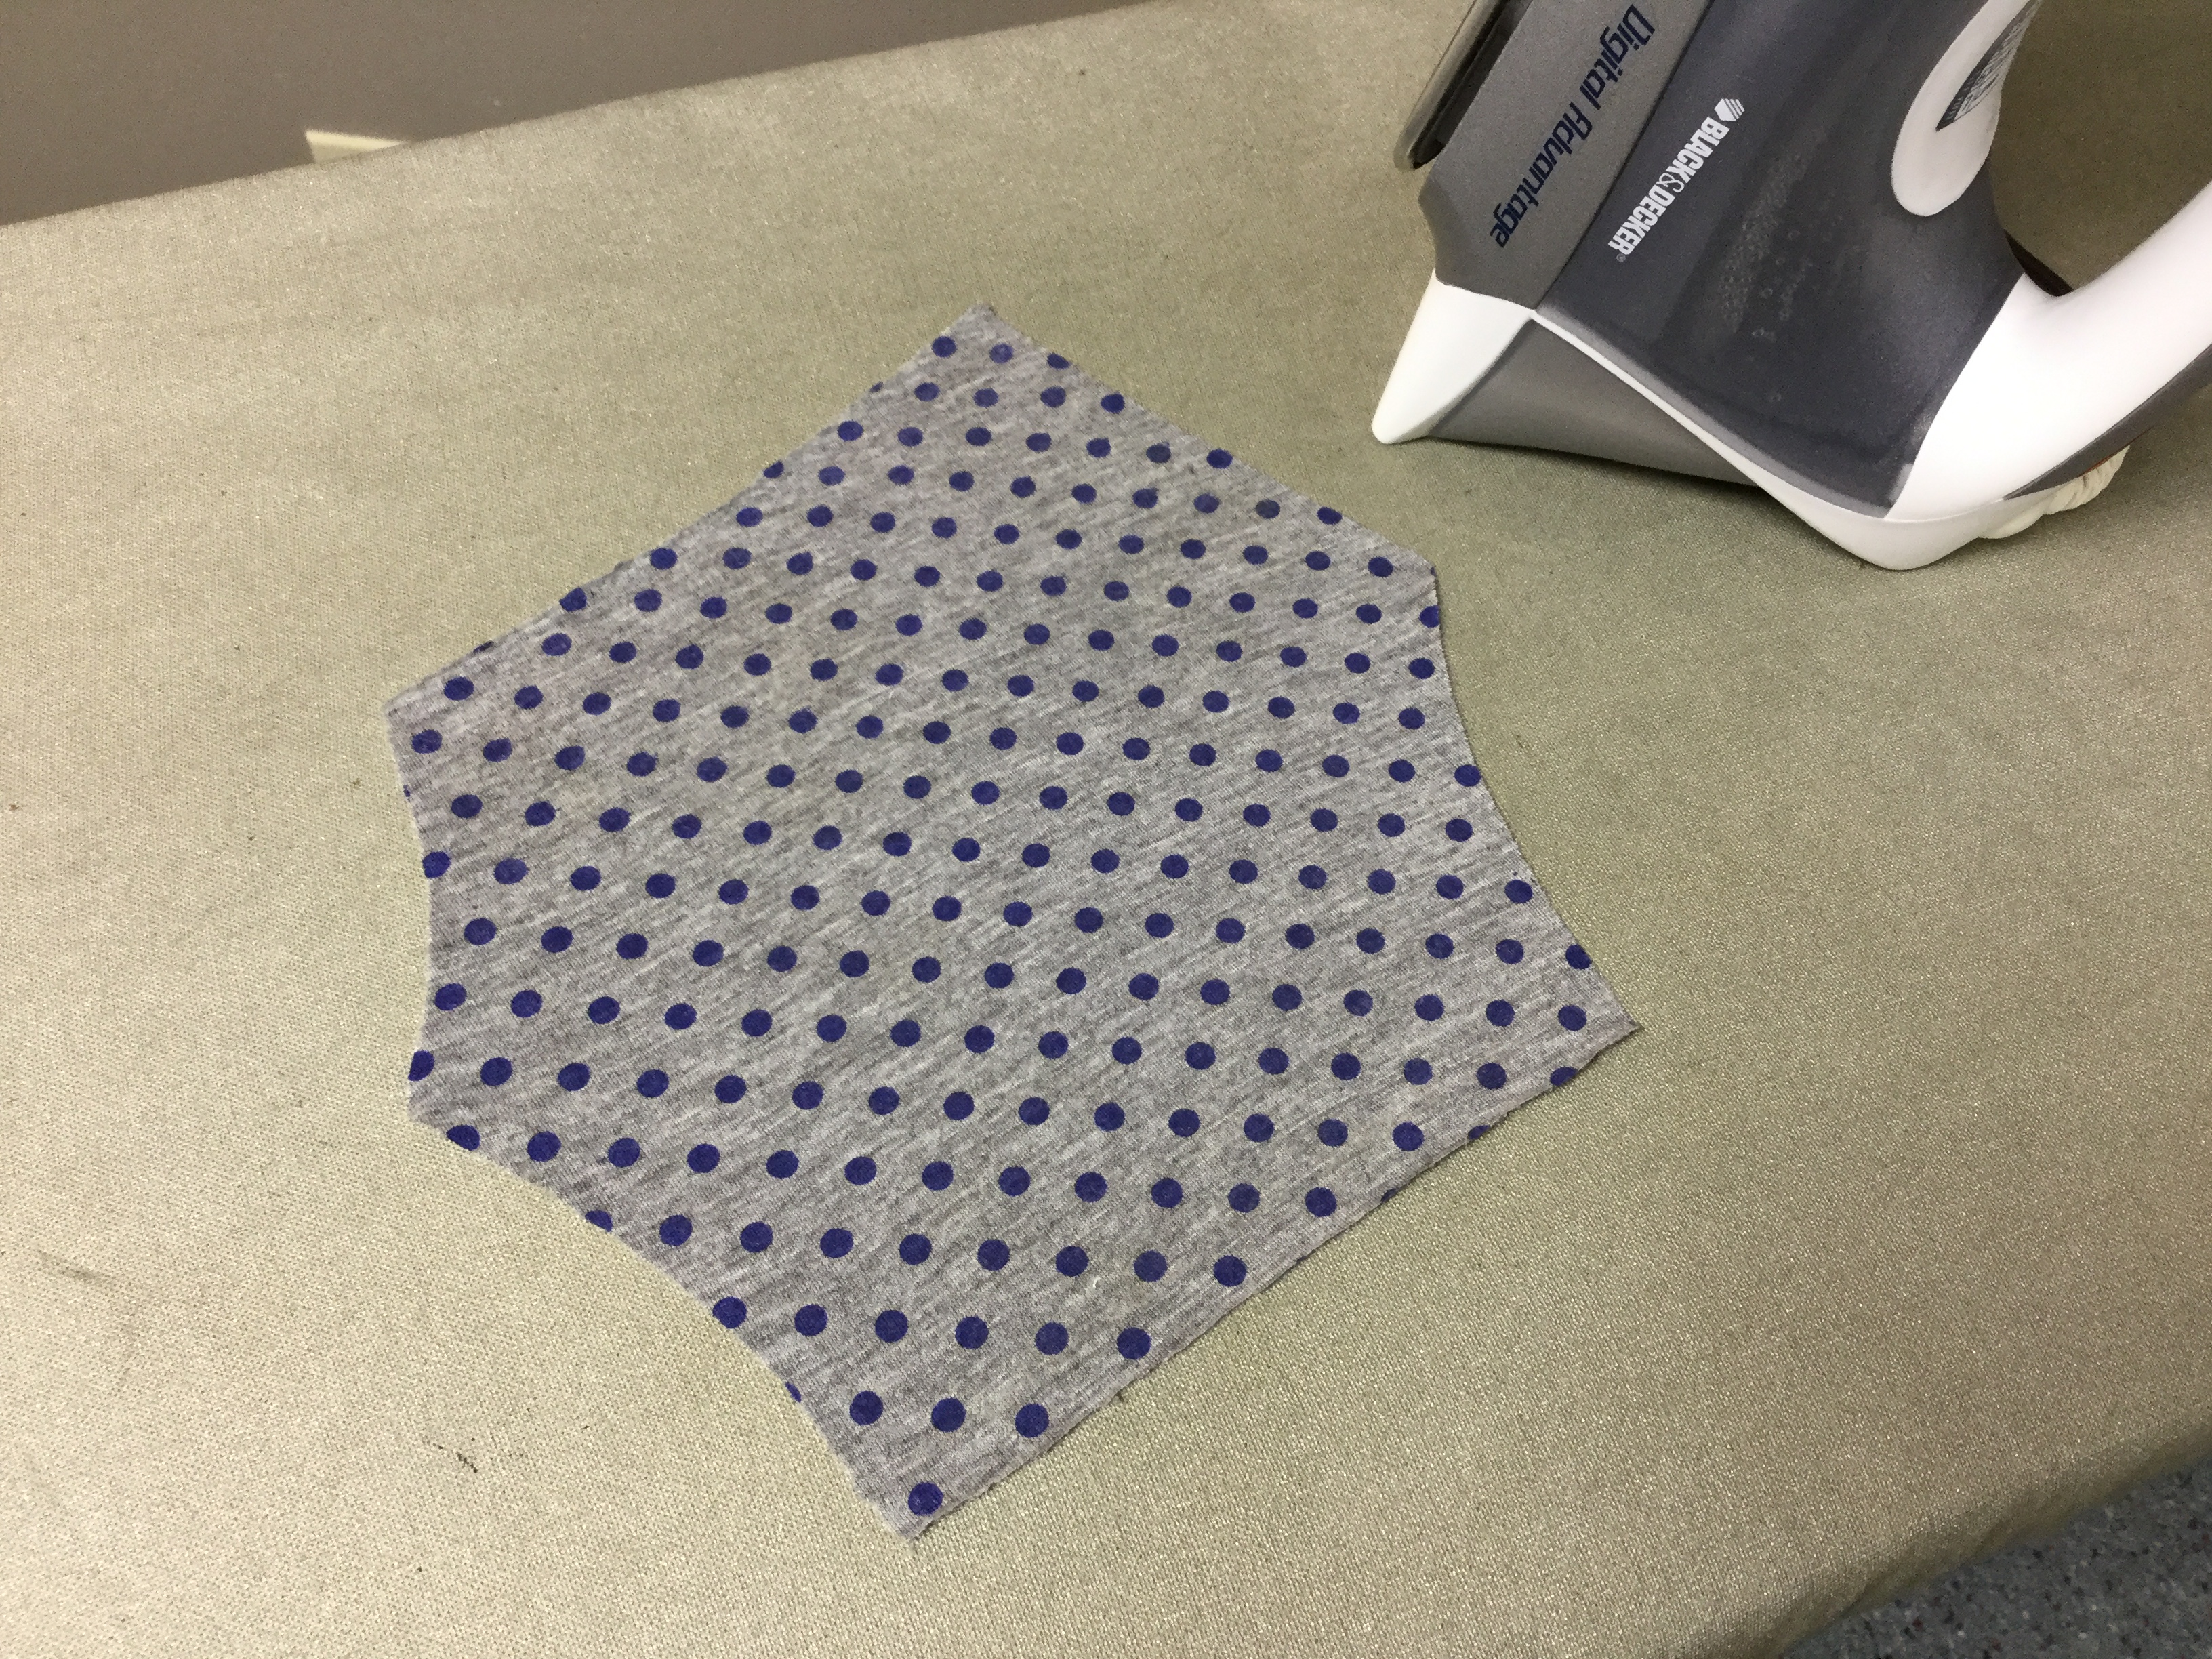
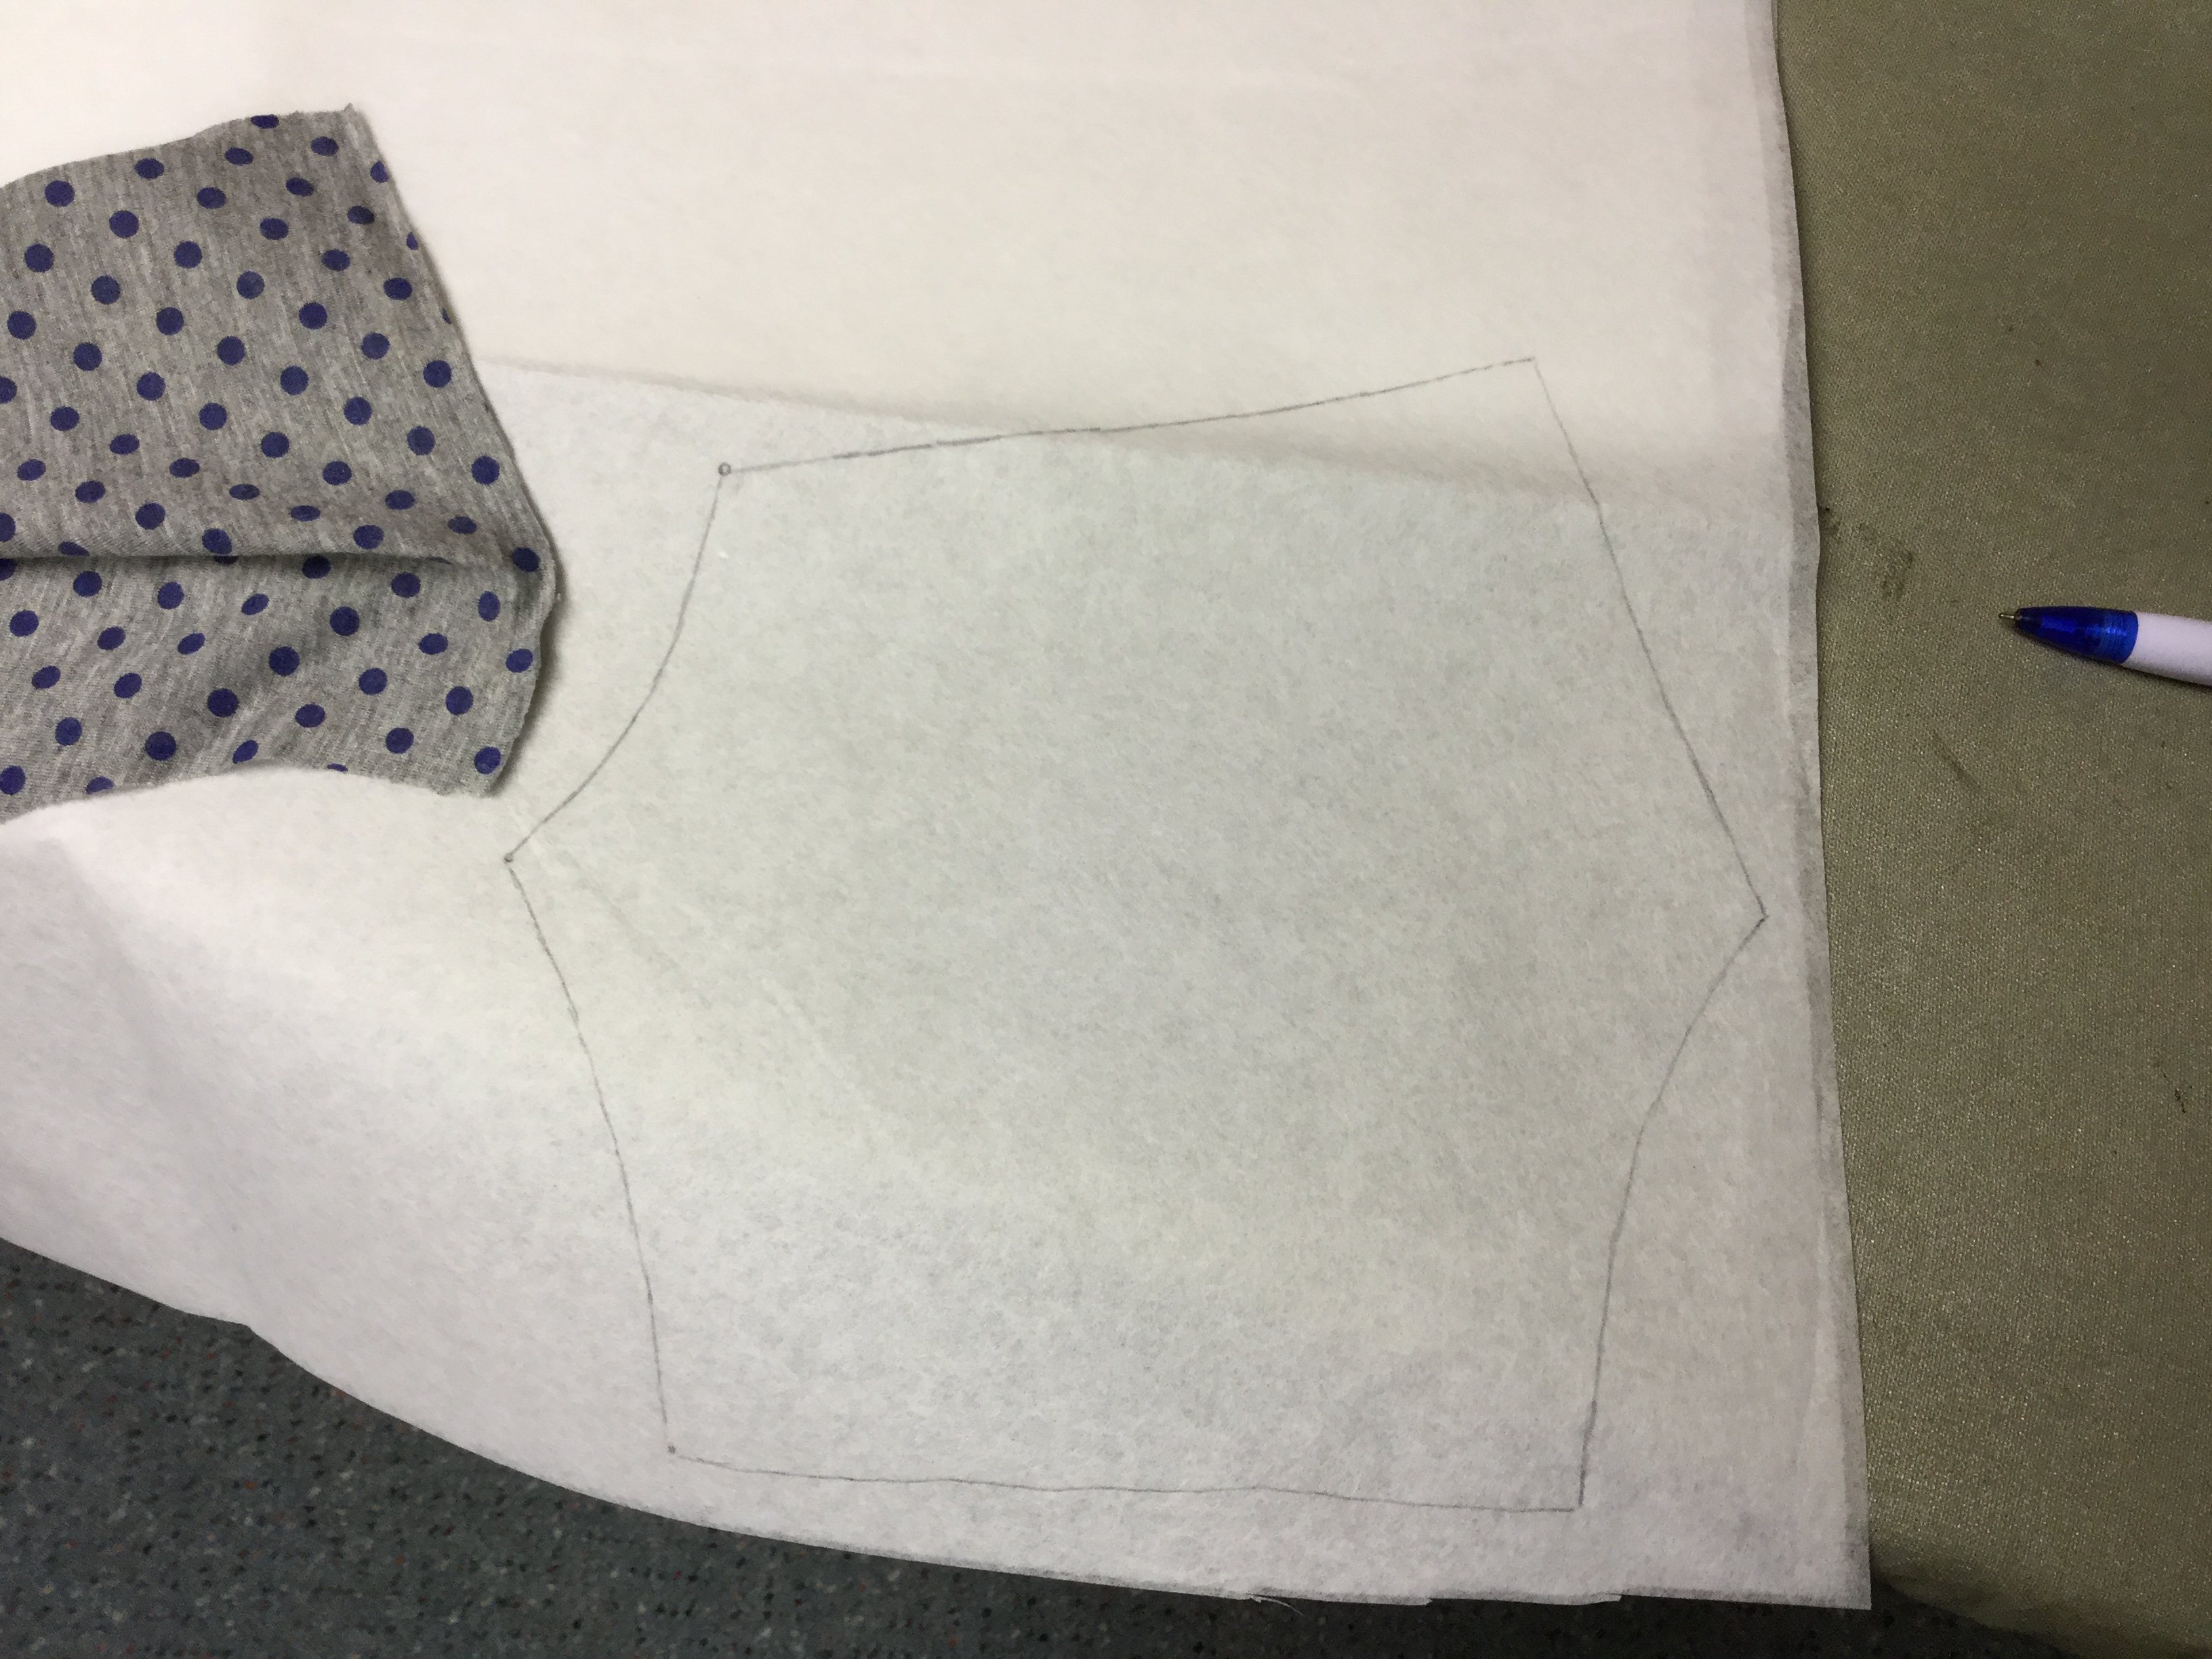
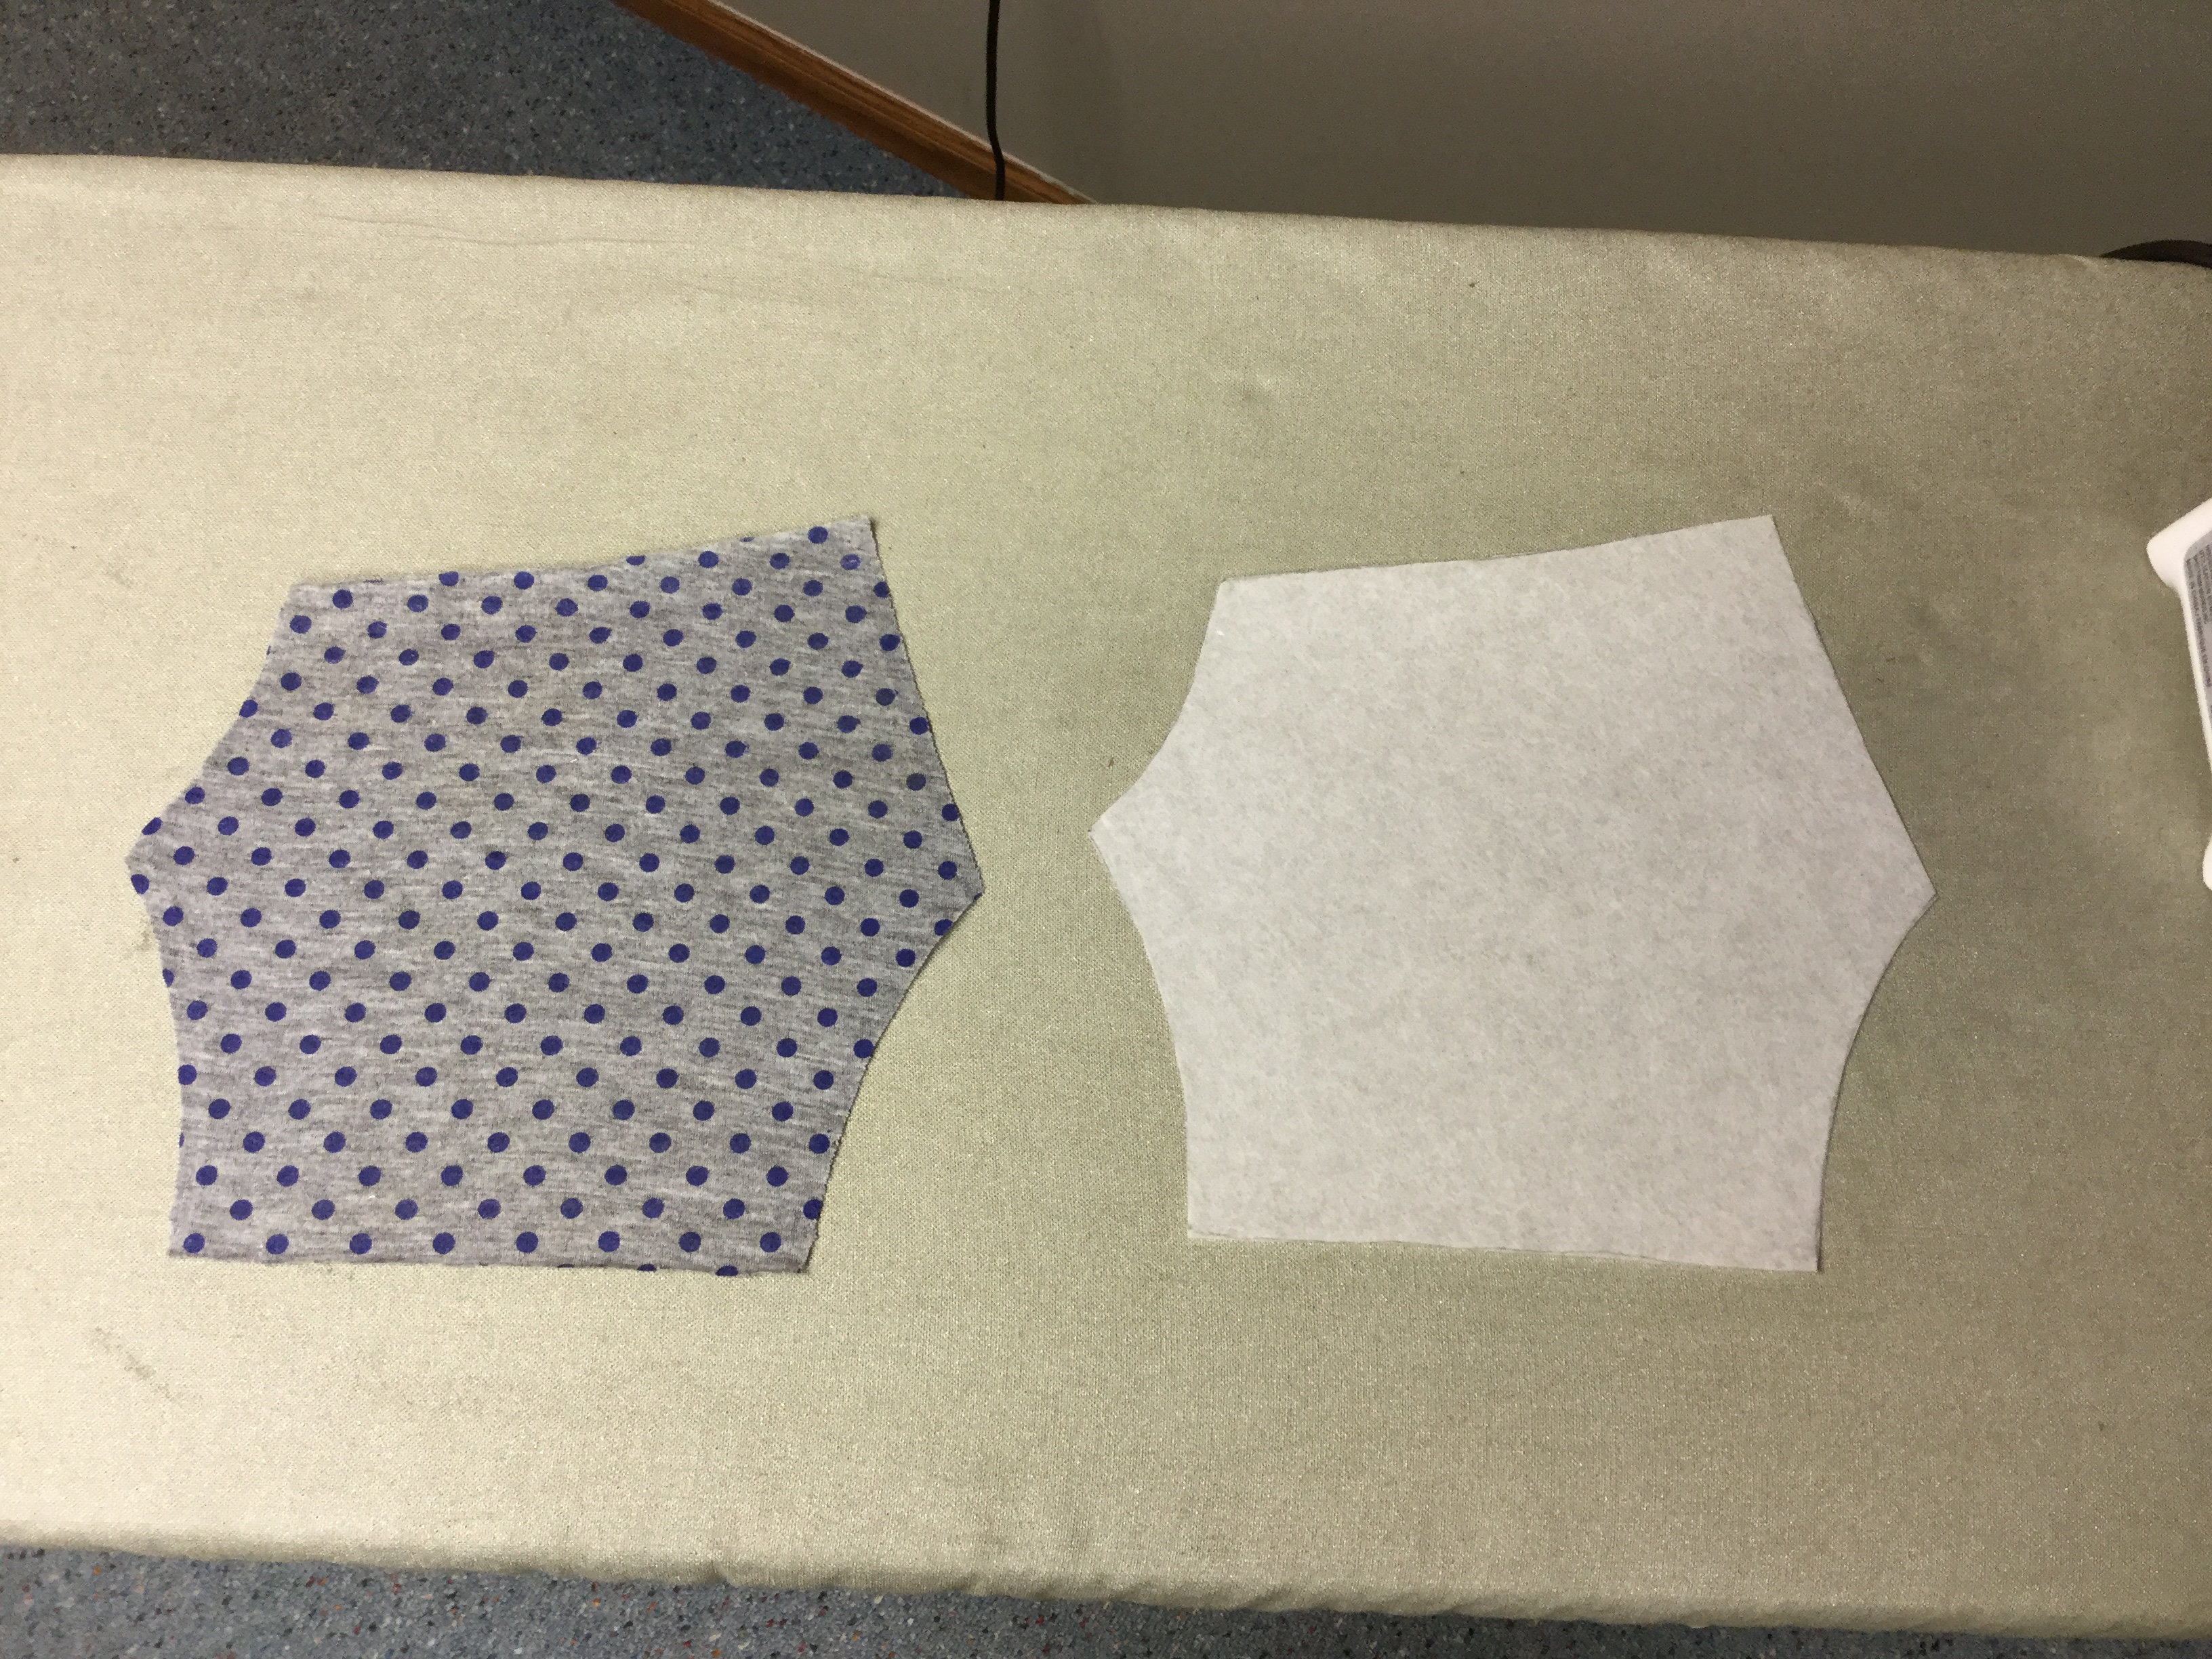
The fabric piece is wrinkled and bent, so iron it carefully to make it flat and easy to trace. You can use the fabric directly to cut a new garment or you can trace it to create a reusable pattern. Sometimes I use wax paper but if you want to make more than one garments you will need to use something more durable. Non-fusable interfacing works very well. It don’t unravel, it can be ironed, and it can be written on.
I usually make the first item out of some scrap material just to make sure the garment will fit and that I like the length and style. I this case I used some cheap lightweight knit. Remember to cut two. This is often the case with purchased patterns as well.
To construct the new pants:
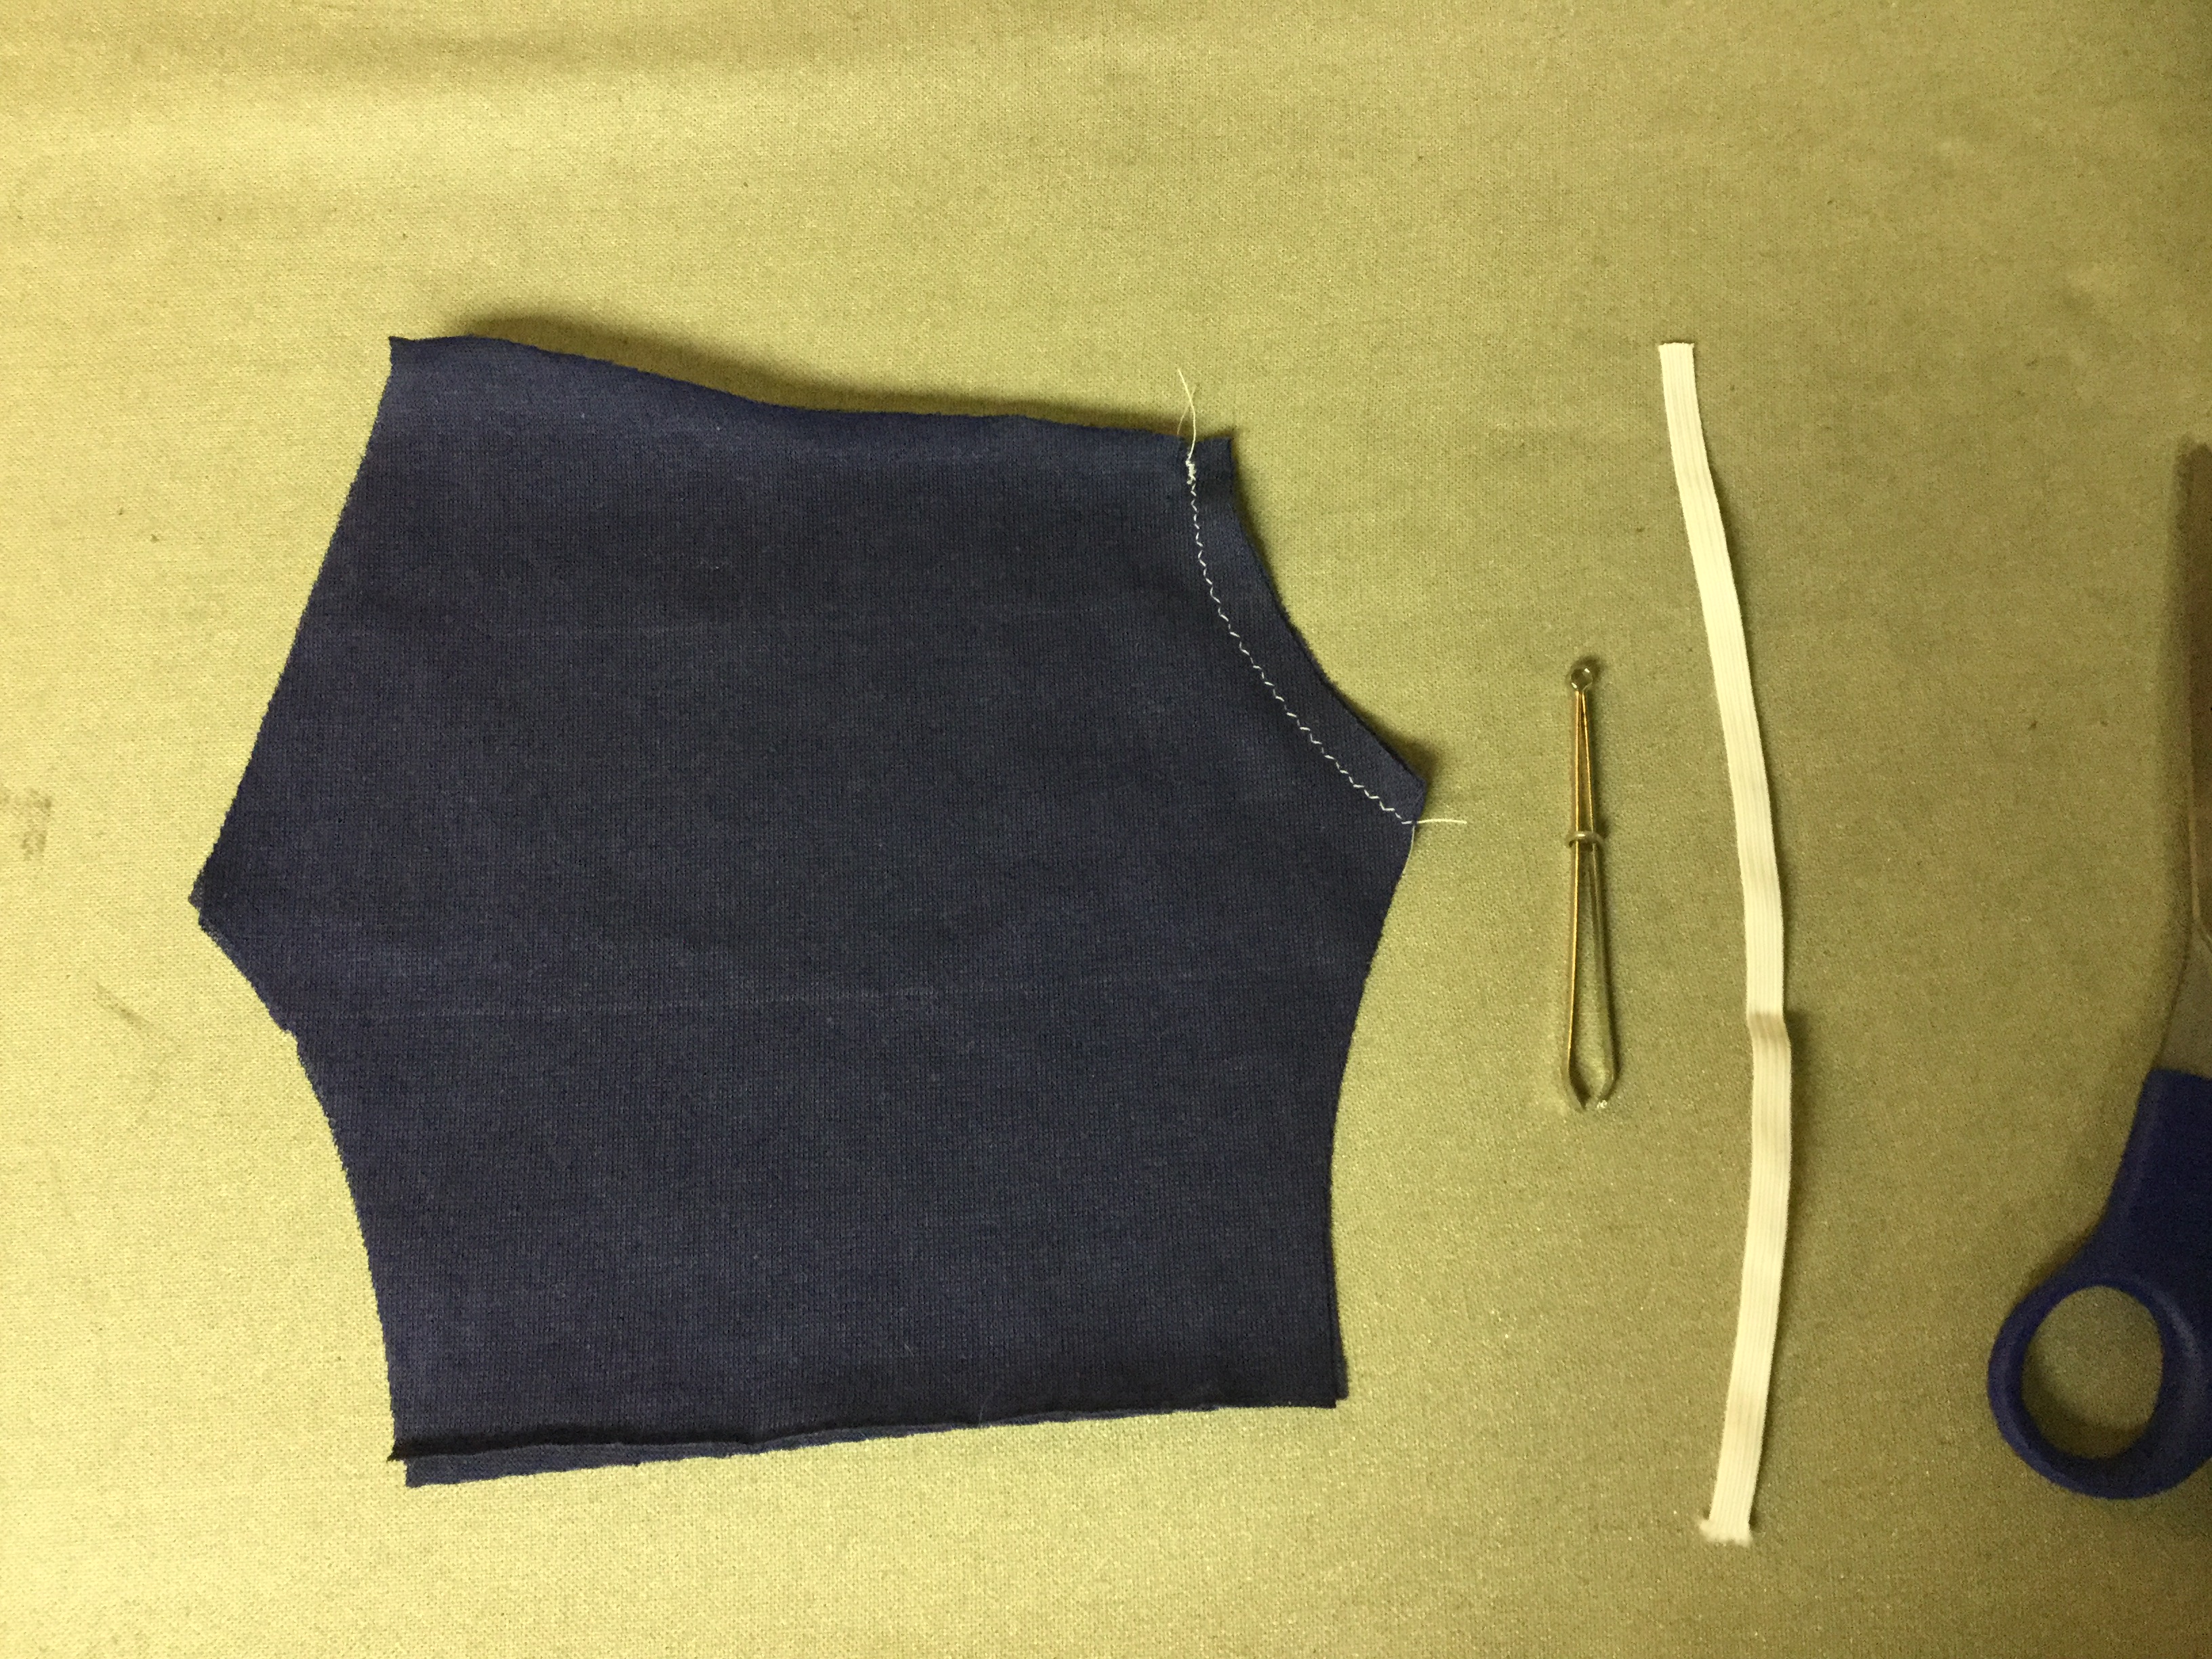
Stitch the center front seam. I have used a slight zigzag stitch here as I often do on knits to provide a little “give” in the seam. The materials stretches so its nice if the seam can, too.
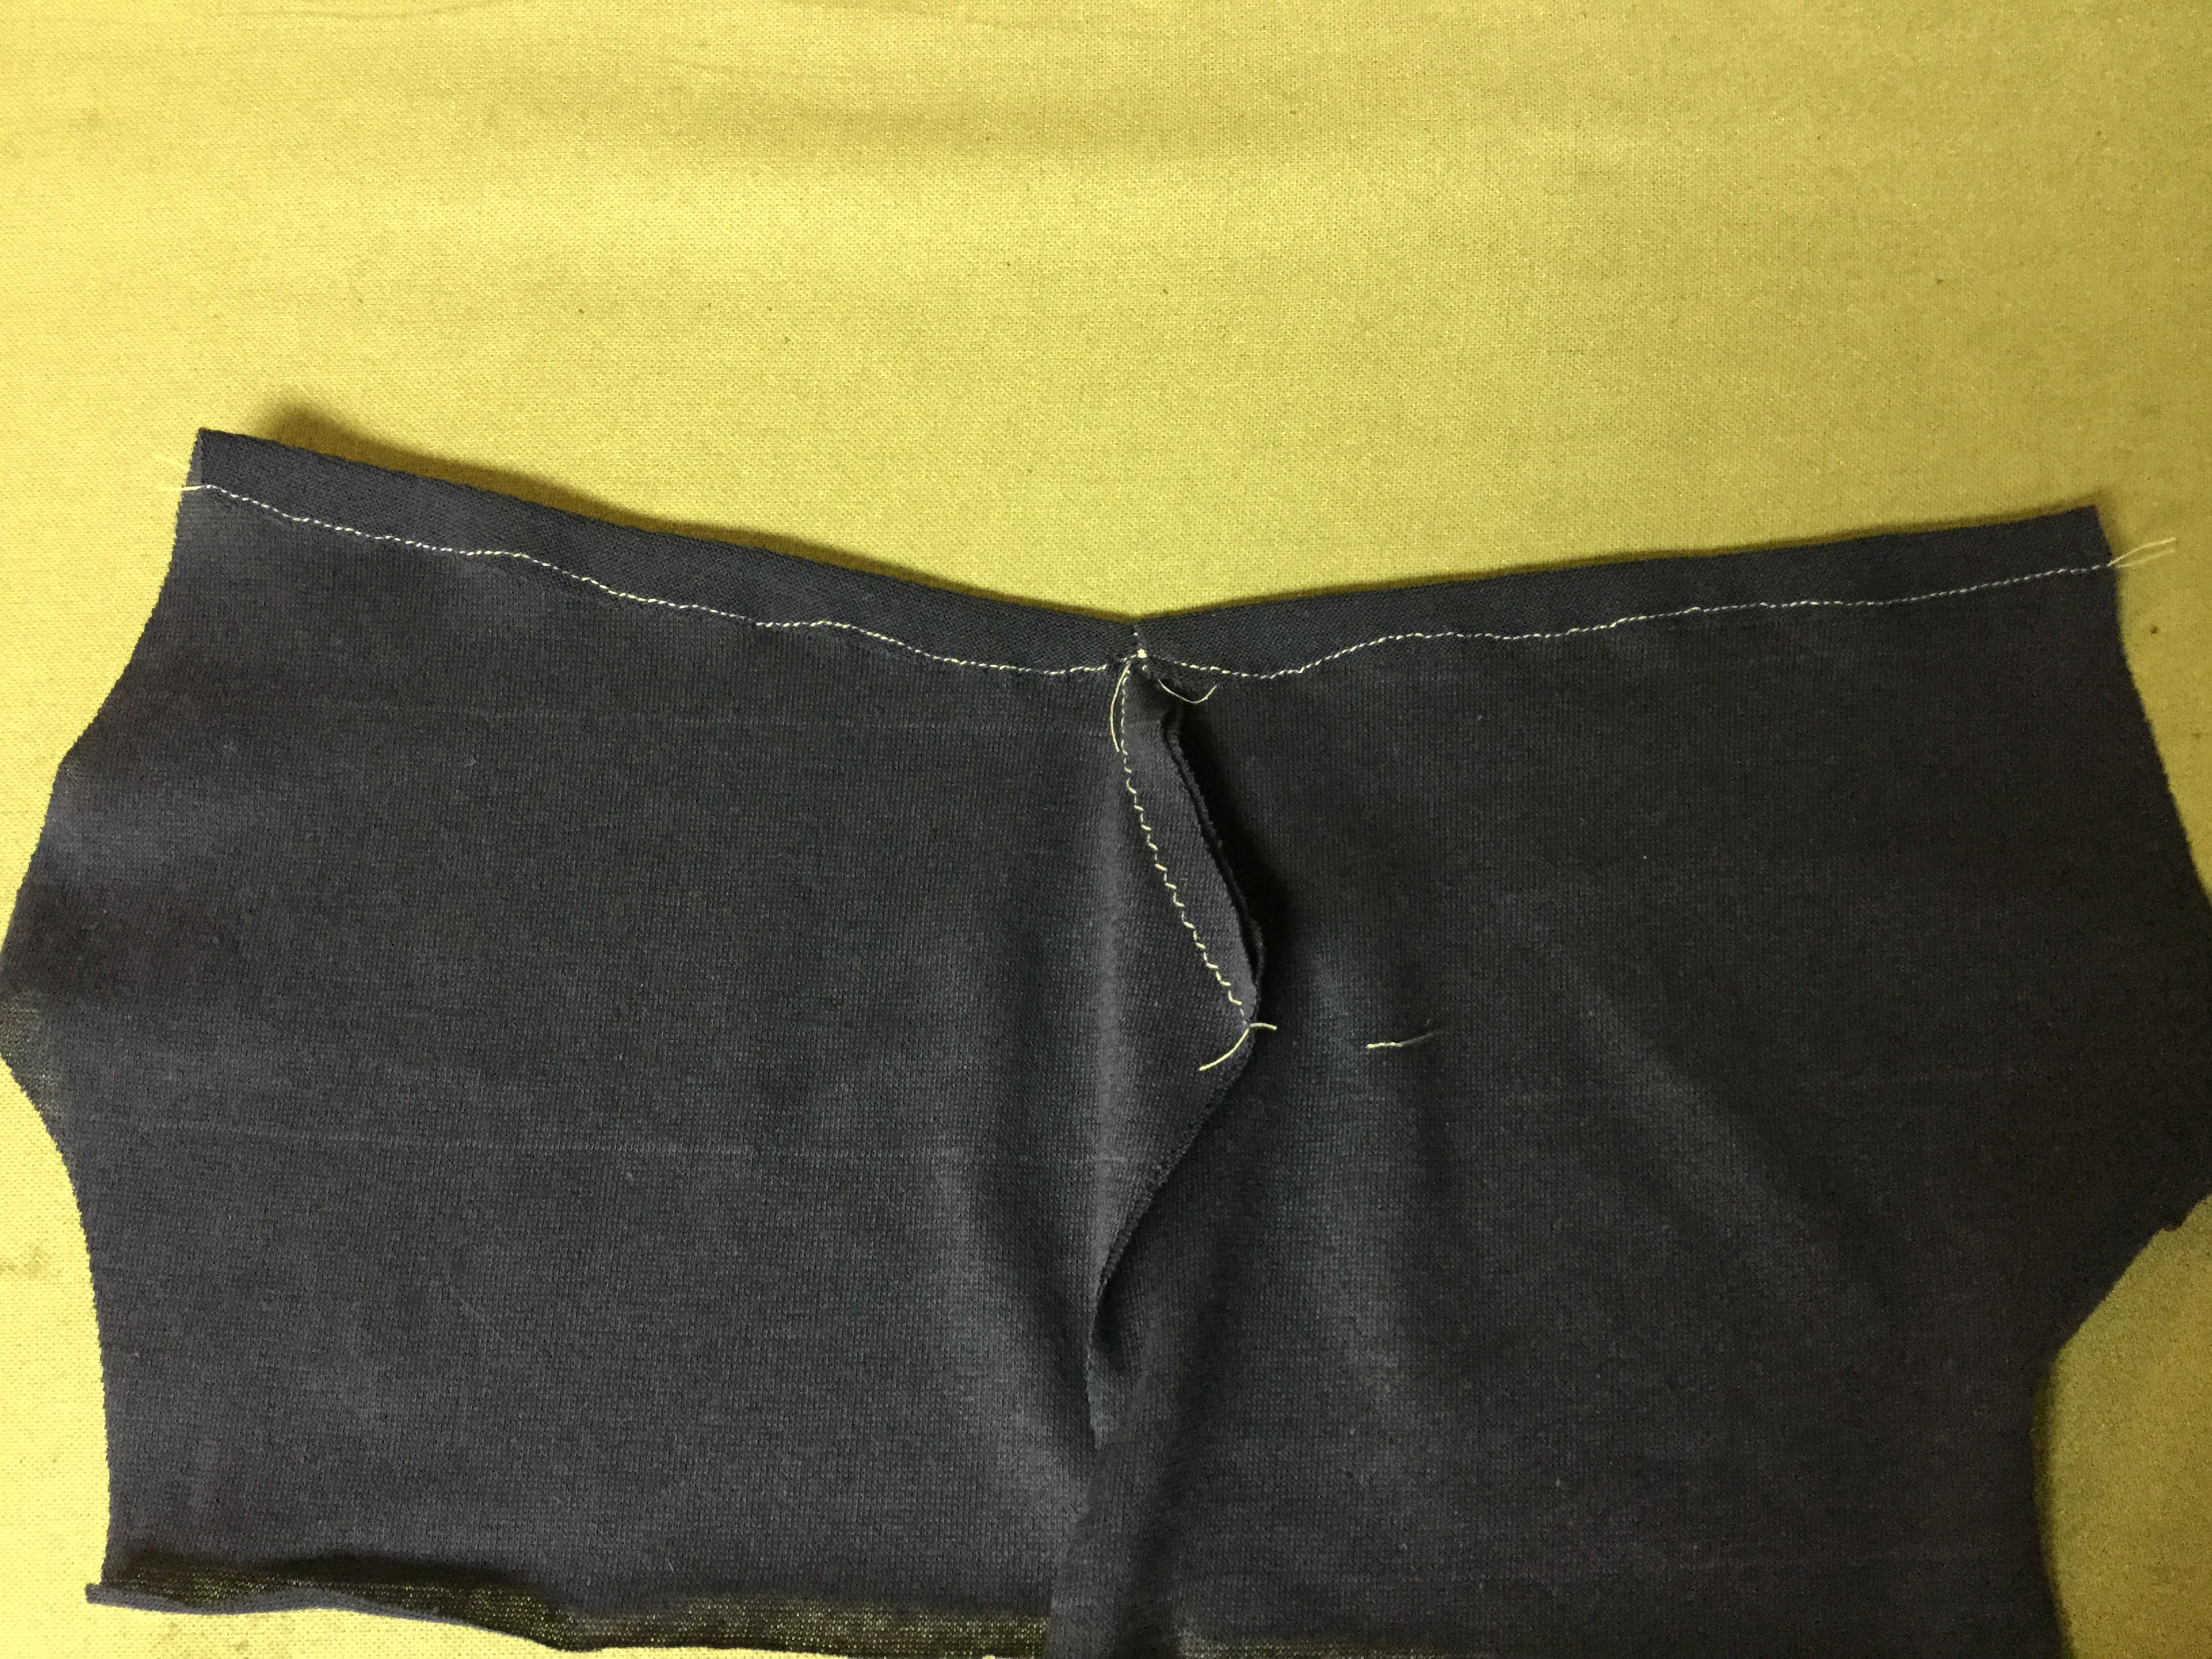
Turn down the material at the waist and sew across to create the elastic casing.
Insert the elastic. Use a bodkin or safety pin to thread the elastic through the casing. Be sure to stitch the elastic in place when the end reaches the edge of the fabric. Continue pulling the elastic through and secure the second end in place with a few stitches.
Stitch the center back seam.
Turn up the hem on each leg and stitch in place.
Align the inseam and sew the pant legs. Sometimes I start at the center and sew each direction. Sometimes I sew from one pant hem to the other along the entire inseam. It depends on whether the pieces line up well or if they are being difficult.
The practice pants are done. Try them on the dolls and check the fit. These seems to fit fine.
There were a couple things about the pattern that I did not care for so before making additional pairs, I would make the waist area a little higher and use 1/4” elastic. It would be easier to thread through and make the casing easier to sew.
It would also be easy to make these legs shorter to make shorts or longer to make pants. I used wax paper to make a couple quick adjustments.
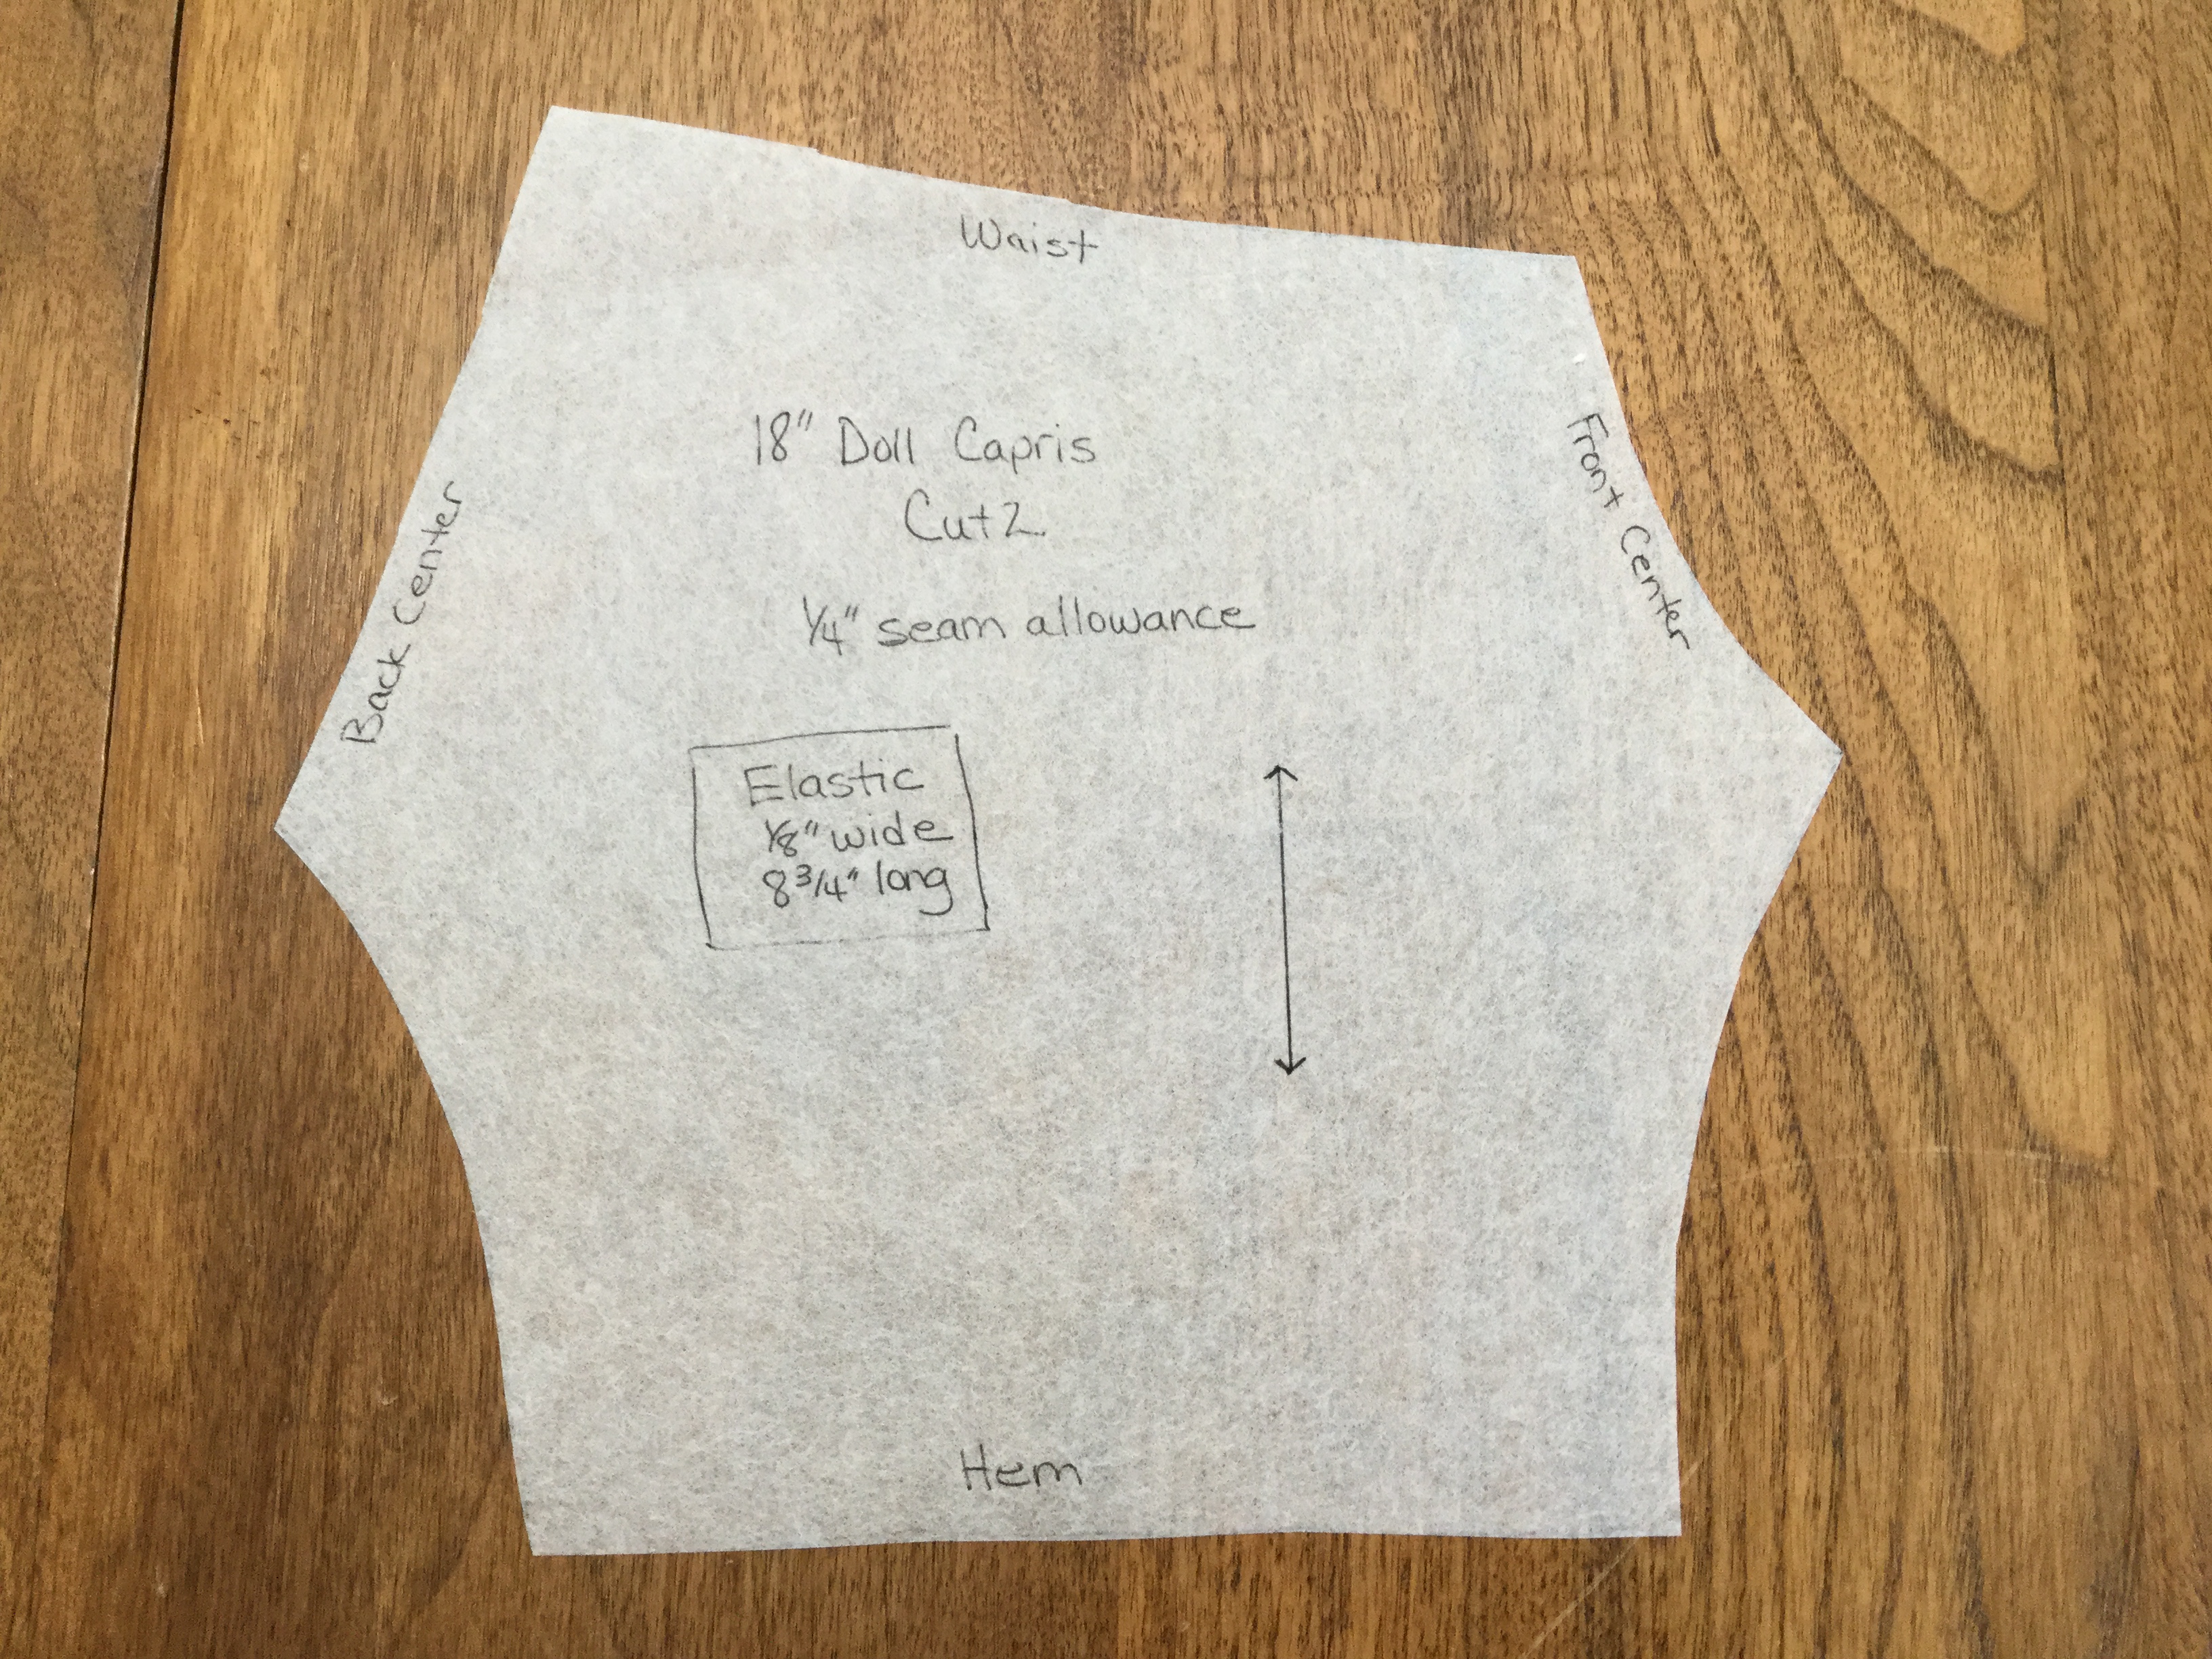
Here is the pattern that I made for the knit capri pants. I put it on the scanner and created a pdf that you can print. Set your printer to print the image at 100%. There is a reference line 2” long that you can use to make sure that your printout is the same size as my original pattern.
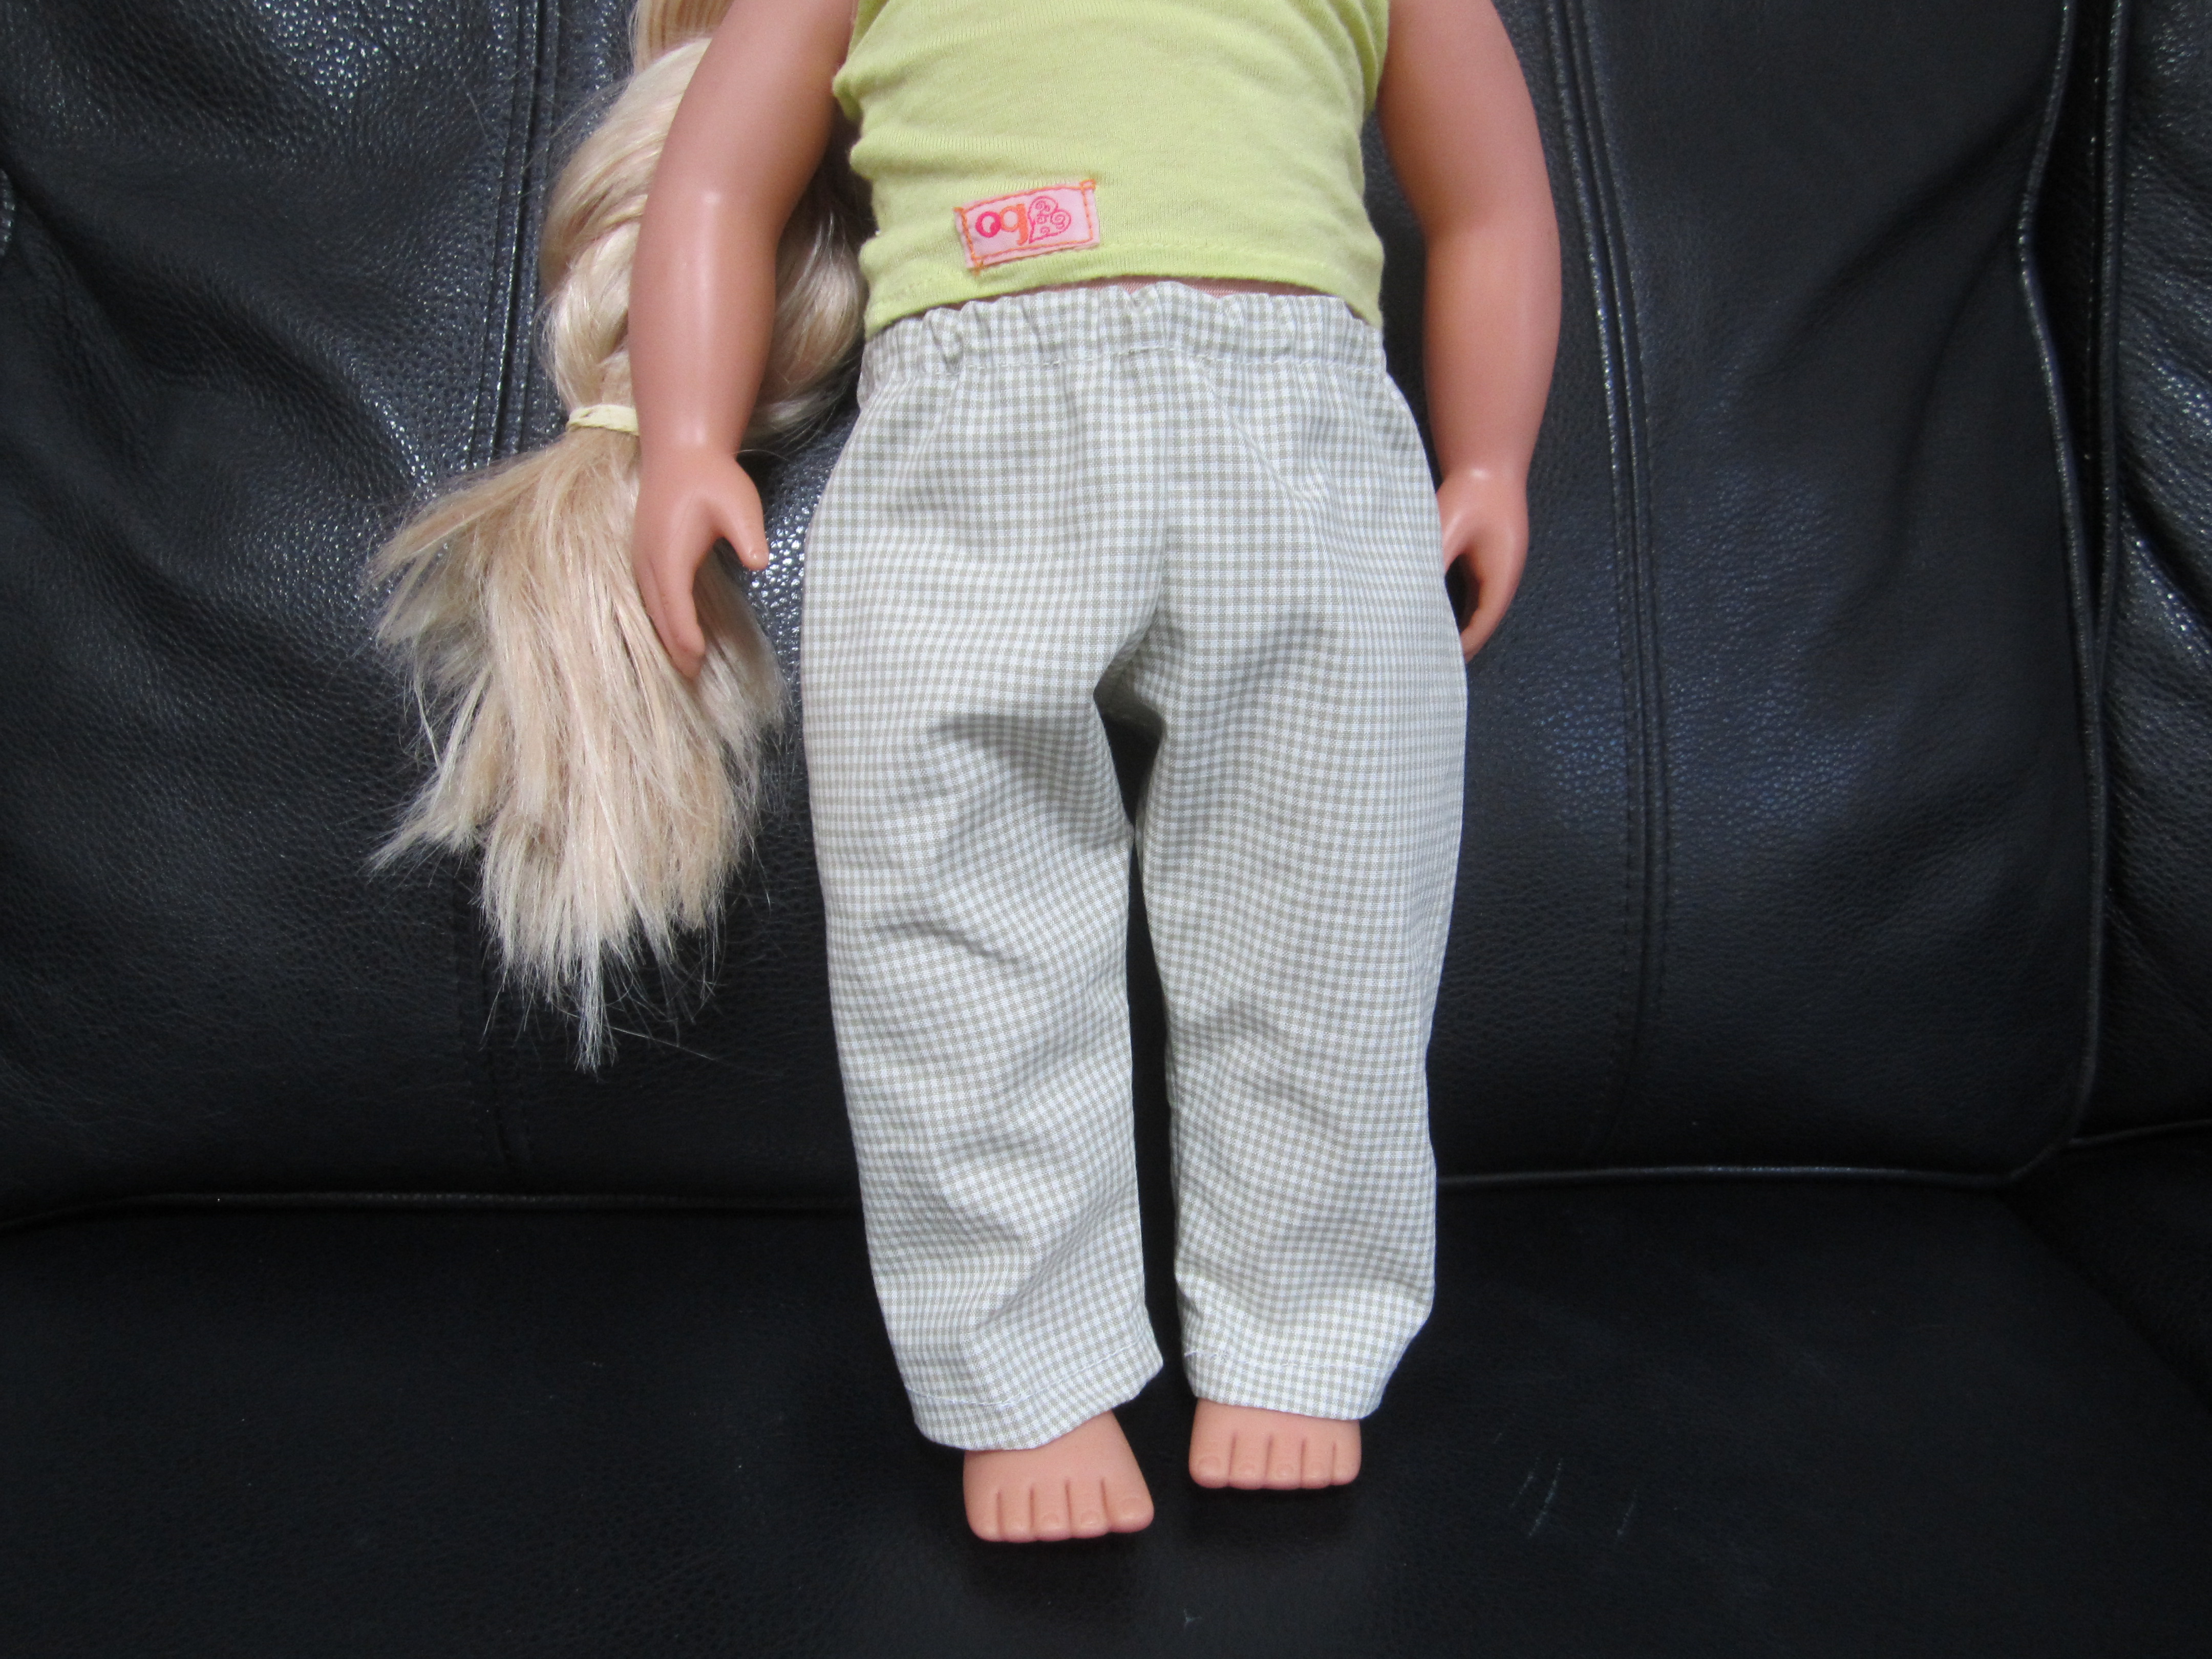
The knit fabric was definitely easy to sew and fit. I didn’t know if the pattern would work as well with woven fabric, which has less stretch, so I made a pair of shorts in woven fabric. They did not fit and I could not get them on the doll. So I found a pair of woven pants and repeated the process. This gave me new patterns for doll pants out of woven material. I am including those patterns as well.
Unfortunately the pattern pieces are wider that the 8” paper most printers and scanner use. So those patterns are included in two pieces. Print them out and tape the two pieces together along the “tape line”.
I have included some pictures of the pants, capris, and short made from these patterns as well.
This is the first pair of pants I made in woven material. Here is the pattern. It is in two parts which should be printed and tape together.
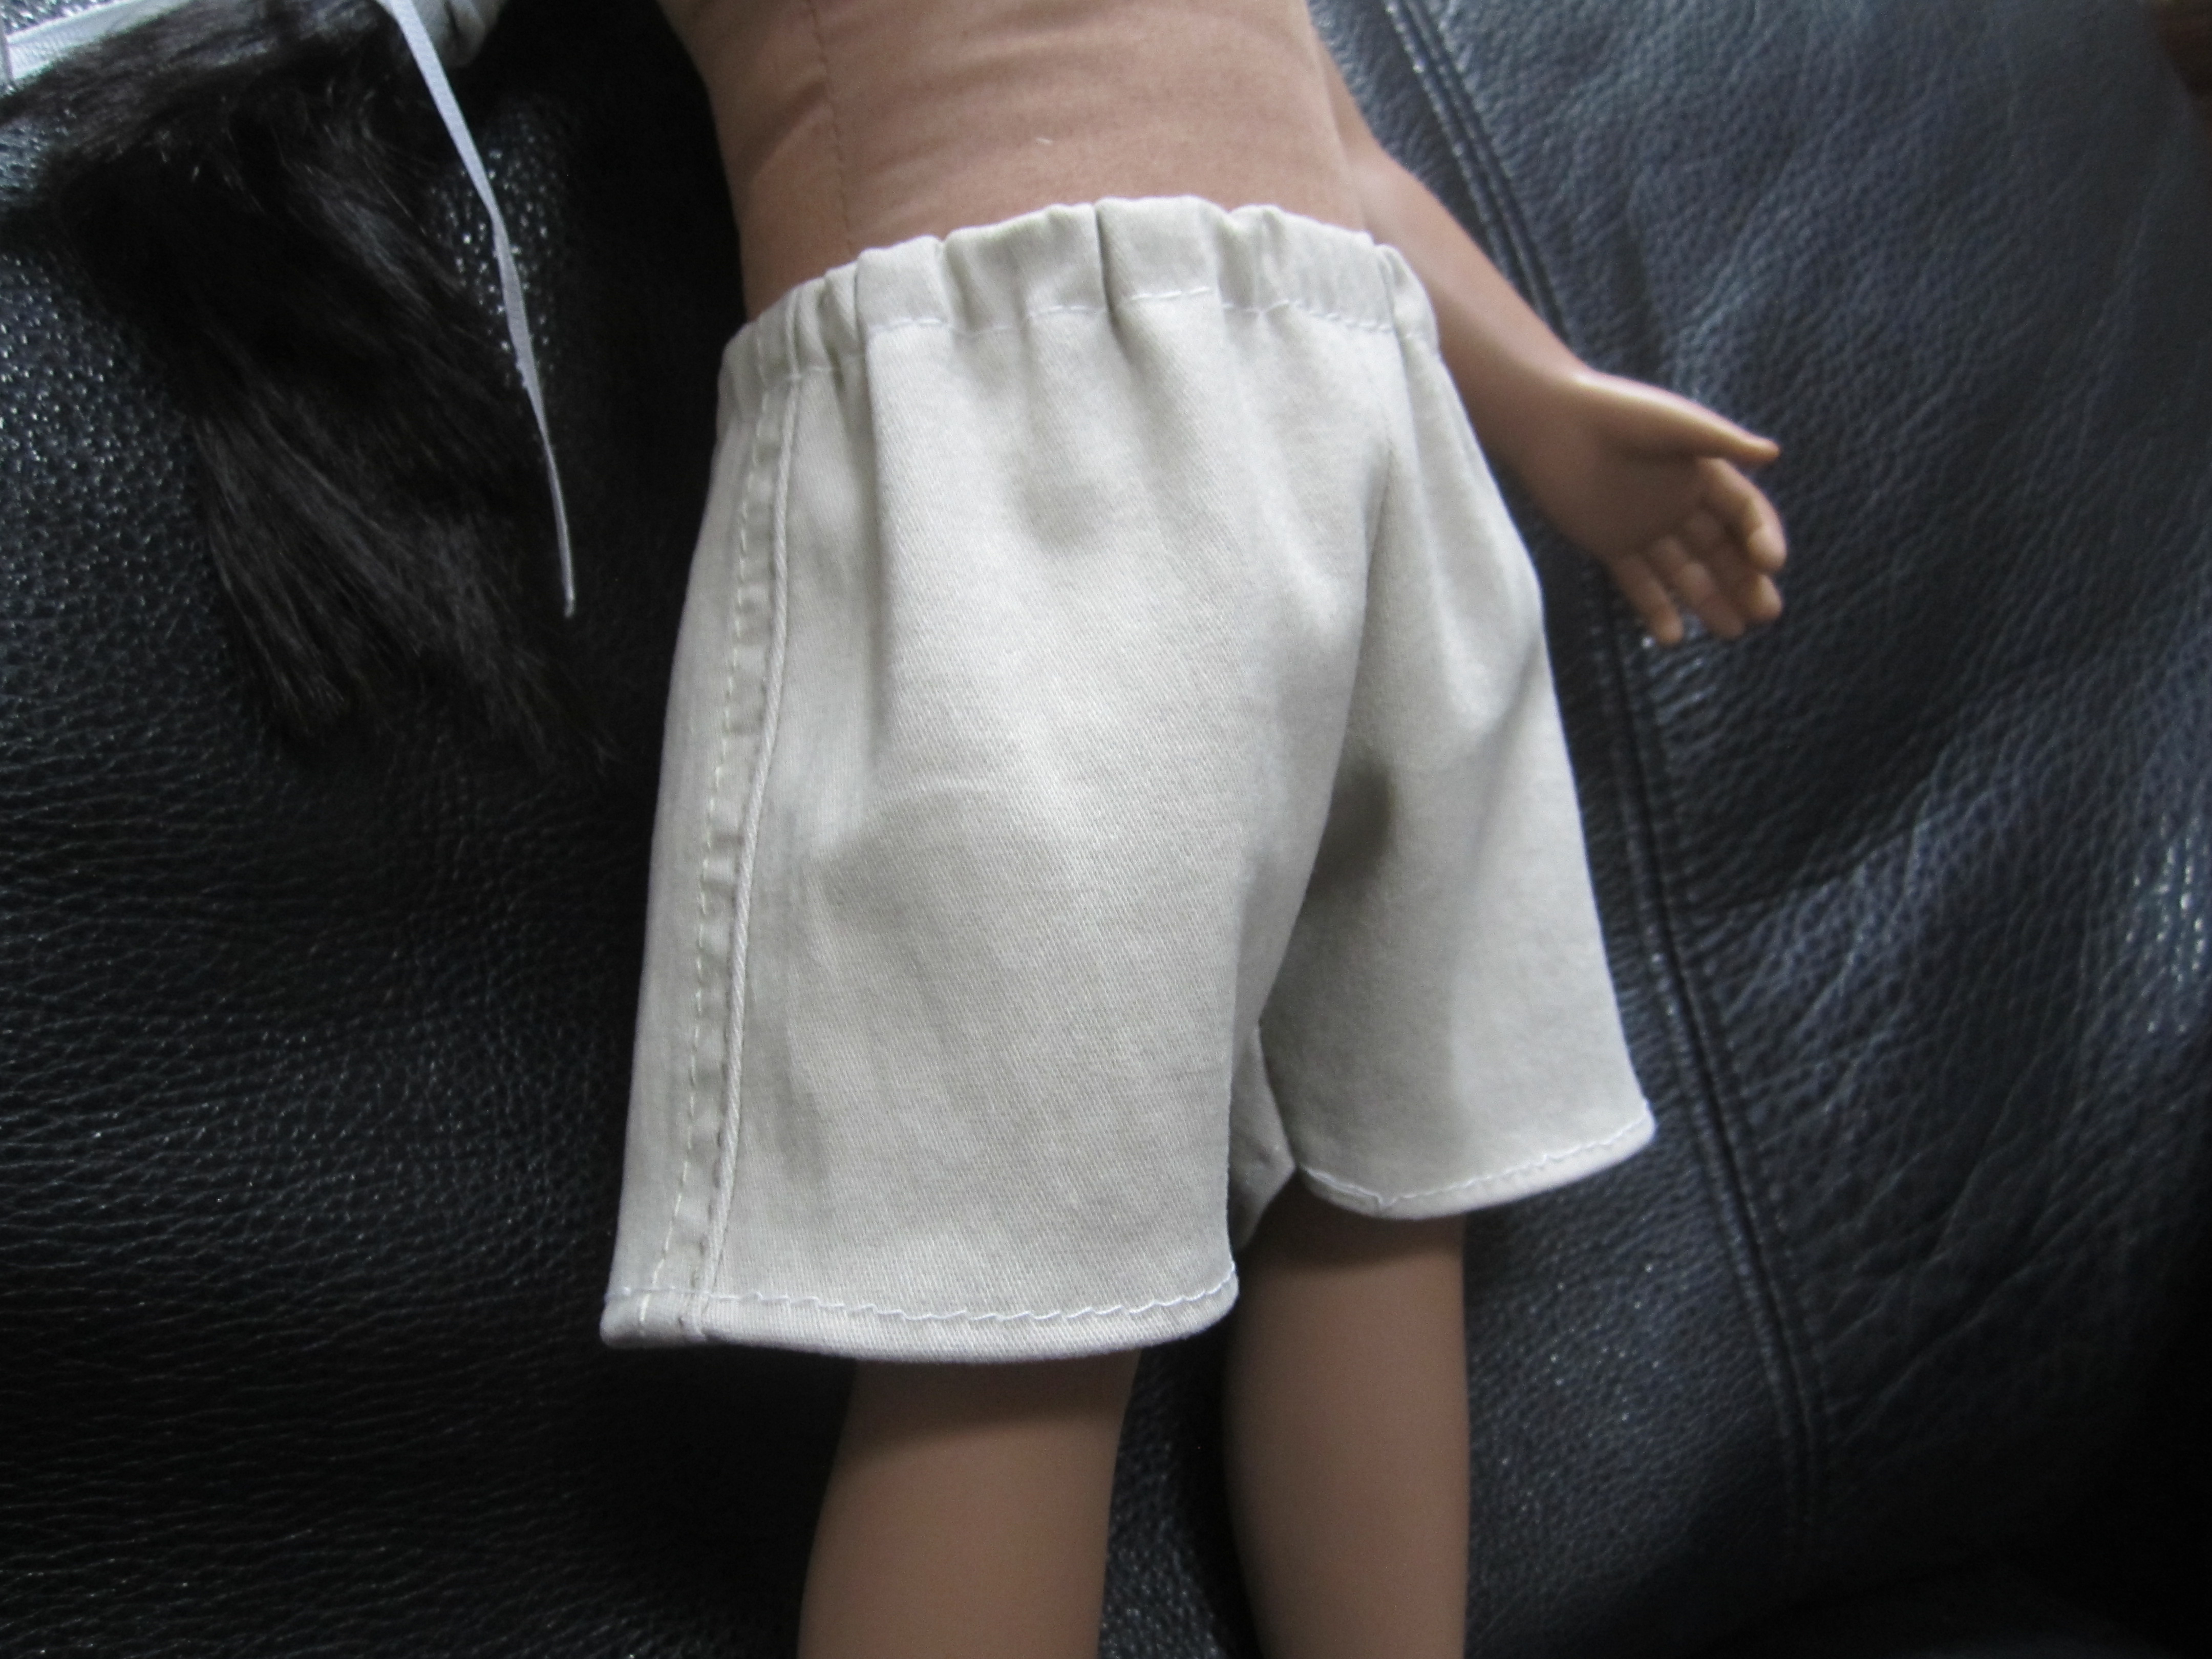
These denim shorts are cut from the leg of an old pair of work jeans. The faded denim is great! This pattern is also in two pieces which should be printed and taped together.
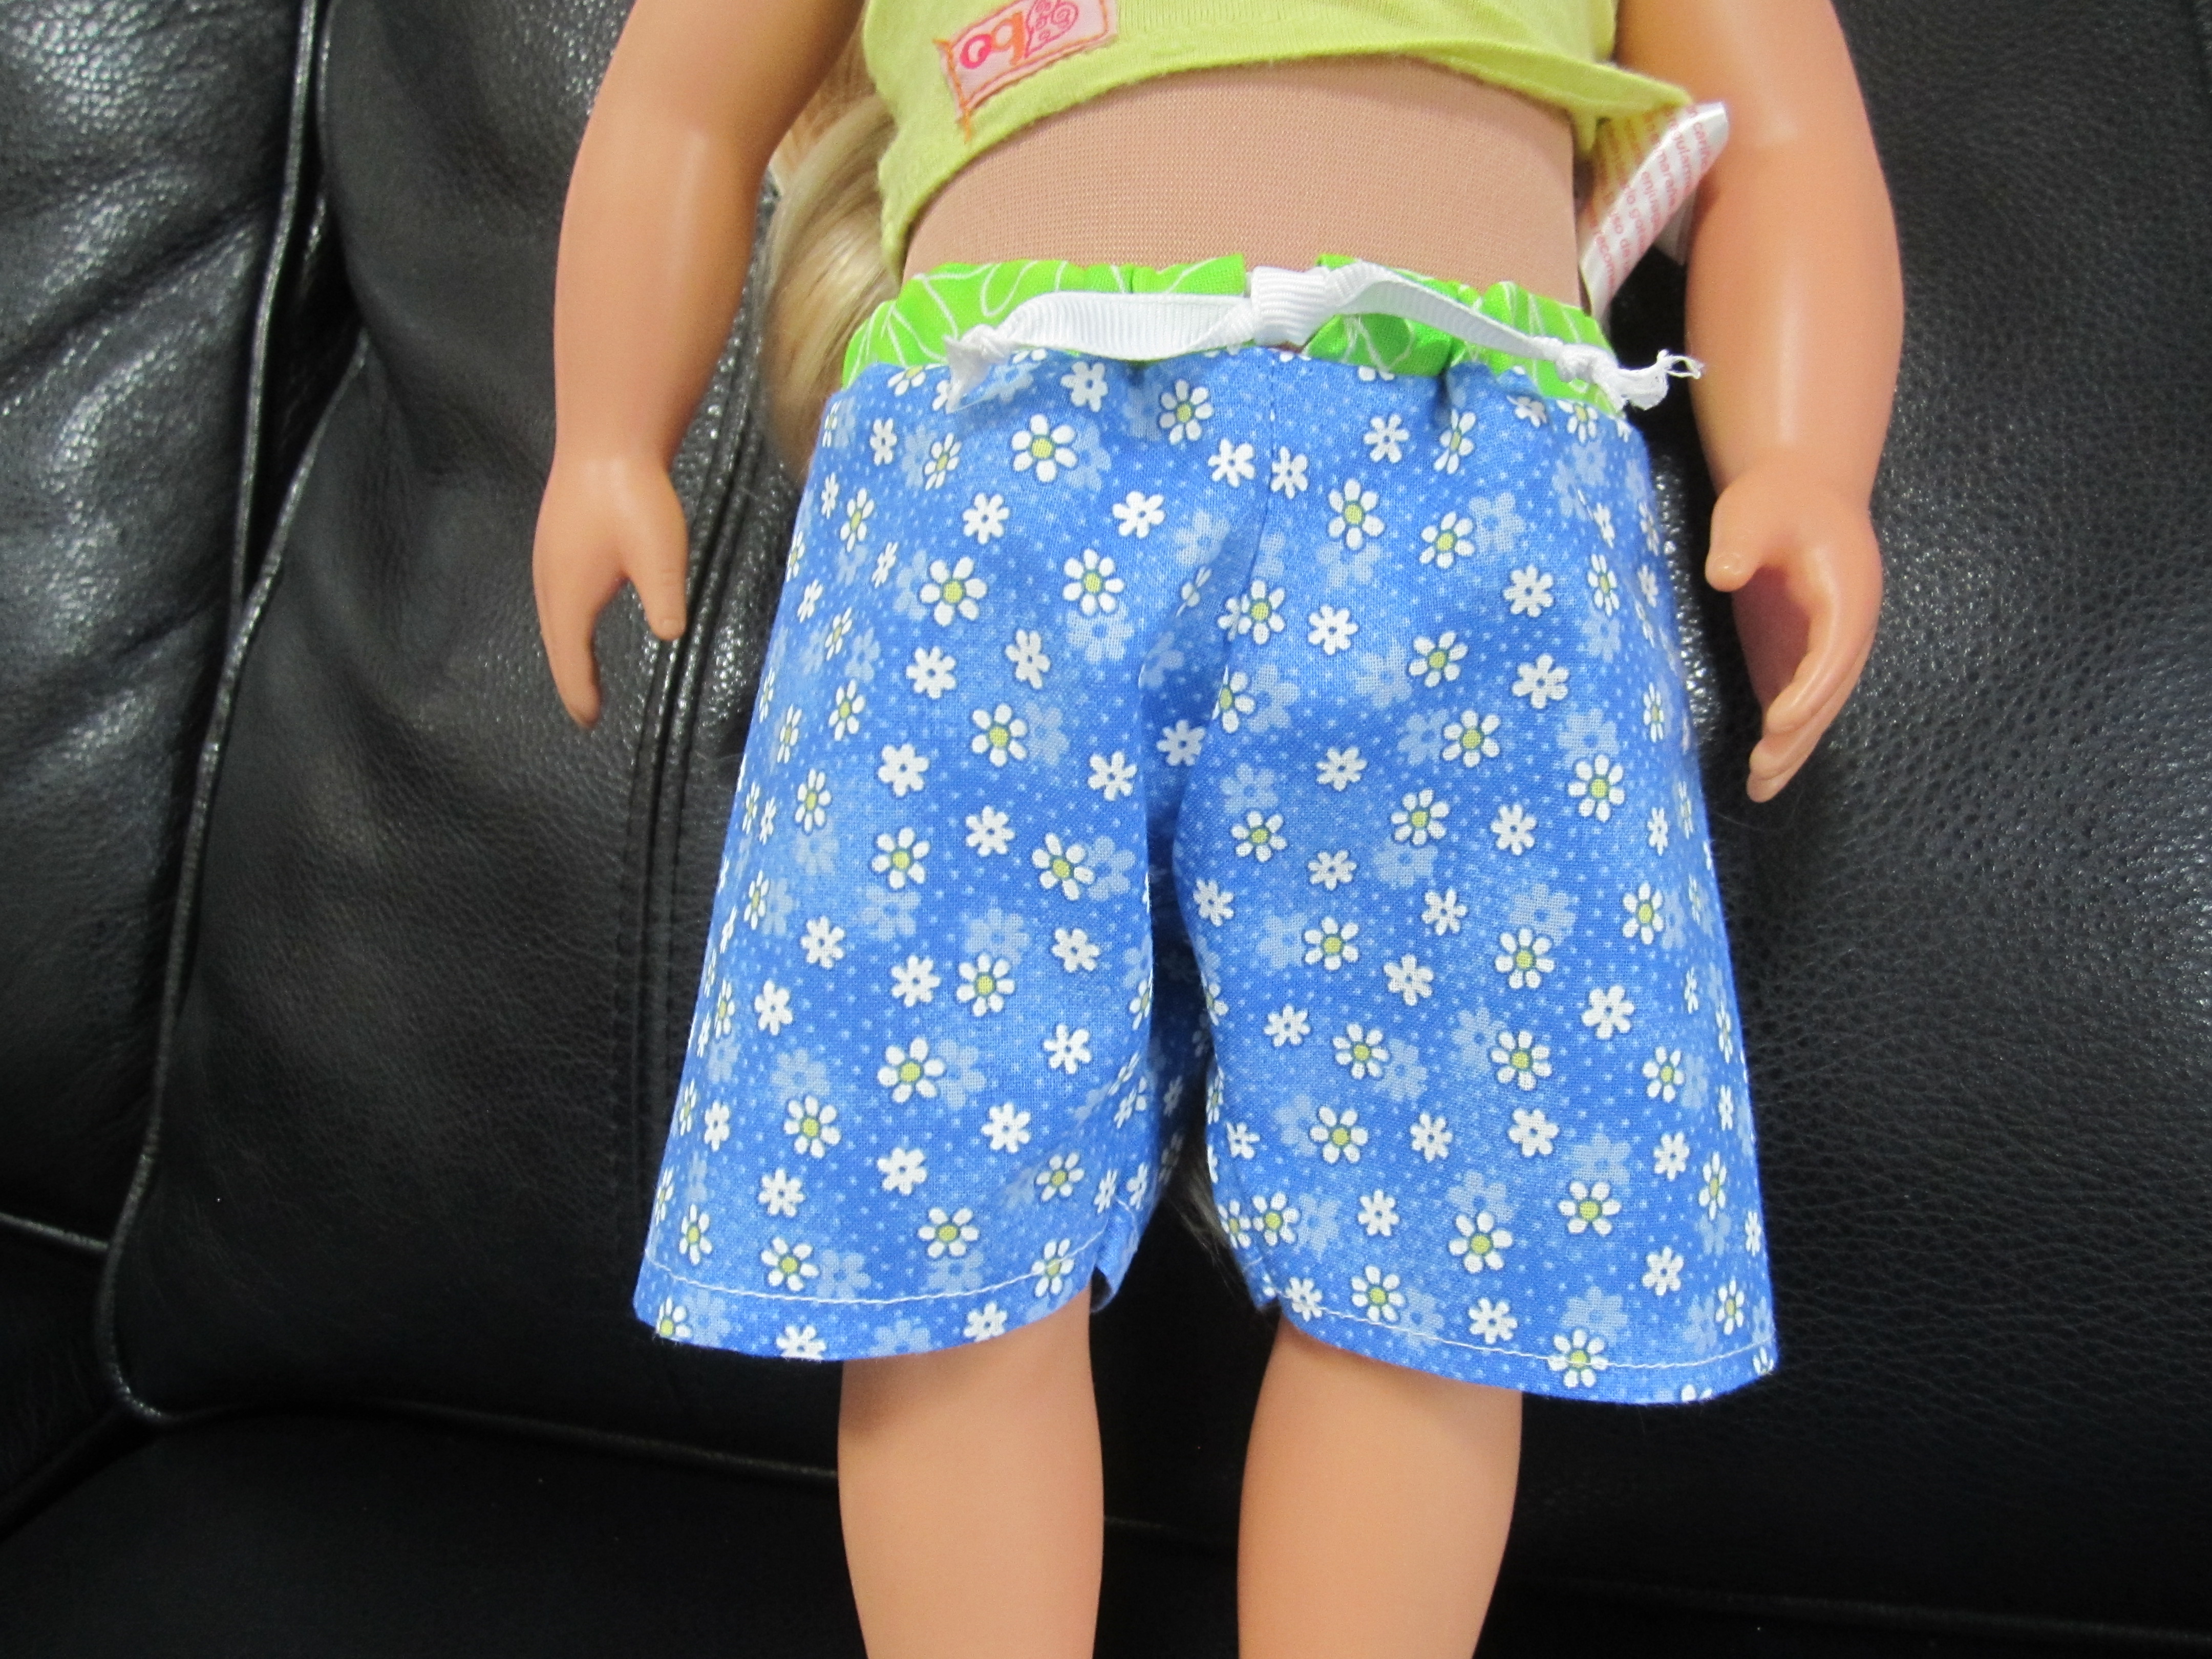
These board shorts use the same pattern as the other shorts, but I cut them a little shorter in the waist and added a band of contrasting material. The ends of the band are folded under and come together at the front, not quite touching, to allow for the insertion of a string or ribbon. Once the ribbon/string is inserted I usually stitch it at the back center so little hands won’t pull the string out.
These khaki shorts (maybe part of a school uniform) have the traditional “flat felled” seam found in store bought pants. I had the legs of a pair of pants that I had cut off for shorts. So I just centered the pattern pieces on the seam so it would look like I had sewn the sides this way. Nice trick!
As you can see from the pictures, I decided to make these shorts a little shorter so I folded up the pattern a bit. Also, to make the garment symmetrical I cut one piece, flipped it over and used it for the pattern from the second piece. In that way I could line up the seam and make sure they would end up in the same position on both legs.
I hope you enjoy the patterns and that you learned to use old doll clothes to make new ones.
Post any pictures you take in the comments section. I would love to see what you make! If you create some patterns that you like, consider sharing them so others can benefit from your efforts.
Next time I am going to use the same process to make some patterns for tops. Watch for them if you are making doll clothes with little friends!
As always, your polite and helpful comments are welcome.
If you like this spider hat, there may be just enough time before Halloween for you to knit one or two. The pattern, by Claire Slade, is available on Ravelry. Several of the members of my knitting groups have made … Continue reading →