Nailed It!


The winter olympics has been such a knitting inspiration. One of the coaches even knits to relax. And the hats! Oh, my. So many pretty knit hats.

coach

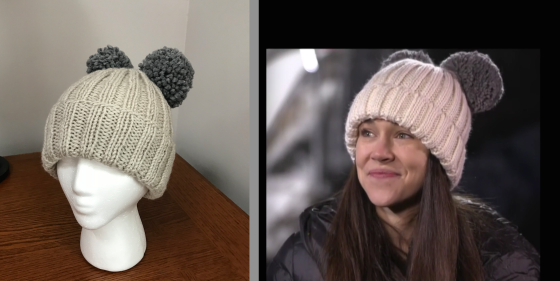
I watched an interview with ski jumper Sarah Hendrickson on Sunday. She was fun to listen to, but all I could think about was that cute hat! I was sure I could make one.

IMG_1246

I looked through my stash and found a light colored yarn that looked like it would work.

The yarn is Vanna’s Choice (worsted weight) and the color is “linen”. I think Sarah’s hat is a little lighter in color, but I didn’t want to make a special trip to the yarn store. For the pom pom I used a thick gray yarn and the large (blue) 85mm Clover Pom-Pom maker. I think Sarah’s pom pom is larger but this was the largest maker I had.

Here’s the hat!

IMG_1325

I think it turned out pretty well. Here are the instructions.

Instruction Pic


Sometimes the things I try don’t turn out exactly like I think they will. Of course, I don’t write about those. Haha. But it is fun to see failures that others have shared about their Pinterest attempts. Often they tag them with “Nailed It!”

I especially like the photographs of babies and children.

691314

These always make me laugh.

Well, here is my entry. What do you think?

Nailed It

As always, your polite and helpful comments are welcome.


Bubble Knit Winter Olympics Hat

IMG_0961

Recently, I saw a video of the bubble knit stitch. It looked fun and not too hard so I knit a sample. It was really hard for me to knit a bunch of rows and then purposely drop stitches to do the K4B (knit four below) stitch. The instruction videos I found on line are pretty good though and it wasn’t as hard as I thought it would be. Once I felt confident, I decided to make this hat for my young friend, just in time for the winter olympics. It only took a few hours, so you would still have time to make one if you get busy!

The bubble stitch is done in sets of four stitches. You need to cast on multiples of 4 plus 3 additional stitches. The “bubbling” is shifted by 2 stitches every other sequence so the bubbles fit together like bricks. The first bubbling row starts with K3 and the next starts with K1. Then back and forth. I wanted a K1,P1 ribbing so I had to cast on an even number, 58, and then add a stitch by knitting front and back to bring the count up to the correct 59 stitches.

I am not including the directions for the bubble stitch itself, I could not do any better than the videos and explanations already available on the internet. But here are the instructions for the hat and a few more pictures.

pic1

pic2


pic3

To make the hat larger, just add bubbles. To make the hat larger diameter, increase the number of stitches in groups of 4 and adjust the rest of the pattern. You can make the longer by adding bubbles six rows at a time.

IMG_0964IMG_0966

I think the bubble stitch is fun and I love the way the hat turned out. I hope you enjoy the pattern. Be sure to visit the internet instruction sites and thank them for their work!

As always, your polite and helpful comments are welcome.